Transcript
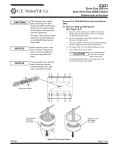
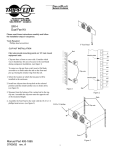
Installation And Safety Instructions
HC-436
Line art shown may not exactly match the fixture enclosed. However, the installation instructions do apply to
this fixture. Fill in Item Number on Carton and File This Sheet For Future Reference. ITEM#_______________
IMPORTANT SAFETY INSTRUCTIONS
•
•
•
•
•
•
•
•
112311
ASSEMBLY
Be sure the electricity to the system you are working on is turned
off; either the fuse removed or the circuit breaker set
at off.
Use of other manufacturers components will void warranty, listing
and create a potential safety hazard.
You don’t need special tools to install this fixture.
Be sure to follow the steps in the order given.
Read instructions carefully.
Under no circumstances should a fixture be hung on house
electrical wires, nor should a swag type fixture be installed on a
ceiling which contains a radiant type heating system.
Proper wiring is essential for the safe operation of this fixture.
Save these instructions.
(Steps 1 and 2 may be factory installed).
STEP 1:
Hold fitter (A) in an upright position. Push fixture screws (B) up
through holes in fitter bottom, heads down.
STEP 2:
Drop springs (C) on screws (B) and thread into retaining plates (D), by
turning screwhead (B).
STEP 3:
WARNING
NOTE: DO NOT INSTALL ON A POST OR A POLE THAT RESULTS IN A
VERTICAL RISE OF 25 FEET OR HIGHER.
CAUTION: FIXTURES WITH PHOTO-CELLS SHOULD BE MOUNTED AT
LEAST 48" FROM ALL SIDES TO AVOID REFLECTION OF LIGHT BACK
ONTO PHOTO-CELL, CAUSING THE PHOTO-CELL TO MALFUNCTION OR
FLICKER.
CLEANING
To clean, wipe fixture with a soft cloth. Clean glass with a mild soap.
Do not use abrasive materials such as scouring pads or powders,
steel wool or abrasive paper.
Drop hex nut (H) into slot groove of the fitter (A). Thread screw (E)
into hex nut (H) on the inside of the fitter (A).
INSTALLATION
STEP 1:
A. Use a wirenut to connect the fixture hot wire (black wire, or round
and smooth tracer) to the supply hot wire.
B. Use a wirenut to connect the fixture common wire (white wire, or
square and rigid) to the supply common wire.
C. Gently try to remove the wires from the connector. If you can
remove the wires, carefully re-do the wiring connection.
ORDERING PARTS
Keep this sheet for future reference, and in case you need to order
replacement parts. Parts for this fixture can be ordered from place of
purchase. Be sure to use exact wording from illustration when
ordering parts.
SCREW
HOLE (F)
GLOBE (G)
RETAINING
PLATE (D)
SPRING (C)
STEP 2:
Grounding Instructions: Connect the supply ground wire (green or
bare conductor) and fixture ground wire (green or bare conductor)
using an orange wire nut. Gently pull on the ground wires to confirm
a secure connection. If either conductor is loose remove the wire
nut and reconnect the wires.
STEP 3:
Install set screw (E) in side of boss, 3 turns.
FINAL ASSEMBLY
Make sure no bare wires can be seen outside wire connectors.
HEX
NUT (H)
STEP 1:
Tighten screw (E) to secure fitter (A) to post (not supplied).
FITTER (A)
Install lamp.
SCREW (E)
FIXTURE
SCREW (B)
* WIRE
CONNECTOR
STEP 3:
Install globe (G) under retaining plate (D) and tighten screws (B). For
easier globe installation tilt globe.
* POST
FIGURE 1
STEP 2:
*NOT SUPPLIED