1
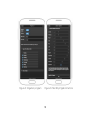
Smart Garden Hub
User Guide
Revision 2.5, March 2015
www.greeniq.co
1. Your GreenIQ Smart Garden Hub
1.1. Welcome
Thank you for purchasing the GreenIQ Smart Garden Hub. The GreenIQ
Smart Garden Hub allows you to easily control your garden's irrigation and
lighting, and save money on your water and electricity bills. Your GreenIQ
Smart Garden Hub:
•
Automatically adjusts irrigation scheduling based on current and
weather forecast.
•
Controls your garden lighting based on sunrise and sunset
schedule changes throughout the year.
•
Connects to the Internet via Wi-Fi or Ethernet cable.
•
Connects to rain, soil moisture, fertiliser-level and flow sensors.
•
Connects to Internet-of-Things (IoT) sensors such as Parrot
FlowerPower, Koubachi and Netatmo.
2
You have full control of your GreenIQ Smart Garden Hub via your iPhone,
iPad, Android smartphone/tablet, PC, Mac and other web-enabled
devices. For more details please visit our web site.
1.2. About this guide
In this guide you’ll learn how to control your GreenIQ Smart Garden Hub
using the GreenIQ web app. The web app is easy and intuitive to use, and
there is no need to read this entire guide to get familiar with most of the
system’s features. However, many users will find this guide useful in order
to explore some of the more advanced features of the GreenIQ Smart
Garden Hub.
Note: The web app is suitable for both desktop computers and touchbased mobile devices. To maintain description clarity, the instructions in
this guide refer only to touch-based device. If you’re using a desktop
computer, simply point and click with your mouse when the instructions
show “tap”.
3
1.3. Installation
GreenIQ web app will work properly only after the following steps were
completed:
1. GreenIQ Cloud account was created.
2. Internet connection was set up (Wi-Fi mode only).
3. The GreenIQ Smart Garden Hub is connected to power and the
Internet.
Please refer to the “GreenIQ Smart Garden Hub Installation Manual” for
more details.
1.4. About this guide
It is highly recommended that you’ll read the latest version of this
document. You can find it in the following link:
http://greeniq.co/documentation.htm
GreenIQ offers technical support in the following link:
http://greeniq.co/support.php
4
2. About GreenIQ Technology
2.1. How it works
1. Using the app, you define start time and end time for each zone (up to
4 different programs per zone).
2. Now you can just lay back and the GreenIQ Smart Garden Hub will
take it from here.
3. The GreenIQ Smart Garden Hub autonomously gets all the information
it needs from the Internet via its Wi-Fi or Ethernet cable connections.
4. The GreenIQ Smart Garden Hub controls your garden's irrigation and
intelligently adjusts your pre-defined schedules according to the
weather.
5. Same thing for lighting. Schedule once and forget about it. The
GreenIQ Smart Garden Hub will turn on and off your garden lights
according to pre-defined schedules or on sunset and sunrise.
5
2.2. The science of Evapotranspiration
Evapotranspiration (ET) is the sum of water evaporation from the soil and
plant transpiration to the atmosphere. Your garden's water balance is
compensated by natural precipitation and by your irrigation system. The
question is how to avoid over-watering and under-watering of your plants?
Your GreenIQ Smart Garden Hub automatically downloads data from the
Internet on current and forecast weather conditions provided by the nearest
weather station. Factors such as temperature, relative humidity (RH), wind
speed and solar radiation directly impact the ET in your garden. The
GreenIQ Smart Garden Hub schedules irrigation based on the start time
and end time you programmed, and modifies the irrigation period
according to ET and latest/forecast precipitation. On very hot and dry days,
your plants will get more water, and on cold and cloudy days - less water.
On rainy days the GreenIQ Smart Garden Hub will turn off irrigation
completely. As a result, your garden will get just the amount of water it
needs. It keeps your garden looking great, it saves you money and it's
good for the environment.
6
3. GreenIQ Web App
3.1. Compatibility
The GreenIQ web app works for iPhone, iPad, Android smartphones/
tablets, Windows PC, Mac and many more platforms. A full list of
supported devices, operating systems and browsers can be found in the
following link: http://jquerymobile.com/gbs/
Only A-grade platforms from this list will be able to run the GreenIQ web
app.
3.2. Response time
When you send a command via the app to the GreenIQ Smart Garden
Hub you’ll notice a delay of a few seconds between:
1. The web app command and its execution by the unit
2. Execution by the unit and notification by the app
These delays are natural, and they are influenced by web app / unit’s
internet connection speed.
7
These delays have no impact on the unit during normal scheduling
operation.
3.3. Launching the web app
Open your web browser and go to the following link: http://greeniq.net
Alternatively, you can scan the QR code on the plastic card you got with
the device.
It is recommended to create a shortcut or bookmark the web app link.
Note: Shortcut and bookmark creation procedures depend on your
device, operating system and browser, and are out of the scope of this
manual.
Tip: When launching the web app on Apple iOS devices (iPhone, iPad or
iPod Touch) you’ll see a tooltip that will guide you through the shortcut
creation.
3.4. Signing In
After launching the web app, you’ll get the sign-in screen. Enter your
username and password, as they appear on the plastic card that was
8
supplied with the device and press the “Sign In” button. If you already set
up your account, you will be forwarded to the main menu. In case your
account is not set up, or if there is a missing detail in your account, you will
be asked to fill the missing information before proceeding to the main
menu.
Tip: You may want to allow cookies in your browser so that the username
and password will be saved by the browser for the next sessions.
9
Figure 1: The Sign In screen
Figure 2: The Main Menu
10
3.5. The main menu
You may choose one of the following options from the main menu:
1. “Program” – Access, create or modify each zone’s irrigation program,
and the lighting programs.
2. “My Account” – Modify your account details.
3. “Report” – View a report of each zone’s activity during the past 7 days.
4. “Internet Setup” – Select Wired-Mode or Wi-Fi Mode and submit Wi-Fi
network details.
5. “Status” – Check your system’s status.
6. “About” – Useful links and contact information.
3.6. Synchronising with GreenIQ Cloud
At the bottom of the main menu there is a large “Submit All” button.
Pressing this button uploads all the configuration data from the web app to
the GreenIQ Cloud. The GreenIQ Smart Garden Hub constantly
synchronises with the cloud to download new configuration data and
upload new status data.
11
Tip: It is recommended to push the “Submit All” button before exiting the
web app, in order to make sure that all configuration data was
synchronised with the cloud. Smaller “Submit All” buttons appear on the
upper right corner of all the screens under the “Program” menu.
Note: An automatic “Submit All” operation takes place every few seconds.
3.7. The Program screen
The Program screen includes the following functions:
1. A menu for selecting one of the six irrigation zones (Zone1 to Zone 6)
and the lighting control channel (Zone 8).
2. Visual indicators of the zones state: On, Off or Disabled.
Note: There is a delay between the web app and the unit, so
indications are delayed for few seconds. For more information, please
refer to paragraph 3.2 above.
3. Master Irrigation Enable switch. Turning off this switch will shut down all
irrigation channels.
12
4. Master Lighting Enable switch. Turning off this switch will turn the
lighting off.
Note: The Master Zone (Zone 7) does not appear on the Program Screen,
as it is not being controlled directly by the user. The Master Zone will turn
on whenever one of the irrigation zones is turned on, and will be turned off
when all the six irrigation zones are off.
13
Figure 3: The Program screen
Figure 4: The Zone screen
14
3.8. Define zone properties
1. Select a zone from the Program Menu. The Zone screen will now show
up.
2. To change the zone name, tap on the Zone Name field.
3. To change the zone’s picture, tap on the picture.
4. Tap the “Choose File” button.
5. Choose a photo. On mobile devices with a camera, you can shoot a
photo directly from this menu.
6. Press the “Upload” button. Note: Picture upload time depends on the picture size and connection
speed. In some cases picture upload might take few minutes.
7. After the picture upload is completed, you will be asked to sign-in
again.
15
3.9. Create an irrigation program
1. Select a zone from the Program Menu. The Zone screen will now show
up.
2. Turn on the “Zone Enable” switch.
3. Select one of the four programs.
4. Turn on the “Program Enable” switch.
5. Edit “Start Time” and “End Time”. Notice that the web app calculates
and displays the irrigation duration for you.
If you wish, you may use one or more of the following options:
1. The “Weather” switch – Turn on this switch to allow the GreenIQ Smart
Garden Hub to adjust the irrigation duration based on the local
weather.
Note: It takes the system about 24 hours from installation time to
collect detailed local weather information. During this time period, the
weather-based irrigation may not be accurate. This is a normal system
behaviour.
Tip: When selecting “Weather Mode”, you need to program watering
16
schedules to match the watering needs during the hottest days of the
year. To save water, the GreenIQ Smart Garden Hub will adjust these
schedules based on actual and weather forecast.
2. “Days of the Week to Run” – Tap this button and check the days of the
week you want this specific program to execute.
3. “Every X Days” – Tap this button and edit the irrigation period to be
every day, every two days etc. You can also define the starting date for
the periodic irrigation in the “Starting From (Date)” field.
3.10. Manual irrigation
Turn on the “Manual” switch in the Zone screen to activate the zone’s
irrigation.
Note: There is a delay between the web app and the unit. For more
information, please refer to paragraph 3.2 above.
17
Figure 5: Irrigation program
Figure 6: Monthly Irrigation Factors
18
3.11. Define the monthly irrigation factors
For each irrigation zone screen there is a collapsible control called “Monthly
Irrigation factors (%)”. This is an optional feature, and the default factors are
set to be 100%. Use the sliders or numerical fields to determine the
percentage of required irrigation each month.
Example: Assuming Program 1.1 (Zone 1) is set to start at 20:00 and end
at 20:30. Defining 30% factor in January will result irrigation from 20:00 to
20:09 during this month (30% x 30min = 9min).
Note: If the “Weather” switch of a specific program is on, this program
ignores the monthly factors.
3.12. The irrigation progress bar
The irrigation progress bar simply shows the progress of the current
watering program starting at 0% at “Start Time” up to 100% at “End Time”.
19
3.13. Create a lighting program
1. Select Zone 8 from the Program Menu. The Lighting screen will now
show up.
2. Select one of the four programs.
3. Turn on the “Program Enable” switch.
4. Tap “Lights On” button.
5. Select Start Time Mode: Clock, Dusk or Sunset.
6. If Clock Mode is selected, set the Start Time.
7. If Dusk or Sunset Modes are selected, you can adjust the number of
minutes before Dusk/Sunset for the lights to turn on.
8. Tap “Lights Off” button.
9. Select End Time Mode: Clock, Dawn or Sunrise.
10. If Clock Mode is selected, set the End Time.
11. If Dawn or Sunrise Modes are selected, you can adjust the number of
minutes after Dawn/Sunrise for the lights to turn off.
12. “Days of the Week to Run” – Tap this button and check the days of the
week you want this specific program to execute.
20
3.14. Managing your GreenIQ account
Select “My Account” from the main menu to edit your account settings.
Important: A valid e-mail address should be entered. This will allow
GreenIQ sending you important alerts such as Internet connection failure
etc.
Important: Make sure that the location on the map is your garden’s
location. If not, press the “Locate Me” button. If your browser asks for
permission to access your location, you need to accept. Your location is
being used only during the activation of your account, in order to allow the
unit to access weather and sunset/sunrise information. The web app will
not attempt to access your location information afterwards.
3.15. Viewing a Report
Select “Report” from the main menu to view a report of each zone’s activity
during the past 7 days. You can also choose to receive the report by email on a daily or weekly basis.
21
3.16. Managing Internet connection
The GreenIQ Smart Garden Hub must have a constant Internet connection
to work properly. Internet connection is defined once during installation.
Please refer the “GreenIQ Smart Garden Hub Installation Guide” for more
details.
If Internet connection is interrupted, the unit will continue watering your
garden, based on “start time” and “end time”, but no water saving will
occur.
An e-mail alert is sent upon Internet interruptions, and when the unit is
reconnected.
3.17. The Status screen
System’s status indication appears on the main menu. If your attention is
required, the menu will show “Status…”.
To check your system’s status, select “Status” from the main menu. In
case of an error or a warning, please wait for a few moments for the
problem to be resolved.
22
The Status screen shows the following indications:
1. “App to cloud connection” – Indicates the status of the web app
connection to the cloud.
2. “Smart Garden Hub Internet connection” – Indicates the status of the
unit’s connection to the Internet.
3. SSID and signal strength as measured by the unit.
4. “Smart Garden Hub software is up-to-date” – GreenIQ releases
software updates from time to time with new features and other
improvements. Each time your GreenIQ Smart Garden Hub is booting
up, it downloads the latest updates. If you see that the unit’s software
is not up-to-date, it is recommended to reset the unit. See paragraph
3.18 below for more details.
5. “Reset Smart Garden Hub” button – See paragraph 3.18 below for
more details.
23
3.18. Resetting your Smart Garden Hub remotely
GreenIQ releases software updates from time to time. Each time your
GreenIQ Smart Garden Hub is booting up, it automatically downloads the
latest updates. If you see that the unit’s software is not up-to-date, it is
recommended to reset the unit by pressing “Reset Smart Garden Hub”
button on the Status screen, and then “OK”.
Important: The remote reset works only if the GreenIQ Smart Garden Hub
is connected to the Internet. If the Internet connection is broken, the only
way to reset the unit is by disconnecting it from power, and then
reconnecting.
24
3.19.GreenIQ Community
We invite you to visit our web page for updates, tips and
support:
http://greeniq-system.com/
You’re welcome to join our Facebook page, share your tips,
photos of your garden, and interact with other GreenIQ users.
https://www.facebook.com/greeniq.systems
Follow us on Twitter for latest updates, events and news
coverage.
https://twitter.com/green_iq
your home just got smarter.
25
26
your home just got smarter.
GIQ-0019-02
© 2015 All Rights Reserved to GreenIQ LTD