1
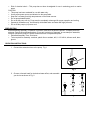
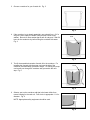
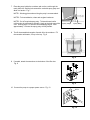
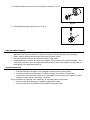
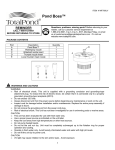
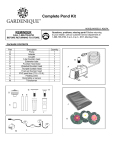
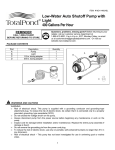
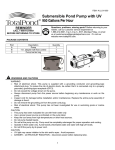
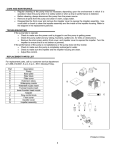
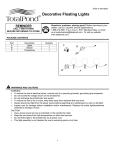
ITEM # A16531L
Container Fountain Kit with LED
Light
REMINDER
CALL 1-888-412-6001
BEFORE RETURNING TO STORE.
Questions, problems, missing parts? Before returning to your
retailer, call our customer service department at
1-888-412-6001, 8 a.m.-6 p.m., EST, Monday-Friday, or email
us at [email protected]. Or visit our website
www.totalpond.com.
PACKAGE CONTENTS
Part
A
B
C
D
E
F
G
H
I
J
Description
Pump with filter and LED light
Extensions
Extension tubes
Waterspray nozzle
Waterbell nozzle insert
Trumpet nozzle insert
Lower fountain head nozzle
Epoxy putty (part A)
Epoxy putty (part B)
Cord holder
Quantity
1
4
1
1
1
1
1
1
1
1
A
E
B
C
H
I
D
E
F
J
G
WARNINGS AND CAUTIONS
WARNING
• Risk of electrical shock. This pump is supplied with a grounding conductor and grounding–type
attachment plug. To reduce the risk of electric shock, be certain that it is connected only to a properly
grounded, grounding-type receptacle.
• Do not exceed the voltage shown on the pump.
• Always disconnect pump from the power source before beginning any maintenance or work on the
pump.
• Inspect cord for damage before installation and/or maintenance. Replace the entire pump assembly if
damage is found.
• Do not remove the grounding pin from the power cord plug.
• To reduce the risk of electric shock, use only on portable, self-contained fountains no larger than 5 ft. in
any dimension.
•
Risk of electrical shock – This pump has not been investigated for use in swimming pools or marine
areas.
CAUTION
• This pump has been evaluated for use with water only.
• Use a proper power source as indicated on the pump label.
• Keep the cord away from high temperatures or other heat sources.
• Do not pump heated liquids.
• Do not let the pump run dry. Pump must be completely submerged for proper operation and cooling.
• Operate in freshwater only. Avoid heavily chlorinated water and water with high pH levels.
• Do not lift the pump by its power cord.
PREPARATION
Before beginning assembly or operation of product, make sure all parts are present. Compare parts with
package contents list and diagram above. If any part is missing or damaged, do not attempt to assemble,
install or operate the product. Contact customer service for replacement parts.
• Estimated Assembly Time: 30 minutes
• Tools required for assembly: container, plastic liner or sealant, drill, 1-1/4” drill bit, silicone caulk, latex
gloves.
OPERATION INSTRUCTIONS
1. Connect the extension tubes to the pump. Fig. 1
Fig. 1
2. Choose a fountain head for the desired water effect, and assemble
your choice as shown in Fig. 2.
E
F
G
G
C
C
D
C
Fig. 2
3. Choose a container for your fountain kit. Fig. 3
Fig. 3
4. If the container is not already watertight, use a plastic liner. Or if a
clay pot is used, spray the inside of the pot with a clear acrylic
sealant. Be sure to use a sealant that is safe for clay pots. Wait 24
hours for the sealant to dry before filling the container with water.
Fig. 4
Liner
Fig. 4
5. Test fit the assembled container fountain kit in the container. For
installing the fountain with the pump cord over the side of the
container (recommended), proceed to step 9. For having the pump
cord comes out through the container wall, proceed to the next
step. Fig. 5
Cord
Fig. 5
6. Select a spot on the container wall that is the least visible from
normal viewing for the cord exit. Drill a hole in appropriate 1 1/4 in.
diameter. Fig. 6
NOTE: Appropriate safety equipment should be used.
Fig. 6
7. Place the pump inside the container and run the cord though the
newly drill hole. Seal the hole around the cord with epoxy putty and
allow it to harden. Fig. 7
NOTE 1: Wearing gloves when mixing the putty is recommended.
NOTE 2: For best adhesion, clean and roughen bond area.
NOTE 3: Cut off required epoxy putty. Twist and knead until a
uniform color is achieved (no streaks). Apply to the hole around the
cord. Working time is 15 minutes until hardening begins. After
approximately 1.5 hours the epoxy putty will fully harden.
Epoxy Putty
Epoxy Putty
Fig. 7
8. Test fit the assembled container fountain kit in the container. Fill
the container with water, 2/3 up to the top. Fig. 8
Fig. 8
9. If needed, attach the extensions to the bottom of the filter box.
Fig. 9
Fig. 9
10. Connect the pump to a proper power source. Fig. 10
GFCI
Fig. 10
11. Use the cord holder to tie a loop in the cord. This will help the
pump stay in place. Fig. 11
Fig. 11
MAINTENANCE PROCEDURE
1. Unplug the pump, and remove it from the container. Fig. 12
Fig. 12
2. Remove the fountain head and extension tube. Turn over the filter
box assembly. Open the filter housing by pushing on the sides of
the housing. As you press on the sides of the filter housing, the top
and bottom will unlock. Fig. 13
Fig. 13
3. Pull off the cover and remove the filter pad. Rinse the filter pad to
remove any debris. Fig. 14
Fig. 14
4. Disassemble the pump and clean the internals of the pump. Fig. 15
Fig. 15
5. Reassemble the pump and filter box kit. Fig. 16
Fig. 16
CARE AND MAINTENANCE
• Regular cleaning of the pump may be necessary depending upon the environment in which it is
operated. Clean the pump when it is visibly soiled or when a drop in performance is detected.
• Before cleaning, always disconnect the pump from the power source.
• Remove all parts from the pump and clean in warm, soapy water.
• Disassemble the front cover and remove the impeller cover to expose the impeller assembly. Use
a soft cloth or brush to clean the impeller assembly and the inside of the impeller housing. Refer to
the diagram in the replacement parts list.
TROUBLESHOOTING
If the pump fails to operate:
• Check to make sure the power cord is plugged in and the pump is getting power.
• Check the pump outlet and any tubing, fountains, spitters etc. for kinks or obstructions.
• Remove the inlet screen and/or front cover, and impeller cover to expose the impeller. Turn the
impeller to ensure that it is not broken or jammed.
If the performance of the pump is not satisfactory or the pump does not flow evenly:
• Check to make sure the pump is completely submerged in water.
• Check to make sure the impeller and the impeller housing are clean.
REPLACEMENT PARTS LIST
For replacement parts, call our customer service department at 1-888-412-6001, 8 a.m.-6 p.m., EST, MondayFriday.
Part
B
C
D
E
F
G
H
I
J
K
L
M
N
O
P
Description
Extensions
Extension tubes
Waterspray nozzle
Waterbell nozzle insert
Trumpet nozzle insert
lower fountain head nozzle
Filter cover
Pump with LED light
Base plate
Filter block
Impeller cover
O-ring
Shaft support
Shaft
Impeller assembly
H
I
K
J
C
B
N
P
D
E
F
G
O
M
N
L
Printed in China
LIMITED WARRANTY
All pumps and electrical products are warranted to the user against defective material and workmanship,
under normal working conditions. This warranty period begins on the date of purchase by the original
purchaser.
All TotalPond® electrical products are warranted to the user against defective material and workmanship,
under normal working conditions for 1 year from the date of purchase. All TotalPond® liners are warranted
to the user against defective workmanship, under normal working conditions for 20 years from the date of
purchase. All other TotalPond® product is warranted to the user against defective material and
workmanship, under normal working conditions for 90 days.
Application
Warranty covers only properly installed and maintained units. Pump warranty is limited to applications
pumping fresh water in a pond or fountain only. Other liquid applications or extreme temperature uses
must be approved in writing by the manufacturer. Receipt and product date code are required for warranty
claims.
Warranty Claim
Warranty claims must be made by calling customer service (at 1-888-412-6001). If the item is
determined to be defective, you will be given authorization to return the defective part(s), freight pre-paid,
along with proof of purchase.
Disposition
The manufacturer will make a good faith effort for prompt disposition regarding all warranty claims.
Returned product will be inspected to determine cause of failure before warranty is applied. Warranty does
not cover any costs associated with the shipping, handling, installation or removal of products or parts
subject to this warranty. For products damaged in transit, a claim should be filed with the carrier.
Disclaimer
Any oral statements made about the product by the seller, the manufacturer, the representatives, or any
other parties do not constitute warranties, should not be relied upon by the user, and are not part of the
contract for sale. The seller’s and manufacturer’s only obligation, and buyer’s only remedy shall be for the
manufacturer to either replace and/or repair at the manufacturer’s sole discretion, the product as described
above. Neither seller nor the manufacturer shall be liable for injury, loss or damages for lost profits, lost
sales, injury to person or property, or any other incidental or consequential loss arising from any cause
whatsoever, no matter whether based upon warranty, contract, negligence or other misuse, and the buyer
and user agree that no other remedy shall be available to them. Before using, the buyer and user shall
determine the suitability of the product for the intended use, and assume all risk and liability whatsoever in
connection therewith. The warranty and remedy described in this limited warranty is an exclusive warranty
and remedy in lieu of any other warranty or remedy expressed or implied. All other warranties and
remedies are hereby expressly excluded, including but not limited to any implied warranty of
merchantability of fitness for any particular purpose. This warranty gives the buyer and user specific legal
rights, and buyer and user may also have other rights which vary from state to state. Some states do not
allow exclusions or limitations of incidental or consequential damages, so the above limitations or
exclusions may not apply to you.
REMINDER
CALL 1-888-412-6001
BEFORE RETURNING TO STORE.