1
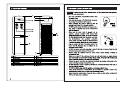
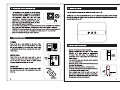
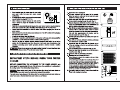
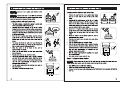
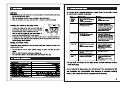
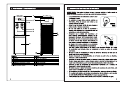
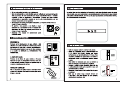
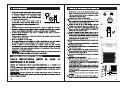
 Honeywell
Honeywell
a
He)
a
—
>
O.
al
[|
—
,
FREE STANDING
WATER COOLER
ENFRIADOR DE AGUA DE PISO
OWNER'S MANUAL
Read and save these instructions
before use
MANUAL DE
INSTRUCCIONES
Lea y guarde estas instrucciones
antes de usar el producto
Modelo HWB1052 Series
For customer service please contact:
1-855-687-2223
Para servicio al consumidor favor contactar:
1-855-687-2223
CONTENTS
1. Before First USE .....................vemerieiian K RER K ER EEG 3
2. Parts and Feature ar rn, 4
3. Important Safety Instructions............... 5
4. Function Buttons ......................=eeiiec R RR R EEK ERKREKKKRKKEKEEEG 6
5. Indicator Light are ee Ree 7
6. Installation GuidelineS....... 7
7. Installing Your Water Cooler For The First Time ……………………… 8
8. Instructions For Loading The Water Bottle....................—..—... 10
9. MaintenanCeE.. nee eee D reee reaeereeeceeeceeeees 12
10. Technical Specification ………….….….……..…..….……srsersserensenmeenennennmenne 12
11. Troubleshooting GUIdE …….…..…..…...…...…...….….………crsrcrasersssrasernsennens 13
2
1. BEFORE FIRST USE
Read all instructions carefully before setting up and operating the unit. Please keep this instruction
manual for future reference. This manual is designed to provide you with important information needed
to operate and maintain your water dispenser. If you don’t understand something or you need more
assistance please contact us. Failure to follow these instructions may damage and/or impair operation
and void the warranty.
Keep proof of the original purchase date with this guide to establish the warranty period. Keep a copy
of the sales receipt.
Write down the model and serial numbers which can be found on a label located on the side of the
water cooler.
Please write the information here:
Date of Purchase:
Model Number: HWB1052
Color: ( ) White ( ) Silver ( ) Black
Serial Number:
WARNING: BEFORE CONNECTING THE APPLIANCE TO THE POWER SOURCE, LET IT STAND
UPRIGHT FOR APPROXIMATELY 24 HOURS. THIS WILL REDUCE THE POSSIBILITY OF AMALFUNCTION
IN THE COOLING SYSTEM FROM MISHANDLING DURING DELIVERY.
2. PARTS AND FEATURES 3. IMPORTANT SAFETY INSTRUCTIONS
WARNING To reduce the risk of fire, electrical shock, or injury when using your appliance,
follow these basic precautions:
« Read and understand all instructions before using
the water cooler.
Your water cooler runs on 115 Volt AC, 60 Hz current.
Do not plug this product to 220V current.
Before operating the product remove it from its 115V AC
packaging and check if it is in good condition. 60Hz
* DO NOT operate any product with a damaged cord or
plug. Using an extension cord is not recommended
with this appliance.
* Make sure the water cooler is plugged into an
© - 9 exclusive properly installed GFCI (Ground-fault
НЕЕ 8 o 3 10 Circuit-interrupter) wall outlet. Do not cut or remove
o the third (ground) prong from the power cord under 7
any circumstances. Any questions concerning N
power and/or grounding should be directed toward 7 BN
a certified electrician. Improper use of the grounded
11 о plug can result in the risk of electrical shock. If the | uu
power cord is damaged, have it replaced by an
authorized service center.
* DO NOT run power cord under carpeting or cover it with rugs or runners. Keep the cord
away from areas where it may be tripped over.
о
12 — || « Always unplug the appliance from the power source before cleaning, servicing or
CI] D relocating the unit.
No Name No Name * Make sure to turn OFF the unit when the hot and cold water tanks are empty. Always
1 | Water Funnel 7 | Safety Lock have water inside the tanks before turning ON any switch. Overlook of this warning may
2 | Hot and Cold Power Switches 8 | Drip Tray cause permanent damage to the unit from overheating.
; e e = ower Borg - Remove the power cord from the electrical receptacle by grasping and pulling on the
ating Labe rain Cap _
5 | Cold Water Faucet Tap 11 | Storage Cabinet power cord plug end only, never pull the cord. . . .
6 | Hot Water Faucet Tap 12| Bracket Kit * DO NOT attempt to repair or adjust any electrical or mechanical functions of the unit, as
this may void the warranty.
° DONOT let children play with this appliance, packaging or plastic bags.
If the unit is damaged or it malfunctions, do not continue to operate it. Refer to the
troubleshooting section and /or please seek professional advice.
* Never locate the product where it may fall into a bathtub or other water container. DO
NOT use in bathrooms or outdoors.
3. IMPORTANT SAFETY INSTRUCTIONS
* This appliance is not intended for use by persons
(including children or elderly) with reduced physical,
sensory or mental capabilities, or lack of experience
and knowledge, unless they have been given
supervision or instruction concerning use of the
appliance by a person responsible for their safety.
* Never clean parts with flammable fluids. The fume
can create a fire hazard or explosion.
« Do not store or use gasoline or any other flammable vapors and liquids in the vicinity of
this or any other water dispenser. The fumes can create a fire hazard or explosion.
« CAUTION: To prevent accidental tip hazard, the water cooler must be securely anchored
to the floor as shown in section “Installing Your Water Cooler For The First Time”
* Keep this instructions handy for future reference.
4. FUNCTION BUTTONS
POWER:
Press on the hot or cold switches on the back of the
unit to turn on the hot and cold functions. DO NOT
turn on both switches at the same time. Please refer
to INSTALLING YOUR WATER COOLER FOR THE FIRST
TIME section.
WATER TAPS:
Push in the hot or cold water levers with a cup or
container to dispense the desire water temperature. To
use the hot lever, press the middle red button (safety
lock) and simultaneously push in the lever.
DRAIN CAP:
Turn counterclockwise to remove the drain cap to drain
the water from the tanks. Turn clockwise to close the
drain cap.
SAFETY
OPEN/RBRIR
J
u
CLOSE/CERRAR
9. INDICATOR LIGHTS
This unit features a power light to indicate the water cooler is ON.
Additionally, it has two indicator lights for the hot and cold water respectively, which will light
up while the feature is working. Once the water has reached the minimum temperature, the
indicator lights will turn OFF.
HOT POWER COLD
6. INSTALLATION GUIDELINES
* Remove the exterior and interior packing. —
* BEFORE CONNECTING THE UNIT TO THE POWER —
SOURCE, let it stand upright for approximately
24 hours. This will reduce the possibility of a UPRIGHT
malfunction in the cooling system from mishandling POSITION
during delivery.
* This unit is for indoor use only and must be installed
in a cool, ventilated area.
* Place the unit on a level surface that is strong enough
to support the dispenser.
* Keep area around the unit free of dust and dirt.
* Locate the unit away from direct sunlight and sources
of heat (stove, heater, radiator, etc.). |
* Direct sunlight may affect the unit over time and Г
heat sources may increase electrical consumption.
Extreme cold ambient temperatures may also cause
the appliance not to perform properly.
LEVEL SURFACE
6. INSTALLATION GUIDELINES
e Direct sunlight may also cause algae to grow inside
your water bottle that may later cause product
malfunction.
* Do not locate the unit in areas where the temperature
may fall below freezing (32° F / 0° C).
* Allow 6 inches of space between the unit and the
wall, to allow for proper air circulation to cool the
Compressor.
* CAUTION: To prevent accidental tip hazard, the water cooler must be securely anchored
to the floor as shown in section “Installing Your Water Cooler For The First Time”
* Please follow the instructions to load the water bottle before plugging the unit to the
power source.
* Make sure the hot and cold water power switches are in the OFF position before plugging
the unit to the power source.
* Do not use an adapter plug with this unit.
* Do not use an extension cord with this unit. If the power cord is too short, have a qualified
electrician or service technician install an outlet near the appliance.
* Plug the unit into an exclusive properly installed grounded wall outlet. Do not cut or
remove the third (ground) prong from the power cord under any circumstances. Any
questions concerning power and/or grounding should be directed toward a certified
electrician.
ATTENTION: If you do not plan to use the water heating function for more than three days,
we recommend that you turn off the hot water power switch.
7. INSTALLING YOUR WATER COOLER FOR THE FIRST TIME
IMPORTANT STEPS BEFORE USING YOUR WATER
COOLER
BEFORE CONNECTING THE APPLIANCE TO THE POWER SOURCE, let it
stand upright for approximately 24 hours. This will reduce the possibility of a malfunction in
the cooling system from mishandling during delivery.
WARNING: Please make sure to turn OFF the unit when the hot and cold water tanks are
empty. Always have water inside the tanks before turning ON any switch.
The water cooler is pre-cleaned at the factory but the reservoir, hot and cold water tanks and
water lines must be flushed with fresh water before use as follows:
7. INSTALLING YOUR WATER COOLER FOR THE FIRST TIME
Ensure the unit is unplugged.
2. Fill water reservoir with tap water full to capacity.
Allow the water to settle into the hot and cold water
tanks for 5 minutes. (Fig. 1)
3. Push each water lever (hot and cold temperature) to
ensure water is running through the unit. (Fig. 2)
4. Plug the dispenser unit into the electrical outlet. Please
review the IMPORTANT SAFETY INSTRUCTIONS and Fig.1
INSTALLATION GUIDELINES before doing so.
==
5. Turn ON the hot water switch, wait a couple of minutes —
and turn ON the cold water switch. Allow the unit to
reach the minimum cold and hot water temperatures. МА
This will take approximately 45 minutes and the Y
indicator lights will turn OFF. (Fig. 3)
6. Testthe water temperatures by pushing once again on
the water levers. Fig.2
7. Turn OFF both hot and cold water switches and unplug
the unit from the electrical outlet.
8. Proceed to drain the water from the faucets one at
a time by pushing on the hot and cold levers until no | o
more water remains. HOT POWER COLD
9. Turn counterclockwise to open the drain cap and
drain the water from the tanks. Do not tilt the unit to
drain the water. (Fig. 4)
10. Close the drain cap by turning it clockwise.
11. Installing the floor Bracket Kit (Fig. 5)
Note: All hardware is included. Set up requires a drill and a Phillips
screwdriver (not included).
1. Place the L-shaped bracket (2) on the lower left side of the back of
the unit using a Phillip screwdriver to secure the small screw (3).
2. Drill a hole in the floor 6 inches away from the wall. Choose the
appropriate drill bit depending on your floor type (tile, concrete or
wood). Use the size 3/8” diameter to drill a hole 2 inches deep.
3. Place the anchor (1) in the hole so that it is flush with the floor level.
4. Align the L-shaped bracket (2) to the anchor and use the washer (4)
and the long screw (5) to secure the unit to the floor.
12. Your unit is ready to be used. Please proceed with the
water bottle loading instructions.
Fig.3
8. INSTRUCTIONS FOR LOADING THE WATER BOTTLE
WARNING: Only use 3 or 5 gallon water bottles on this
water cooler.
WARNING: Please make sure to turn OFF the unit when
the hot and cold water tanks are empty. Always have water
inside the tanks before turning ON any switch.
Loading bottles with spill proof cap
e This unit contains a funnel with a prong to avoid spills
when using bottles with spill proof cap.
e (Carefully lift the bottle (approx. 40 Ibs. for the 5 gallon
bottle). Bend your knees to lift the bottle, not your back.
Do not place hands over the opening of the bottle while
placing it on the unit. Please seek help if you are unable
to lift the water bottle.
o |nvert the 3 or 5 gallon water bottle over the unit and
gently let the neck of the bottle slide into the funnel,
making sure the spill proof cap slides down into the
prong.
e The prong will break the spill proof cap allowing the
water from the bottle to go down into the funnel and
into the main reservoir without any spills.
e Allow the water to fill all tanks of the unit for
approximately one minute.
e Push in on all water levers to make sure water flows
from all faucets.
Plug the unit back into the electrical outlet.
e Turn ON the hot water switch, wait a couple of minutes
and turn ON the cold water switch. Allow the unit to
reach the minimum cold and hot water temperatures.
This will take approximately 45 minutes and the
indicator lights will turn OFF.
e Test the water temperatures by pushing once again on
the water levers.
e Your water cooler is now ready for use.
10
=
8. INSTRUCTIONS FOR LOADING THE WATER BOTTLE
Loading bottles without spill proof cap
e Remove the cap from the 3 or 5 gallon water bottle = a
and use a clean cloth to wipe off the neck of the 1 “ 7
bottle.
e (Carefully lift the bottle (approx. 40 Ibs. for the 5 gallon
bottle). Bend your knees to lift the bottle, not your
back. Do not place hands over the opening of the
bottle while placing it on the unit. Please seek help if
you are unable to lift the water bottle.
e [nvert the 3 or 5 gallon water bottle over the unit and
gently let the neck of the bottle slide into the funnel,
making sure the prong goes into the neck of the
bottle.
o Allow the water to fill all tanks inside the unit for
approximately one minute.
e Push in on all water levers to make sure water flows
from all faucets.
Plug the unit back into the electrical outlet.
Turn ON the hot water switch, wait a couple of minutes
and turn ON the cold water switch. Allow the unit to
reach the minimum cold and hot water temperatures.
This will take approximately 45 minutes and the
indicator lights will turn OFF.
e Test the water temperatures by pushing once again
on the water levers.
e Your water cooler is now ready for use.
Steps To Replace Water Bottles
WARNING: Please make sure to turn OFF the unit when the hot and cold water tanks are
empty. Always have water inside the tanks before turning ON any switch.
e Turn OFF the hot and cold water switches.
o Unload the empty bottle from the water cooler.
e Proceed to load the new bottle following the INSTRUCTIONS FOR LOADING THE WATER
BOTTLE.
11
9. MAINTENANCE
CAUTION:
e Before cleaning the unit, switch the hot and cold switches to the OFF position and remove
the plug from the power socket.
Never use corrosive elements or any chemicals to clean this product.
When the product is not in use, store the unit in a dry place out of direct sunlight.
Cleaning the outside of the water cooler
e To clean the outside of the unit, use a soft cloth with
warm water. Avoid abrasive cleaners or hard materials
to prevent damage and or scratches to the unit.
e (lean the drip tray regularly to avoid water buildup. To
remove the drip tray simply lift it up and outward.
e To clean the back of the machine, clean with a duster such as a micro fiber cloth and/
or vacuum the coils using the duster attachment of the vacuum (please refer to your
vacuum cleaner owner’s manual).
Storing your Water Cooler
Please follow these instructions to store the water cooler when it will not be used for an
extended period of time.
e Turn OFF the hot and cold water switches. Unplug the power cord from the power
supply.
Drain the water through the faucets and draining cap.
o The unit must be stored in the upright position and protected from dust.
10. TECHNICAL SPECIFICATION
Model No HWB1052 Series
Voltage and Frequency 115V/60Hz
Rated Total Power 485W
Heating Power 400W
Cooling Power 85W
Heating Capacity 4L/h - 290°C (1.06 G/h - 2 194°F)
Cooling Capacity 2L/h - s 10°C (0.53 G/h - = 50°F)
Compressor Refrigerant Eco Friendly R134a
12
11. TROUBLESHOOTING GUIDE
IF THE UNIT IS NOT WORKING PROPERLY, PLEASE REFER TO THE TABLE BELOW
TO SOLVE MOST COMMON PROBLEMS:
Issue
Possible Cause
Solution
No water
comes out
from the
faucets
* No water inside the tanks.
* Tanks or tubes inside the unit are
clogged.
* Levers not working properly.
* Make sure the tanks are filled with
water.
* Contact customer service.
No hot water
* Hot switch is OFF.
* The unit may have overheated.
* Hot switch is damaged.
* Turn ON the hot switch. Check the
temperature 45 minutes later.
* Turn OFF the hot switch and allow
the unit to rest for 1 hour. Turn ON
the hot switch again (make sure
there is water inside the tank).
* Contact customer service.
No cold water
* Cold switch is OFF.
* The unit may have overheated.
* Cold switch is damaged.
+ Turn ON the cold switch. Check the
temperature 45 minutes later.
* Turn OFF the hot and cold switches
and allow the unit to rest for 1 hour.
Turn ON both switches again (make
sure there is water inside the tank).
* Contact customer service.
Water leaking
from the unit
* Drip tray is full.
* The water bottle was not properly
loaded.
* Water leakage inside of the unit.
* Empty the drip tray.
* Turn OFF the cold and hot water
switches and dry the unit on the
outside and its surroundings.
+ If the problem continues contact
customer service.
Odor in the * New machine. * Please proceed with First Time
water * The unit has not been used for a Instructions on page 8.
long time.
* There may be an algae issue.
Low Electric * The unit is not properly grounded. * Please call a professional electrician
shocks * The power cord is damaged. to assist you with any electrical
problem.
* |f the problem continues, contact
customer service.
For any issue not shown on the table, please contact customer service.
1-855-687-2223
Do not attempt to disassemble the unit yourself. The manufacturer will
not undertake any responsibility from damages or incidents resulting
from it. This action will void the manufacturer's warranty.
Mitrana Group Inc.
Av. Interamericana y Roberto
Eisemann, Coronado Mall, P 2, Ofc. 352
Panama.
For general inquires about Mitrana Group Inc or
Honeywell Water Coolers please contact the toll
free number: 1-855-HWHELP1 (1-855-494-3571).
International rates may apply.
Or visit: www.honeywellwatercoolers.com
Imported and Distributed by:
SCA Imports LLC
18851 NE 29th Ave., Suite 706
Aventura, FI 33180
Tel: 1-855-687-2223
© 2013 Mitrana Group Inc. All rights reserved
IMO1-HWB1052W/S/B-2013-02
The Honeywell Trademark is used under license
from Honeywell International Inc. Honeywell
International Inc. makes no representations or
warranties with respect to this product.
This product is manufactured by Mitrana Group Inc.
LIMITED WARRANTY FOR THE CONTINENTAL U.S.A.
SCA Imports, LLC (“Distributor”) warrants to the original purchaser of this water cooler, and to
no other person, that if this water cooler is assembled and operated in accordance with the printed
instructions accompanying it (read the User Manual carefully before installing or using this product),
then for a period of one (1) year from the date of purchase, all parts (except the cooling compressor)
in such water cooler shall be free from defects in material and workmanship. The cooling
compressor will have a limited warranty of two (2) years from the date of purchase from defects in
material and workmanship.
Distributor may require reasonable proof of your date of purchase from an authorized retailer
or distributor. Therefore, you should retain your sales slip or invoice.
The Limited Warranty shall be limited to repair or replacement of parts, which prove defective
under normal use and service and which Distributor shall determine in its reasonable discretion
upon examination to be defective. Before returning any parts, you should contact Distributor’s
Customer Service using the contact information listed below. If Distributor confirms, after
examination, a defect covered by this Limited Warranty in any returned part, and if Distributor
approves claim, Distributor will replace such defective part without charge (including labor). If you
return defective parts, transportation charges must be prepaid by you. Distributor will return
replacement parts to original purchaser, freight or postage prepaid.
To obtain warranty service please contact Customer Service to the Toll Free number
1-855-687-2223 or write to [email protected]
Before contacting Customer Service, please make sure you have at hand the following information
(if writing by email, please provide the same information):
e Model Number (you may find this on the back or side of the unit)
e Product Serial Number (you may find this on the back or side of the unit)
e Purchase invoice (name of distributor, purchase date and invoice number). If writing by email
please attach the invoice.
THIS LIMITED WARRANTY DOES NOT COVER any failures or operating difficulties due to
accident, abuse, misuse, alteration, misapplication, improper installation or improper maintenance or
service by you or any third party, or failure to perform normal and routine maintenance on the water
cooler, as set out in the User's Manual. In addition, the Limited Warranty does not cover damages to
the finish, such as scratches, dents, discoloration or rust after purchase.
The Limited Warranty is in lieu of all other express warranties. Distributor disclaims all warranties
for products that are purchased from seller other than authorized retailers or distributors. AFTER
THE PERIOD OF THE ONE (1) YEAR EXPRESS WARRANTY (TWO -2- YEARS IN THE CASE OF THE
COOLING COMPRESSOR), DISTRIBUTOR DISCLAIMS ANY AND ALL IMPLIED WARRANTIES,
INCLUDING WITHOUT LIMITATION THE IMPLIED WARRANTIES OF MERCHANTABILITY AND
FITNESS FOR A PARTICULAR PURPOSE. FURTHER, DISTRIBUTOR SHALL HAVE NO LIABILITY
WHATSOEVER TO PURCHASER OR ANY THIRD PARTY FOR ANY SPECIAL, INDIRECT, PUNITIVE,
INCIDENTAL, OR CONSEQUENTAL DAMAGES. Distributor assumes no responsibility for any defects
caused by third parties. This Limited Warranty gives the purchaser specific legal rights; a purchaser
may have other rights depending upon where he or she lives. Some jurisdictions do not allow
exclusion or limitation of special, incidental or consequential damages, or limitations on how long a
warranty lasts, so the above exclusion and limitations may not apply to you.
This warranty does not apply outside the continental U.S.A.
SCA IMPORTS LLC
18851 NE 29™ AVE.
SUITE 706
AVENTURA, FL 33180
Honeywell
Honeywell
a
He)
a
—
>
O.
al
[|
—
il
f
FREE STANDING
WATER COOLER
ENFRIADOR DE AGUA DE PISO
OWNER'S MANUAL
Read and save these instructions
before use
MANUAL DE
INSTRUCCIONES
Lea y guarde estas instrucciones
antes de usar el producto
Modelo HWB1052 Series
For customer service please contact:
1-855-687-2223
Para servicio al consumidor favor contactar:
1-855-687-2223
CONTENIDO
1. Antes de Utilizar su Equipo por Primera Vez............................. 3
2. Componentes y CaracteristicaS …………………….…..……..…..….…srsereernes 4
3. Instrucciones Importantes de Seguridad............................... 5
4. Botones de Funciones ....................eee=eriiieie Ree 6
5. Luces lndicadoras......................e..eeiiiri ns 7
6. Guíade InstalaCiON eee 7
7. Instalar el Dispensador por Primera VEz......................=...e e... 8
8. Instrucciones para Colocar el Botellon de Agua........................ 10
9. MantenimientO ER ———— 12
10. Especificaciones Técnicas ..................e.....eee A 12
11. Guía de Solución de Problemas ..........................e.me 13
2
1. ANTES DE UTILIZAR SU EQUIPO POR PRIMERA VEZ
Lea todas las instrucciones cuidadosamente antes de instalar y operar la unidad. Mantenga este
manual de instrucciones para futuras referencias. Este manual ha sido diseñado con el objeto de
proporcionarle las instrucciones importantes necesarias para utilizar y mantener su dispensador
de agua. Si necesita asistencia adicional no dude en contactarnos. No seguir estas instrucciones
puede ocasionarle daño y/o impedir el funcionamiento correcto de la unidad, y anular la garantía del
fabricante.
Mantenga la constancia original de compra junto con esta guía para establecer el periodo de
garantía. Mantenga una copia del recibo de compra.
Escriba el número de serie y modelo los cuales pueden ser ubicados en la etiqueta que está ubicada
a un lado del dispensador de agua.
Por favor escriba la información aquí:
Fecha de Compra:
Número de Modelo: HWB1052
Color: ( ) Blanco ( ) Negro ( ) Plateado
Número de Serial:
AVERTENCIA: ANTES DE CONECTAR ESTE ELECTRODOMÉSTICO A LA FUENTE DE PODER,
PERMITA QUE REPOSE VERTICALMENTE POR APROXIMADAMENTE 24 HORAS. ESTO REDUCIRÁ
LA POSIBILIDAD DE FALLA DE LA UNIDAD DE ENFRIAMIENTO DEBIDO A MOVIMIENTOS BRUSCOS
DURANTE EL ENVÍO.
2. COMPONENTES Y CARACTERISTICAS 3. INSTRUCCIONES IMPORTANTES DE SEGURIDAD
ADVERTENCIA: Para reducir el riesgo de fuego, descarga eléctrica, o lesion cuando se
utilice este electrodoméstico, por favor siga estas instrucciones básicas:
* Leay entienda todas las instrucciones antes de usar
el enfriador de agua.
* Su enfriador de agua utiliza corriente eléctrica de
115 Voltios, 60HZ. No conecte esta unidad a una
corriente eléctrica de 220V. 115V AC
* Antes de usar la unidad retírela de todo empaque y 60Hz
revise si estä en buenas condiciones.
NO use esta unidad si el cable de electricidad 0
enchufe estan dafiados. No se recomienda usar una
extension con este electrodomestico.
. . * Asegurese que la unidad este conectada a un
ee 8 o o—10 toma corriente apropiadamente instalado con un
interruptor diferencial GFCI (Ground-fault Circuit- 7
interrupter). No corte ni remueva el contacto a tierra S
del toma corriente bajo ninguna circunstancia. Si / AN
tiene alguna pregunta relacionada a la electricidad
o y/o toma a tierra debe contactar a un electricista Ÿ
certificado. El uso inapropiado del tomacorriente
con toma a tierra puede resultar en el riesgo de una descarga eléctrica. Si el cable
de electricidad está dañado, debe ser remplazado a través un centro de servicio
о autorizado.
12 — | * NO pase el cable de electricidad por debajo de alfombras. Mantenga el cable lejos de
- áreas donde pueda causar tropiezos.
No Name No Name * Siempre desconecte el electrodoméstico de la fuente de poder antes de limpiarlo,
Embudo 7 | Botón de Seguridad reubicarlo o darle mantenimiento.
Interruptores de Agua Fría y Caliente | 8 | Bandeja Contra Derrames * Asegúrese de apagar la unidad cuando los tanques de agua fría y caliente estén vacíos.
pique DOES on = Tapón = Drenaje —— Siempre tenga agua dentro de ambos tanques antes de prender los interruptores. El no
Llave de Agua Fría 11 | Gabinete de Almacenaje seguir estas instrucciones puede causar sobrecalentamiento y daño de la unidad.
Llave de Agua Caliente 12 | Kit de Anclaje * Remueva el cable de electricidad del tomacorriente sujetándolo por el enchufe. No
desconecte la unidad halando del cable.
* NOintente reparar o ajustar las funciones eléctricas y/o mecánicas de esta unidad, esto
puede causar la anulación de la garantía.
* NO permita que los niños jueguen con el electrodoméstico, enpaque o bolsas de plástico.
* Sila unidad está dañada o no funciona correctamente, deje de utilizarla. Lea la sección
de GUIA DE SOLUCION DE PROBLEMAS y/o busque ayuda profesional.
Nunca ubique este producto donde pueda caer en una tina o contenedor de agua.
11
©) | Сл | +5 | 0 | |->
3. INSTRUCCIONES IMPORTANTES DE SEGURIDAD 9. LUCES INDICADORAS
* NO use esta unidad en baños o en la intemperie. La unidad tiene una Luz Indicadora de Encendido la cual estara iluminada cuando la unidad
* Este electrodoméstico no está diseñado para ser utilizado por personas (incluyendo este prendida. Las Luces Indicadoras se encenderán mientras las funciones de agua caliente
niños y personas de edad avanzada) que tengan capacidades físicas o mentales y fría estén en funcionamiento. Una vez que el agua haya alcanzado la temperatura máxima,
reducidas, o falta de experiencia y conocimiento, a menos que hayan recibido las Luces Indicadoras se apagarán.
entrenamiento y supervisión relevante al uso de este electrodoméstico por una
persona responsable por su seguridad.
* Nunca limpie esta unidad con líquidos inflamables. Los vapores pueden crear un
riesgo de fuego o explosión.
inflamable en la proximidad de éste o cualquier otro
dispensador de agua. Los vapores pueden crear un
riesgo de fuego o explosión.
* Mantenga este manual de instrucciones para
referencia futura.
* No guarde o use gasolina u otro líquido o vapor
4. BOTONES DE FUNGIONES
ENCENDIDO:
Presione en los interruptores de agua caliente o fría ,
ubicados en la parte posterior de la unidad para prender 6. GUIA DE INSTALACION
las funciones de agua fria y caliente respectivamente.
NO prenda ambas funciones a la vez. Por favor refiérase e Retire el empaque exterior e interior de la unidad
Mer de INSTALAR EL DISPENSADOR POR e ANTES DE CONECTAR ESTE ELECTRODOMÉSTICO =
' A LA FUENTE DE PODER, permita que repose
verticalmente por aproximadamente 24 horas. Esto POSICIÓN
LLAVES DE AGUA: ‚BOTONDE mim reducirá la posibilidad de alguna falla de la unidad de
Presione en las llaves de agua caliente o fría para | y enfriamiento debido a movimientos bruscos durante
dispensar el agua a la temperatura deseada. Para usar el envio. a
el agua caliente, presione el boton de seguridad rojo en * Esta unidad es solamente para uso en Interiores y
el medio y simultaneamente la llave. debe ser ubicada en un área fresca y ventilada.
£ÑÑ — q — * Coloque la unidad en una superficie plana que sea
lo suficientemente fuerte para soportar el peso del |
TAPAS DE DRENAJ E: OPEN/ABRIR electrodoméstico y botellón. =
aire a la Izquierda para quitar a tapa de drenaje y drenar * Mantenga el área alrededor de la unidad libre de polvo {| SUPERFICIE
el agua de los tanques. Gire hacia la derecha para cerrar y suciedad Ed PLANA
la tapa de drenaje. * Evite que la unidad tenga contacto directo con
la luz solar y con otras fuentes de calor (estufas,
CLOSE/CERRAR calentadores, radiadores, etc.)
6. GUIA DE INSTALACION
® La luz solar de forma directa puede afectar la unidad
conel tiempo y las fuentes de calor pueden incrementar
su consumo eléctrico. Las temperaturas frías
extremas pueden causar que este electrodoméstico
no funcione apropiadamente.
* La luz solar de forma directa puede causar la
reproducción de algas dentro del botellón de agua, lo
cual puede provocar un mal funcionamiento de la
unidad.
* NO ubique la unidad en áreas donde la temperatura se ubique por debajo de 0 °C / 32 °F.
* Acomode el enfriador de agua dejando al menos 6 pulgadas de espacio entre la unidad y
la pared, esto permitirá la circulación de aire necesaria para enfriar el compresor.
* Por favor siga las instrucciones para colocar el botellón de agua antes de conectar la
unidad a la fuente de poder.
* Asegúrese que los interruptores de agua fría y caliente estén apagados antes de conectar
la unidad a la fuente de poder.
* No use un adaptador con esta unidad.
* No use una extension con esta unidad. Si el cable de electricidad es muy corto, contacte
un electricista certificado para que instale un toma corriente cerca a la unidad.
* Conecte la unidad a un toma corriente con contacto a tierra que esté conectado
apropiadamente. No corte ni remueva el contacto a tierra del toma corriente bajo ninguna
circunstancia. Si tiene alguna pregunta relacionada a la electricidad y/o toma a tierra debe
contactar a un electricista certificado.
* ATENCIÓN: Si no planea utilizar la función de agua caliente por un período de tres días o
más, es recomendado que apague el interruptor de esta función.
7. INSTALAR EL DISPENSADOR POR PRIMERA VEZ
PASOS IMPORTANTES ANTES DE USAR SU
DISPENSADOR DE AGUA.
ANTES DE CONECTAR ESTE ELECTRODOMÉSTICO A LA FUENTE DE
PODER, permita que repose verticalmente por aproximadamente 24 horas. Esto reducirá
la posibilidad de alguna falla de la unidad de enfriamiento debido a movimientos bruscos
durante el envío.
ADVERTENCIA: Por favor asegúrese que la unidad está apagada cuando los tanques de
agua caliente y fría estén vacíos. Siempre debe haber agua dentro de los tanques antes de
prender cualquier interruptor.
7. INSTALAR EL DISPENSADOR POR PRIMERA VEZ
10.
11.
12.
El dispensador de agua ha sido limpiado previamente en la
fábrica, sin embargo los tanques de reserva, agua caliente
y fría, así como las tuberías, deben ser enjuagadas con agua
fresca antes de usarlo como sigue:
Asegúrese que la unidad este desenchufada.
Llene el tanque de agua con agua de grifo hasta que esté
lleno. Permita que el agua se asiente en los tanques de agua
caliente y fría por lo menos 5 minutos. (Fig. 1)
Presione en cada una de las llaves (caliente y fría) para
confirmar que el agua está corriendo por la unidad. (Fig. 2)
Conecte el dispensador al tomacorriente. Por favor revise
antes las secciones de INSTRUCCIONES IMPORTANTES DE
SEGURIDAD y GUIA DE INSTALACIÓN.
Prenda el interruptor de agua caliente, espere un par de
minutos y luego prenda el interruptor de agua fría. Permita que
la unidad alcance las temperaturas mínimas del agua caliente
y agua fría. Esto tomará aproximadamente 45 minutos y las
Luces Indicadoras se apagarán. (Fig. 3)
Pruebe la temperatura del agua presionando cada una de las
llaves.
Apague los interruptores de agua caliente y fría y desconecte
la unidad del toma corriente.
Proceda a drenar el agua de cada uno de los grifos hasta que
haya salido toda el agua.
Gire en sentido contrario a las manijas del reloj la tapa de
drenaje para abrirla y drene el agua de los tanques. No incline
la unidad para drenar el agua. (Fig. 4)
Cierre la tapa de drenaje girándola en el sentido de las manijas
del reloj.
Instalacion del Kit de Anclaje (Fig. 5)
Nota: Todas las piezas estan incluidas. La instalacion requiere de un
taladro y un destornillador Phillips (no incluidos)
1. Coloque el soporte en forma de L (2) en el lado inferior izquierdo de
la parte posterior de la unidad usando un destornillador Phillips para
asegurar el tornillo pequeño (3).
2. Haga un agujero en el piso a 6 pulgadas de distancia de la pared. Elija
la broca apropiada según el tipo de suelo (ceramica, concreto, madera,
etc.). Utilice la broca de 3/8” de diámetro para perforar un agujero de 2
pulgadas de profundidad.
3. Coloque el anclaje (1) en el agujero de modo que quede al ras con el
nivel del suelo.
4, Alinear el soporte en forma de L (2) con el anclaje y utilize la
arandela (4)
La unidad esta lista para ser usada. Por favor prosiga a la
sección con las instrucciones para colocar el botellón de agua.
Fig.1
Fig.2
21% FUN
Fig.3
o o o
HOT POWER COLD
8. INSTRUCCIONES PARA COLOCAR EL BOTELLON DE AGUA
8. INSTRUCCIONES PARA COLOCAR EL BOTELLON DE AGUA
ADVERTENCIA: Solo use botellones de 3 o 5 galones
con este dispensador de agua.
ADVERTENCIA: Asegúrese que la unidad esté apagada
cuando los tanques de agua caliente y fría estén vacíos.
Siempre debe haber agua dentro de los tanques antes de
prender cualquier interruptor.
Colocar botellones con tapa a prueba de
derrames
e Esta unidad contiene un embudo con punta para
evitar derrames cuando se usan botellones con tapa
a prueba de derrames.
o [Levante cuidadosamente el botellón (aprox. 40 libras
por el botellón de 5 galones). Doble sus rodillas para
levantar el botellón, no su espalda. No coloque las
manos bloqueando la abertura del botellón mientras
lo está colocando. Pida ayuda si no le es posible
levantar el botellón.
e Invierta el botellón de 3 0 5 galones sobre la
unidad y cuidadosamente permita que el cuello del С) o me
botellón se deslice dentro del embudo, asegúrese
que la tapa a prueba de derrames se deslice hacia
la punta del embudo. 1
e La punta del embudo rompera el sello de la tapa a
prueba de derrames permitiendo que el agua fluya
sin derrames desde el botellón hacia el embudo y los
tanques de agua. 7
e Permita que el agua llene todos los tanques por La
aproximadamente un minuto. J
o Presione en las llaves de agua para confirmar que el
agua fluye en todos los grifos.
Conecte la unidad al toma corriente. rr
Prenda el interruptor de agua caliente, espere unos
minutos y prenda el interruptor de agua fría. Permita
que la unidad alcance las temperaturas mínimas del
agua fría y caliente. Esto tomará aproximadamente
45 minutos y las Luces Indicadoras se apagarán. М
o Pruebe la temperatura del agua presionando cada
una de las llaves.
e Su dispensador de agua está listo para ser utilizado. fei en
10
Colocar botellones sin tapa a prueba de derrames
e Remueva la tapa del botellón de agua de 3 0 5
galones y utilice un paño limpio para limpiar el cuello
del botellón. 9 a
e Levante cuidadosamente el botellón (aprox. 40 libras
por el botellón de 5 galones). Doble sus rodillas para
levantar el botellón, no su espalda. No coloque las
manos bloqueando la abertura del botellón mientras
lo está colocando. Por favor pida ayuda si no le es
posible levantar el botellón.
o Invierta el botellón de 3 o 5 galones sobre la unidad y
cuidadosamente permita que el cuello del botellón se
deslice dentro del embudo, asegúrese que el cuello se
deslice hacia la punta del embudo.
e Permita que el agua llene todos los tanques por
aproximadamente un minuto.
o Presione en las llaves de agua para confirmar que el
agua fluye en todos los grifos.
o Conecte la unidad al toma corriente.
o Prenda el interruptor de agua caliente, espere unos
minutos y prenda el interruptor de agua fría. Permita
que la unidad alcance las temperaturas mínimas del
agua fría y caliente. Esto tomará aproximadamente
45 minutos y las Luces Indicadoras se apagarán.
o Pruebe la temperatura del agua presionando cada
una de las llaves.
o Su dispensador de agua está listo para ser utilizado.
Pasos para reemplazar botellones de agua
ADVERTENCIA: : Asegúrese que la unidad esté apagada cuando los tanques de agua
caliente y fría estén vacíos. Siempre debe haber agua dentro de los tanques antes de prender
cualquier interruptor.
e Apague los interruptores de agua caliente y fría.
e Retire el botellón vacío del dispensador.
o Proceda a colocar el nuevo botellón siguiendo las INSTRUCCIONES PARA COLOCAR EL
BOTELLON DE AGUA.
11
9. MANTENIMIENTO
CUIDADO:
Antes de limpiar la unidad apague los interruptores del agua caliente y fría, y desenchufe
la unidad del toma corriente.
Nunca utilice elementos corrosivos o químicos para limpiar esta unidad.
Cuando la unidad no esté en uso, almacénela en un lugar seco y fuera del contacto
directo con la luz solar.
Limpieza externa del enfriador de agua
* Para limpiar el exterior de la unidad, utilice un paño
suave con agua tibia. Evite utilizar limpiadores
abrasivos y materiales duros para prevenir daños y/o
rayones a la unidad.
o Limpie la bandeja de derrames con frecuencia para
evitar la acumulación de agua. Para remover la
bandeja de derrames simplemente levante y hale hacia fuera.
e Para limpiar la parte posterior de la máquina, limpie con un saca polvo, un paño de
microfibra y/o aspire el espiral de alambre usando el accesorio de cepillo de la aspiradora
(por favor refiérase al manual de instrucciones del usuario de la aspiradora).
Almacenamiento del enfriador de agua
Por favor siga estas instrucciones para almacenar esta unidad cuando no vaya a ser utilizada
por un largo periodo de tiempo.
e Apaguelos interruptores del agua caliente y fría. Desenchufe el cable de electricidad del
tomacorriente.
e Drene el agua usando las llaves y la tapa de drenaje.
Esta unidad debe ser almacenada verticalmente y protegida del polvo.
10. ESPECIFICACIONES TECNICAS
Numero de Modelo
HWB1052 Series
Voltaje y Frecuencia 115V/60Hz
Corriente Total 485W
Poder de Calentamiento 400W
Poder de Enfriamiento 85W
Capacidad de Calentamiento
AL/h - > 90%C (1.06 G/h - > 194°F)
Capacidad de Enfriamiento
2L/h - < 10°C (0.53 G/h - < 50°F)
Refrigerante al Compresor
Eco Friendly R134a
12
11. GUIA DE SOLUCION DE PROBLEMAS
SIESTA UNIDAD NO ESTA FUNCIONANDO CORRECTAMENTE, REVISE LA SIGUIENTE
TABLA PARA RESOLVER LOS PROBLEMAS MAS COMUNES:
agua caliente
esta apagado.
* La unidad se ha sobrecalentado.
* El interruptor de agua caliente
está dañado.
Problema Causa Posible Solución
No sale agua * No hay agua dentro de los tanques. * Asegúrese que los tanques tienen
de los grifos * Los tanques y/o tubos dentro de la agua.
unidad están atorados. * Contacte Servicio al Consumidor.
* Las llaves no están funcionando
apropiadamente.
No dispensa * El interruptor del agua caliente * Encienda el interruptor de agua
caliente. Pruebe la temperatura
después de 45 minutos.
* Apague el interruptor de agua caliente
y permita que la unidad descanse por
1 hora. Encienda nuevamente el
interruptor de agua caliente
(asegúrese que los tanques tengan
agua adentro).
* Contacte Servicio al Consumidor.
No dispensa
agua fría
* El interruptor del agua fría
está apagado.
* La unidad se ha sobrecalentado.
* El interruptor de agua fría
está dañado.
* Encienda el interruptor de agua fría.
Pruebe la temperatura después de
45 minutos.
* Apague los interruptores de agua fría
y caliente, y permita que la unidad
descanse por 1 hora. Encienda
ambos interruptores otra vez
(asegúrese que los tanques tengan
agua adentro).
* Contacte Servicio al Consumidor.
Fuga de agua
en la unidad
* La bandeja de derrames está llena.
* El botellón de agua no fue colocado
correctamente.
* Fuga de agua dentro de la unidad.
* Vacie la bandeja de derrames.
* Apague los interruptores de agua
caliente y fría y seque la parte
exterior de la unidad y sus
alrededores.
* Si el problema continúa, contacte
Servicio al Consumidor.
Olor en el agua
* Nueva unidad.
* La unidad no ha sido usada por un
largo periodo de tiempo.
* Tal vez tenga un problema de algas.
* Proceda a seguir las instrucciones
de Instalar su Dispensador por
Primera Vez en la página 8.
Descargas
eléctricas bajas
* La unidad no está correctamente
conectada a tierra.
* El cable de electricidad está dañado.
* Por favor llame a un electricista
certificado para que lo asista con
cualquier problema eléctrico.
* Si el problema continua, contacte
Servicio al Consumidor
Para cualquier problema no incluido en esta tabla, por favor contacte
Servicio al Consumidor al: 1-855-687-2223
No intente desarmar la unidad por sí mismo. El fabricante no asume
ninguna responsabilidad de los daños o incidentes que resulten de esta
acción, la cual también anulará la garantía del fabricante.
13
Mitrana Group Inc.
Av. Interamericana y Roberto
Eisemann, Coronado Mall, P 2, Ofc. 352
Panama.
For general inquires about Mitrana Group Inc or
Honeywell Water Coolers please contact the toll
free number: 1-855-HWHELP1 (1-855-494-3571).
International rates may apply.
Or visit: www.honeywellwatercoolers.com
Imported and Distributed by:
SCA Imports LLC
18851 NE 29th Ave., Suite 706
Aventura, Fl 33180
Tel: 1-855-687-2223
© 2013 Mitrana Group Inc. All rights reserved
IMO1-HWB1052W/S/B-2013-02
The Honeywell Trademark is used under license
from Honeywell International Inc. Honeywell
International Inc. makes no representations or
warranties with respect to this product.
This product is manufactured by Mitrana Group Inc.
GARANTIA LIMITADA PARA EE.UU. CONTINENTAL
SCA Imports, LLC ("Distribuidor") garantiza al comprador original de este enfriador de agua, y a
ninguna otra persona, que si el mismo se arma y opera de acuerdo con las instrucciones impresas que
la acompañan (lea el manual del usuario antes de instalar o usar este producto), entonces durante un
período de un (1) año desde la fecha de compra, todas las piezas (excepto el compresor de
refrigeración), estarán libres de defectos de material y mano de obra. El compresor de refrigeración
tendrá una garantía limitada de dos (2) años a partir de la fecha de compra contra defectos de
materiales y mano de obra.
El Distribuidor podrá requerir prueba razonable de la fecha de la compra en un mayorista o
minorista autorizado. Por lo tanto, usted debe conservar el recibo o factura de venta.
La garantía está limitada a la reparación o reemplazo de las piezas que resulten defectuosas en
condiciones de uso y servicio normales, y que el Distribuidor determine a su discreción razonable en
la revisión para ser defectuoso. Antes de devolver cualquier pieza, comuníquese con el Servicio al
Cliente del Distribuidor a través de la información de contacto que aparece más abajo. Si el
Distribuidor confirma, después de la revisión, un defecto cubierto por esta garantía limitada de
alguna de las piezas devueltas, y si el Distribuidor aprueba el reclamo, el Distribuidor decidirá
reemplazar tales partes sin costo alguno (incluyendo mano de obra). Si usted devuelve las partes
defectuosas, los gastos de transporte deben ser prepagados. De la misma forma el Distribuidor
devolverá las partes al comprador original mediante transporte o envío prepagados.
Para obtener el servicio de garantía, por favor póngase en contacto con Servicio al Cliente al
número gratuito 1-855-687-2223 o escriba a supportusa Qhoneywellwatercoolers.com
Antes de ponerse en contacto con Servicio al Cliente, por favor asegúrese de tener a mano la
siguiente información (si es escrito por correo electrónico, por favor proporcione la misma
información):
* Número de modelo (puede encontrarlo en la parte posterior o lateral de la unidad)
* Número de serie del producto (puede encontrarlo en la parte posterior o lateral de la unidad)
e Factura de compra (nombre del distribuidor, fecha de compra y número de factura). Si envía un
correo electrónico por favor adjunte la factura.
ESTA GARANTIA NO CUBRE los defectos o las dificultades de funcionamiento debido a un
accidente, abuso, mal uso, alteración, aplicación indebida, instalación incorrecta, falta de mantenimiento
O servicio inapropiado por usted o cualquier tercero, o por no realizar el mantenimiento normal y rutinario
del enfriador de agua, según lo establecido en el Manual del Usuario. Además, la garantía limitada no
cubre daños al acabado, tales como rasguños, abolladuras, descoloridos o el óxido después de la compra.
La garantía limitada se otorga en lugar de cualquier otra garantía expresa. El Distribuidor
renuncia a todas las garantías para los productos que se compran en lugares que no sean minoristas
О mayoristas autorizados. DESPUÉS DEL PERÍODO DE UN (1) AÑO DE GARANTÍA EXPRESA (DOS -2-
años en el caso del compresor de refrigeración), EL DISTRIBUIDOR NIEGA TODAS LAS GARANTÍAS
IMPLÍCITAS, INCLUIDAS LAS GARANTÍAS DE COMERCIALIZACIÓN Y APTITUD PARA UN
PROPÓSITO PARTICULAR. ADEMÁS, EL DISTRIBUIDOR NO SERÁ RESPONSABLE ANTE EL
COMPRADOR O CUALQUIER TERCERO POR DAÑOS ESPECIALES, INDIRECTOS, MORALES,
INCIDENTALES O CONSECUENCIALES. El Distribuidor no asume ninguna responsabilidad por los
defectos causados por terceras personas. Esta garantía limitada le da al comprador derechos legales
específicos y el comprador puede tener otros derechos según el lugar donde él o ella resida. Algunas
jurisdicciones no permiten la exclusión o limitación de daños especiales, incidentales o consecuentes,
O limitaciones en la duración de una garantía, por lo que esta limitación puede no aplicarse en su
caso.
Esta garantía no aplica fuera del territorio continental de EE.UU.
SCA IMPORTS LLC
18851 NE 29™ AVE.
SUITE 706
AVENTURA, FL 33180