1
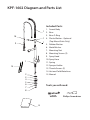
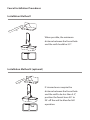
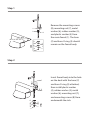
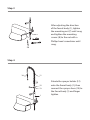
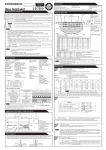
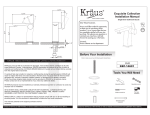
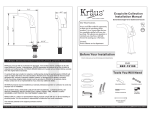
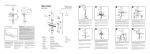
I N S TA L L AT I O N MA N UA L
Single Lever Pull Out
Kitchen Faucet
KPF-1602
www.kraususa.com I
toll free: 1.800.755.0703 I © 2013-2014 Kraus USA Inc.
Congratulations on your new Kraus purchase!
We would like to take this opportunity to thank you for your business with Kraus USA.
It is our sincere hope that you are completely satisfied with your Kraus experience.
We welcome any questions or comments you may have, and look forward to assisting
you in the future.
For more information about Kraus products, please visit our website at:
www.kraususa.com.
In order to allow us to serve you better, we recommend registering your new Kraus
product at: www.kraususa.com/product-registration
Sincerely,
Kraus Customer Service Department
Prior to Installation
•
•
•
•
Make sure that the cold and hot water lines are turned off
Wrap all threaded connections with Teflon tape. Always wrap in a clockwise
direction
Cover your drain to avoid losing parts
Do not disassemble the main faucet body, as it has been installed & commissioned
correctly & precisely before delivery from the factory
•
To keep the faucet from jamming, flush the water pipe before installation
•
Using condition: Working pressure at 0.05-1.0MPa (including cold & hot water
pressure) with applicable water temperature: 40C-900C
•
The minimum distance between the faucet hole and the wall/backsplash is 3.5”
•
The faucet hole size must be between 1-3/8” and 1-1/2”
•
Check to make sure you have all included parts (page 2)
•
Do not assemble parts 9 -12 until step 4
KPF-1602 Diagram and Parts List
Included Parts:
1. Faucet Body
11 2. Base
3. Base O-Ring
10
12 4. Plastic Washer - Optional
15
(Top Mount Sinks Only)
13
9
10
5. Rubber Washer
6. Metal Washer
7. Mounting Nut
8. Mounting Screws (2)
11
9. Spray Head
10.Spray Hose
11.Spring
12
12.Sprayer Holder
13.Thumb Screws (2)
13
14.Hot and Cold Waterlines
15.Manual
15
1
11
14
9
12
2
3 13
4
5
6
7
18
14
1
13
2
3
Tools you will need:
Wrench
11
12
2
3
4
5
6
15
15
Phillips Screwdriver
815
32 3/32”
815
32 3/32”
Dimension Drawings
Max1 3/8”
Max1
3/8”
Max35
8 17/32”
8 17/32”
Max35
279
10 31/32”
279
10 31/32”
194 194
217 217
7 5/8”7 5/8”
Ø35~Ø38
Ø35~Ø38
Ø1 3/8~Ø1
Ø1 3/8~Ø1
1/2” 1/2”
Hot Water
Hot Water
Cold Water
Cold Water
Safety Tips
•
If soldering the water connections when installing the faucet, remove the O-rings,
cartridges, and washers before applying any heat
•
Protect your eyes with safety glasses when cutting or soldering
m m
m mm
90me 90m
e
c not overtighten fixing screws/nuts. Tighten finger-tight,9then
0m 9use
0 a wrench/
nc• tanDo
a
n
n
t
is dis
ha s tha
d
t
s
m m
”
to tighten the fixing screw/nut until snug
Les Le.5s ” .5”
muinim~u3.5” ~3.5screwdriver
~3 ~3
M
Ø35~Ø38
Ø1 3/8~Ø1 1/2”
Cold Water
Hot Water
Faucet Installation Procedures
Installation Method 1
m
0m
m
0m
n9
tha
s
s
Le
5”
~3.
815
32 3/32”
M
9
nce
ista
d
um
5”
~3.
inim
7 5/8”
Max1 3/8”
Max35
194
When possible, the minimum
distance between the faucet hole1
2
and the wall should be 3.5”.
3
Ø35~Ø38
Ø1 3/8”~Ø1 1/2”
Ø35~Ø38
30˚
Ø1 3/8~Ø1 1/2”
Cold Water
4
6
5
7
8
Installation Method 2 (optional)
m
0m
n9
tha
s
s
Le
5”
~3.
If circumstances require the
distance between the faucet hole
and the wall to be less than 3.5,”
position the faucet lever 30˚ to
90˚ off the wall to allow for full 8
operation.
30˚
7
Step 1
1
2
3
Ø35~Ø38
Ø1 3/8”~Ø1 1/2”
4
5
6
7
Remove the mounting screws 1
(8), mounting nut (7), metal
washer (6), rubber washer (5),
and plastic washer (4) from 2 3
the main faucet (1). The base
(2) and base O-ring (3) should
remain on the faucet4 body.
6
8
8
5
7
Step 2
10
9
10
1
3
23
7
8
4
6
8
5
7
11
Insert faucet body into the hole
on the deck with the base (2)
12
and base O-ring (3) attached,
12
then install plastic washer
13
(4), rubber washer (5), metal
washer (6), mounting nut (7), 1
and mounting screws (8) from
underneath the sink.
10
Step 3
9
11
10
11
1
12
After adjusting the direction
12
of the faucet body (1), 13
tighten
the mounting nut (7) until snug
and tighten the mounting
1
screws (8) to the nut with a
Phillips head screwdriver until
snug.
23
7
8
4
6
8
5
7
Step 4
10
11
12
13
1
Close
25˚
Situate the sprayer holder (12)
onto the faucet body (1), then Open
connect the sprayer hose (10) to
the faucet body (1) and finger
tighten.
Left
Hot
Step 5
10
Hexagon Nut
9
11
12
13
Hot
Water
Cold
Water
Step 6
xagon Nut
3
Tighten the hexagon nut of
sprayer hose (10) with a wrench
until snug. Insert the spring
(11) into sprayer holder (12).
After adjusting the direction
of sprayer holder (12) to the
desired location, tighten
thumb screws (13). Connect
sprayer (9) to the sprayer
hose (10); finger-tighten, then
tighten with wrench until snug.
Close
25˚
90˚
Connect and tighten hot and
cold waterlines (14) to the
angle stops and tighten with a
wrench until snug. Turn on the
water supplies and check for
leaks.
Installer Tip
Open
Left
Hot Water
Hot
Water
Cold
Water
Push
If facing faucet, the hot water
connector is to the left & cold
water connector is to the right.
Water
agon Nut
12
Water
13
Usage
How to operate the handle:
Hot
Close
25˚
Hot
Cold
Water 90˚ Water
Cold
Water handle
Water
1. Raise the lever
to turn on
the water. Push down to turn off.
Push
Open
Left
Hot Water
2. Turn the lever handle to the left
to increase hot water flow, turn
to the right to increase cold flow.
Sprayer:
1. To activate sprayer, turn on
water with lever and squeeze
sprayer.
Close
25˚
90˚
Push
Push
Open
Left
Hot Water
Care & Maintenance
*To keep the product clean & shining, follow the
steps below:
1.
2.
3.
4.
Rinse with clean water & dry with a soft cloth
Do not clean with soaps, acid, polish, abrasives, or harsh cleaners
Do not use a cloth with a coarse surface
Unscrew the aerator and clean when necessary
*This installation manual is subject to change without further notice.
Trouble - Shooting
If you have followed the instructions carefully and your faucet still does not
work properly, take the following corrective steps:
PROBLEM
CAUSE
ACTION
Leakage under the
handle
Locking nut has come
loose
Unscrew the lever on
the handle by hand.
Loosen set screw
with a hex wrench.
Remove the handle and
unscrew trim cap by
hand. Tighten locking
nut with an adjustable
wrench
Aerator drips or has
inconsistent water flow
pattern
Aerator is dirty or not
seated properly
Unscrew aerator by
hand and clean out
debris
Water will not shut off
completely
Cartridge may be
defective
Unscrew the lever on
the handle by hand.
Loosen set screw with
a hex wrench (2.5 mm).
Remove the handle
and unscrew trim cap
by hand. Unscrew the
locking nut with an
adjustable wrench.
Remove ceramic disc
cartridge. Check for
cracks
Leaking between hose
and faucet body or
spray head
Hose may be loose or
washers are not seated
correctly in the hose
connections
Tighten the hexagon
nut with a wrench and
make sure the washers
are seated correctly
Codes/Standards Applicable:
Specified model meets or exceeds the following: ANSI/ASME A112.18.1, cUPC,
AB1953
KRAUS Brand Lavatory Faucets
Limited Lifetime Warranty
KRAUS is proud to offer its customers the strongest, most durable ceramic
cartridges in all of its solid brass Lavatory Faucets. KRAUS guarantees that all of
its products are free of defect in materials and craftsmanship. All KRAUS BRAND
Lavatory Faucets carry a limited lifetime warranty from the original date of
purchase.
If a product fails due to defect in material or craftsmanship during the warranty
period, KRAUS will repair or replace the items at its sole discretion. Warranty
does not apply when the item has been tampered with, misused, improperly
installed, altered, or damaged due to abuse or accident. Proof of purchase
(original sales receipt) must be provided to KRAUS for all warranty claims. Please
contact one of our representatives for any additional details.
All KRAUS products must be installed by a licensed professional plumber or
contractor to avoid any improper use or installation.
IN NO EVENT SHALL KRAUS BE LIABLE FOR ANY INCIDENTAL, CONSEQUENTIAL,
OR SPECIAL DAMAGES, INSTALLATION COST, LABOR, TRAVEL TIME, FREIGHT
COSTS INCURRED, LOST PROFITS, OR CONTINGENT LIABILITIES.
KRAUS USA Inc. makes no representation that its products comply with any
or all local building or plumbing codes. It is the consumer’s responsibility to
determine local code compliance.
This warranty extends to the original purchaser and first consumer.
HELP LINE
For additional assistance at any point in the installation process, please call us at
1.800.775.0703 or email us at [email protected]
Our customer service hours are Monday – Friday, 9am – 6pm EST.
Be sure to visit our website at www.kraususa.com.
www.kraususa.com