1
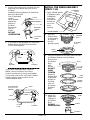
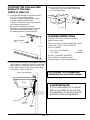
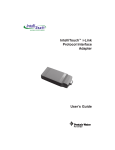
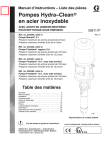
Shampoo
Bowls
3100 CAMEO BOWL
3800 ALPHA BOWL
PORCELAIN ENAMEL SHAMPOO
BOWL WITH VACUUM BREAKER
AND MODEL 522 FIXTURE
INSTALLATION AND PLUMBING
NOTE: Read the instructions through before starting
to familiarize yourself with the components.
Any conformance with LOCAL CODES or
INSPECTIONS is the RESPONSIBILITY
OF THE PURCHASER.
3100
1. Attach the Fixture to the Bowl according to
the instructions packed with the Fixture.
ATTACH HOSE RECEIVER TO BOWL
(STEPS 2 thru 6).
2. To make Hose Receiver installation easier,
complete these steps to cut screw threads
in the mounting holes:
S Take a Mounting Screw and drive it 2 or
3 turns into one hole.
DO NOT OVERTIGHTEN.
S Remove the Screw.
S Repeat for all four (4) mounting holes.
3800
3. Place the Vacuum
Breaker pipes
through the
Gaskets and the
holes in the
Hose Receiver as
shown.
Secure the Vacuum
Breaker to the Hose
Receiver with
two Nuts.
DO NOT
OVERTIGHTEN.
If the Bowl is not equipped with a Vacuum
Breaker, proceed to Step 4.
*NOTE:
If you ordered a Vacuum Breaker,
your Hose Receiver will have two
holes for mounting the Vacuum
Breaker.
GASKET
HOSE
RECEIVER
NOTE: Install the Vacuum
Breaker as shown.
If the Vacuum Breaker is
installed backwards,
it will interfere with the
Spray.
4. Place the Gasket
over the flange
on the bottom of
the Hose Receiver.
VACUUM
BREAKER
MOUNTING
HOLES
MOUNTING
SCREW
VACUUM
BREAKER
NUTS
VACUUM
BREAKER
HOSE
RECEIVER
DRIVE
SCREW
IN 2 OR 3
TURNS
GASKET
Belvedere USA Corporation
PAGE 1 of 4
A wholly owned subsidiary of The Wella Corporation
One Belvedere Boulevard, Belvidere, Illinois 61008
Printed in U.S.A. E.C.O. 4164 4001021 Rev. 1-03
5. Place the Hose Receiver in the Bowl with the
large hole in the dome facing the front of
the Bowl.
Install the Mounting Bracket on the bottom
side of the Bowl with
four (4) embossed
DOME
corners
facing upward,
against the
bottom of
the Bowl.
Secure with
EMBOSSED
four (4)
CORNER
(UP)
Screws.
DO NOT
OVERTIGHTEN.
MOUNTING
SCREW
6. If your Bowl is not equipped with a Vacuum
Breaker attach the Spray Hose connector
to the fixture tailpiece.
INSTALL THE DRAIN ASSEMBLY
(STEPS 7-10)
PLUMBER’S
7. Apply a liberal amount
of plumber’s putty
(available at
most hardware stores)
around the
top of the
drain
opening.
PUTTY
DRAIN OPENING
8. Place the
Strainer Body
in the opening,
and press it
into the
plumber’s putty.
STRAINER
BODY
PLUMBER’S
PUTTY
DRAIN
OPENING
SPRAY
HOSE
RECEIVER
TAILPIECE
If your Bowl is equipped with a Vacuum
Beaker, connect one end of the Fixture
Hose to the inlet side of the Vacuum Breaker.
Connect the other end to the Fixture Tailpiece.
Attach the Spray Hose connector to the
Vacuum Breaker outlet.
HOSE RECEIVER
WITH VACUUM
BREAKER
SPRAY
INLET
OUTLET
FIXTURE
HOSE
TAILPIECE
9. From the underside of the Bowl, place the Fiber
and Rubber Washers over the Strainer
Body. Secure
BOWL
the Strainer
Body
with
the Nut.
STRAINER
DO NOT
BODY
OVERTIGHTEN.
When the
FIBER
Strainer Body
WASHER
is tightened
securely to
RUBBER
the Bowl,
WASHER
clean off
any excess
plumber’s
NUT
putty.
10. Attach the
Gasket and
Tailpiece to
the Strainer
Body.
DO NOT
OVERTIGHTEN.
BOWL
GASKET
TAILPIECE
PAGE 2 of 4
12. Mount the Bowl onto the Wall Bracket by
lowering the Lugs on the back of the Bowl
into the Wall Bracket.
TO MOUNT THE 3100 and 3800
BOWLS TO THE WALL
(STEPS 11 THRU 13)
11. Install the Wall Bracket so that the top edge
is 31-1/4” from the finished floor.
(This backet height is suggested to obtain
the most suitable neckrest height.
However, the bracket height may be varied
to suit personal preference.)
Be sure that the Bracket is securely
fastened to a structural member in the wall.
Also, be sure the Bracket is level. Install
the Leveling Bolt into the Wall Bracket.
LUGS
CLEANING INSTRUCTIONS
BRACKET
Paste wax monthly to preserve and protect
against common soils.
BOWL LEVELING
BOLT
With normal care your bowl will last many years.
31 1/4”
CLEAN ONLY WITH A NON-ABRASIVE
LIQUID CLEANER.
Dow Tub & Tile CleanerR
Mr. CleanR
409R
FantasticR
DO NOT USE HARSH ABRASIVES
These will dull the sparkling surface.
See back page for rough-in specifications.
13. Check to be sure the Bowl is level side-to-side and
front-to-back. Connect the Fixture to the hot and
cold supply lines. Install the trap and connect the
drain. Apply a bead of silicone to the back edge
of the Bowl to seal it to the wall.
APPLY SILICONE HERE
ALL PLUMBING TO BE PLANNED AND
PERFORMED BY A QUALIFIED PLUMBER
BOWL
IMPORTANT NOTE:
It is the responsibility of the owner
and/or the installer to be sure that
the installation conforms to all local
plumbing codes and regulations.
TRAP
LEVELING
BOLT
SUPPLY
LINES
PAGE 3 of 4
ROUGH-IN PLUMBING SPECIFICATIONS.
This Shampoo Bowl is designed for optimum comfort when the Bowl Neckrest is at 31”.
However, this may vary to suit individual salon owners.
SEE NOTE BELOW.
Belvedere Recommends a Bowl Neckrest height of 31”.
To mount the Bowl at this height, locate the bracket height as shown in these specifications.
TOP
VIEW
IMPORTANT!
DO NOT OVERTIGHTEN
DRAIN ASSEMBLY!
3 1/2” BASKET STRAINER
APPLY SILICONE HERE
LEVEL
31”
RECOMMENDED
6” TAILPIECE
FURNISHED
HOT
COLD
BRACKET
4”
FRONT
VIEW
LEVELING
BOLT
4”
APPROX.
16”
FINISHED FLOOR LINE
PAGE 4 of 4
SIDE
VIEW
31 1/4”
TOP OF
BRACKET
TO FLOOR
18”