Transcript
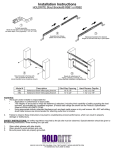
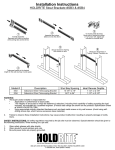
WARNING:
Risk of damage or injury if concealed pipes or wiring are
contacted during installation. If unsure seek qualified help.
WARRANTY/DISCLAIMER
HOLDRITE warrants this product to be free of
defective material and workmanship for as long as you own
the water heater it secures. This is the full extent of our lifetime
warranty. It is the responsibility of the user to make sure the
restraint is properly installed. HOLDRITE shall
not be liable for improper installations.
PATENT PENDING
Join straps in front: A. Insert free end from behind and
through front buckle. B. Loop free end over front of buckle,
back through second slot, and out through back of buckle.
C. Dress loop and pull free end to remove slack. D. Press
down on Quick Lock to secure strap.* E. Secure excess
strap with supplied wire clip.
A.
Thread through
B.
Thread through
Package Contents
C. & D.
PACKAGE CONTENTS:
Push
QUICK LOCK
4 - Straps
4 - Lag Bolts
2 - Wire Clips
If not a "Zero Clearance" water heater, back spacer is
needed. Use or construct two spacers to meet water heater
manufacturer's spacing requirements, one at each strap
height. Lag bolts must not attach to back spacers.
Pull free end
*BUCKLE RELEASE: Insert screwdriver into gap
between front plate and side flange, just forward of each
lock. Twist gently while prying up. Pull up on thumb tab
to free strap.
Full performance even if only one lock is engaged.
Figure 1
The best place to locate your water heater is directly in front
of a 2" x 4" wall stud. See Figure 1.
&
Repeat the entire installation
process for the second pair of
straps using the same hole and
slot positions as the first
installation.
Figure 2
Mark stud locations on both sides of
heater within top and bottom thirds.
Bottom strap must clear controls by 4".
See Figure 2.
1/3
Attach end brackets to studs at marks
with lags, noting orientation of brackets.
4"
1/3
(800) 321-0316 www.holdrite.com