Transcript
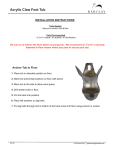
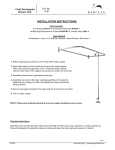
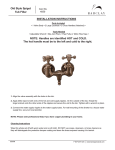
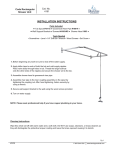
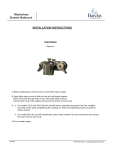
Decorative
Shower Flange
350
INSTALLATION INSTRUCTIONS
Parts Included
• 2 Mounting Brackets • 2 Escutcheons •2 Threaded Attachment Rings
• 2 Threaded Sleeves • 4 Wall Screws • 2 Anchors • Allen Wrench
Tools Needed
• Pencil • Drill • Measuring Tape • Screwdriver
A.
1. Mark spot on wall where Flange will be attached.
2. Un-assemble Flange as shown in picture (A.)
a.) Un-thread “Threaded Sleeve” (1)
b.) Use Allen Wrench (5) provided to detach Ring (2)
c.) Un-thread Escutcheon (3)
3. Attach Mounting Bracket (4) to wall using anchors
and screws provided.
4. Thread Escutcheon (3) onto Mounting Bracket (4)
as shown in picture (B.)
B.
C.
5. Put Threaded Attachment Ring (2) onto Mounting
Bracket (4) and tighten using Allen Wrench (5)
provided as shown in picture (C.)
6. Thread “Threaded Sleeve” (1) onto Attached Ring (2)
as shown in picture (D.)
D.
7. Push shower rod into sleeve-internal O-Ring will hold
rod in place.
8. We recommend use of ceiling supports to stabilize
shower rod.
01/09/2015
P 847•244•1234
www.barclayproducts.com