1
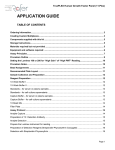
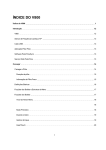
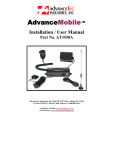
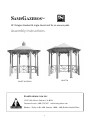
SAMSGAZEBOS
TM
10’ Octagon Gazebo #A single-ered roof for an uneven pao
Assembly Instrucons
-
10-OCT-A
10-OCT-A-CUPOLA
SAMSGAZEBOS.COM, INC.
132 E. 163rd Street, Gardena, CA 90248
Customer Service: (800) 376-7267
[email protected]
Monday ~ Friday: 8:00~ 6:00, Saturday: 10:00 ~ 4:00 (Pacific Standard Time)
1
SAMSGAZEBOSTM
Introduc
on
Thank you for purchasing SamsGazebos TM products. These instrucons include helpful hints and informaon
necessary to safely assemble and properly maintain the gazebo for many years of enjoyment. Please read instrucons completely before you begin.
This gazebo has been designed for easy assembly with nominal pre-assembled parts for un uneven pao. All
steps can be completed in five hours by two people. If you have a level floor such as wood deck, e-mail us at
[email protected] at the me of order; we can make all posts same complete with hardware necessary at
no extra charge. Minimum floor required is 10’ x 10’.
Before Assembly
1. Make sure you have all the parts. Compare the contents of the crate to the List of the Parts. If any parts
are missing or you have any quesons, please contact Customer Service at (800) 376-7267.
2. Lay out the parts in separate staging area. We recommend you set aside the same parts together while you
go through the list; this step will save you me and effort during assembly.
3. Select a locaon for your gazebo. Choose any area of your hard surfaced pao or cement pad. Trim down
overhanging trees and avoid underground pipes or cables before assembling the gazebo.
4. Check with your local building authories regarding any required building permits.
5. Prepare the tools and read the manuals.
6. Adjust sprinklers if necessary.
Tools Required
◊
8’ Ladder
◊
Level
◊
Tape Measure
◊
Hammer
◊
Square
◊
Pencil
◊
3/8” Socket Wrench
◊
Cordless Screw Driver & 1/8” or 3/16” Cordless Drill bit (to drill for lag bolts)
◊
Miter Saw / Circular Saw/ Handsaw (to adjust posts)
◊
Power Drill with a 3/8”drill bit (if installed on a cement pad)
◊
(other) Bloom, Work Gloves, Safety Goggles, Masking Tape, Sledge Hammer
2
10’ Octagon Gazebo #A single-
ered roof
List of Parts
Standard Post
Longer Post
This is line 1,
standard post
length.
8 Headers
8 Posts: 1 standard and 7 longer
8 RaFers
8 Post Bases
(One is aGached to the standard post.)
8 Lower Roof Panels
8 Upper Roof Panels
3
Top Rail
Rail
16 Corbels
5 Rails & 5 Top Rails
2 Temporary Rail Holders
2 Wood Pieces, 1 small and 1 large,
& 1 small 4x4 for leveling
8 Temporary Post Holders
8 3/8”Hanger Bolts with Washers & Nuts
4
8 3/8” Lag Bolts & Washers
8 Header Connectors
8 “L” Post Connectors
Screws : 16 Small for the boGom
of the lower roof panels & Large
for everywhere else
1 Cupola (oponal):
Not included in 10-oct-A model
5
8 3/8” Wedge Anchors
Nails : 32 Small for the header
connectors & Large for everywhere else
Rotate it to face your
house or pathway.
e
Sid
Sid
eE
e
nc
tra
En
nt
ran
ce
This is a template for
post posions.
Front Entrance
1. Sweep the area where the gazebo will be installed; it is easy
to work on a pao without any debris.
2. Lay out the eight headers in an octagon shape. The gazebo
has three entrances. Rotate them to your liking.
3. Fasten each of the headers together with large nails ONLY
half way.
4. Fasten the headers where drilled with a large screw. These
nails and screws are temporary and are removed aFer leveling.
5. Repeat steps 3 and 4 for the remaining seven corners.
6. Measure the inside headers to make sure the eight headers
form a perfect octagon. Adjust the header posions unl the
distances are all the same for opmal results.
6
7. Trace both the inside and the outside of the headers with a pen- 8. Repeat step 7 for the other seven headers.
cil. The lines will determine the permanent posion of the gazebo.
Taping your level to the longer
piece is recommended.
9. Put the small 4 x 4 around the center of the headers and trace
it with a pencil. This should NOT be removed during the leveling.
10. Begin to level each corner. Use the two included pieces
of wood for leveling.
Please take
extra me for
accuracy since
this is the most
important
step.
Your lines may look
much closer than
this example if your
pao is almost level.
1
11. Check the level and mark the leveled horizontal line for
each corner.
12. Connue to level unl you have eight lines. Label the
lowest line as “1”.
7
IMPORTANT:
This corner marked
at top is the lowest
so that a post will
be longest.
1
This corner is the
highest and the
standard post 1 will
be installed.
13. The lines indicate the height differences of the eight corners.
You will adjust the posts to make up the differences later.
14. Using a square, extend the line you marked as “1” around the
perimeter of the wood you have been marking in steps 12 &13.
1
1
1
1
16. Label the headers, the corners of the pao “1” to avoid
mistakes or confusion. Put standard post 1 next to them.
15. Using the level, find a corner for line 1. This corner should be
the highest and installaon point of standard post 1.
Post 2 will be
this much
longer than
standard post
1 in this example.
Please note
that the actual difference
between the
two lines can
be smaller.
17. Go to the next corner. Flip the leveling wood piece to the
other side to avoid confusion, mark the level, and label it “2”.
2
Line 1
18. The line 2 (and the other lines) should be marked
ABOVE line 1. If it is not, redo the step 10.
8
Line 1
The other posts should
be LONGER than the
line 1, the standard
post 1.
UP
2
Post
19. Lay the small leveling wood piece and a post together and
align “line 1”. Please note that line 2 should be BELOW line 1.
20. Extend the line 2 around the perimeter to the other sides of
the post using a square. This is the line you will need to cut.
21. We recommend you cut the posts with a miter saw.
22. If you are using a circular saw, cut the post from side-to-side
then rotate and proceed to cut through the post in this fashion.
23. AGach the post base to the boGom of the post. Align the
outsides and the four corners.
24. Fasten the post base to the boGom of the post with large
screws.
9
2
2
2
2
25. Label the post, headers, and the corners “2”. Labeling
them is the best way to avoid confusion.
26. Go to the next corner and repeat steps 17 ~ 24 for posts
3 ~ 8, and label each post in the sequenal numerical order.
Your lines may
look different
depending on a
slope of your
pao. However,
the other lines
should be
marked ABOVE
the line 1.
1
28. Now the seven posts are adjusted, the post bases are
fastened, and ready to install.
27. A good way to keep tack of marks is to rotate the leveling
wood piece as you level.
Put your
both feet
on the
headers
while you
are drilling.
Do NOT
move the
headers.
29. Drill a 3/8” hole into each corner into the cement to mark
for the post base.
30. Repeat step 29 for the other seven posts.
10
31. Remove the temporary nails and screws from the headers
and move the headers outwards.
32. Sweep the dust away from drilling the holes.
33. Drill 1-1/2” deep where you previously drilled in step 29.
34. Sweep the dust away again.
The line should be
directly over the
drilled holes.
35. Draw a line with a pencil to connect the outside corners with
the inside corners tracing of the headers drawn in steps 7 and 8.
11
36. Repeat step 35 for the rest of the corners. This will keep
you align the posts again later.
Outside
1
1
37. Start installing the posts. It is crucial that you install the
right posts to the correct labeled corner.
38. Let the bolt of the post base slip into the hole.
Inside
Outside
40. Temporarily aGach an “L” post connector to the post and
mark for a wedge anchor.
39. Align the diagonal pencil line to the center of the post base.
Outside
Outside
42. Put the post and the L post connector back where they
were and drill a 1/8” ~ 3/16” hole for a 3/8” lag bolt.
41. Set the post aside and drill for the 3/8” wedge anchor
approximately 1-1/2” deep where you marked.
12
Socket Wrench
43. Fasten the L post connector to the post with a lag bolt.
44. Insert a wedge anchor into the newly drilled hole and
hammer it in.
Temporary
Post Holder
46. Go to the next post and repeat steps 38 ~ 45. Put a temporary post holder between posts as you go to the next post.
45. Fasten down the wedge anchor with a socket wrench.
Rail
48. Install the rails as you install posts. Use your foot to
hold the rail in place as you proceed to step 49.
47. These temporary post holders will prevent the posts from
spreading out as you connue.
13
Post
Rail
Outside
49. Hold up the rail with temporary rail holders from the
outside of the base as posts.
50. Push the rail to the post from the outside towards the
inside of the fiOng.
Outside
Outside
51. Fasten the rail to the post with a large screw as shown above.
52. Fasten the rail again but this me to the lower end. Repeat
this process on the other side of the rail.
Header
Outside
Remove the washers
and nuts from the
hanger bolt and set
them aside for later
use.
Top Rail
Post
54. Now remove the temporary post holders and place the
headers on top one at a me.
53. Fasten a top rail to the posts with large screws.
14
Outside
55. Temporarily fasten these headers with large nails to prevent shiFing while you fasten the headers with screws.
56. Now fasten the headers with a large screw.
Inside
57. Fasten down the headers with the washers and nuts.
58. Fasten each header to a post with large screws.
Outside
Ra-er
59. Fasten a header connector to each corner with small
nails. Repeat this process with each corner.
60. Install the raFers on the ends one at a me by loosely
puOng them over the fiOngs as above.
15
61. Hammer the raFer down into the fiOng.
62. Fasten the raFer from both sides with large screws.
Ra-ers
63. Install raFers one aFer another. Adjust the raFer top
posions up or down as you install raFers.
64. As you do this, fasten the raFer tops with large nails. Countersink the large nails for a perfect fit.
66. Repeat steps 60 ~ 65 as you add more raFers. Adjust the
raFer top posions up or down as you align the raFer tops.
65. Fasten the raFer end from both sides with large screws.
16
Top View
Interior View
67. Upon complete installaon of the raFers, they should
form a perfect octagon as seen above .
68. Fasten the raFer tops to each other with large screws.
69. Now install the lower roof panels one at a me.
70. Gently hammer the roof ends if there are gaps in between
the roof panels.
71. AFer the gaps are gone, fasten the roof ends with small
screws.
72. Once you are complete with the lower panels, install the
upper roof panels with the smoother side facing inwards.
17
The heavier looking sides should
be at the boGom.
73. Fasten the upper roof panels and the lower roof panels to
the raFers with nails.
74. Now install the corbels with large screws. Remove the
temporary nails from the headers from step 55.
75. Fasten an oponal cupola with large screws aFer installing
a roofing material of your choice.
76. Finish.
18