Transcript
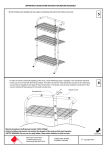
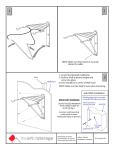
MAKE LIFE EASY : READ AND FOLLOW ALL INSTRUCTIONS CUSTOMER SERVICE : 1-800 - 474 - 6615 ARM ATTACHMENT DIAGRAM 1 Go to www.deltacycle.com for video on arm assembly. 3 2 PATENTS PENDING Copyright 2010 O Rings Slide O Rings up to keep arms in correct position. ASSEMBLY INSTRUCTIONS Bolts 1. Begin assembling the legs and work upwards. 2. Do not tighten bolts until rack is fully assembled and tubes are properly aligned. 3. O Rings should be slid to desirable height. 4. Add Arms above O Ring on Frame. 5. Adjust height of arms before they bear any weight. 6. Make sure that all bolts are tight before using. Go to www.deltacycle.com for video on arm assembly. IMPORTANT WARNING: DO NOT EXCEED MAXIMUM TOTAL WEIGHT LIMIT OF 66 LBS (30 Kgs) MAX LOAD Per Hook 17 LBS (7.7 kgs) MAX WEIGHT Per Bike 33 LBS (15 kgs) O Rings keep the arms in correct position. Arms can be positioned so that they are nested or stacked separately. IMPORTANT SAFETY In order to avoid accidental toppling of the rack, a wall stabilizing strap is supplied. This should be attached to the rack at one end with the bolt provided. The other end of the strap should be secured to the wall using a screw that is suitable for the type of wall construction. If in doubt, consult your hardware merchant for the correct method of fixing based on the wall construction. Attach to wall Threaded hole Add Arms after rack body assembly Delta Design Company 125 Washington St. Unit #7 Foxborough, MA 02035 USA Phone: 800 - 474 - 6615 Donatello RS6100 Assembly Diagram Copyright 2010