1
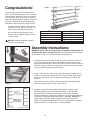
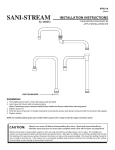
Wood Rack
PBR001 (6-shelf)
PBR002 (5-shelf)
OPERATORS MANUAL
Assembly • Operation • Parts List • Warnings • Warranty
Caution: Read all instructions carefully.
SAVE THESE INSTRUCTIONS. Refer to them often and use them to instruct others.
MANUEL DE L’UTILISATEUR
Assemblage • Fonctionnement • Liste de pièces • Avertissements • Garantie
Mise en garde : Lire attentivement l’ensemble des instructions.
CONSERVER CES INSTRUCTIONS. Les consulter souvent et les utiliser pour éduquer les autres.
Date Purchased/Date d’achat:
Where Purchased/Lieu d’achat:
Address/Adresse:
Congratulations!
You have just purchased a Portamate Wood
Rack. The Portamate Wood Rack is a compact
storage system designed to help you organize
your workshop. It can be used for a variety of
materials including timber, moldings, pipes, PVC
and more. Applications include garage walls,
basements, sheds, and even outdoor fences.
•
The Wood Rack provides 5 levels with a
capacity of 110 lb. (50 kg.) per level. It is
easy to install and easy to customize.
•
Due to product improvements, actual
product may vary slightly. Made in China.
1 Year warranty.
NOTICE: Assembly hardware located in
tubes at end of package
D
A
Figure 1
B
PBR001
Description
Part No.
A Screws (12)
S002
B Horizontal Bars (12) SH003
C Spacers (6)
S001
D Vertical Bars (2)
SV004
PBR002
Description
Part No.
A Screws (10)
S002
B Horizontal Bars (10) SH003
C Spacers (6)
S001
D Vertical Bars (2)
SV004
Assembly Instructions:
WARNING: Ensure your mounting location is capable of withstanding the
additional load. Never overload your rack. Note: Vertical bars can be used
as templates to mark your drilling locations before assembly.
1. Locate the bottom of the long vertical bar. It has a small screw hole 1/2
inch (13mm) from the end. Insert a screw A. Locate the bottom of an
orange horizontal bar B. It has a small notch as shown in the inset photo.
Slide the orange bar down the length of the vertical bar from the top until
it rests in position against the screw. Figure 1.
2. Insert a screw into the next hole up, then slide another orange bar into
position. Continue this process until all the bars are fitted, being careful
that all the notches face down. Repeat this process for the other side.
Figure 2.
Figure 2
*PBR001 shown.
Other models
may vary slightly.
Note: Alternative rack positions can be achieved by drilling additional
holes where desired using a 5/32" (4mm) drill bit.
3. Installing to drywall or other paneled wall sheeting: Locating a solid
structural support for your Portamate Wood Rack is very important.
Ensure that you are securely contacting the center of the wall studs.
Distance between the vertical bars is optional. The recommended distance
to support the designed weight capacity is 4 – 6 ft. (120 - 180 cm). For
longer material or greater weight, multiple wood racks can be used.
Figure 3. The assembled Wood Rack is 1-5/8" (41mm) thick so a suitable
length of fastener is 3" (76mm) and 1/4" (6mm) diameter.
Figure 3
2
4. Position the Spacers C behind the mounting holes, and fasten to the
wall using the fasteners (not included) described in the recommended
installations.
Note: Customizing your Portamate Wood Rack is easy and practical to
solve workshop storage needs.
Recommended Installations:
Figure 4
1. See Step 3 of assembly instructions for drywall or other paneled wall
sheeting.
2. Installing on masonry walls: Use 1/4" (6mm) masonry anchors. The
assembled wood rack is 1 5/8" (41mm) thick so a suitable length of
anchor is 3" (76mm) minimum. Use the proper drill bits and fasteners to
create a solid, strong hold of your wood rack.
Figure 5
3. Installing on a steel wall or shed: Mount the racks securely to a portion
of the structural framework at top and bottom of sides so the weight
is properly transferred to the wall. To do this, first install floor to roof
verticals such as 2 x4 and secure with fasteners every 12" (300 mm).
The assembled wood rack is 1 5/8" (41mm) thick so a suitable length of
fastener is 3" (76 mm) and 1/4" (6 mm) diameter. Figures 5 & 6.
4. Installing on wood fence: Structural reinforcement of the fence section
is required because it was not designed to carry a load. This can easily
be achieved by installing the proper horizontal supports between fence
posts and then using vertical supports as shown. The assembled wood
rack is 1 5/8" (41mm) thick so a suitable length of fastener is 3" (76 mm)
and 1/4" (6mm) diameter. Figure 7.
Figure 6
Customizing Your Wood Rack:
1. For Outdoor Use: Weather protection of your materials is achieved by
creating a custom cover. Anchor a horizontal board the length of your
material above the wood rack. Take a sheet of vinyl or thick plastic and
attach several thin wood battens to the inside with staples to keep it from
flapping around. The batten at the top is used to screw it to the anchor
board. Reinforcing strips can be glued in to avoid puncture from the
horizontal rack bars.
2. Convenient shelf: The bottom
rack is easily converted to a
shelf to store shorter pieces of
material. A lip can be added
to your shelves to prevent
roll-off of round stock material.
Figure 7
3. Handy Hooks: If you mount
your wood rack closer to
the ceiling, the bottom
rack can be customized
to provide great locations
for hooks to organize
power cords or power tools.
3
Félicitations
Vous venez d’acheter un Portamate Wood Rack.
L’étagère pour bois d’oeuvre Portamate est un système
d’entreposage compact qui vous permet d’optimiser le
rangement de votre atelier. Elle permet de stocker un
large éventail de matériaux qu’il s’agisse de poutres, de
plinthes et moulures, de tuyaux, de PVC... Cette étagère
peut être fixée le long des murs de garages, de soussols, de remises, ainsi que sur des clôtures extérieures.
•
•
L’étagère pour bois d’oeuvre comporte 5
niveaux pouvant supporter 50 kg (110 lb)
chacun. Il est facile à installer et à agencer
selon vos besoins. Voir les instructions et les
illustrations au dos de la boite.
Grâce aux améliorations apportées, le produit
actuel pourra être légèrement différent.
Fabriquée en Chine. Garantie d’un an.
D
A
Figure 1
B
PBR001
Description
Part No.
A Screws (12)
S002
B Horizontal Bars (12) SH003
C Spacers (6)
S001
D Vertical Bars (2)
SV004
PBR002
Description
Part No.
A Screws (10)
S002
B Horizontal Bars (10) SH003
C Spacers (6)
S001
D Vertical Bars (2)
SV004
Instructions de montage:
Remarque : Les barres verticales peuvent servir de gabarit pour repérer les
niveaux de perçage avant assemblage
1. Prenez la partie inférieure de la longue barre verticale. Repérez le trou
de vis percé à 13 mm (1/2 po.) en partant du bas. Insérez une vis A.
Prenez la partie inférieure de la barre horizontale orange. Repérez la petite
encoche B (voir photo encadrée). Glissez la barre orange le long de la
barre verticale en la faisant coulisser en partant du haut jusqu’à ce qu’elle
soit immobilisée contre la vis. Figure 1.
2. Insérez une vis dans le trou suivant, situé au‐dessus de celui de l’étape
1. Positionnez en la glissant une autre barre orange. Répétez l’opération
jusqu’à ce que toutes les barres soient installées en vous assurant que
toutes les encoches sont dirigées vers le bas. Procédez de la même
façon pour l’autre côté. Figure 2.
Figure 2
*PBR001 shown.
Other models
may vary slightly.
Remarque : Vous pouvez modifier la disposition de l’étagère en perçant
d’autres trous à l’aide d’une perceuse à mèche de 2.5 mm (3/32 po.).
3. Installation sur du placo-plâtre ou des cloisons type panneaux : Il est
important de s’assurer que l’étagère pour bois d’oeuvre Portamate puisse
être fixée sur une ossature solide. Assurez-vous que vous percez bien au
centre des montants du mur. Vous pouvez faire varier la distance entre
les barres verticales. La distance conseillée est de 120 cm à 180 cm (4
pi. – 6 pi.) pour supporter le poids maximal. Pour des matériaux soit plus
lourds soit plus longs, vous pouvez utiliser plusieurs étagères. Figure 3.
Figure 3
4
4. Positionnez les butées C derrière les trous de fixation, et attachez le
support au mur à l’aide d’outils appropriés (non fournis) décrits dans les «
installations recommandées ».
Figure 4
Remarque : Personnaliser votre étagère pour bois d’oeuvre est facile et
pratique car cela permet de répondre à tous vos besoins de rangement
de votre atelier.
Installations recommandées:
1. Installation sur placo-plâtre ou cloisons type panneaux : voir Étape 3.
2. Installation sur des murs de maçonnerie : Utilisez des attaches de
maçonnerie de 6 mm (1/4 po.). L’étagère pour bois d’oeuvre fait 41 mm
(1 5/8 po.) d’épaisseur donc la longueur des attaches doit être de 71 mm
(2 3/4 po.) minimum. Utilisez les mèches de perceuse et les attaches qui
conviennent pour créer une ossature solide et robuste pour votre étagère.
Figure 5
3. Installation sur des murs en acier ou dans une remise : Montez l’étagère
solidement sur l’ossature en l’attachant par le haut et le bas ou par
les cotés de façon à répartir correctement le poids vers le mur. Pour
ce faire, installez d’abord des poutres verticales et sécurisez-les avec
des attaches tous les 300 mm (12 po.). L’étagère fait 41 mm (1 5/8 po.)
d’épaisseur donc la longueur des attaches doit être de 71 mm (2 3/4 po.)
et 6 mm (1/4 po.) de diamètre.
Figure 6
5
Page left intentionally blank.
6
Page left intentionally blank.
7
One Year Limited Warranty
Warrantor warrants to the original purchaser that the PortaMate PBR001/PBR002 will be free from defects in materials and workmanship under normal
use and service for a period of one (1) year from the date of original purchase.
The obligation of this Warranty is limited to repair or replacement, at our option, of components which prove defective under normal use.
Any product or component claimed to be defective should be sent during Warranty period, postage prepaid to Affinity Tool Works, 1161 Rankin, Troy,
Michigan 48083, Attn: Warranty Department, together with a copy of your original dated sales receipt. Call for authorization number before sending.
This warranty is in lieu of all other express warranties, obligations or liabilities. ANY IMPLIED WARRANTIES, OBLIGATIONS OR LIABILITIES, SHALL BE
LIMITED IN DURATION TO THE ONE YEAR PERIOD OF THIS LIMITED WARRANTY. NO AGENT, REPRESENTATIVE, DEALER, OR EMPLOYEE OF
THE COMPANY HAS THE AUTHORITY TO INCREASE OR ALTER THE OBLIGATIONS OF THIS WARRANTY.
This Warranty shall not apply to any product or component which in the opinion of the Warrantor has been modified or altered in any way, damaged as a
result of an accident, misuse or abuse, or loss of parts. In no case shall the Warrantor be liable for any special or consequential damages, or any other
costs or warranty, expressed or implied, whatsoever.
This Warranty gives you specific legal rights, and you may also have other rights which vary from state to state.
Garantie limitée de un an
Le garant garantit à l’acheteur d’origine que le PortaMate PBR001/PBR002 sera exempt de défaut de matériaux et de fabrication dans des conditions
d’usage et d’entretien normal pendant une période de un (1) an à partir de la date de l’achat d’origine.
Les obligations de cette garantie sont limitées à la réparation ou au remplacement, à notre discrétion, des composants dont il a été déterminé qu’ils sont
défectueux suite à une utilisation normale.
Tout produit ou composant considéré défectueux doit être envoyé pendant la période de garantie, dans un colis affranchi à Affinity Tool Works,
1161 Rankin, Troy, Michigan 48083, Attn: Warranty Department, avec une copie du reçu orignal de vente daté. Appeler pour obtenir un numéro
d’autorisation avant d’envoyer.
Cette garantie remplace toute autre garantie expresse, obligation ou responsabilité. TOUTE GARANTIE IMPLICITE, OBLIGATION OU RESPONSABILITÉ
EST LIMITÉE À LA PÉRIODE DE UN AN DE CETTE GARANTIE LIMITÉE. AUCUN AGENT, REPRÉSENTANT, DÉTAILLANT OU EMPLOYÉ DE
L’ENTREPRISE N’EST AUTORISÉ À AUGMENTER OU MODIFIER LES OBLIGATIONS DE CETTE GARANTIE.
Cette garantie ne peut s’appliquer à aucun autre produit ou composant qui, selon l’opinion du garant, a été modifié ou altéré en quelque manière,
endommagé suite à un accident, mal utilisé ou abusé, ou encore perdu. En aucun cas le garant ne peut être responsable de dommages spéciaux ou
consécutifs ou de tout autre coût ou garantie, explicite ou implicite.
Cette garantie donne à l’acheteur des droits juridiques spécifiques ainsi que certains autres droits qui peuvent varier d’une juridiction à l’autre.
Customer Service Department
www.portamate.com
proudly distributed in the USA by
Troy, MI 48083 USA
an division of
part of the
TOOL WORKS
TOOL WORKS
TOOL WORKS group of companies
©2015 Affinity Tool Works, LLC
Part # PBR001/PBR002