Transcript
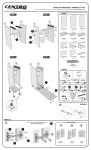
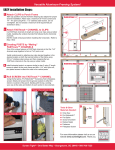
L8-5E16-P0
PARTS INCLUDED | Componentes Incluídos
5E33
5E33
5E33
5E33
Gripper
Pinzas
Gripper Key
Llave de pinzas
1
1
1
1
10707-50
10707-50
Top Ring
Anillo superior
1
1
10707-49
10707-49
10707-48
10707-48
Bottom Ring
Anillo inferior
Side Panels
Paneles laterales
1
1
3
3
REQUIRED TOOLS for Ball Rack Assembly
5E34
5E34
Bands
Bandas
2
2
HERRAMIENTAS REQUERIDAS para ensamble
del estante vertical para pelotas
5E35
5E35
5E35
5E35
Screws
Tornillos
Screws: If Direct Wall Mounted
Tornillos: Si se montan directamente en la pared
12
12
3
3
5E35
5E35
Anchors and Anchor Key
Anclajes y Llave de anclaje
VERTICAL BALL RACK
Estante Vertical para Pelotas
3/8"
1|1
1|1
ASSEMBLING BALL RACK | Ensamble del estante para pelotas
A. Assemble gripper onto top ring. Make sure to face
back of gripper towards the outside of the ring.
B. Align cut outs in wire with gripper slot.
B1. Insert key into gripper.
B2. Use a hammer and tap slug in evenly until it
appears flush with back of gripper.
C. Assemble 3 side panels using the provided screws
to the bottom ring.
Back of Gripper
A
Reverso de
pinza
(Note: make sure the side panel’s center support with hole is closest
to the bottom ring.)
C1.Assemble top ring to all three side panels.
(Note: make sure to keep band holders towards the front of the ball
rack on both top and bottom rings.)
D. Assemble bands into the band holders on top and
bottom rings as shown.
B
B1
B2
A.
Ensamble la pinza en el anillo superior. Asegúrese que el
reverso de la pinza mira hacia afuera del anillo.
B. Alinee los recortes en el alambre con la ranura de la pinza.
B1. Inserte la llave en la pinza.
B2. Golpee uniformemente el saliente con un martillo hasta
que esté a ras con el reverso de la pinza.
C. Ensamble los 3 paneles laterales al anillo inferior usando
los tornillos provistos. (Nota: asegúrese que el soporte central
del panel lateral con el agujero sea el que esté más cerca al anillo
inferior).
C1. Ensamble el anillo superior a los 3 paneles laterales
C1
C
(Nota: asegúrese de mantener los soportes de las bandas hacia el
frente del estante para pelotas tanto en el anillo superior como en
el inferior).
D
D.
Ensamble las bandas en los soportes de bandas en los
anillos superior e inferior como se muestra.
E.
F.
Attach Ball Rack to FastTrack® Rail.
Level the Ball Rack and mark the hole in center support
of side panel.
If the rack is not on a stud, drill a 3/8" hole and insert a
wall anchor.
Secure screw in center support of side panel.
RAIL MOUNT | Montaje en el riel
G.
H.
E.
F.
E
F
G
H
G.
H.
Fije el estante para pelotas al riel FastTrack®.
Nivele el estante para pelotas y marque el agujero en el
soporte central del panel lateral.
Si el estante no está en un montante, perfore un agujero
de 3/8”e inserte un anclaje para pared.
Asegure el tornillo en el soporte central del panel lateral.
DIRECT WALL MOUNT (Option) | Montaje directamente en la pared (Opción)
Wall Stud
Parante de
pared
REQUIRED TOOLS
Herramientas Requeridas
1/8"
STUD FINDER
Ball Rack can be attached to FastTrack® rail or direct mounted
to wall studs.
El estante para pelotas puede fijarse al riel FastTrack® o
montarse directamente a los montantes de pared.
1.
2.
3.
4.
5.
Locate wall stud
Level item
Mark mounting holes
Pre-drill 1/8" holes
Secure item to stud
Rubbermaid Home Products, Fairlawn, OH, U.S.A. 44333-3306 • 1-888-895-2110 • www.rubbermaid.com • Patent pending. Patente solicitada.
1.
2.
3.
4.
5.
Localice los montantes de la pared
Nivele el objeto
Señale los agujeros de montaje
Empiece a taladrar agujeros de 1/8 pulg.
Sujete el objeto al montante