Transcript
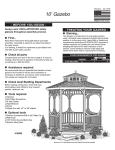
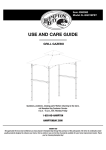
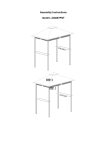
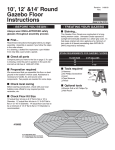
1-24-03
Gazebo Flower Box
10’, 12’ and 14’ Models
#16688
■ Tools Required
-BEFORE YOU BEGIN-
❒ Phillips Screwdriver
■ First...
Read these instructions thoroughly before you begin
assembly.
■ Optional Tools
❒ Electric Drill with #2 phillips Tip
❒ Drill Bit for Pre-drilling and Drainage Holes
■ Check all parts
Parts List
Compare the parts you have to the list, If a part is missing,
circle the part in question and call our toll-free # at (800)
437-0784.
PARTS LIST
Qty.
1
1
Description
Assembled Flower Box
Plastic Insert
❒ Hardware
■ Staining...
- (4) #8 2-1/2” Screws
This Flower Box is constructed of a long-lasting
western cedar. Untreated cedar exposed to sunlight will
eventually weather to a silver-grey color. Applying Stain
or Sealers per manufacturers instructions WITHIN 30
DAYS will improve the water resistance of your Flower
Box. Some sanding to remove rough edges and natural
wood stains may be required prior to staining.
Always wear OSHA-APPROVED safety
glasses throughout the assembly process
1-A: Install the Flower Box to the outside of your Gazebo or desired location below the sill as shown. Install (4) 2-1/2”
screws from the inside equally spaced. Insert Plastic Tray.
Note: You may prefer to drill small
drainage holes in tray bottom.
Fig. 2
Plastic Tray
Fig.1
1-A
Inside
2-1/2"
Screw
1
Flower
Box