1
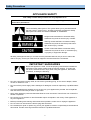
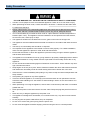
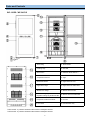
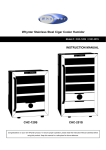
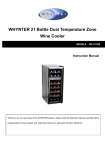
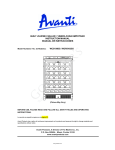
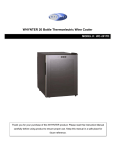
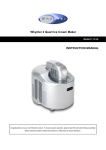
Whynter Dual Zone Touch Control Stainless Steel Freestanding Wine Cooler Model # : WC-181DS / WC-241DS INSTRUCTION MANUAL WC-181DS WC-241DS Congratulations on your new Whynter product. To ensure proper operation, please read this Instruction Manual carefully before using this product. Keep this manual in a safe place for future reference. Table of Contents PAGE Safety Precaution 3-4 Parts and Controls 5 Introduction / Technical Data 6 Installation 7-8 Operation and Controls 9 - 10 Care and Maintenance 11 Troubleshooting 12 Warranty Information 13 2 Safety Precautions APPLIANCE SAFETY Your safety and the safety of others are very important to us. To reduce the risk of fire, electrical shock, or injury when using your appliance, follow these basic precautions This is the Safety Alert Symbol. This symbol alerts you to potential hazards that may result in serious injury. All safety messages will follow the Safety Alert Symbol and either the words” DANGER” or “WARNING”. Danger means that failure to heed this safety statement may result in severe injury or death. Warning means that failure to heed this safety statement may result in extensive product damage, serious injury, or death. Caution means that failure to heed this safety statement may result in minor or moderate injury, or property or equipment damage. All safety messages will alert you to know what the potential hazard is, tell you how to reduce the chance of injury, and let you know what can happen if the instructions are not followed. IMPORTANT SAFEGUIDES Before the appliance is used, it must be properly positioned and installed as described in this manual, please read the manual carefully. To reduce the risk of fire, electrical shock or injury when using the appliance, follow basic precaution, including the following: Plug into a grounded 3-prong outlet, do not remove grounding prong, do not use an adapter, and do not use an extension cord. Do not use if the power supply cord is damaged. If damaged, it must be replaced by a qualified electrician. It is recommended that a separate circuit, serving only your appliance be provided. Use receptacles that cannot be turned off by a switch or pull chain. Never clean appliance parts with flammable fluids or harsh chemicals. These fumes can create a fire hazard or explosion. Do not store or use gasoline or other flammable vapors and liquids in the vicinity of the appliance or any other appliance. Before proceeding with cleaning and maintenance operations, make sure to unplug the appliance. Do not connect or disconnect the electric plug with wet hands. Do not attempt to repair or replace any part of your appliance unless it is specifically recommended in this manual. All other servicing should be referred to a qualified technician. 3 Safety Precautions FOLLOW WARNING CALL OUTS BELOW ONLY WHEN APPLICABLE TO YOUR MODEL Use two or more people to move and install the appliance. Failure to do so can result in injury. When positioning the wine cooler, ensure that there is at least a 4” clearance at the sides and a 6” clearance at the back. Please note that this is a freestanding appliance and should not be placed into a built-in space. Even with the recommended clearance, there may not be adequate airflow. It is recommended that you install the wine cooler in a place where the ambient temperature is between (68°F- 78°F). This appliance must be installed in an area protected from the element, such as wind, rain, water spray or drips. The appliance should not be located next to ovens, grills or other sources of high heat. The appliance must be installed with all electrical connections in accordance with state and local codes. The fuse (or circuit breaker) size should be 15 amperes. It is important for the appliance to be leveled in order to work properly. For a stable installation, make sure the appliance is placed on a flat, level and solid surface. Ensure that the surface on which the appliance is placed is strong enough to hold the appliance and the items stored inside. This appliance is not intended for use by young children or physically-challenged persons without supervision/assistance. Young children must be supervised to ensure safety around this or any appliance. Do not use solvent-based cleaning agents of abrasives on the interior. These cleaners may damage or discolor the interior. Keep fingers out of the “pinch point” areas. Clearance between the doors and between the doors and cabinet are necessarily small. Be careful closing doors when children are in the area. Close the wine cooler immediately after putting in any items to keep the internal temperature relatively constant. Avoid placing any objects on top of the appliance. This is an electrical appliance, to avoid injury from electrical shock do not operate the unit with wet hands, while standing on a wet surface or while standing in water. Do not use outdoors or in wet conditions. When positioning or moving the appliance, ensure that it is not turned up side down or unleveled greater than 45°. Never pull the power cord to disconnect it from the outlet. Grasp the plug and pull it from the outlet. Never lift, carry or drag the appliance by the power cord. This appliance is designed for household, non-commercial use only. Any other use will void the warranty. Do not plug into the power outlet before set up is completed. Do not cut or remove the ground prong from the power cord. Do not move this appliance without emptying it and securing the door in a closed position. 4 Parts and Controls WC-181DS / WC-241DS 1. Power Plug 11. Zone Divider 2. Leveling Legs 12. Fan Grill 3. Door Frame 13. Stainless Steel Shelves ** 4. Temperature Control 14. Light 5. Recessed Handle 15. Upper Zone Air Vent 6. Upper Door Hinge 16. Upper Zone Air Intake Filter 7. Bottom Door Hinge 17. Bottom Zone Air Vent 8. Small Leveling Leg for WC-181DS Regular Leveling Leg for WC-241DS 18. Bottom Zone Air Intake Filter 9. Tempered Double-Pane Glass 19. Air Vent 10. Door Seal 20. Condensation Tray ** WC-181DS - 4 premium stainless steel trimmed scalloped shelves ** WC-241DS - 6 premium stainless steel trimmed scalloped shelves 5 Introduction to Wine Coolers Whynter Thermoelectric Wine Coolers offer premium quality and innovative design. Whether for the office, the yacht or home, Whynter wine coolers are a center piece of any living space. Our wine coolers are designed for storing and cooling wines with vibration-free thermoelectric cooling. With its sleek countertop designed and stainless steel door allows for stylish and compact wine preservation in any space. The thermoelectric technology operates with minimal noise and vibration ensuring the delicate wine sediment is not agitated. The soft-touch digital control panel provides intuitive and precise temperature control. Capacity: WC-181DS : 18 bottles WC-241DS : 24 bottles Freestanding setup Vibration-free thermoelectric cooling Stainless steel glass door with sleek black cabinet Removable shelves Shelf Count WC-181DS - 4 premium stainless steel trimmed scalloped shelves, 1 zone divider WC-241DS - 6 premium stainless steel trimmed scalloped shelves, 1 zone divider Adjustable thermostat with temperature range from 46ºF - 66ºF Enhanced LCD temperature display Soft interior LED lighting with on/off switch Solid state components for long life Internal fan-forced circulation for even temperature distribution throughout the cabinet ETL Certified TECHNICAL DATA MODEL : WC-181DS WC-241DS Capacity 18 bottles 24 bottles Voltage 115V / 60 Hz 115V / 60 Hz Current 1.4A 1.4A Input Power 100W 100W Temperature Control Range Upper Zone 54ºF - 66ºF Bottom Zone 46ºF - 66ºF Upper Zone 54ºF - 66ºF Bottom Zone 46ºF - 66ºF Shelves 4 chrome shelves 1 zone divider 6 chrome shelves 1 zone divider Unit Dimensions 14” W x 20.25” D x 25.75” H 14” W x 20.25” D x 33.5” H Packaging Dimensions 16.25” W x 22” D x 27.75” H 16.25” W x 22” D x 35.75” H Net Weight 33.5 lbs 46.5 lbs Gross Weight 37.25 lbs 53 lbs 6 Installation IMPORTANT SAFETY INSTRUCTIONS WARNING To reduce the risk of fire, electrical shock, or injury when using your appliance, follow these basic precautions: Read all instructions before using the appliance. DANGER or WARNING: An empty wine cooler can be a hazardous for children or small pets. If disposing of the wine cooler, remove gasket seals, latches, lids or the entire door from your unused appliance, or take other action to ensure the appliance is harmless. Never allow children to operate, play with, or crawl inside the appliance. Never clean appliance parts with flammable fluids or harsh chemicals. The fumes can create a fire hazard or explosion. Do not store or use gasoline or any other flammable vapors and liquids in the vicinity of this or any other appliance. The fumes can create a fire hazard or explosion. INSTALLATION INSTRUCTIONS BEFORE USING YOUR APPLIANCE Remove the exterior and interior packing. Clean the interior surface with lukewarm water using a soft cloth. INSTALLATION OF YOUR APPLIANCE Please note that this is a freestanding appliance and should not be placed into a built-in space WARNING: Do not store or install the appliance outdoors. CAUTION: This appliance is designed for storing and cooling beverage or wines. Do not store perishable food, medicine or other medical products. Place your appliance on a hard and level floor that is strong enough to support it when it is fully loaded. To level your appliance, adjust the leveling legs at the bottom of the appliance if needed. When positioning this freestanding wine cooler, ensure that there is at least a 4” clearance at the sides and a 6” clearance at the back. Please note that this is a freestanding appliance and should not be placed into a built-in space. Even with the recommended clearance, there may not be adequate airflow We do not recommend installing the appliance on carpet. Do not install the appliance near an oven or other heating source. Direct sunlight may affect the acrylic coating and heat sources may increase electrical consumption. For best performance, do not install the appliance behind a cabinet door or block the base grille. Extreme cold ambient temperatures may also cause the appliance not to perform properly. Avoid locating the appliance in area that may be exposed to excessive moisture. Plug in the appliance into an exclusive, grounded wall power outlet. Do not under any circumstances cut or remove the third (ground) prong from the power cord. Any questions concerning power and/or grounding should be directed toward a qualified electrician or an authorized service center. 7 Installation ELECTRICAL CONNECTION WARNING: Improper use of the grounded plug can result in the risk of electrical shock. If the power cord is damaged, have it replaced by a qualified electrician or contact Whynter Service Department. This appliance requires a standard 115/120 Volt AC ~/60Hz electrical ground outlet with three-prong. Have the wall outlet and circuit checked by a qualified electrician to make sure the outlet is properly grounded. The cord should be secured behind the appliance and not left exposed or dangling to prevent accidental injury. The appliance should always be plugged into its own individual electrical outlet which has a voltage rating that matches the rating label on the appliance. This provides the best performance and also prevent overloading house wiring circuits that could cause a fire hazard from overheated. Never unplug the appliance by pulling the power cord. Always grip the plug firmly and pull straight out from the receptacle. Repair or replace immediately all power cords that have become frayed or otherwise damaged. Do not use a cord that shows cracks or abrasion damage along its length or at either end. When moving the appliance, be careful not to damage the power cord. EXTENSION CORD Because of potential safety hazards, it is strongly recommended that you do not use an extension cord with this appliance. However, if you must use an extension cord, it is absolutely necessary that it be a UL/CUL-Listed, 3-wire grounding type appliance extension cord having a grounding type plug and outlet and that the electrical rating of the cord be 115 volts and at least 10 amperes. 8 Operation and Controls It is recommended that you install the wine cooler in a place where the ambient temperature is between (68°F - 78°F). If the ambient temperature is above or below recommended temperatures, the performance of the unit may be affected. For example, placing in extreme cold or hot conditions may cause interior temperature to fluctuate thus the set temperature may not be achievable. SETTING THE TEMPERATURE The unit has two separate temperature zones. The temperature range of upper zone can be set between 54ºF and 66ºF while the bottom zone can be set between 46ºF and 66ºF. To set the desired temperature, press the “▼” button to lower the temperature or “▲” button to raise the temperature on the control panel. The temperature display will flash for 5 seconds indicating that the desired temperature is set and will revert back to its actual internal temperature. NOTE: The temperature inside the wine cooler is dependent on the ambient temperature (room temperature). INTERIOR LIGHT You can turn on and off the interior light by pressing the “Light” button on the control panel. Note: If zone divider is installed, only the upper zone will be illuminated when interior light is turned on. LEVELING THE APPLIANCE It is important for your appliance to be leveled in order to work properly. It can be raised or lowered by rotating each of the feet on the bottom of the machine. If you find that the surface is not level, rotate the feet until the appliance becomes level .You may need to make several adjustments to level it. We recommend using a carpenter’s level to check the machine. Note: The WC-181DS has 3 large leveling legs and 1 small leveling leg under the door hinge while the WC-241DS has 4 large levelling legs. 1. Place a carpenter’s level on top of the product to see if the appliance is level from front to back and side to side. 2. Adjust the height of the feet as follows: Turn the leveling feet to the right to lower that side of the refrigerator. Turn the leveling feet to the left to raise that side of the refrigerator. BOTTLE CAPACITY The listed bottle capacity for your wine cooler is an estimated maximum capacity base on a standard 750ml wine bottle. For other size bottles, the capacity will vary. WINE SHELVES The WC-181DS wine cooler is equipped with 4 scalloped stainless shelves and 1 zone divider, while the WC -241DS wine cooler is equipped with 6 scalloped stainless shelves and 1 zone divider. If you are having trouble fitting the stated listed number of bottles of wine in the wine cooler, try flipping the wine racks over. To prevent damage to the door gasket, make sure the door is all the way opened when pulling the shelves out. For easy access of the wine bottles, you must pull the shelves approximately ⅓ out of the railing. When removing the shelves out of the railing, make sure to remove all items first. To remove the shelves, pull the shelf forward through the rail carefully. NOTE: It is recommended that the zone divider is installed in the middle of the cabinet. This setup creates an even temperature distribution for each zone which results in the most efficient operation. If the zone divider is not installed in the middle of the cabinet, the wine cooler may not be able to achieve the set temperature of both zones. 9 Operation and Controls TRANSPORT OF THE WINE COOLER The ideal packaging for the wine cooler is its original packaging. Please keep the original packaging handy and repack the wine cooler if you need to transport the unit. OPERATING THE WINE COOLER It is recommended you install the appliance in a place where the ambient temperature is between 68º-78ºF. If the ambient temperature is above or below recommended temperatures, the performance may be affected. For example, placing your Wine Cooler in extreme cold or hot conditions may cause interior temperatures to fluctuate. RECOMMENDED TEMPERATURE SETTINGS Conservation 49 - 57ºF Red Wines 58 - 72ºF Dry/White Wines 48 - 57ºF Rose Wines 49 - 51ºF DEFROSTING Under most ambient conditions, the wine cooler does not need to be defrosted. In cold ambient temperatures and/or high humidity, some frost may build up. To defrost, remove all items, unplug the wine cooler and leave the door open. Never use a knife or other metal instrument to scrape ice/frost. After defrosting, plug in the wine cooler and set the desired temperature. PREPARING FOR STORAGE If the wine cooler will not be used for a long time, or is to be moved to another place, it will be necessary to defrost the unit and dry the interior. 1. Disconnect the wine cooler from the power supply by removing the power plug from the wall socket. 2. Leave the door open to allow for air circulation and to prevent mold, mildew and unpleasant smells. CAUTION: Store the unit out of the reach of children. If you have children, you may want to take additional precautions such as removing the door to prevent a child from being trapped inside the wine cooler Note: If the wine cooler is unplugged, encounter power lost, or turned off; you must wait 3 to 5 minutes before restarting the wine cooler. When the wine cooler is used for the first time or restarted after having been shut off for a long time, there could be a few degrees variance between the temperature you select and the one indicated on the display. This is normal and it is due to the length of the inactivation time. 10 Care and Maintenance CAUTION: Failure to unplug the appliance could result in electric shock or personal injury CLEANING YOUR APPLIANCE Turn off the power, unplug the appliance, and remove all contents from the appliance and store them in a suitable place. Clean the inside, the door seal and the inside of the glass with a clean, damp cloth. Never use detergents or other substances that emit odors. Always keep the door closed when cleaning the outside of the appliance. Make sure no detergent odors penetrate into the appliance. Clean the side panels and door surfaces with a clean and soft cloth. If necessary, use a moist cloth. Al- ternatively, use a microfiber cloth. The humidity tray should be hand-washed with water and detergent. After cleaning, always make sure the tray is thoroughly rinsed with clean water before replacing. VACATION TIME Short vacations: Leave the appliance operating during vacations of less than two days. Long vacations: If the appliance will not be used for an extended period, remove all items and turn off the appliance. Clean and dry the interior thoroughly. MOVING YOUR APPLIANCE Remove all items inside the appliance. Securely tape down (we recommend using painter’s tape) all loose items (shelves) inside your appliance. Turn the adjustable legs up to the base to avoid damage. Tape (we recommend using painter’s tape) the door shut. Be sure the appliance stays secure in the upright position during transportation and protect the exterior of appliance with a blanket, or similar item. PREPARING FOR STORAGE If the appliance will not be used for a long time, or is to be moved to another place, it will be necessary to defrost the unit and dry the interior. 1. Disconnect the appliance from the power supply by removing the power plug from the wall socket. 2. Leave the door open to allow for air circulation and to prevent mold, mildew and unpleasant smells. CAUTION: Store the unit out of the reach of children. If you have children, you may want to take additional precautions such as removing the door to prevent a child from being trapped inside the appliance. ENERGY SAVING TIPS The appliance should be located in the coolest area of the room, away from heat producing appliances, and out of any direct sunlight. Ensure that the appliance is adequately ventilated. Never obstruct the air vents. Close the door tightly and do not open the appliance too frequently or for a long period of time. Store the content in an organized way. Do not over-fill the appliance to allow air to circulate. 11 Troubleshooting Problem The appliance does not operate Possible Causes There is a power failure. The appliance is not plugged in A house fuse has blown or the circuit breaker is tripped The appliance is not reaching the desired temperature Solutions Ensure the appliance is plugged in and the power outlet has power Replace the broken fuse or reset the breaker The appliance is placed too close to a Adjust the temperature heat source The door is opened too often Keep the appliance away from sunshine or The door is not closed completely Close the door tightly and do not open the The door gasket does not seal proper- door too frequently or for a long period of time. Ensure the door gasket is not loose other heat sources ly Frost forming inside the appliance The environment is too humid The ambient temperature is too low The door is opened too frequently for a long period of time The appliance turns itself on and off frequently Although this unit uses an auto-defrost system, under certain conditions, manual defrosting may required. If frost builds up, try running the cooler on a warmer temperature setting Close the door tightly and do not open the door too frequently or for a long period of time Unplug the unit to allow the frost to melt The ambient (room) temperature is too Decrease or increase the ambient (room) low or high A large amount of contents has been added to the appliance temperature To minimize internal temperature fluctuation, do not add large amount of contents at once Close the door tightly and do not open the door too frequently or for a long period of time. Ensure the door gasket is not loose The door is opened too often. The door is not closed completely The door gasket does not seal properly The appliance makes too much noise The door does not close properly If the noise is from the fan, it may be normal operating noise Contraction and expansion of the inside walls may cause popping and crackling noises The appliance is not level The fan makes normal fan noises Some popping or cracking noises are normal. They are caused by expansion and contraction of the inside walls due to temperature changes Make sure the unit is on a hard and level surface. Do not place the appliance on carpet The appliance is not level Make sure the appliance is on a hard and The door was reversed and not level surface. Avoid placing the appliance on a carpeted or soft surface Reinstall door properly installed Condensation builds up on the glass door. The shelves are out of position . Correctly install the shelves Ambient temperature or humidity is Lower the room humidity by a dehumidifier high or air conditioner Frost forming inside the appliance. Drawer(s) blocking internal fan Move drawer(s) to the bottom portion of the appliance Items are blocking the internal fan 12 Move items so they do not block the fan ONE YEAR LIMITED WARRANTY This Whynter Thermoelectric Wine Cooler is warranted, to the original owner within the 48 continental states, for one year from the date of purchase against defects in material and workmanship under normal use and service. Should your Whynter Thermoelectric Wine Cooler prove defective within one year from the date of purchase, return the defective part or unit, freight prepaid (within two months of purchase; after two months to one year, customer will be responsible for freight cost to Whynter’s service department), along with an explanation of the claim to Whynter LLC. Please package the Whynter Thermoelectric Wine Cooler carefully in its original packaging material to avoid damage in transit. Please retain the original box and packaging material. Under this warranty, Whynter will repair or replace any parts found defective. This warranty is not transferable. After the expiration of the warranty, the cost of labor and parts will be the responsibility of the original owner of the unit. THIS WARRANTY DOES NOT COVER: Acts of God, such as fire, flood, hurricanes, earthquakes and torna- does. Damage, accidental or otherwise, to the Whynter Thermoelectric Wine Cooler while in the possession of a consumer not caused by a defect in material or workmanship; Damage caused by consumer misuse, tampering, or failure to follow the care and special handling provisions in the instructions. Damage to the finish of the case, or other appearance parts caused by wear. Damage caused by repairs or alterations to the product by anyone other than authorized by the manufacturer. Freight and Insurance cost for the warranty service. DISCLAIMER OF IMPLIED WARRANTIES; LIMITATION OF REMEDIES CUSTOMER'S SOLE AND EXCLUSIVE REMEDY UNDER THIS LIMITED WARRANTY SHALL BE PRODUCT REPAIR OR REPLACEMENT AS PROVIDED HEREIN. CLAIMS BASED ON IMPLIED WARRANTIES, INCLUDING WARRANTIES OF MERCHANTABILITY OR FITNESS FOR A PARTICULAR PURPOSE, ARE LIMITED TO ONE YEAR OR THE SHORTEST PERIOD ALLOWED BY LAW, BUT NOT LESS THAN ONE YEAR. WHYNTER SHALL NOT BE LIABLE FOR CONSEQUENTIAL OR INCIDENTAL DAMAGES SUCH AS PROPERTY DAMAGE AND INCIDENTAL EXPENSES RESULTING FROM ANY BREACH OF THIS WRITTEN LIMITED WARRANTY OR ANY IMPLIED WARRANTY. SOME STATES AND PROVINCES DO NOT ALLOW THE EXCLUSION OR LIMITATION OF INCIDENTAL OR CONSE- QUENTIAL DAMAGES, OR LIMITATIONS ON THE DURATION OF IMPLIED WARRANTIES, SO THESE LIMITATIONS OR EXCLUSIONS MAY NOT APPLY TO YOU. THIS WRITTEN WARRANTY GIVES YOU SPECIFIC LEGAL RIGHTS. YOU MAY ALSO HAVE OTHER RIGHTS THAT VARY FROM STATE TO STATE. To obtain service or information, contact Whynter LLC via email at [email protected] or call 866-WHYNTER. Product contents and specifications may change without notice. Copyright © 2014 Whynter LLC WWW.WHYNTER.COM 13