1
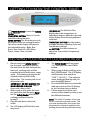
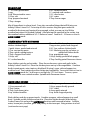
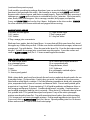
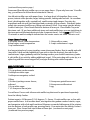
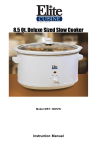
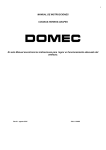
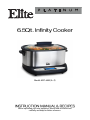
Model: MST-6805(A~Z) Before operating your new appliance, please read all instructions carefully and keep for future reference. IMPORTANT SAFEGUARDS 2 SHORT CORD PURPOSE AND POLARIZED PLUG WARNING 4 PARTS IDENTIFICATION 5 FEATURES & BENEFITS 6 GETTING TO KNOW THE CONTROL PANEL 7 PREPARING YOUR INFINITY COOKER FOR USE 7 COOKING FUNCTION CHART 8 HOW TO USE YOUR INFINITY COOKER 9 HINTS & TIPS 16 CARE & MAINTENANCE 17 TROUBLESHOOTING 17 RECIPES 18 WARRANTY & CUSTOMER SERVICE 34 1 When using electrical appliances, basic safety precautions should always be followed, including the following: 1. Read all instructions before using your Elite Platinum Infinity Cooker. WARNING TO REDUCE THE RISK OF FIRE, ELECTRIC SHOCK OR INJURY: 2. To protect against electrical shock do not immerse cord, plugs, or the base unit in water or other liquids. If the unit falls into liquid, unplug the power cord from the electrical outlet immediately. DO NOT reach into the liquid. 3. Close supervision is necessary when appliance is used near children. 4. NEVER ALLOW A CHILD TO USE THIS PRODUCT. 5. Remove the power cord from the electrical outlet when not in use, before assembling or disassembling parts and before cleaning. To unplug, grasp the plug and pull from the electrical outlet. Never pull from the power cord. Allow the appliance to cool before adding or removing parts. 6. The use of attachments or tools not recommended by supplier may cause fire, electric shock or injury. 7. DO NOT let the power cord hang over the edge of the table or work-top, and keep it away from any hot surfaces. 8. Always use the appliance on a dry, level surface. Extreme caution must be used when moving an appliance containing hot oil or other hot liquids. Always use oven mitts or pot holders when moving the cooking system. Allow hot oil to cool prior to removal or cleaning the appliance. 9. Allow lid and cooker to cool before allowing it to touch water. Never touch the outer enclosure of the cooker during its operation or before it cools. Use the handles or knobs. Do not touch hot surfaces. Always use oven mitts or pot holders when removing the pot. 10. Do not use cooker or glass lid if cracked or chipped. 11. Never leave the appliance connected to the socket outlet when not in use. 12. Do not switch on the appliance when it is upside down or laid on its side. 13. The glass lid is fragile. Handle with care. 14. This appliance is not intended for use by persons (including children) with reduced physical, sensory or mental capabilities, or lack of experience and knowledge, unless they have been given supervision or instruction concerning use of the appliance by a person responsible for their safety. 15. If the supply cord is damaged, it must be replaced by a special cord or assembly available from the manufacture or its service agent. 16. It is recommended to regularly inspect the appliance to avoid a hazard. Do not operate any appliance with a damaged cord or plug or after the appliance malfunctions or has been damaged in any manner. Return appliance to the nearest authorized service facility for examination, repair, or adjustment. 17. Do not place on or near a hot gas or electric burner, or in a heated oven. 18. Always attach plug to appliance first, then plug cord into the wall outlet. To disconnect, power “off” by pressing POWER button, then remove plug from wall outlet. 19. Fully unwind the power cord before use. 20. Any maintenance other than cleaning should be performed at an authorized Service Center. 21. Do not use this appliance for anything other than its intended use. Do not use in moving vehicles or boats. Do not use outdoors. Misuse may cause injury. 22. Remove any packaging material and promotional stickers before using the Cooker for the first time. 2 23. Do not place the Cooker on the edge of a bench or table during operation. Ensure the surface is level, clean and free of water and other substances. 24. Do not use on a sink drain board. 25. Position the Cooker well away from walls, curtains and other heat or steam sensitive materials. Minimum of 20cm distance. 26. If using plastic utensils, do not leave inside the appliance when hot or on sauté setting. 27. Always ensure the Cooker is properly assembled before use. 28. Never plug in or switch on the Cooker without having the removable cooking bowl placed inside the stainless steel housing. 29. CAUTION: TO REDUCE THE RISK OF ELECTRIC SHOCK, COOK ONLY IN THE POT PROVIDED OR IN CONTAINERS RECOMMENDED BY MAXI-MATIC PLACED ON THE COOKING RACK IN THE PROVIDED POT. DO NOT USE THE APPLIANCE WITHOUT THE REMOVABLE COOKING POT INSIDE. 30. Do not place food or liquid directly into the stainless steel housing. Only the removable cooking bowl is designed to contain food or liquid. 31. Never operate the Cooker without food and liquid in the removable cooking bowl. 32. Ensure that the food or liquid to be cooked fills half or more of the removable cooking bowl before switching on the appliance. 33. The glass lid has been specially treated to make it stronger, more durable and safer than ordinary glass, however it is not unbreakable. If struck extremely hard it may break or weaken, and could at a later time, shatter into many small pieces without any apparent cause. 34. Do not move the appliance during cooking. 35. Always have the glass lid placed correctly into position on the removable cooking bowl throughout operation of the appliance unless stated in the recipe to have it removed. 36. Do not place the removable cooking bowl when hot on any hot surface that may be affected by heat. 37. Avoid sudden temperature changes. Do not place frozen or very cold foods into the removable cooking bowl when it is hot. Do not place removable cooking bowl when hot into cold water. 38. Do not use the removable cooking pot in a conventional oven. Do not place the removable cooking bowl onto a heat gas or electric burner. 39. Do not use a damaged or cracked removable cooking pot. Replace before using. 40. Use extreme caution when removing the lid after cooking. Serious burns can result from the steam inside. Always lift and tilt the lid away from you when removing, using care to ensure that water does not drip back into the appliance. 41. Do not place anything, other than the lid, on top of the Cooker when assembled, when in use and when stored. 42. Always POWER the Cooker ‘Off’ by pressing the POWER button, then unplug and allow to cool, if appliance is not in use, before cleaning, before attempting to move the appliance, dissembling, assembling and when storing the appliance. 43. Keep the stainless steel housing, removable cooking bowl and glass lid clean. Follow the cleaning instructions provided in this book. 44. The Cooker is not intended to be operated by means of an external timer or separate remote control system. 45. Some countertop and table surfaces, such as Corian®, wood and / or laminates, are not designed to withstand prolonged heat generated by certain appliances. It is recommended by countertop manufacturers and Maxi-Matic that a hot pad or trivet be placed under your appliance to prevent possible damage to the surface. 3 46. DO NOT use this appliance for deep frying. 47. Do not heat or pre-heat the Cooker when empty. 48. The removable bowl will not withstand sudden temperature changes. Always ensure the bowl is at room temperature before adding hot or cold items. NOTE: A short power cord is provided to reduce the risk of personal injury resulting from becoming entangled in or tripping over a longer cord. Longer power-supply cords or extension cords are available and may be used if care is exercised in their use. If an extension cord is used: (1) the marked electrical rating of the extension cord should be at least as great as the electrical rating of the product; (2) the extension cord should be arranged so that it will not drape over the countertop or tabletop where it can unintentionally be pulled on or tripped over by children or pets. If this appliance is equipped with a polarized plug (one blade is wider than the other), please follow the below instructions: To reduce the risk of electrical shock, this plug is intended to fit into a polarized outlet only one way. If you are unable to fit the plug into the electrical outlet, try reversing the plug. If the plug still does not fit, contact a qualified electrician. Never use the plug with an extension cord unless the plug can be fully inserted into the extension cord. Do not alter the plug of the product or any extension cord being used with this product. Do not attempt to defeat the safety purpose of the polarized plug. 4 a b c d f h e g i a. Cool Touch Handle b. Vented Tempered Glass Lid c. Roasting/Steam Rack d. 6.5QT. Non-Stick Inner Pot e. Stainless Steel Main Housing NOTE f. Cool Touch Handles The Inner Pot (d) consists of a nonstick surface. To avoid scratching the non-stick surface, please use wooden or plastic utensils. g. Cool Touch Base Unit h. Control Panel i. LCD Display 5 Thank you for purchasing the Elite Platinum 6.5Qt. Infinity Cooker. The Elite Platinum 6.5Qt. Infinity Cooker is one of the most innovative and versatile appliances that you will ever own. Digital controls and an effortless design give you the ability to Cook Rice, Sauté, Bake, Roast, Stew, Slow Cook, or Steam a wide range of healthy meals for your entire family. FEATURES & FUNCTIONS: Sauté: Simmer, Sauté or Sear using this mode with temperature settings between 210°F ~ 420°F and timer settings between 5 minutes and 2 hours. Steam: Program the Infinity Cooker to steam between 20 ~ 90 minutes. Stew: Program the Infinity Cooker to cook soups and stews from 2 hours up to 4 hours. Slow Cooker Settings: Select from 2 temperature settings of HIGH and LOW, and program the timer to slow cook from 4 ~ 12 hours. Bake: Select this mode to bake at temperatures between 230°F ~ 425°F and program baking times from 30 minutes up to 4 hours. Roast: Select this mode to roast at temperatures between 290°F ~ 425°F and program roasting times from 30 minutes up to 4 hours. Cook Rice: Like any standard rice cooker, this mode will automatically cook rice without any temperature or timer settings. Keep Warm Buffet: Keep food warm from 1 hour up to 4 hours in this cooker or even use it as an elegant buffet station. Digital Controls with LCD Display and Timer/Temperature Settings. Goes to Keep Warm automatically in Slow Cooker mode. 6 LCD DISPLAY: The left side of the display shows the temperature in Fahrenheit degrees while the right side of the display shows the programmed cook time. TIMER/TEMP BUTTON: Use this button to toggle between adjusting Time and Temperature settings. +/- BUTTON: Use these buttons to adjust the Time and/or Temperature settings. POWER BUTTON: Powers the Infinity Cooker On/Off. START/STOP BUTTON: Starts or Cancels selected cooking function. MENU BUTTON: Use this button to cycle through and select a cooking function The arrow on the display will point to the selected function - Bake, Rice, Roast, Slow Cook (HI, LOW), Keep Warm, Steam, Stew, or Sauté. 1. 2. 3. 4. Before using your Infinity Cooker for the first time, carefully remove all the parts from the box and wash the inner pot, roasting rack, and the tempered glass lid with warm, soapy water. The cooking pot may also be washed in the top shelf of the dishwasher. The roasting rack is not dishwasher safe. IMPORTANT: DO NOT IMMERSE THE MAIN HOUSING IN WATER. Wipe it clean with a damp cloth. When ready to use, place the inner pot inside the main housing. Never use the Infinity Cooker without the cooking pot placed into the housing. Plug the unit into an electrical outlet. The LCD display will flash blue and beep once. 5. 6. 7. 8. The Infinity Cooker will not power “On” until you press the POWER button. When ready to begin cooking, press the POWER button. The LCD display will illuminate blue and show "888°F 88:88." The indicator arrow will begin flashing until you press the MENU button. Press the MENU button to move the indicator arrow on the LCD display to the Function that you desire. Follow instructions in the next section of this manual on how to use the different functions. NOTE: The initial 15 minutes of use may result in minimal smell and smoke. This is normal and harmless and comes from the protective substance applied to the heating elements during manufacturing. 7 Default Temperature Default Time N/A 6:00H N/A 8:00H KEEP WARM N/A 2:00H STEAM N/A 0:30M ROAST 350°F 0:30M BAKE 325°F 1:00H SAUTÉ (SIMMER | SEAR) 390°F 0:05M STEW N/A 2:00H RICE N/A N/A Function SLOW COOKER (HI) SLOW COOKER (LOW) 8 Cooking Time Range 4:00 ~ 12:00H 30 min increments 4:00 ~ 12:00H 30 min increments 1:00 ~ 4:00H 30 min increments 0:20 ~ 1:30H 10 min increments 0:30 ~ 4:00H 10 min increments 0:30 ~ 4:00H 10 min increments 0:05 ~ 2:00H 5 min increments 2:00 ~ 4:00H 10 min increments N/A Cooking Temperature Range N/A N/A N/A N/A 290°F ~425°F; 5°F increments 230°F ~425°F; 5°F increments 210°F ~420°F; 5°F increments N/A N/A increments to the desired cook time. Hold down for rapid increase/decrease. 7. Follow the Cooking Function Chart on page 8 to reference the range of cooking times and temperatures for the SAUTÉ (SIMMER | SEAR) mode. [NOTE: The unit will countdown 10 sec and begin cooking if no other buttons are pressed.] 8. Press the START/STOP button once to begin cooking. 9. Continuously mix/stir the contents of inner pot using a non-metallic utensil. 10. Once cooking is complete the unit will power off and beep 3 times. 11. When you are finished using the unit, make sure the POWER is “Off” and then unplug the unit and allow it to cool completely before handling. TIP #2: Waiting more than 10 sec in between making selections will cause the indicator arrow to turn solid and the cooking process to begin for whichever function and settings are currently displayed on the LCD screen. If this happens, simply press the START/STOP button to cancel cooking and start the selection process over. HOW TO SAUTÉ (SIMMER | SEAR): 1. Place the inner pot inside the main housing. 2. Place food inside the inner pot in an even layer for best results. Do not cover with Glass Lid. 3. Plug the unit into an outlet and push the POWER button to turn "On." 4. Press the MENU button until the flashing indicator arrow moves to the SAUTÉ position. 5. Press the TIMER/TEMP button once and the default temp of "390°F" on the LCD display will flash. Press the + or – buttons to adjust in 5°F increments to the desired temperature. Hold down for rapid increase/decrease. TIP #1: To SAUTÉ, set the temperature to 320°F~380°F. To SIMMER, set the temperature to 210°F~215°F. To SEAR, set the temperature to 380°F~420°F. 6. Once the desired temperature is indicated on the LCD display, press the TIMER/TEMP button again and the default time of "00:05" on the display will flash. Press the + or – buttons to adjust in 5 min 9 HOW TO SLOW COOK (HI & LOW): 6. Follow the Cooking Function Chart on page 8 to reference the range of cooking times for the SLOW COOKER mode. (Cooking Temperatures are not manually adjustable in SLOW COOKER mode). [NOTE: The unit will countdown 10 sec and begin cooking if no other buttons are pressed.] 7. Press the START/STOP button once to begin cooking. Do not open the lid repeatedly while cooking. 8. After cooking is complete, the unit will switch to Auto KEEP WARM for 2 hours (you will hear a 3 beep indicator). After the timer counts down the 2 hours the unit will shut off. 9. When you are finished using the unit, make sure the POWER is “Off” and then unplug the unit and allow it to cool completely before handling. TIP #3: The SLOW COOKER mode uses pre-programmed temperature settings to cook. Cooking temperatures are not manually adjustable in SLOW COOKER mode. The 6.5QT. capacity of the Infinity Cooker makes it the perfect size for cooking family meals or for large gatherings. In this mode, the unit will automatically switch to KEEP WARM once cooking is complete. Use the SAUTÉ function on 380°F~420°F to SEAR meats before slow cooking to enhance color, flavor, and texture. 1. 2. 3. 4. 5. Place ingredients into the inner pot and place the pot into the base. Cover with Glass Lid. If you need to pre-cook or brown foods prior to slow cooking, follow the instructions in this manual under SAUTÉ (SIMMER | SEAR). Plug the unit into an outlet and press the POWER button. Press the MENU button until the flashing indicator arrow moves to the SLOW COOKER (HI) or (LOW) position depending on the recipe instructions. Press the TIMER/TEMP button once and the default time of “6:00” for HI or “8:00” for LOW on the display will flash. Press the + or buttons to adjust in 30 min increments to the desired cook time. 10 HOW TO COOK RICE: 1. 2. 3. 4. 5. Place ingredients into the inner pot and place the pot into the base. Cover with Glass Lid. Plug the unit into an outlet and press the POWER button. Press the MENU button until the flashing indicator arrow moves to the RICE position. In RICE mode, neither the Time nor the Temperature can be manually adjusted. [NOTE: The unit will countdown 10 sec and begin cooking if no other buttons are pressed.] 6. 7. Simply press the START/STOP button once to begin cooking. Once cooking is complete the unit will go to keep warm for 2 hours (you will hear a 3 beep indicator). After the timer counts down the 2 hours the unit will power off. When you are finished using the unit, make sure the POWER is “Off” and then unplug the unit and allow it to cool completely before handling. NOTE: Rinse your rice in the inner pot until the water is clear. For softer rice, let it soak in water for 10-20 minutes. Add water to the inner pot. Refer to rice/water measurement chart below. Measurements are shown using a US measuring cup. UNCOOKED WHITE APPROX. RICE RICE COOKED RICE WATER YIELD WITH MEASURING CUP 1 Cup 1 1 3 Cups 2 Cups 2 Cups 2 2 3 Cups 4 Cups 3 Cups 1 3 2 Cups 6 Cups 4 Cups 2 4 3 Cups 8 Cups 5 Cups 2 5 3 Cups 10 Cups 6 Cups 1 6 2 Cups 12 Cups 7 Cups 1 7 3 Cups 14 Cups 11 HOW TO USE THE KEEP WARM (BUFFET FUNCTION): The Infinity Cooker can also be used as a buffet server to keep food warm. Food can be kept warm from 1 hour up to 4 hours. This can be used for food previously cooked in the Infinity Cooker or for food already prepared that you want kept warm. TIP #4: Food can be kept warm in the Infinity Cooker for up to 4 hours. Past 4 hours and food contents may start to become dry or the flavor may alter. Food cooked in other appliances can be transferred to the Infinity Cooker to keep warm as well. 1. Place ingredients into the inner pot and place the pot into the base. Cover with Glass Lid. 2. Plug the unit into an outlet and press the POWER button. 3. Press the MENU button until the flashing indicator arrow moves to the KEEP WARM position. 4. Press the TIMER/TEMP button once and the default time of "02:00" on the display will flash. Press the + or - buttons to adjust in 30 min increments to the desired KEEP WARM time. 5. Follow the Cooking Function Chart on page 8 to reference the range of cooking times for the KEEP WARM mode. (Temperatures are not manually adjustable in KEEP WARM mode). [NOTE: The unit will countdown 10 sec and begin cooking if no other buttons are pressed.] 6. Press the START/STOP button once to begin keeping warm. 7. Once the timer is up the unit will power off and beep 3 times. 8. When you are finished using the unit, make sure the POWER is “Off” and then unplug the unit and allow it to cool completely before handling. 12 HOW TO ROAST: display will flash. Press the + or – buttons to adjust in 10 min increments to the desired cook time. Hold down for rapid increase/decrease. 6. Follow the Cooking Function Chart on page 8 to reference the range of cooking times and temperatures for the ROAST mode. [NOTE: The unit will countdown 10 sec and begin cooking if no other buttons are pressed.] 7. Press the START/STOP button once to begin cooking. 8. Once cooking is complete the unit will power off and beep 3 times. 9. When you are finished using the unit, make sure the POWER is “Off” and then unplug the unit and allow it to cool completely before handling. Temperature settings from 290°F~ 425°F are ideal for roasting meats and vegetables. The programmable timer can be set in 10 minute intervals up to 4 hours. 1. 2. 3. 4. 5. Place food on the Roasting Rack and lower into the Inner Pot. Cover with Glass Lid. Plug the cord into an outlet and push the POWER button to turn "On." Press the MENU button until the flashing indicator arrow moves to the ROAST position. Press the TIMER/TEMP button once and the default temp of "350°F" on the LCD display will flash. Press the + or – buttons to adjust in 5°F increments to the desired temperature. Hold down for rapid increase/decrease. Once the desired temperature is indicated on the LCD display, press the TIMER/TEMP button again and the default time of "00:30" on the IMPORTANT: Use caution when handling hot foods. ROASTING GUIDE Cooking results may vary, adjust these times to your individual requirements. MEAT OVEN TEMP TIME PER LB. Beef Roast 325 – 425° 25 – 30 min. Pork Roast 325 – 425° 40 – 45 min. Ham 325 – 425° 35 – 40 min. Chicken 350 – 425° 20 – 25 min. Turkey 350 – 425° 20 – 25 min. NOTE: All roasting times are based on meats at refrigerator temperature. Frozen meats may take considerably longer. Using a meat thermometer is highly recommended. 13 HOW TO BAKE: the TIMER/TEMP button again and the default time of "01:00" on the display will flash. Press the + or – buttons to adjust in 10 min increments to the desired cook time. Hold down for rapid increase/decrease. 6. Follow the Cooking Function Chart on page 8 to reference the range of cooking times and temperatures for the BAKE mode. [NOTE: The unit will countdown 10 sec and begin cooking if no other buttons are pressed.] 7. Press the START/STOP button once to begin cooking. 8. Once cooking is complete the unit will power off and beep 3 times. 9. When you are finished using the unit, make sure the POWER is “Off” and then unplug the unit and allow it to cool completely before handling. Temperature settings from 230°F~ 425°F allow for baking delicious pastries, desserts and other easy one pot meals. The programmable timer can be set in 10 minute intervals up to 4 hours. 1. 2. 3. 4. 5. Place ingredients into the inner pot and place the pot into the base. Cover with Glass Lid. Plug the cord into an outlet and push the POWER button to turn "On." Press the MENU button until the flashing indicator arrow moves to the BAKE position. Press the TIMER/TEMP button once and the default temp of "325°F" on the LCD display will flash. Press the + or – buttons to adjust in 5°F increments to the desired temperature. Hold down for rapid increase/decrease. Once the desired temperature is indicated on the LCD display, press HOW TO STEAM: Steaming cooks food more gently than almost any other method. This means food retains its shape, color, and texture. 1. 2. 3. 4. 5. Place food on the Steam Rack and lower into the Inner Pot. Add water to the bottom of the inner pot. Generally, 1-2 cups of water provides approximately 5-10 minutes of steam time. If additional water is required while cooking, carefully lift the lid away from you and add room temperature water. Water level should NOT exceed the steam rack 6. 14 or touch the food as that will result in boiling the food. Cover with Glass Lid. Plug the cord into an outlet and push the POWER button to turn "On." Press the MENU button until the flashing indicator arrow moves to the STEAM position. 9. 7. Press the TIMER/TEMP button once and the default time of "00:30" on the display will flash. Press the + or – buttons to adjust in 10 min increments to the desired cook time. Hold down for rapid increase/decrease. 8. Follow the Cooking Function Chart on page 8 to reference the range of cooking times for the STEAM mode. (Cooking Temperatures are not manually adjustable in STEAM mode). [NOTE: The unit will countdown 10 sec and begin cooking if no other buttons are pressed.] 10. 11. Press the START/STOP button once to begin cooking. Once cooking is complete the unit will power off and beep 3 times. When you are finished using the unit, make sure the POWER is “Off” and then unplug the unit and allow it to cool completely before handling. Use caution when placing hot meats on steam rack. CAUTION: DO NOT add any liquids to the base of the main housing of the appliance. HOW TO STEW: Stewing is a slow simmering process suitable for the least tender cuts of meat. It is recommended to first sear the meat whole in the Infinity Cooker and then cut into chunks for stewing. 1. 2. 3. 4. 5. 6. Follow the Cooking Function Chart on page 8 to reference the range of cooking times for the STEW mode. (Cooking Temperatures are not manually adjustable in STEW mode). [NOTE: The unit will countdown 10 sec and begin cooking if no other buttons are pressed.] 7. Press the START/STOP button once to begin cooking. NOTE: The cooking timer will not begin counting down until the cooker reaches a boil. 8. Once cooking is complete the unit will power off and beep 3 times. 9. When you are finished using the unit, make sure the POWER is “Off” and then unplug the unit and allow it to cool completely before handling. Place ingredients into the inner pot and place the pot into the base. Cover with Glass Lid. If you need to pre-cook or brown foods prior to slow cooking, follow the instructions in this manual under SAUTÉ (SIMMER | SEAR). Plug the unit into an outlet and press the POWER button. Press the MENU button until the flashing indicator arrow moves to the STEW position. Press the TIMER/TEMP button once and the default time of "02:00" on the display will flash. Press the + or - buttons to adjust in 10 min increments to the desired cook time. 15 1. 2. 3. 4. 5. 6. 7. Cooking times can vary based on the ingredients, the temperature selected, and the temperature of the inner pot. Always use non-metal utensils in the inner pot. Metal utensils may damage the nonstick coating of the inner pot. For even browning, make sure that food is placed in an even layer on the bottom of the inner pot or on the roasting rack. Cooked foods may not brown or get as golden on top compared to a conventional oven. Foods will become more browned on the bottom and crisp on the bottom and sides. If you do not manually set a temperature and time, the cooker will automatically start at the default temperature and time. When slow cooking, here are some tips to follow: Slow cooking retains moisture. If you wish to reduce moisture in the cooker, remove the lid after cooking and program to simmer for 30 to 45 minutes. The lid is not a sealed fit. Do not lift lid during cooking unnecessarily as the temperature will drop each time the lid is opened. Each time you remove the lid, add an additional 10 minutes to the cooking time. Most meat and vegetable recipes require 8-10 hours on low and 4-6 hours on high. Some ingredients are not suitable for slow cooking. Pasta, seafood, milk, and cream should be added towards the end of the cooking time. Many things can affect how quickly a recipe will cook, water and fat content, initial temperature of the food and the size of the food. Food cut into small pieces will cook quicker. A degree of ‘trial and error’ will be required to fully optimize the potential of your slow cooker to cook foods the way you prefer. Root vegetables usually take longer to cook than meat, so try and arrange root vegetables in the lower half of the pot. Most foods are suitable for slow cooking; however there are a few guidelines that need to be followed: Cut root vegetables into small, even pieces, as they take longer to cook than meat. They should be gently sautéed for 2-3 minutes before slow cooking. Ensure that root vegetables are always placed at the bottom of the pot and all ingredients are immersed in the cooking liquid. Trim all excess fat from meat before cooking, since the slow cooking method does not allow fat to evaporate. If adapting an existing recipe from conventional cooking, you may need to cut down on the amount of liquid used. Liquid will not evaporate from the slow cooker to the same extent as with conventional cooking. Never leave uncooked food at room temperature in the slow cooker. Do not put the glass lid in an oven, freezer, and microwave or on a gas/electrical hob. 16 6. If food residue is stuck onto the inner pot, fill the pot with water and allow to soak overnight in soapy water and rinse the next day. DO NOT use scouring pads on the inner pot. If scouring is necessary, use a non-abrasive cleanser or liquid detergent with a nylon pad or brush. 7. Please return the unit to MAXIMATIC, USA for any other servicing. 8. The glass lid is dishwasher safe once it has cooled down to room temperature. Do not place a hot or warm glass lid into a cold environment or it may result in cracking. NOTE: After usage, the exterior of the cooking pot may produce a black film when cleaned. This is due to oxidation and occurs from normal usage. The Infinity Cooker should be cleaned thoroughly after every use. 1. 2. 3. 4. 5. Unplug the unit from the electrical outlet. Never immerse the main body housing in water or any other liquid. To clean the main body housing and the control panel, wipe clean with a damp cloth. CAUTION: Do not allow water to seep into the LCD control panel as that may damage the appliance. Wash the inner pot, roasting rack, and the tempered glass lid with warm, soapy water. The inner pot may also be washed in the top shelf of the dishwasher. The roasting rack is not dishwasher safe. Dry all parts after each use. PROBLEM POSSIBLE SOLUTION "E1" appears on the display screen Temperature Sensor is not properly inserted, please contact customer service at 800-365-6133. "E2" appears on the display screen Temperature Sensor is damaged, please contact customer service at 800-365-6133. The display screen is blank, buttons do not work Please contact customer service at 800-365-6133 17 ITALIAN MEATBALLS 1 lb. ground beef 2 eggs 1/2 C. dry breadcrumbs 1/2 tsp. garlic powder 1/2 lb. Italian sausage 1/4 C. milk 3 Tbsp. grated parmesan cheese salt and pepper In a bowl, beat eggs and add milk. Add beef and Italian sausage. Mix together. Add rest of ingredients and mix until combined. Shape the mixture into 1 inch balls and place on the bottom of the Infinity Cooker's Inner Pot in an even layer. Set to BAKE at 350°F for 15 minutes. Sauce 1 15 oz. can tomato sauce 1 small onion chopped 1/2 C. beef broth 2 garlic cloves minced 1 tsp. salt 1 2 tsp. pepper 1 6 oz. can tomato paste 1/2 C. green pepper 1/3 C. water 1 tsp. oregano 1 tsp. sugar Mix all ingredients in a bowl and pour over the meatballs. Cover and cook using the SLOW COOK function on Low for 4 - 5 hours. SLOPPY JOES 3 lbs. ground beef 1 C. celery diced 1 1/2 C. ketchup 1 6 oz. can tomato paste 1/2 tsp. paprika 3 Tbsp. brown sugar salt and pepper 1 C. onions diced 1 C. green pepper diced 2 Tbsp. Worcestershire sauce 3/4 C. water 3 Tbsp. vinegar 1 tsp. dry mustard Brown ground beef in the Infinity Cooker's Inner Pot using the SAUTÉ|SEAR function and break up into small pieces. Add the rest of the ingredients and mix well. Turn on SLOW COOK function on Low and cook for 8 hours. Serve on hamburger buns. CHILI DIP 1 lb. ground beef 2 cans refried beans 1/2 tsp. chili powder 8 oz. cheddar cheese shredded (continued on next page) 1 16 oz. jar mild picante sauce 8 oz. sour cream 1/2 C. chopped onion Jalapenos or mild chilies to taste 18 (continued from previous page) Brown ground beef and onion in the Infinity Cooker's Inner Pot using the SAUTÉ|SEAR function. Drain and return to inner pot. Add beans, picante sauce, jalapenos (if using) and chili powder. Turn on the SLOW COOKER function on Low and cook for 2 - 3 hours. Add cheese and sour cream last 1/2 hour. Serve with tortilla chips. WILD MUSHROOM BEEF STEW 2 lbs. beef for stew, cut into 1-inch pieces 1 tsp. salt 1/2 tsp. dried thyme leaves, crushed 1/4 C. tomato paste 2 cloves garlic, minced 8 oz. assorted mushrooms, such as shiitake, cremini and oyster, cut into quarters 1 C. baby carrots 1/4 C. all-purpose flour 1/2 tsp. pepper 3/4 C. ready-to-serve beef broth 1/4 C. dry red wine 1 lb. red-skinned potatoes (1-1/2-inch diameter), cut into quarters Fresh parsley (optional) Combine flour, salt, pepper and thyme in small bowl. Place beef in the Infinity Cooker's Inner Pot. Sprinkle with flour mixture; toss to coat. Combine broth, tomato paste, wine and garlic in small bowl; mix well. Add to beef. Add potatoes, mushrooms and carrots; mix well. Cover and cook on SLOW COOKER function on HIGH for 5 to 6 hours or on LOW for 8 to 9 hours, (or until beef and vegetables are tender). No stirring is necessary during cooking. Stir well before serving. Garnish with parsley, if desired. POT ROAST 3 - 4 lb. pot roast 1 C. beef broth 4 - 5 potatoes cut up large onion cut up 1 lb. carrots cut in 2 inch pieces salt and pepper Brown pot roast in the Infinity Cooker's Inner Pot using SAUTÉ|SEAR function. Remove from pot and add vegetables to the bottom of the pot. Top with the roast and pour beef broth over it. Salt and pepper to taste. Cook for 8 hours on Low in SLOW COOKER mode. 19 BBQ MEATLOAF 2 - 2 1/2 lbs. ground beef 1 egg 2 tsp. Worcestershire sauce 1/2 tsp. salt 2 tsp. prepared mustard 1 Tbsp. vinegar 3/4 C. barbecue sauce 1 C. crushed soda crackers 1/2 C. diced onion 1/4 C. water 2 Tbsp. brown sugar Mix all ingredients in a large bowl. Form into a meatloaf shape that will fit into your Infinity Cooker's Inner Pot. Cut a strip of foil to create a sling that goes under the meatloaf in the inner pot, leaving it long enough so that you can use it to lift the meatloaf out when it is finished cooking. After placing the meatloaf in the cooker, top the meatloaf with an additional 1/3 C. barbecue sauce. Cook for 8 - 10 hours on Low in SLOW COOKER mode. CHICKEN MERLOT WITH MUSHROOMS 2 1/2 to 3 lbs. boneless, skinless chicken thighs 2 garlic cloves, peeled and minced 1 6-oz. can tomato paste 2 Tbsp. quick-cooking tapioca 2 Tbsp. chopped fresh basil 1/4 tsp. salt 2 C. cooked noodles 12 oz. sliced fresh mushrooms 1 large onion, peeled and chopped 3/4 C. low-sodium chicken broth 1/4 C. Merlot or any dry red wine, or additional chicken broth 2 tsp. granulated sugar 1/4 tsp. freshly ground black pepper 2 Tbsp. freshly grated Parmesan cheese Rinse chicken, pat dry and set aside. Place the mushrooms, onion and garlic in the Infinity Cooker's Inner Pot. Place the chicken pieces on top of the vegetables. Combine broth, tomato paste, wine, tapioca, dried basil (if using), sugar, salt and pepper in a medium bowl. Pour mixture over the chicken and vegetables. Cover and cook on Low in SLOW COOKER mode for 7 to 8 hours or on High for 3 1/2 to 4 hours. To serve, spoon chicken mixture over cooked noodles. Sprinkle with Parmesan cheese. LEMON GARLIC CHICKEN 2 lbs. chicken breasts boneless/skinless 1/2 tsp seasoned salt 2 Tbsp. butter 4 Tbsp. fresh lemon juice 2 tsp. chicken bouillon 1 1/2 tsp. oregano leaves crushed 1/4 tsp. pepper freshly ground 1/4 C. water 4 cloves garlic minced 2 tsp. fresh chopped parsley Wash chicken and dry on paper towels. Combine oregano, salt and pepper in a small bowl. Sprinkle on the chicken and pat it in. Place the chicken breasts in the Infinity Cooker's Inner Pot and use the SAUTÉ|SEAR function until browned in butter. Add the water, lemon juice, bouillon, garlic and parsley to the inner pot. Bring mixture to a boil. (continued on next page) 20 (continued from previous page) Cover and cook on High in SLOW COOKER mode for 2 1/2 3 hours or on Low for 5 - 6 hours. Add parsley and baste chicken. Cover and cook on High in SLOW COOKER mode another 15 -30 minutes. SOUTHWESTERN CHICKEN 1 (15-oz) can whole kernel corn, drained 1 (11- oz) can Mexicorn, drained 1 (15- oz) can black beans, rinsed and drained 1 (16- oz) jar chunky salsa (divided use) 6 boneless, skinless chicken breast halves, rinsed and dried Flour tortillas Shredded cheddar cheese Combine the cans of corn, beans and half the salsa in Infinity Cooker's Inner Pot. Top with the chicken. Pour remaining sauce over. Cover and cook first hour on High in SLOW COOKER mode, then either 3 more hours on High or 6 on Low until meat juices run clear. Serve with warm tortillas; top with cheese. CHICKEN PAPRIKA WITH DUMPLINGS 6 boneless, skinless chicken breasts 1 tsp. salt 1 Tbsp. Hungarian paprika 8 ounces sour cream 1 medium onion chopped 1/2 tsp. black pepper 1 cup chicken broth 1 Tbsp. cornstarch or flour Dumpling Ingredients: 3 eggs 2-1/2 cups all-purpose flour, sifted 1/3 cup water Add onions to Infinity Cooker's Inner Pot. Add seasonings, chicken and broth. Cover and cook in SLOW COOKER mode on LOW 5 to 6 hours. Shortly before serving, turn to SLOW COOKER (high) and stir together sour cream and cornstarch. Stir into cooker and heat through. Taste and adjust seasonings (sour cream and cornstarch may be omitted if desired). Serve with dumplings (recipe below). Dumpling Instructions Beat 3 eggs, add 1/3 cup water and 2-1/2 cups flour. Beat with a spoon until smooth. Drop from teaspoon into boiling salted water (can also use Infinity Cooker | SAUTÉ function) and cook until dumplings rise to the top, approximately 10 minutes. CHEESY SHRIMP PASTA 1 (2-lb.) block Velveeta cheese 1 (8-oz) Canned Chopped Tomatoes 4 pods garlic, minced Cooked pasta of choice 1 (16-oz.) carton half-and-half 1 small onion, chopped 1 lb. raw shrimp (continued on next page) 21 (continued from previous page) Place cheese, half-and-half, tomatoes, onions and garlic in Infinity Cooker's Inner Pot and cook on SLOW COOKER (low) for 4 hours. Add shrimp and cook for another hour on HIGH or until shrimp are pink. Cook pasta of choice and spoon sauce over cooked pasta. FISHERMAN'S SEAFOOD CHOWDER 1 to 1-1/2 lbs. fish (any combination of flounder, ocean perch, pike, trout, haddock or halibut) 1/2 C. chopped onion 1/2 C. chopped celery 1/2 C. chopped carrots 1/4 C. snipped parsley 1/4 tsp. leaf rosemary 1/2 C. dry white wine 16-oz. can whole tomatoes, mashed 8-oz. bottle of clam juice 1 tsp. salt 3 Tbsp. flour 3 Tbsp. butter or margarine, melted 1/3 C. light cream Cut cleaned fish into 1-inch chunks. Combine all ingredients except flour, butter and cream in Infinity Cooker's Inner Pot; stir well. Cover and cook on SLOW COOKER (low) setting for 7 to 8 hours (3 to 4 hours on high). One hour before serving, combine flour, butter and cream and stir into Infinity Cooker's Inner Pot. Continue cooking until mixture is slightly thickened. SALMON BAKE 2 cans salmon, boned and skinned (15 oz. size) 1 tsp. lemon juice 1 chopped green bell pepper 1 can cream of celery soup 1 tsp. garlic powder 2 chicken bouillon cubes, crushed 4 cups bread crumbs 1 (8-oz.) can tomatoes 1 (8-oz.) can cream of onion soup 4 well beaten eggs 1 teaspoon Greek seasoning 1/4 cup milk Combine all ingredients except celery soup and milk. Pour into Inner Pot. Cover and cook on SLOW COOKER (low) heat for approximately 5 hours. Remove from pot. Combine cream of celery soup with 1/2 cup of milk into Inner pot and heat using SAUTÉ|SIMMER function. Use as a sauce for salmon bake. BEST ITALIAN SAUSAGE SOUP (SERVES 8) 1 1/2 pounds sweet Italian sausage 2 cloves garlic, minced 2 small onions, chopped 2 (16 ounce) cans whole peeled tomatoes 1 1/4 cups dry red wine 5 cups beef broth 1/2 teaspoon dried basil 1/2 teaspoon dried oregano 2 zucchini, sliced 1 green bell pepper, chopped 3 tablespoons chopped fresh parsley 1 (16 ounce) package spinach fettuccine pasta salt and pepper to taste (continued on next page) 22 (continued from previous page) Cook noodles according to package directions (you can use the Infinity Cooker's SAUTÉ function to boil pasta and set aside). Add sausage to inner pot and SAUTÉ until brown. Remove with a slotted spoon, and drain on paper towels. Drain fat from pot, reserving 3 tablespoons. SAUTÉ garlic and onion in reserved fat for 2 to 3 minutes. Stir in tomatoes, wine, broth, basil, and oregano. Stir in sausage, zucchini, bell pepper, and parsley. Cover, and SLOW COOK on Low for 4 to 6 hours. Add pasta to the slow cooker. SIMMER for a few minutes, and season with salt and pepper before serving. BAKED STUFFED APPLES 6 medium red tart apples 1/4 C. raisins 1/4 C. butter 3 Tbsp. orange juice concentrate 1 C. light brown sugar 1 Tbsp. orange peel 2 C. very hot water Wash and core apples, but don't peel them. In a pan that will fit in your Inner Pot, stand the apples up. Butter the pan first. Fill the core cavities with the brown sugar, raisins and orange peel. Top with butter. Place the pan in the Inner Pot. Pour the hot water around the pan. Sprinkle the orange juice concentrate over the apples. Cover the cooker and cook on SLOW COOKER (low) for 3 - 5 hours or until apples are tender. PINA COLADA BREAD PUDDING 1 lb. loaf French bread 6 oz. pineapple juice 1/2 C. cream of coconut 3 eggs 1 C. raisins 1 t. lemon peel; grated 10 oz. frozen piña colada drink mix 12 oz. evaporated milk 2 large bananas; sliced 1/4 C. light rum 8 oz. pineapple; crushed w/juice fresh mint sprigs With a sharp knife, peel crust from bread; discard crust or make into bread crumbs for use in another recipe. Cut bread into 1-inch cubes; set aside. In blender or food processor, fitted with a metal blade, combine 1/2 of the following ingredients; drink mix, pineapple juice, evaporated milk, cream of coconut, and banana slices. Process until pureed; pour puree into a 6-cup bowl. Puree remaining 1/2 of liquid ingredients and banana slices as well as eggs and liqueur, if desired. Combine both purees; set aside. Combine raisins and crushed pineapple (and the juice); set aside. Place about 2/3 of bread cubes in Inner Pot, sprinkle with 1/2 t. grated lemon peel and spread 1 cup of the raisin-pineapple mixture over bread in Inner Pot. Top with remaining bread cubes, then with remaining 1/2 t. lemon peel and raisin-pineapple mixture. Pour pureed ingredients into Inner Pot. Cover and cook on SLOW COOKER (low) for 6 hours. Spread pudding into 8 or 10 dessert dishes and serve hot. Garnish with fresh mint sprigs. 23 Roasting Rack may be used with some of these recipes. CHERRY-GLAZED PORK ROAST (can substitute with beef roasts) 14 oz. Jar of cherry preserves 3 lb. Boneless pork roast ¼ C Red wine vinegar ½ Tsp. Salt ¼ Tsp. Salt ¼ Tsp. Black pepper 3 Tbsp. Light corn syrup ¼ Cup Vegetable Oil ¼ Tsp. Ground cinnamon ¼ Tsp. Ground cloves 3 Tbsp. Almonds, slivered toasted. Combine first 7 ingredients in Inner Pot. Using SAUTÉ|SIMMER bring mixture to a boil; reduce heat, and simmer for 2 minutes. Add the almonds and simmer for 1 minute. Remove from Inner Pot. Sprinkle roast with salt and pepper. Set to SAUTÉ|SEAR (380°~420°) and heat oil in inner pot. Place roast into Inner Pot and cook uncovered for 15 minutes until browned on all sides. Remove roast from Pot. Place roasting rack into pot. Place roast on rack. Set cooking function to ROAST. Set temperature to 350° and time to 45 min up to 1 hour. Cover and cook until the meat is cooked through. After every 15 minutes of roasting, occasionally brush on the Cherry Mixture. When cooking cycle is complete, remove roast carefully and let stand 5 minutes before slicing. CAJUN PORK ROAST (Can substitute with Beef Roasts) Ingredients: 2 lbs. Boneless Single Loin Pork Roast ½ Tsp. Cayenne Pepper 2 Tsp. Oregano ½ Tsp. Salt 1 Tsp. Cumin 2 Tbsp. Paprika ½ Tsp. Garlic Powder 1 Tsp. Thyme ½ Tsp. White pepper ¼ Tsp. Nutmeg Combine all seasonings and rub mixture over the surface of roast. Place roasting rack into Inner Pot. Place roast onto rack. Set cooking function to ROAST at 350° and Timer to 1- 1 ½ hour. When done, let stand for 5 minutes before slicing. SWEET CHILE CHUTNEY ROAST BEEF 2 ½ lb. Boneless Rib of beef. Glaze: 3 Tbsp. Honey 1 Tbsp. Dried chilies Chutney: 1 large thinly sliced apples 2 Tbsp. Brown Sugar ½ Cup Water (continued on next page) 2 Tomatoes, chopped ½ Cup Red Wine Pinch of Cayenne pepper 24 (continued from previous page) Place ingredients for Chutney into Inner Pot. Use SAUTÉ|SIMMER function to bring to a boil and simmer for 10 minutes until thick. Remove from Inner Pot and set aside. Place roasting rack into Inner Pot. Place roast beef onto rack. Set cooking function to ROAST at 350° and Timer to 30~45 minutes. Brush Honey onto Roast. Let roast cook for another 10 minutes and brush some of the Chutney mixture onto roast. Let stand for 5 minutes before slicing. Serve with remaining Chutney mixture. JAMAICAN CHICKEN ½ Cup Water 2 dried chili peppers, crumbled ¼ cup white-wine vinegar 1 Tsp. Dried thyme ½ Tsp. Ground Black pepper 5-6 thin slices fresh ginger ½ onion chopped. 1 Tbsp. Pepper sauce ½ Tsp. Ground allspice 1 Whole chicken (4 lbs.) In blender, combine water, ginger, chili peppers, onions, vinegar, pepper sauce, thyme, allspice and black pepper. Puree until fairly smooth. Spread mixture onto chicken evenly. Reserve leftover mixture for later use. Cover and refrigerate chicken for 4 hours up to overnight. Place roasting rack into Inner Pot. Place chicken onto roasting rack and set the cooking function to ROAST. Set the temperature to 375° and the timer to 1- 1½ hours. When done, carefully remove chicken and the roasting rack from the inner pot and set aside. Take reserved mixture and place into inner pot. Using the SAUTÉ function bring to a boil. Serve mixture as the sauce with the chicken. BALSAMIC CHICKEN 1/3 Cup Olive Oil 1 Tbsp. Dried rosemary 1 clove garlic, minced 1 Green bell pepper, sliced 1 Small red onion, quartered 1 Small eggplant cut into 1” pieces. 1/3 Cup Balsamic Vinegar ½ Tsp. Red pepper flakes 1 Whole chicken (4 lbs.) 1 Red bell pepper, sliced. 3 Carrots cut into 1” pieces. In small bowl, combine olive oil, balsamic vinegar, rosemary, red pepper flakes and garlic. Marinate chicken in mixture for 30 minutes. Reserve the mixture. Place roasting rack into the Inner Pot. Place chicken onto roasting rack. Set cooking function to ROAST at 375° and set the timer to for 1-1½ hour. When done, carefully remove chicken from the Inner Pot. Add the vegetables into reserved mixture and toss to coat evenly. Place vegetables in an oven safe pan and place onto the roasting rack. Set to ROAST at 350° for 15-20 minutes or until edges brown. Serve together with chicken. 25 SPICY CUBAN ROTISSERIE CHICKEN 1 large whole chicken (4 lbs.) 2 Tsp. Dried oregano 1 Tsp. Salt & pepper 1 Tsp. Ground cumin 1 Shallot, minced 2 Large garlic cloves 1 Tsp. Grated Lime peel ¼ Cup fresh lime juice 3 Tbsp. Olive Oil ¼ Tsp. Pepper lime slices Minced Cilantro sprigs In large bowl, mix lime juice, olive oil, shallot, garlic, lime peel, oregano, salt, cumin and pepper together. Cover chicken with this mixture, make sure to coat evenly. Cover chicken and refrigerate for 4 hours up to overnight. Place roasting rack into Inner Pot. Place chicken onto roasting rack. Set cooker to ROAST at 375° and set the timer to 1- 1½ hours. When done, let chicken stand for 5-10 minutes. Serve with lime slices and cilantro sprigs. EASY ROASTED CHICKEN 4 Tsp. Salt 2 Tsp. Paprika 1 Tsp. Cayenne pepper 1 Tsp. Thyme ½ Tsp. Garlic Powder 1 Large Whole chicken (4 lbs.) 1 Tsp. Onion Powder 1 Tsp. White Pepper ½ Tsp. Black Pepper 1 Cup Chopped Onion Combine all spices in a bowl. Remove giblets from chicken. Rub spice mixture into chicken inside and out. Cover and refrigerate 4 hours up to overnight. When ready to roast, stuff cavity of chicken with onions. Place roasting rack into Inner Pot. Place chicken onto the roasting rack. Set to ROAST at 375° and set the timer to 1-1½ hours. Once done, let chicken stand for 5-10 minutes. Carve and serve. APPLE CIDER GLAZED HAM 1 (3 lb - 5 lb) Boneless shank of Ham 4 Tsp. Cornstarch 1/8 Tsp. Cloves, ground 1 Cup Apple Cider 2 Tsp. Spicy Mustard Combine 2 Tbsp. Of apple cider and cornstarch together in small bowl. Pour into the Infinity Cooker's Inner pot. Using the SAUTÉ function, bring cornstarch mixture and rest of apple cider, mustard and cloves to a boil. Stir until thickened. Coat Ham in mixture, cover and refrigerate for 4 hours up to overnight. When ready to cook, place roasting rack into Inner Pot and place ham onto rack. Set to ROAST at 350° and set the timer to 1 – 1 ½ hour. Occasionally glaze Ham with remaining apple cider mixture. Serve mixture over slices of Ham. 26 GARLIC PRIME RIB MAKES A 10LB ROAST 1 (10 pound) prime rib roast 10 cloves garlic, minced 2 tablespoons olive oil 6 cups beef broth 2 teaspoons salt 2 teaspoons ground black pepper 2 teaspoons dried thyme In a small bowl, mix together the garlic, olive oil, salt, pepper and thyme. Spread the mixture over the fatty layer of the roast. Place the roast into the Inner Pot and cook uncovered on SAUTÉ|SEAR until browned on all sides. Remove and set aside. Pour beef broth into the inner pot. Place roasting rack into inner pot. Place roast onto the roasting rack. Set to ROAST at 350° for 60 to 75 minutes. The internal temperature of the roast should be at 135 degrees F for medium rare. Allow the roast to rest for 10 or 15 minutes before carving so the meat can retain its juices. SWEET & SOUR BEEF SPARE RIBS SERVES 4 3 tablespoons vegetable oil 3 lb lean short spareribs cut into serving pieces 3 cups beef broth 2 tablespoons onion, minced 2 tablespoons apricot marmalade 2 tablespoons cider vinegar 2 tablespoons dry sherry 1 teaspoon hot pepper sauce, or to taste Sweet-Sour Sauce Ingredients: 3 tablespoons soy sauce 2 tablespoons brown sugar 3 tablespoons honey 3 cloves garlic, minced 1/4 cup ketchup In a small bowl combine all the sauce ingredients. Heat the oil in the Infinity Cooker's Inner Pot, add as many ribs at a time as will comfortably fit, and SAUTÉ until brown for about 5 minutes. Remove ribs and repeat this step until all ribs have been browned. Pour off all fat. Pour beef broth into inner pot and place roasting rack into inner pot. Place ribs onto the roasting rack and set to ROAST at 375° for 1 hour. Brush sauce mixture onto the ribs and set to ROAST at 375° for another 30 minutes. 27 PIZZA CASSEROLE (SERVES 6-8) 2 cups uncooked egg noodles 1/2 pound lean ground beef 1 onion, chopped 2 cloves garlic, minced 1 green bell pepper, chopped 1 cup sliced pepperoni sausage 16 ounces pizza sauce 4 tablespoons milk 1 cup shredded mozzarella cheese Cook noodles according to package directions (you can use the Infinity Cooker's SAUTÉ function to boil pasta and set aside). Add the ground beef with the onion, garlic and green bell pepper into the Infinity Cooker's inner pot and brown using SAUTÉ function. Drain excess fat. Stir in the noodles, pepperoni, pizza sauce and milk, and mix well. Set to BAKE at 350° for 20 minutes, top with cheese, then bake for 5 to 10 more minutes. PARMESAN CHICKEN BAKE (SERVES 6) 2 tablespoons olive oil 2 cloves garlic, crushed and finely chopped 1/4 teaspoon crushed red pepper flakes, or to taste 6 skinless, boneless chicken breast halves 2 cups prepared marinara sauce 1/4 cup chopped fresh basil 1 (8 ounce) package shredded mozzarella cheese, divided 1/2 cup grated Parmesan cheese, divided 1 (5 ounce) package garlic croutons Sprinkle the bottom of the Inner Pot with garlic and hot red pepper flakes. Arrange the chicken breasts in bottom of the pot, and pour marinara sauce over chicken. Sprinkle basil over marinara sauce, and top with half the mozzarella cheese, followed by half the Parmesan cheese. Sprinkle on the croutons, then top with the remaining mozzarella cheese and remaining Parmesan cheese. Set the cooker to BAKE at 350° for 35 minutes to an hour or until cheese and croutons are golden brown and the chicken is no longer pink inside. (This may depend on the shape and thickness of chicken breasts). An instant-read thermometer inserted into the thickest part of a chicken breast should read at least 160°. EASY MEXICAN CASSEROLE (SERVES 6) 1 pound lean ground beef 2 cups salsa 1 (16 ounce) can chili beans, drained 3 cups tortilla chips, crushed 2 cups sour cream (continued on next page) 1 (2 ounce) can sliced black olives, drained 1/2 cup chopped green onion 1/2 cup chopped fresh tomato 2 cups shredded Cheddar cheese 28 (continued from previous page.) Preheat oven to 350 degrees F (175 degrees C). Add ground beef to Inner pot and SAUTÉ until no longer pink. Stir in salsa, reduce the temperature and SIMMER for 20 minutes, or until liquid is absorbed. Stir in beans, and heat through. Remove from Inner Pot and set aside. Spread crushed tortilla chips in bottom of Inner Pot, then spoon beef mixture over chips. Spread sour cream over beef, and sprinkle olives, green onion, and tomato over the sour cream. Top with Cheddar cheese. Set cooker to BAKE at 350° for 30 minutes, or until hot and bubbly. CHICKEN WITH QUINOA AND VEGGIES SERVES 4 1 cup rinsed quinoa 2 cups chicken broth 2 tablespoons extra-virgin olive oil 2 garlic cloves, chopped 1 small onion, chopped 2 skinless, boneless chicken breast halves - cut into strips 2 tablespoons extra-virgin olive oil 1 zucchini, diced 1 tomato, diced 4 ounces crumbled feta cheese 8 fresh basil leaves 1 tablespoon lime juice SAUTÉ 2 tablespoons of olive oil Inner Pot; cook and stir the chopped garlic and onion until onion is translucent, about 5 minutes. Stir in the chicken breast strips and cook until the chicken is still slightly pink in the middle, about 5 more minutes. Remove the cooked chicken and set aside. Pour 2 more tablespoons of olive oil into the inner pot and SAUTÉ the zucchini and tomato until the zucchini is tender, 5 to 8 minutes. Remove from inner pot and set aside. Add quinoa and chicken broth to inner pot and use SAUTÉ function to bring to a boil. Stop the Cooker and carefully place roasting rack into the inner pot over the quinoa and place chicken onto the roasting rack. Sprinkle with feta cheese, basil leaves, and lime juice. Set to BAKE at 300° for 15 minutes. Once done, add the cooked zucchini and tomatoes and mix well. MAPLE SALMON SERVES 4 1/4 cup maple syrup 2 tablespoons soy sauce 1 clove garlic, minced 2 cups water 1/4 teaspoon garlic salt 1/8 teaspoon ground black pepper 1 pound salmon In a small bowl, mix the maple syrup, soy sauce, garlic, garlic salt, and pepper. Place salmon in a shallow glass baking dish, and coat with the maple syrup mixture. Cover the dish, and marinate salmon in the refrigerator 30 minutes, turning once. Pour the water into the Infinity Cooker's inner pot. Place roasting rack into the inner pot. Place baking dish onto the roasting rack. BAKE at 400° for 20 minutes or until easily flaked with a fork. 29 RED VELVET MINI CUPCAKES (MAKES 12) 1 1/8 cups sifted cake flour (10 tbsp) 1 tbsp cocoa powder 1/2 tsp baking powder 1/2 tsp baking soda 1/4 tsp salt 3/4 cups sugar 1/4 cup butter, softened 1 egg 1/2 cup buttermilk 1 1/2 tsp red food coloring 1/2 tsp apple cider vinegar 1 tsp vanilla extract You will need at least 1 oven-safe silicone mini muffin tray that must be purchased separately from the Infinity Cooker. Grease 12 mini muffin cups, or line with paper muffin liners. In a medium bowl, sift together cake flour, cocoa, baking powder, baking soda and salt. In a small bowl, whisk together buttermilk, food coloring, vinegar and vanilla extract. In a large bowl, cream together butter and sugar. Add in egg and beat until smooth. Add dry ingredients in 4 additions, alternating with 3 additions of the buttermilk mixture, scraping the sides of the bowl as necessary. Stir until just combined. Spoon batter into prepared cupcake tins. Fill them 2/3 to 3/4 full, which will create nice, rounded tops. Pour water into the Infinity Cooker's Inner pot. Place Steam Rack into bottom of Inner pot. Place Muffin Tray onto the steam rack. Set to BAKE at 350° for 15-20 minutes or until golden and the tops spring back when lightly pressed. Cool in the pans for 10 minutes before removing to cool completely on a wire rack. Mascarpone frosting 8 oz mascarpone cheese, room temperature 2 tbsp butter, room temperature 2 tsp vanilla paste (extract is fine) 1 tbsp milk 1 1/4 cups confectioners sugar Beat together mascarpone and butter until well combined. Beat in vanilla and milk. Add in confectioners sugar, scraping down the bowl as you go. When it has all been incorporated, beat on high speed for 1-2 minutes, until icing is smooth. CHOCOLATE MINI CUPCAKES WITH CREAM CHEESE FROSTING (MAKES 48) 1 1/2 cups all purpose flour 1/4 tsp salt 1/2 cup cocoa powder 3/4 cup milk (low fat is ok) 2 tsp instant coffee powder (optional) 1/2 cup vegetable oil 1 cup sugar 1 tsp vanilla extract 1 tsp baking powder 2 tsp apple cider vinegar 1/2 tsp baking soda You will need at least 1 oven-safe silicone mini muffin tray that must be purchased separately from the Infinity Cooker. (continued on next page) 30 (continued from previous page.) Grease and flour 48 mini muffin cups, or use paper liners. (If you only have one 12 muffin tray, you will need to follow these instructions 4 times). Line 48 mini muffin cups with paper liners. In a large bowl, sift together flour, cocoa power, instant coffee powder, sugar, baking powder, baking soda and salt. In a medium bowl, whisk together milk, vegetable oil, vanilla extract and vinegar. Pour into dry ingredients and stir until just combined and no streaks of flour remain. Distribute batter evenly into prepared muffin cups, filling each about 3/4 full. Pour water into the Infinity Cooker's Inner pot. Place Steam Rack into bottom of Inner pot. Place Muffin Tray onto the steam rack. (If you have additional steam rack and muffin trays you can stack them in the inner pot and eliminate having to bake 4 separate times). Set to BAKE at 350° for 1015 minutes or until a toothpick inserted into the center comes out clean. Allow to cool. Cream Cheese Frosting 6-oz cream cheese, room temperature 6 tbsp butter, room temperature 1 tsp vanilla extract 1-2 tbsp milk or cream 2-3 cups confectioners’ sugar In a large mixing bowl, cream together cream cheese and butter. Beat in vanilla and milk (start with 1 tbsp and add additional if you wish to thin the frosting), then add in the confectioners’ sugar gradually until the frosting reaches your desired consistency (make it a bit stiffer if you wish by adding additional sugar). Fill a pastry bag with a star tip, or a ziploc bag with the corner snipped off, and pipe frosting onto cooled cupcakes. MINI CHEESECAKES (MAKES 12) Crust: 1/3 cup graham cracker crumbs 1 tablespoon white sugar 1 tablespoon margarine, melted Filling: 1 (8 ounce) package cream cheese, softened 1/4 cup white sugar 1 1/2 teaspoons lemon juice 1/2 teaspoon grated lemon zest 1/4 teaspoon vanilla extract 1 egg You will need 1 oven-safe silicone mini muffin tray that must be purchased separately from the Infinity Cooker. Preheat oven to 325 degrees F (165 degrees C). Grease 12 mini muffin cups, or line with paper muffin liners. In a medium bowl, mix together the graham cracker crumbs, sugar, and margarine with a fork until combined. Measure a rounded tablespoon of the mixture into the bottom of each muffin cup, pressing firmly. Pour water into the Infinity Cooker's Inner pot. Place Steam Rack into bottom of Inner pot. (continued on next page) (continued from previous page.) 31 Place Muffin Tray onto the steam rack. Set to BAKE at 325° for 5 minutes, then remove to cool. Beat together the cream cheese, sugar, lemon juice, lemon zest and vanilla until fluffy. Mix in the egg. Pour the cream cheese mixture into the muffin cups, filling each until 3/4 full. Set to BAKE at 325° for 25 minutes. Cool completely in pan before removing. Refrigerate until ready to serve. FETA CHEESE & CHIVES BISCUITS (MAKES 9) 2/3 Cups Skim milk, plus extra for glazing ¼ Tsp Cayenne pepper 2 Cups Water 1 Cup Self-rising flour 1 Cup Self-rising whole wheat flour Pinch Salt 3 oz. Feta Cheese 1 Tablespoon Chopped fresh chives Sift the flours and salt into a bowl. Crumble the feta cheese and rub into the dry ingredients. Stir in the chives, then add the milk and mix to a soft dough. Turn the dough onto a floured surface and lightly knead until smooth. Roll out into ¼ inch thick and stamp out nine biscuits with a floured cookie cutter. Transfer to a greased baking sheet. (Make sure the baking sheet is the right size to fit into the Inner Pot). Brush with skim milk and sprinkle with cayenne pepper. Pour water into the Inner Pot. Place steam rack onto bottom of Inner Pot. Place baking sheet onto the steam rack. Set to BAKE at 400° for 15 minutes until golden brown. Serve warm. (You may need to repeat the baking process for the remaining dough.) 32 BEEF STEW (SERVES 10) 2 pounds cubed beef stew meat 3 tablespoons vegetable oil 4 cubes beef bouillon, crumbled 4 cups water 1 teaspoon dried rosemary 1 teaspoon dried parsley 1/2 teaspoon ground black pepper 3 large potatoes, peeled and cubed 4 carrots, cut into 1 inch pieces 4 stalks celery, cut into 1 inch pieces 1 large onion, chopped 2 teaspoons cornstarch 2 teaspoons cold water Add beef in oil to Inner Pot and SAUTÉ until brown. Dissolve bouillon in water and pour into pot. Stir in rosemary, parsley and pepper. Use SAUTÉ|SEAR function to bring to a boil, then program to STEW for 1 hour. Stir potatoes, carrots, celery, and onion into the pot. Dissolve cornstarch in 2 teaspoons cold water and stir into stew. Cover and program to STEW for 1 more hour. TURKEY AND BROCCOLI ALFREDO (SERVES 4) 1/2 (16 ounce) packaged linguine* 1 cup fresh or frozen broccoli flowerets 1 (10.75 ounce) can Condensed Cream of Mushroom Soup (Regular or 98% Fat Free) 1/2 cup milk 1/2 cup grated Parmesan cheese 1/4 teaspoon ground black pepper 2 cups cubed cooked turkey Cook the linguine according to the package directions (you can use the Infinity Cooker's SIMMER|SAUTÉ|SEAR function to boil pasta and set aside). Add the broccoli for the last 4 minutes of the cooking time. Drain the linguine and broccoli well in a colander. Add the soup, milk, cheese and black pepper into the inner pot and set to SIMMER|SAUTÉ. Add the turkey and linguine mixture and cook until it's hot and bubbling (you may increase temperature if necessary). Serve with additional Parmesan cheese. RECIPES COURTESY OF ALLRECIPES.COM: 33 LIMITED WARRANTY* ONE (1) YEAR WARRANTY IS ONLY VALID WITH A DATED PROOF OF PURCHASE 1. Your small kitchen appliance is built with precision, inspected and tested before leaving our factory. 2. It is warranted, to the original purchaser to be free from any manufacturing defects under normal use and conditions for one (1) year, cord excluded. This Warranty applies only to the original purchaser of this product. 3. If you need to exchange the unit, please return it in its original carton, with a sales receipt, to the store where you purchased it. If you are past the stores allowed return policy period, please see the enclosed Warranty. 4. If you use your appliance for household use and according to instructions, it should give you years of satisfactory service. 5. During the one-year warranty period, a product with a defect will be either repaired or replaced with a new or reconditioned comparable model (at our option) when the product is returned to our Service Center. (See the “Returns” section below). 6. The repaired or replacement product will be in warranty for the remaining balance of the one-year warranty period and an additional one-month period. 7. This limited warranty covers appliances purchased and used within the 50 contiguous states plus the District of Columbia and does NOT cover: - Damages caused by unreasonable use, neglect, normal wear and tear, commercial use, improper assembly or installation of product. - Damages caused in shipping. - Damages caused by replacement or resetting of house fuses or circuit breakers. - Defects other than manufacturing defects. - Breakage caused by misuse, abuse, accident, alteration, lack of proper care and maintenance, or incorrect current or voltage. - Lost or missing parts of the product. Parts will need to be purchased separately. - Damages of parts that are not electrical; for example: cracked or broken plastic or glass. - Damage from service or repair by unauthorized personnel. - Extended warranties purchased via a separate company or reseller. - Consumer’s remorse is not an acceptable reason to return a product to our Service Center. *One Year Limited Warranty valid only in the 50 contiguous states plus the District of Columbia, excluding Puerto Rico and the Virgin Islands. This warranty is effective only if the product is purchased and operated in the USA; product usage which is in violation of the written instructions provided with the unit will void this warranty. For international warranty, please contact the local distributor. **Any instruction or policy included in this manual may be subject to change at any time. MAXI-MATIC, USA 18401 E. Arenth Ave. City of Industry, CA 91748 Customer Service Dept: (626) 912-9877 Ext: 120/107 MON-FRI 8am-5pm PST Website: www.maxi-matic.com email: [email protected] 34 RETURN INSTRUCTIONS RETURNS: A. B. Any return of defective merchandise to the manufacturer must be processed accordingly by first contacting customer service (contact information shown below) to obtain an RA # (Return Authorization Number). We will not accept any returns of merchandise without an applicable RA #. IMPORTANT RETURN INSTRUCTIONS. Your Warranty depends on your following these instructions if you are returning the unit to Maxi-Matic USA: 1. Carefully pack the item in its original carton or other suitable box to avoid damage in shipping. 2. Before packing your unit for return, be sure to enclose: a) Your name, full address with zip code, daytime telephone number, and RA#, b) A dated sales receipt or PROOF OF PURCHASE, c) The model number of the unit and the problem you are having (Enclose in an envelope and tape directly to the unit before the box is sealed,) and d) Any parts or accessories related to the problem. 3. Maxi-Matic USA recommends you ship the package U.P.S ground service for tracking purposes. We cannot assume responsibility for lost or damaged products returned to us during incoming shipment. For your protection, always carefully package the product for shipment and insure it with the carrier. C.O.D shipments cannot be accepted. 4. All return shipping charges must be prepaid by you. 5. Mark the outside of your package: MAXI-MATIC USA 18401 E. ARENTH AVE. CITY OF INDUSTRY, CA 91748 6. Once your return has been received by our warehouse, Maxi-Matic USA will repair or replace the product if it is defective in material or workmanship, subject to the conditions in paragraph B. 7. Maxi-Matic will pay the shipping charges to ship the repaired or replacement product back to you. 35