1
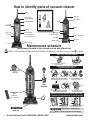
Owner’s Guide
AS1090- AS1099 Series
Upright vacuum cleaner; household type.
Thank you for purchasing your new Eureka vacuum!
Important instructions
For easy assembly, please take a few
moments to read this owner’s guide.
To view an assembly video, go to Eureka.com/
videos or scan QR code. If you have questions
about your new vacuum, please contact our
customer service helpline at 1-800-282-2886.
We're here to help!
Guía del Propietario
¡Gracias por la compra de su nueva aspiradora
Eureka!Pour visualiser la vidéo d’assemblage, rendez-vous à
al cliente llamando al
1-800-282-2886. ¡Estamos aquí para ayudarle!
Le Guide du Propriétaire
Merci d’avoir acheté votre nouvel aspirateur
Eureka!ur visualiser la vidéo d’assemblage, rendez-vous à
pirateur, veuillez contacter notre Ligne d'aide du
1-800-282-2886. Nous sommes là pour vous aider!
www.eureka.com
© 2014 Electrolux Home Care Products, Inc. Printed in China PN 88595
Where to find important vacuum information
Keep this information
Write the model, type and serial number here:
Date of purchase (keep your receipt) _______________
Model number and type _________________________
Serial number _________________________________
Find these numbers on a label on the middle back side
of the vacuum cleaner. Refer to these numbers when
ordering parts and accessories or if service is needed.
Before you start your vacuum cleaner
Refer to Quick Start Guide for assembly and use. This Owner’s Guide provides
important instructions to prolong the life of your Eureka vacuum cleaner.
Registration: To register your product visit www.eureka.com and click on the ‘Register Your Product’ link
in the top right corner.
Inspection: Carefully unpack and inspect your new Eureka vacuum cleaner for shipping damage. Each unit
is tested and thoroughly inspected before shipping. For instructions regarding any shipping damage, call
Eureka Customer Service HELPLINE 1-800-282-2886 immediately.
Table of contents
Important safeguards . . . . . . . . . . . . . . . . . . . . . . . . . . . . . . . . . . . . . . . . . . . . . . . . . . . . . . . . . . . . . . . . . . .1
How to identify parts of vacuum cleaner . . . . . . . . . . . . . . . . . . . . . . . . . . . . . . . . . . . . . . . . . . .2
Maintenance schedule . . . . . . . . . . . . . . . . . . . . . . . . . . . . . . . . . . . . . . . . . . . . . . . . . . . . . . . . . . . . . . . . . .2
Dust cup, filter, screen and exhaust/HEPA filter.
How to use accessories . . . . . . . . . . . . . . . . . . . . . . . . . . . . . . . . . . . . . . . . . . . . . . . . . . . . . . . . . . . . . . . . .3
Automatic cord rewind, wand, crevice tool, dusting brush, turbo nozzle and stair hose.
How to maintain your vacuum cleaner . . . . . . . . . . . . . . . . . . . . . . . . . . . . . . . . . . . . . . . . . . . . . . . . . . . .4
Maintain brush roll, replace U belt and how to clear a blockage.
How to maintain turbo nozzle . . . . . . . . . . . . . . . . . . . . . . . . . . . . . . . . . . . . . . . . . . . . . . . . . . . . . . . . . . . .5
Eureka limited warranty information . . . . . . . . . . . . . . . . . . . . . . . . . . . . . . . . . . . . . . . . . . . . . . . . . . . . . .5
Thermal cut-off and problem solving . . . . . . . . . . . . . . . . . . . . . . . . . . . . . . . . . . . . . . . . . . . . . . . . . . . . .6
Spanish owner’s guide . . . . . . . . . . . . . . . . . . . . . . . . . . . . . . . . . . . . . . . . . . . . . . . . . . . . . . . . . . . . . . .7-13
French owner’s guide . . . . . . . . . . . . . . . . . . . . . . . . . . . . . . . . . . . . . . . . . . . . . . . . . . . . . . . . . . . . . . .14-20
Order forms and parts list . . . . . . . . . . . . . . . . . . . . . . . . . . . . . . . . . . . . . . . . . . . . . . . . . . . . . . . . . . . . . . .21
! Follow caution information wherever you see this symbol.
Eureka Customer Service HELPLINE 1-800-282-2886
www.eureka.com
IMPORTANT SAFEGUARDS
When using an electrical appliance, basic precautions should always be followed, including the following:
READ ALL INSTRUCTIONS BEFORE USING THIS VACUUM CLEANER
WARNING
ENGLISH
!
To reduce the risk of fire, electric shock, or injury:
• Do not use outdoors or on wet surfaces.
• Do not leave vacuum cleaner when plugged in. Turn off the switch and unplug the electrical
cord when not in use and before servicing.
• Do not allow to be used as a toy. Close attention is necessary when used by or near children.
• Use only as described in this manual. Use only manufacturer's recommended attachments.
• Do not use with damaged cord or plug. If vacuum cleaner is not working as it should, has been
dropped, damaged, left outdoors, or dropped into water, return it to a service center before using.
• Do not pull or carry by cord. Do not use cord as a handle. Do not close a door on cord or pull cord
around sharp edges or corners. Do not run vacuum cleaner over cord. Keep cord away from
heated surfaces.
• Do not use extension cords or outlets with inadequate current carrying capacity.
• Turn off all controls before unplugging.
• Do not unplug by pulling on cord. To unplug, grasp the plug, not the cord.
• Hold plug when rewinding into cord reel. Do not allow plug to whip when rewinding.
• Do not handle plug or vacuum cleaner with wet hands.
• Do not put any object into openings. Do not use with any opening blocked; keep free of dust, lint,
hair, and anything that may reduce airflow.
• This vacuum cleaner creates suction and contains a revolving brush roll. Keep hair, loose clothing,
fingers, and all parts of body away from openings and moving parts.
• Do not place vacuum cleaner on furniture or stairs as the brush roll may cause damage. Use extra
care when cleaning stairs. Place vacuum cleaner on floor with the handle in storage
position while using attachments.
• Do not pick up anything that is burning or smoking, such as cigarettes, matches, or hot ashes.
• Do not use without dust cup, filter and screen, and HEPA exhaust filter in place.
• Belt pulleys can become hot during normal use. To prevent burns, avoid touching the belt pulley
when servicing the drive belt.
• Do not use to pick up flammable or combustible liquids such as gasoline, or use in areas where
they may be present.
• Store your vacuum cleaner indoors in a cool, dry area.
• Keep your work area well lighted.
• Unplug electrical appliances before vacuuming them.
• Unplug before connecting turbo nozzle.
SAVE THESE INSTRUCTIONS
To reduce the risk of electric shock, this appliance has a polarized plug (one blade is wider
than the other). This plug will fit in a polarized outlet only one way. If the plug does not fit fully
into the outlet, reverse the plug. If it still does not fit, contact a qualified electrician to install the
proper outlet. Do not change the plug in any way.
Motor
Do Not Oil the motor or the brush roll at any time. The bearings are permanently lubricated
and sealed.
Eureka Customer Service HELPLINE 1-800-282-2886
www.eureka.com
1
How to identify parts of vacuum cleaner
Handle
SPECIAL FEATURES
Available on some models
Cord clip
Turbo nozzle
(on some models)
Filter assembly
(located inside dust cup)
Air path
selector knob
Carry handle
Turbo
nozzle
Dust cup release
Hose
WAND
2
Wand 2
Dust cup
Crevice tool
Dusting brush
Cord rewind switch
Exhaust/HEPA
filter compartment
Power cord
Cord reel
Wand
Turbo cover
Lower hose retainer
(located behind dust cup)
Power switch
Brushroll on/off pedal
Brush roll cover
Height
adjustment knob
!
Base hose
Handle release
Maintenance schedule
Maintenance Schedule is also located on back side of dust cup.
READ ALL INSTRUCTIONS BEFORE USING THIS VACUUM CLEANER. Moving parts! Power switch is marked I for On/Off.
DUST CUP – Empty after each use
Press lever to release bottom lid.
Debris will empty.
Close bottom lid
until it clicks.
Washable dust cup filter DCF25 Clean
as needed to maintain suction.
Wa
sh
able
Washable filter
DCF-25
Pull filter latch to release dust cup cover. Lift out
cup filter. Wash filter; allow to air dry thoroughly.
Lift out filter tube and screen. Shake off
dust. Rinse; dry thoroughly.
Filter
assembly
Align tabs on filter tube, screen and cup;
drop into position. Reinstall cup filter.
Exhaust filter
EF6
Close cover.
Filters and screen must be in
place for cover to lock.
EXHAUST FILTER EF6 – Check filter regularly. Replace every
6-12 months or when performance loss is noticeably declining
( HEPA filter
on some models)
W belt
Remove dust cup. Press down tab and Lift out filter and replace. Reinstall
remove filter cover.
cover and snap into place.
Brush roll
2 Eureka Customer Service HELPLINE 1-800-282-2886
BRUSH ROLL – Clean monthly
W BELT – Replace worn, cut or out of shape belt
www.eureka.com
How to use accessories
C A U T I O N
LS
FLO
TOO
OR
S
Fig.1
Fig. 2
Fig.3
Fig.4
ENGLISH
When using tools, always place handle
in upright position to raise vacuum to
highest carpet setting. Brush roll will
continue to turn when vacuum is turned
on and handle is in upright position. Do
not tilt vacuum forward while using tools.
To avoid damage, do not set vacuum on
carpet, carpeted stairs, furniture or
fringed rugs when using tools.
Before using accessories
• Turn air path selector knob to ‘tools’ (Fig. 1).
• Pull out cord to desired length.
Do not pull past red line (Fig. 2).
• Push cord into cord clip (Fig. 3).
• To store, press switch to retract cord (Fig. 4).
2-Position wand
WAND
1
(wand 2 on some models or available for purchase)
• Loosen wand and hose from vacuum.
• Push tool onto end of wand (Fig. 5).
• Short wand: Push hose release button to
remove wand 1. Attach tool to end of hose.
WAND
1
WAND
2
Dusting brush
WAND
2
WAND
1
• Longer wand: Slide off wand 2 and turn over,
then push opposite end onto wand 1.
Wand 1
Use for baseboards, corners
and tight spaces.
Fig.5
WAND
2
Crevice tool
WAND
1
Use for furniture, drapes and vents.
Wand 2 (on some models)
Turbo nozzle
(on some models or available for purchase)
Use for furniture and stairs.
Stairs – make sure vacuum is below
you, pushed against the bottom step.
• Attach turbo nozzle to end of hose.
NOTE: Hose length can be increased by
releasing the hose from the hose retainer
on back of unit. Reposition hose inside
hose retainer after using accessories.
Eureka Customer Service HELPLINE 1-800-282-2886
www.eureka.com
3
!
How to maintain your vacuum cleaner
Make sure vacuum cleaner is turned off and power cord is unplugged.
Maintain brush roll
Motor pulley can become hot with normal use.
Remove hair and threads from brush roll periodically. Do not remove end caps.
!
Check W belt. Replace if worn, cut or out of shape.
Avoid touching the motor shaft when checking brush roll or belt.
How to replace brush roll or belt
• Step on handle release to lower handle flat
onto floor (Fig.1).
• Remove 4 screws from brush roll cover.
(Fig. 2).
Fig.1
Fig. 2
Fig. 3
Fig. 4
Fig. 5
Fig. 6
• Lift off brush roll cover. (Fig. 3).
• Remove brush roll and belt. Thread new
belt around motor shaft and brush roll
(Fig. 4).
• Insert left end of brush roll first. Make sure
end cap fits into base. Pull right side of
brush roll to stretch belt and insert right
end cap into base (Fig. 5). Make sure it
slides into position.
• Rotate brush roll 2 turns to center belt.
• Replace brush roll cover (Fig. 3).
• Replace 4 screws (Fig. 6).
How to clear a blockage
!
4
Make sure vacuum is turned off and power cord is unplugged.
Hose blockage
• Remove hose from hose retainer. Flex the
hose to loosen any blockage (Fig.1).
• Remove dust cup. Set air path knob to ‘floors.’
Use finger to check for debris (Fig 2).
Fig. 1
• Base hose – Pull down to loosen end of
base hose. Use finger to clear blockage.
Snap hose end back up into position (Fig 3).
• Hose connector – Pull out on left side tab
to remove connector. Remove debris. Align
tab at right and snap connector back into
Fig. 2
Fig. 3
place (Fig. 4).
Eureka Customer Service HELPLINE 1-800-282-2886
Fig. 4
www.eureka.com
How to maintain turbo nozzle (on some models)
1) Turn nozzle onto back
side. Remove 1 screw.
2) Rotate lower part of
cover down over brush
and lift off cover.
3) Clear blockage from
brush roll area. Use
scissors to clip
threads or hair.
4) Place cover back
into position.
Tighten screw.
ENGLISH
The Eureka limited warranty
Eureka warrants this vacuum cleaner to be free from defects in
material and workmanship for a term of three years for normal
household use. Warranty is granted only to the original
purchaser and members of immediate household.
USA: 1-800-282-2886
Mexico: (55) 5343-4384
Canada: 1-800-282-2886
Electrolux Home Care
North America Service Division
P.O. Box 3900
Peoria, IL 61612
Electrolux Home Care
Electrolux Home Care
North America Service Division
5855 Terry Fox Way
Mississauga, Ontario L5V 3E4
This warranty is good for three years from the date of purchase
only when the vacuum cleaner is used in the accordance with
Eureka operating instructions. Note: refurbished or
remanufactured products have a one year limited warranty.
Obtaining warranty service
outside your community
You must pay the shipping charges to the Eureka Authorized
Warranty Station.
This warranty does not cover
• Parts of the vacuum that require replacement under
normal use such as disposable dust bags, filters,
drive belts, light bulbs, brush roll, bristles, impellers
and cleaning.
Return shipping charges will be paid by the Warranty Station.
When returning parts for repair, please include the model, type
and serial number located on the rating plate on the lower
backside of the vacuum.
• Damages or malfunctions caused by negligence,
abuse, and use not in accordance with the
Owner’s Guide.
• Defects or damages caused by unauthorized
service or the use of other than Genuine Eureka,
ARM & HAMMERTM and FiltreteTM by 3M parts.
What Eureka will do
Eureka will, at its option, repair or replace a defective vacuum
or vacuum part that is covered by this warranty. As a matter of
warranty policy, Eureka will not refund the consumer’s
purchase price.
Obtaining warranty service
To obtain warranty service you must return the vacuum
or vacuum part along with “proof of purchase” to any Eureka
Authorized Warranty Station. For Eureka Authorized Warranty
Station or Service Information, visit www.eureka.com,
write or telephone toll free:
Further limitations and exclusions
Any warranty that may be implied in connection with your
purchase or use of the vacuum, including any warranty of
Merchantability or any warranty for Fitness For A Particular
Purpose is limited to the duration of this warranty. Some states
do not allow limitations on how long an implied warranty lasts,
so the above limitations may not apply to you.
Your relief for the breach of this warranty is limited to the relief
expressly provided above. In no event shall the manufacturer
be liable for any consequential or incidental damages you may
incur in connection with your purchase or use of the vacuum.
Some states do not allow the exclusion or limitation of
incidental or consequential damages, so the above limitation
or exclusion may not apply to you.
This warranty gives you specific legal rights. You may
also have other rights, which may vary by state.
The ARM & HAMMER name is a trademark of Church and Dwight Co., Inc.
3M and Filtrete are trademarks of 3M Company, used by Electrolux Home Care
Products, Inc. under license.
Eureka Customer Service HELPLINE 1-800-282-2886
www.eureka.com
5
Problem solving
! Make sure vacuum is turned off and power cord is unplugged.
N O T I C E : Thermal cut-off
This vacuum cleaner has a special thermostat that protects the vacuum in case of motor overheating. If the vacuum suddenly shuts off, proceed as follows:
1) Push the power switch to off and unplug the vacuum.
2) Check the vacuum for a possible source of overheating such as a full dust cup, blocked hose or clogged filter. If these conditions are found, fix them
and wait at least 30 minutes before attempting to use the vacuum.
3) After the 30 minute period, plug the vacuum back in and turn on the switch. If the vacuum still does not work, call the Eureka customer service helpline.
Power plug
• Push plug securely into outlet, try another outlet or
check circuit breaker.
Power switch
• Step on power switch to turn vacuum on.
Thermal cut-off
• See detailed "thermal cut-off" instructions above.
Dust cup and filter
• Empty dust cup, clean and/or change filter.
• Clean or replace filters regularly to maintain suction. Page 2
• If picking up fine dust, the dust cup may not look full, but a fine substance
tends to reduce suction when it blocks air flow through the filter and screen.
Refer to page 2 for filter maintenance. Make sure filter, screen and dust cup
are installed properly.
Air path selector
• Turn selector knob to ‘floors.’
Belt
• Replace a worn, cut or out of shape belt. Page 4
Hose
• Remove clogs from the hose that restrict the airflow. Make sure hose
is replaced into hose retainer. Page 4
Bare floor setting
Dust cup and filter
• For bare floor cleaning, turn height adjustment knob
to bare floor position. Step on brushroll on/off pedal to
turn off the brushroll.
• For carpet cleaning, step on the brushroll on/off pedal to ensure the brushroll
is on. Adjust height adjustment knob to appropriate carpet height setting.
• Empty dust cup, clean and/or change filter.
• Clean or replace filters regularly to maintain suction. Page 2
• If picking up fine dust, the dust cup may not look full, but a fine substance
tends to reduce suction when it blocks air flow through the filter and screen.
Refer to page 2 for filter maintenance. Make sure filter, screen and dust cup
are installed properly.
Air path selector
• Turn selector knob to ‘tools.’
Hose
• Remove clogs from the hose that restrict the airflow. Make sure hose
is replaced into hose retainer. Page 4
Turbo nozzle will not turn
(on some models).
Rotating brush
• Check turbo nozzle for debris. Page 5
• If no suction at end of hose, turn selector knob to ‘tools.’
Vacuum is hard
to push.
Vacuum height setting
• Adjust knob to a higher position.
Motor will not start.
Vacuum does not clean
carpet or bare floor.
Carpet height setting
No suction at the
end of hose.
6
Solution
Cause
Problem
Belt
• Replace a worn, cut or out of shape belt. Page 4
Burning smell; brush roll
will not turn.
Belt
• Check brush roll for debris. Page 4
• Replace broken or out of shape belt. Page 4
Cord will not rewind fully.
Cord tangles
• Pull out entire cord removing any kinks, and push button to rewind
completely.
Eureka Customer Service HELPLINE 1-800-282-2886
www.eureka.com
Dónde encontrar información importante sobre la aspiradora
Guarde esta información
Escriba aquí el modelo, tipo y número de serie:
Fecha de la compra (guarde su recibo) ________________
Número del modelo y tipo ___________________________
Número de serie __________________________________
Encuentre estos números en la etiqueta que se encuentra
en la parte baja del lado de atrás de la aspiradora. Refiérase
a estos números cuando ordene piezas y accesorios o si
necesita servicio de mantenimiento.
Antes de hacer funcionar su aspiradora
Consulte la Guía Rápida para Empezar, para obtener información sobre el ensamble y el uso. Esta guía
del propietario le proporcionará instrucciones importantes para prolongar la vida de su aspiradora Eureka.
Registro: Para registrar su producto visite www.eureka.com y haga clic en el enlace ‘Register Your Product’
en la esquina superior derecha.
Índice de materias
Salvaguardas importantes . . . . . . . . . . . . . . . . . . . . . . . . . . . . . . . . . . . . . . . . . . . . . . . . . . . . . . . . . . . . .8
Cómo identificar las piezas de la aspiradora . . . . . . . . . . . . . . . . . . . . . . . . . . . . . . . . . . . . . .9
Programa de mantenimiento . . . . . . . . . . . . . . . . . . . . . . . . . . . . . . . . . . . . . . . . . . . . . . . . . . . . . . . . . . .9
Taza para el polvo, filtro, pantalla y filtro de escape/HEPA.
Cómo usar los accesorios . . . . . . . . . . . . . . . . . . . . . . . . . . . . . . . . . . . . . . . . . . . . . . . . . . . . . . . . . . . .10
Rebobinador automático del cable, varilla, herramienta para ranuras,
cepillo desempolvador, boquilla turbo y manguera para escalones.
Cómo dar mantenimiento a su aspiradora . . . . . . . . . . . . . . . . . . . . . . . . . . . . . . . . . . . . . . . . . . . . . .11
Cómo mantener el cepillo de rodillo, cambiar la banda tipo U y cómo despejar un bloqueo.
Cómo hacer mantenimiento de la boquilla turbo . . . . . . . . . . . . . . . . . . . . . . . . . . . . . . . . . . . . . .12
Información sobre la Garantía Limitada de Eureka . . . . . . . . . . . . . . . . . . . . . . . . . . . . . . . . . . . .12
Interruptor térmico y resolución de problemas . . . . . . . . . . . . . . . . . . . . . . . . . . . . . . . . . . . . . . .13
Guía del propietario en francés . . . . . . . . . . . . . . . . . . . . . . . . . . . . . . . . . . . . . . . . . . . . . . . . . .14-20
Formularios para ordenar y lista de piezas . . . . . . . . . . . . . . . . . . . . . . . . . . . . . . . . . . . . . . . .21-22
! Cuando vea este símbolo aplique la información sobre tener cuidado.
LÍNEA DE AYUDA de Atención al Cliente de Eureka: 1-800-282-2886
www.eureka.com 7
ESPAÑOL
Inspección: Con cuidado, desempaque e inspeccione su nueva aspiradora Eureka para ver si ha ocurrido
algún daño durante el envío. A cada unidad se la somete a pruebas y se la inspecciona completamente antes
de su envío. Para recibir instrucciones con respecto a cualquier daño ocurrido durante el envío, llame inmediatamente a la LÍNEA DE AYUDA del Servicio al Cliente de Eureka, al 1-800-282-2886.
SALVAGUARDAS IMPORTANTES
Al usar un artefacto eléctrico siempre se deben tomar precauciones básicas, incluyendo lo siguiente:
ANTES DE USAR ESTA ASPIRADORA, LEA TODAS LAS INSTRUCCIONES
ADVERTENCIA
!
Para reducir el riesgo de incendio, de descarga eléctrica, o de lesiones:
• No la use a la intemperie ni sobre superficies mojadas.
• No deje sola a la aspiradora cuando se encuentre enchufada. Cuando no esté en uso, y antes de darle
mantenimiento, apague el interruptor y desconecte el cable de alimentación eléctrica.
• No permita que se la utilice como si fuera un juguete. Cuando sea usada por niños, o cerca de niños, es
necesario prestar mucha atención.
• Usar sólo como se describe en este manual. Usar sólo aditamentos recomendados por el fabricante.
• No usar con un cable o enchufe dañado. Si la aspiradora no está funcionando como es debido, si se la ha dejado
caer, si ha sido dañada, si se la ha dejado a la intemperie, o si se la dejó caer en el agua, retórnela a un centro
de servicio antes de usarla.
• No jalar del cable, ni usarlo para transportarla. No use el cable como si fuese una agarradera. No cierre una
puerta sobre el cable ni jale el cable alrededor de aristas ni de esquinas afiladas. No deje que la aspiradora pase
sobre el cable. Mantenga al cable lejos de las superficies calientes.
• No use cables de extensión ni tomacorrientes que no tengan suficiente capacidad para transportar la corriente.
• Apague todos los controles antes de desenchufar.
• No desconectar jalando del cable. Para desconectar, agarre del enchufe, no del cable.
• No maneje el enchufe ni la aspiradora con las manos mojadas.
• Sostenga el enchufe al rebobinar el cable en su carrete. No permita que el enchufe dé latigazos al rebobinarse.
• No ponga ningún objeto dentro de las aberturas. No la use si alguna de las aberturas está bloqueada;
manténgala libre de polvo, de hilachas, de pelo, y de cualquier cosa que pueda reducir el flujo del aire.
• Esta aspiradora crea succión y contiene un cepillo de rodillo giratorio. Mantenga el cabello, la ropa suelta, los
dedos y todas las partes del cuerpo, lejos de las aberturas y piezas móviles.
• No coloque la aspiradora encima de muebles ni de escaleras puesto que el cepillo de rodillo puede causar daño.
Mientras use los aditamentos, coloque la aspiradora sobre el piso, con la agarradera en la posición de
almacenamiento.
• No aspire ninguna cosa que se esté quemando o que esté humeando, como cigarrillos, fósforos, o cenizas calientes.
• No usar si la taza para el polvo, el filtro y la pantalla, y el filtro de escape HEPA no están en su sitio.
• Las poleas de la banda se pueden calentar durante el uso normal. Para evitar quemaduras, evite tocar la polea
de la banda cuando dé mantenimiento a la banda de transmisión.
• Tenga cuidado extra cuando haga limpieza en escaleras.
• No la use para recoger líquidos inflamables ni combustibles como gasolina, ni la use en zonas donde ellos
puedan estar presentes.
• Almacene su aspiradora bajo techo, en un lugar fresco y seco.
• Mantenga su área de trabajo bien iluminada.
• Desconecte los aparatos eléctricos, antes de limpiarlos con la aspiradora de polvo.
• Desenchufe el aparato antes de conectare la boquilla turbo.
GUARDE ESTAS INSTRUCCIONES
Para reducir el riesgo de descargas eléctricas, este aparato tiene un enchufe polarizado (uno de los contactos es
más ancho que el otro). Este enchufe encaja en un tomacorriente polarizado sólo en una dirección. Si el enchufe no
encaja bien en el tomacorriente, déle la vuelta al enchufe. Si todavía no encaja, contacte a un electricista calificado para
que instale un tomacorriente correcto. No haga ningún cambio en el enchufe.
Motor
Nunca aceite el motor ni el cepillo de rodillo. Los cojinetes son lubricados permanentemente y sellados.
8
LÍNEA DE AYUDA de Atención al Cliente de Eureka: 1-800-282-2886
www.eureka.com
Cómo identificar las piezas de la aspiradora
CARACTERÍSTICAS ESPECIALES
Disponibles con algunos modelos
Agarradera
Boquilla turbo
(algunos modelos)
Liberación del recipiente
para el polvo
Perilla para
seleccionar la
trayectoria
del aire
Agarradera para
transportar
Boquilla
turbo
Unidad del filtro
(situada dentro del
recipiente para el polvo)
Manguera
WAND
2
Cobertura turbo
Varilla 2
Taza para el polvo
Compartimiento del
filtro de escape/HEPA
Cable de
alimentación
eléctrica
Carrete
del cable
(situado detrás de la taza para el polvo)
Varilla
La herramienta
para ranuras
Cepillo desempolvador
Interruptor del rebobinador del cable
Retén inferior
de la manguera
El interruptor de encender
Pedal de encendido/apagado
del cepillo de rodillo
Perilla de ajuste
de altura
!
Clip del cable
Manguera de la base
Liberación de la agarradera
Cubierta del cepillo de rodillo
Programa de mantenimiento
El programa de mantenimiento también se encuentra en la parte trasera de la tapa de la taza para el polvo.
TAZA PARA EL POLVO – Vacíe después de usar cada vez
Presione la palanca para bajar la tapa.
Los desechos se vaciarán.
Wa
sh
able
Cierre la tapa hacia arriba hasta
que quede en su.
FILTRO
RECIPIENTE
Limpie
según
FILTRO
DCF21LAVABLE
– Para
mantenerDEL
la succión
cámbielo,
o límpieloDCF25
regularmente
con el cepillo
para el filtro
sea
necessario
para
mantener
la succión
Filtro lavable
DCF25
Jale la aldaba del filtro para liberar la tapadel
recipiente para el polvo. Saque el filtro
delrecipiente levantándolo hacia arriba. Lave el
filtro,deje que se seque al aire completamente.
Saque el tubo del filtro y la pantalla
levantándolos hacia arriba. Sacuda el
polvo. Enjuage; seque completamente.
Unidad
del filtro
Alinee las lengüetas del tubo del filtro, de
la pantalla y del recipiente; déjelos caer
en su sitio. Vuelva a instalar el filtro del
recipiente. Cierre la cubierta.
Filtro de
escape EF6
(Filtro HEPA con
algunos modelos)
Los filtros y la pantalla
deben estar en su sitio
para que la cubierta se
asegure.
FILTRO DE ESCAPE EF6 – Inspeccione el filtro con regularidad. Reemplácelo
cada 6-12 meses o cuando se note que el rendimiento está declinando
Banda W
Saque la taza
para el polvo.
Cepillo de rodillo
Presione la lengüeta hacia abajo Saque el filtro hacia arriba y cámbielo.Vuelva a instalar la
y retire la cubierta del filtro.
cubierta y haga que entre en su sitio con un chasquido.
CEPILLO DE RODILLO – Limpie cada mes
BANDA W – Cambie una banda gastada, cortada, o deforme
LÍNEA DE AYUDA de Atención al Cliente de Eureka: 1-800-282-2886
www.eureka.com 9
ESPAÑOL
ANTES DE USAR ESTA ASPIRADORA, LEA TODAS LAS INSTRUCCIONES. ¡Piezas móviles! El interruptor para encender y apagar está marcado con un I .
Cómo usar los accesorios
C U I D A D O
Cuando use las herramientas, siempre ponga el
mango en posición vertical para levantar la
aspiradora a la posición para alfombras más alta.
El cepillo de rodillo sigue girando cuando se
enciende la aspiradora y el mango está en posición
vertical. No incline la aspiradora hacia adelante
mientras se utilicen las herramientas. Para evitar
daños, cuando use las herramientas no ponga a la
aspiradora sobre alfombras, escalones alfombrados,
muebles ni tapetes con flequillos.
LS
FLO
TOO
OR
S
Fig.1
Fig. 2
Fig.3
Fig.4
Antes de usar los accesorios
• Gire la perilla selectora de la trayectoria del aire a
‘tools’ (herramientas) (Fig. 1).
• Jale y extienda el cable a la longitud deseada.
No lo jale más allá de la línea roja (Fig. 2).
• Ponga el cable en su clip (Fig. 3).
• Para almacenar, presione el interruptor para que
el cable se retraiga (Fig. 4).
Varilla de 2 posiciones
WAND
1
WAND
2
• Retire la varilla y la manguera de la aspiradora.
• Introduzca la herramienta en el extremo de la
varilla (Fig. 5).
• Varilla corta: Presione el botón de liberación de la
manguera para sacar la varilla 1. Coloque la
herramienta en el extremo de la manguera.
• Varilla más larga: Deslice y saque la varilla 2, déle
la vuelta y coloque el extremo opuesto en la varilla 1.
WAND
2
(Varilla 2 incluida con algunos modelos,
o disponible para la compra)
WAND
1
WAND
1
Varilla 1
Cepillo desempolvador
Herramienta para ranuras
WAND
1
WAND
2
Use para muebles, cortinas y rejillas de ventilación.
Fig.5
Varilla 2 (algunos modelos)
Use para zócalos, rincones y espacios estrechos.
Boquilla turbo
(algunos modelos o disponible para la compra)
Use para muebles y escaleras.
Escaleras – cerciórese de que la aspiradora esté
más abajo que usted, apoyada en el escalón
inferior.
• Coloque la boquilla turbo en el extremo de la
manguera.
NOTA: Se puede incrementar la longitud de la manguera
liberándola de su retén, situado en la parte trasera de la
unidad. Después de usar los accesorios vuelva a colocar
la manguera en su retén.
10
LÍNEA DE AYUDA de Atención al Cliente de Eureka: 1-800-282-2886
www.eureka.com
!
Cómo dar mantenimiento a su aspiradora
Cerciórese de que la aspiradora esté apagada y de que el cable de alimentación esté desconectado
Mantenimiento del cepillo de rodillo
La polea del motor puede calentarse durante el uso normal.
Periódicamente retire los pelos e hilachas del cepillo de rodillo. No quite las tapas de los extremos.
!
Revise la banda W. Si está desgastada, cortada o distorsionada,
cámbiela Evite tocar el eje del motor al inspeccionar la banda del cepillo de
Córodillo.mo cambiar el cepillo
de rodillo o la banda
• Pise el pedal de liberación de la agarradera
para ponerla horizontal en el piso (Fig.1).
• Quite 4 tornillos de la cubierta del cepillo de
rodillo (Fig. 2).
Fig.1
Fig. 2
Fig. 3
Fig. 4
Fig. 5
Fig. 6
• Levante y retire la cubierta del cepillo de
rodillo (Fig. 3).
• Inserte el extremo izquierdo del cepillo de
rodillo primero. Asegúrese que las tapas de
los extremos encajen en la base (Fig. 5).
ESPAÑOL
• Quite el cepillo de rodillo y la banda. Coloque
la nueva banda alrededor del eje del motor y
del cepillo de rodillo (Fig. 4).
• Haga girar 4 vueltas al cepillo de rodillo para
que la banda se centre.
• Vuelva a colocar la cubierta del cepillo de
rodillo (Fig. 3).
• Vuelva a poner los 4 tornillos (Fig. 6).
!
Cómo despejar un bloqueo
Cerciórese de que la aspiradora esté apagada y de que el cable de alimentación esté desconectado.
Bloqueo en la manguera
• Retire la manguera de su retén. Flexione la manguera para
aflojar cualquier bloqueo (Fig.1).
• Saque la taza para el polvo. Coloque la perilla de la
trayectoria del aire en ‘floors’ (pisos). Use un dedo para ve