1
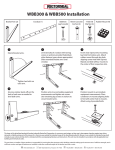
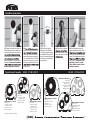
Installation instructions
(1) Determine the path which the lineset will follow and strike a chalk line to
mark the surface material. Attach the
(2)
cured to the siding, measure and
length (not provided). Predrill where
necessary. Duct must terminate
Remember to account for some
seasonal expansion and contraction. Install and fasten LD Ducting
bases. Attach bases only to structure through provided punch outs
from sliding out of position.
(not provided).
will be placed last), along the marked
Typical lineset* capacity
LD-92
(3) Position and twist in
lineset duct clips (Model#
LDC) evenly spaced throughout installation. Nylon cable
ties (not included) slip through
lineset duct clips and fasten
around lineset.
(4) Run lineset, drainhose,
and duct bases and secure
to duct clips using tie wraps
31/2” W x 21/2” D
(5) Snap straight duct top over
mating straight base pieces. Seat
and secure with provided stainless
screws. Duct must terminate with a
out of position. If duct is to be
painted, or duct is a dark
color, adhere cover to base
with pvc cement.
LD-122
41/2” W x 31/4” D
LD-122 w/Dual 3/4” Lineset
BTU - 42,000
Suction Lines - 3/4”OD
(Insulation ) - 1/2”
Liquid Lines - 3/8”OD
(Insulation ) - 1/2”
Drain Hose - 7/8” OD
11/8”
LD-92 w/Single
BTU - 60,000
Suction Line - 11/8”OD
(Insulation) - 1/2”
Liquid Line - 1/2”OD
Drain Line- 3/4”PVC
Lineset
LD-92 w/Dual 3/4” Lineset
BTU - 36,000
Suction Lines - 3/4”OD
(Insulation) - 3/8”
Liquid Lines - 3/8”OD
Drain Line- 3/4”PVC
LD-92 w/Single 3/4” Lineset
BTU - 42,000
Suction Line - 3/4”OD
(Insulation ) - 1/2”
Liquid Line - 3/8”OD
(Insulation ) - 1/2”
Drain Hose - 7/8” OD
* Lineset size may change on Seer Rating
LD-122 w/Single 11/8” Lineset
BTU - 60,000
Suction Line - 11/8” OD
(Insulation) - 1”
Liquid Line - 1/2”OD
Drain Line- 3/4”PVC
LD-122 w/Dual 3/4” Lineset
BTU - 36,000
Suction Lines - 3/4”OD
(Insulation) - 1/2”
Liquid Lines - 3/8”OD
Drain Line- 3/4”PVC
c
®
ZLI080
all Sleeve
INLINE COUPLING
(1)
bases to wall. (2) Cut LF duct
(3) Secure LF duct with split
cap and two screws.
(4) Secure duct into coupler
WALL CONNECTION
(1)
to wall. (2) Place LF duct into
(3) Clamp LF duct with
cap and two screws.
(1) Using a hole saw, drill a hole at the desired
point of penetration. (2) Secure LW base over hole.
(3) Insert LWS sleeve into hole. (4) Install lineset.
(5) Seal and attach LW cover.
cal support to the lineset
duct cover. Without this
slide out of place.
To adjust the opening to
suit lineset size, simply
LWF
LFJ
HOLE
the desired groove, and
break off unwanted
sections.
A coupling can also be
utilized at the duct end
LW
COVER
LF
GROOVES
RIBS
RIBS
LW
BASE
LWS
SLEEVE
31/4 or 41/4 O.D.
LEN
LF
Fitting List
Available in WHITE, IVORY, BROWN and GRAY. Sizes 3 1/2” (92mm) or 4 1/2” (122mm).
Ducting (8ft lengths)
LD
90° Inside Vertical Ell
LCI
Flexible Ell
LF
Coupler
LJ
90° Outside Vertical Ell
LCO
Flexible Adaptor
LFJ
Wall Inlet
LW
45° Inside Vertical Ell
LCFI
Flexible Wall Flange
LWF
LP
45° Outside Vertical Ell
LCFO
Wall Sleeve
LWS
End Fitting
LEN
Tee
LT
Twistlock Lineset clips
LDC
90° Flat Ell
LK
Reducer
LDR
45° Flat Ell
LKF
90° Sweep Ell
LKS
Limited Warranty and Limitation of Liability
RectorSeal Corporation warrants to the original consumer purchaser of its products, that they are free from defects in material or workmanship. If within one year of purchase, this product shall prove to be defective, it shall be repaired or replaced at RectorSeal’s option, subject to the terms and conditions set forth below. Your original receipt of purchase is a requirement to determine warranty eligibility.The
limitations of liability set forth include body and all component parts as well as product itself as a whole.
Any purchaser or third party actions brought for any reason hereunder shall be brought in its entirety in Bristol County and no other jurisdiction, and such actions shall be subject to the laws of the State of Massachusetts. Any notice herein shall be sent to RectorSeal 2601 Spenwick Drive Houston, TX 77055
General Terms and Conditions:
Purchaser must pay all labor and shipping charges necessary to replace product covered by this warranty. This warranty shall not apply to products which, in the sole judgment of RectorSeal, have been subject to negligence, abuse, accident, tampering, misapplication, alteration; nor due to improper installation, operation or maintenance or storage; nor to other than normal application, use or service, including
but not limited to, operational failures cause by corrosion, rust or other foreign materials in the system. Requests for service under this warranty shall be made by returning the defective product to the Retail outlet or to RectorSeal as soon as possible after the discovery of any alleged defect. RectorSeal will subsequently take corrective action as promptly as is reasonable.This warranty sets forth RectorSeal’s sole obligation
and the purchaser’s exclusive remedy for defective products. In all circumstances, RectorSeal’s maximum liability shall not exceed the actual purchase price paid for the product alone. Warranty claims must be registered with Airtec within (30) days of damage or malfunction. RectorSeal reserves the right to visit the site of the installation or to require documentation of the claim before assuming any responsibility under
the provisions of this warranty. Consumer agrees to inspect the product at the time of installation for any reasonable discernable defects and, further, agrees to inspect the product annually. Any damages occurring, which could have been avoided by proper inspection will not be the responsibility of Airtec.RECTORSEAL SHALL NOT BE LIABLE FOR ANY CONSEQUENTIAL, INCIDENTAL, OR CONTINGENT
DAMAGES WHATSOEVER TO THE PURCHASER OR ANY THIRD PARTY. THE FORRGOING WARRANTIES ARE EXLUSIVE AND IN LIEU OF ALL EXPRESS WARRANTIES. IMPLIED WARRANTIES, INCLUDING BUT NOT LIMITED TO THE IMPLIED WARRANTIES OF MERCHANT ABILITY AND FITNESS FOR A PARTICULAR PURPOSE, SHALL NOT EXTEND BEYOND THE DURATION OF THE