1
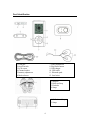
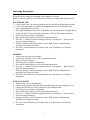
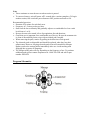
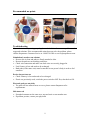
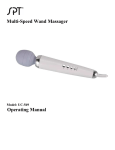
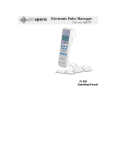
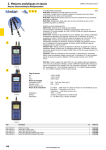
Mini Electronic Pulse Massager
UC-030B
Operating Manual
Contents
Introduction………………………………………………………………………...2
Safety warnings.…………………………………………………………………....3
Part identification ……………………………………………………………… …4
Operating instructions………………………………………………...………….5-6
Program schematics………………..…………………………………………….7-8
Recommended use points...………………………………………………………...9
Trouble shooting……………………………………………………………………9
Warranty info……………………………………………………………………....10
1
Introduction
UC-030B Mini Electronic Pulse Massager is a pain relief product, which delivers electric
impulses to tired and sore muscles. These impulses are generated by the device and
delivered through the connecting wires and electrodes to the target body areas. The
impulses mimic the action potential coming from the central nervous system to trigger
contraction of the muscle. UC-030B is portable, compact, and stylish in design. It may
help relief pain in various parts of the body, such as the lower back, shoulders, joints,
hands and feet. Using UC-030B properly will provide you with a healthy and comfortable
life.
Features of UC-030B Mini Electronic Pulse Massager:
1. Liquid crystal display (LCD) with battery usage indictor
2. Build-in rechargeable lithium battery, DC 3.7V
3. Frequency: 0-200 Hz
4. Main unit measure: 1.69 x 0.51 x 3.30 inches
5. Net weight of the main unit: 1.2 oz (.075 lb)
6. Six massaging modes
7. Adjustable intensity and up to 60 minutes countdown timer
8. Massage slippers and belts connect to the Mini Massager
9. Accessories included: 1 pair of slipper, 2 belts, 6 bands, 4 electrode pads, 2 lead
wires, 1 USB adapter, 1 USB cable, and 2 wire/pad holders
2
Safety warnings
If you have one of the following conditions, please consult with your physician before
purchasing or using this device.
Acute disease; malignant tumor; infective disease; pregnant; heart disease; high fever;
abnormal blood pressure; lack of skin sensation or an abnormal skin condition; any
condition requiring the active supervision of a physician.
Do not use this unit if you are using an implanted electronic medical device such as a
pacemaker or other life-maintaining device.
Do not use this unit if you are wearing electronic medical devices for monitoring
health functions.
Do not use this device while driving.
Do not use this device while sleeping.
Do not use this device in high humidity areas such as bathroom.
Keep this device out of reach of children.
Stop using this device at once if you feel pain, discomfort, dizziness or nausea, and
consult your physician.
Do not attempt to move the electrode pads while the device is operating. Turn off the
device before moving or removing the electrode pads.
Do not use the device around the heart, on the head, mouth, pudendum or blemished
skin areas.
Keep the device away from wet, high-temperature and/or direct-sunlight place.
Medical Electrical Equipment needs special precautions regarding electromagnetic
compatibility (EMC) and needs to be installed and put into service according to the
EMC information provided.
Portable and mobile radio frequency (RF) communication equipment can affect
Medical Electrical Equipment.
Operating temperature range: 32°F to 118°F
Operating humidity: 10% to 85%
Atmospheric pressure: 400hPa to 1060hPa
3
Part Identification
1.USB port
2.On/off switch
3.LCD screen
4.Channel outlets
5.Intensity adjustment
6.Mode selector
7. Timer adjustment
8. Play/Pause button
9. USB charger
10. USB cable
11. Electrode pads
12. Lead wires
1. Magnets
2. Hook and loop
3. Pin holes
4. Snaps
1&2: Hook and loop
3. Snaps
4
Operating Instructions
Before initial use, charge the massager for a minimum of 8 hours.
Make sure power switch is in the OFF position before you connect pad, slipper or belt.
ELECTRODE PAD
1. Connect lead wire(s) by inserting the plug into the Left and/or Right channel outlets.
2. Connect electrode pads to lead wires by snapping them on. This should be done
before applying pads to the skin.
3. Place pads to treatment areas (such as shoulder or lower back), make sure pads do not
touch each other. Press down firmly and ensure a full and firm contact with skin.
4. Switch the power switch to ON position.
5. Press the M (mode) button to select desired massage mode.
6. Press the “+” button to increase massage intensity. Pressing the “-“ button would
decrease massage intensity.
7. During a massage session, pressing the center "►II" button would pause the
operation. Press again to resume.
8. Press the T (timer) button to set massage time, up to 60 minutes, in 10-minute
increments.
SLIPPERS
1. Snap on the lead wire to the slippers.
2. Connect the lead wire to unit’s left or right channel outlet.
3. Place feet into the slippers.
4. Switch the power switch to ON position.
5. Press the M (mode) button to select desired massage mode.
6. Press the “+” button to increase massage intensity. Pressing the “-“ button would
decrease massage intensity.
7. During a massage session, pressing the center "►II" button would pause the
operation. Press again to resume.
8. Press the T (timer) button to set massage time, up to 60 minutes, in 10-minute
increments.
MASSAGE BANDS
1. Snap the lead wires to massage belt.
2. Choose the appropriate band and affix to desired body part (waist, thigh, arm, etc).
3. Connect the lead wire(s) to unit’s left and/or right channel outlet.
4. Switch the power switch to ON position.
5. Press the M (mode) button to select desired massage mode.
6. Press the “+” button to increase massage intensity. Pressing the “-“ button would
decrease massage intensity.
7. During a massage session, pressing the center "►II" button would pause the
operation. Press again to resume.
8. Press the T (timer) button to set massage time, up to 60 minutes, in 10-minute
increments.
5
Note:
• Timer continues to count down even when session is paused.
• To conserve battery, unit will power off 5 seconds after a session completes. To begin
another session, first switch the power button to OFF position and back to ON.
Recommended practices:
• Duration of 20 minute for each body area.
• Frequency of 1-2 times per day per area.
• Start from the lowest intensity and gradually adjust to a comfortable level on a scale
level from to 1 to 10.
• Be sure the area to be treated is free of perspiration, dirt and abrasions.
• Good skin care is important for a comfortable use of device. Be sure the treatment site
is clean of dirt and body lotion, wipe with an alcohol pad if needed.
• When removing the pads, remove by pulling in the direction of hair growth.
• The electrode pads are disposable and should be replaced when they lose their
adhesiveness. However, keeping electrode pads clean will extend their lifespan.
Replace pads to the storage holder immediately after use. Avoid touching with
fingertips due to grease on fingertips.
• The lifespan of the pads will vary depending on the frequency of use. To purchase
additional pads, please contact Sunpentown at 1-800-330-0388 and ask for part
number: PAD-029
Program Schematics
6
Massage Mode
Acupuncture Mode
Tapping Mode
7
Scraping Mode
Cupping Mode
Kneading Mode
8
Recommended use points
Troubleshooting
If your device is not operating properly, please check below for common problems and
suggested solutions. If the recommended action does not solve the problem, please
contact Sunpentown Customer Service at 1-800-330-0388 or [email protected].
Stimulation is weak or non-existent
• Be sure skin is clean and pads are firmly attached to skin.
• Be sure the pads are not touching each other.
• Check wire connection and make sure lead wires are securely plugged in.
• Unit’s battery is low and needs to be recharged.
• Both pads (of the same wire) must be attached to one person’s body in order to feel
sensation.
Devise does not turn on
• Check if battery is low and needs to be recharged.
• If unit was previously used, switch the power switch to OFF first, then back to ON.
Electrode pads are not sticky
• The pads will lose adhesiveness over use, please contact Sunpentown for
replacements.
Skin turns red
• Extended treatment on the same area, stop and wait or treat another area.
• If problem persists, contact your physician.
9
Your Guarantee
If this product is found to be faulty as a result of faulty materials or workmanship
within one year from date of purchase, it will be repaired free of charge.
This guarantee is subject to the following terms:
• Sunpentown must be notified of the fault.
• Proof of purchase must be presented to Sunpentown’s nominated
representative.
• The warranty will be void if the product if modified, misused or repaired by
an unauthorized person.
• The warranty after repair will not be extended beyond the original oneyear period.
• All replacement parts will be new or reconditioned.
• Parts, which are replaced, become the property of Sunpentown.
• The warranty applies for the use of the product in the USA only.
What is NOT COVERED:
• Warranty does not include freight charges.
• Incidental or consequential damage caused by possible defects with this
product.
• Damage to product caused by improper power supply voltage, accident,
fire, floods or acts of nature.
• Failure of product resulting from unauthorized modifications to the product.
• Improper installation or failure to perform the necessary maintenance.
This GUARANTEE is in addition to your Statutory Rights
SUNPENTOWN INTERNATIONAL INC.
14625 Clark Ave. City of Industry, CA 91745
Tel: 800-330-0388
[email protected]
www.sunpentown.com
10