1
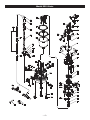
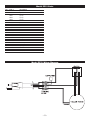
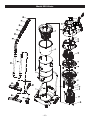
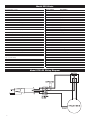
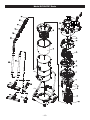
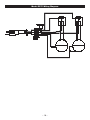
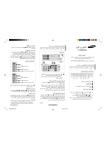
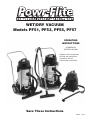
WET/DRY VACUUM
Models PF51, PF53, PF55, PF57
OPERATING
INSTRUCTIONS
COMMERCIAL
WET/DRY VACUUM
Equipment must be operated,
serviced and maintained in
accordance with the
manufacturer’s instructions.
Save These Instructions
X8683 11/05
SAVE THESE INSTRUCTIONS FOR FUTURE REFERENCE
*When using a wet/dry vacuum, basic precautions should be followed.
*Read all instructions before using your vacuum.
IMPORTANT SAFETY ADVICE
GROUNDING INSTRUCTIONS
This appliance must be grounded. If it should malfunction or break down,
grounding provides a path of least resistance for electric current to
reduce the risk of electric shock. This appliance is equipped with a cord
having an equipment-grounding conductor and grounding plug. The plug
must be plugged into an appropriate outlet that is properly installed and
grounded in accordance with all local codes and ordinances.
This appliance is for use on a nominal 120 volt circuit and has a ground
plug (see illustration, right). Make sure that the appliance is connected to
an outlet having the same configuration as the plug. No adaptor should
be used with this appliance.
READ ALL INSTRUCTIONS BEFORE USING THIS
APPLIANCE
When using an electrical appliance, basic precautions should
always be followed.
WARNING
To reduce the risk of fire, electric shock of injury;
only use dryer as described in this manual.
WARNING
You must have training in the operation of this machine before using it.
Read all instructions carefully before use.
Improper connection of the equipment-grounding conductor can result in
a risk of electric shock. Check with a qualified electrician or service person if you are in doubt as to whether the outlet is properly grounded. Do
not modify the plug provided with the appliance – if it will not fit the outlet,
have a proper outlet installed by a qualified electrician.
● Keep children and unauthorized persons away from the machine
when in use.
● Do not leave the machine plugged in when not in use.
● Switch the machine off before removing the plug from the outlet.
Grounded
Outlet
● When unplugging, pull the plug, not the cord.
● The machine must be unplugged prior to cleaning or servicing
the machine .
● Keep the power cord clear of moving parts.
● Do not run the machine over the power cord.
● Do not operate the machine with a damaged power cord or plug,
or if the machine malfunctions or is damaged in any way.
Prong or
Grounding pin
● Do not use where hazardous dust is present.
● Do not use in an explosive atmosphere.
Grounded
Outlet Box
● Do not use where flammable liquids or gasses are present.
● Do not use or pick up flammable chemicals or liquids with
this machine.
DRY OPERATION OF VACUUM
● Take care when using the machine near the top of stairs to avoid
overbalancing.
The wet/dry vacuums are equipped with bypass motors. Install the cloth
filter, place the motor head on the canister and snap down the hold-down
clamps.
● Maintenance and repair must be done by authorized personnel only.
● Wear suitable footwear to avoid slipping.
● Do not operate this machine in bare feet or with open-toed shoes
or sandals.
WET OPERATION OF VACUUM
The wet/dry vacuums are equipped with a bypass motor so that the working vacuum is separated from the cooling air flow. To pick up water, the
dry filter must be removed and the float cage assembly must be in place,
the motor head placed on the canister and the hold down clamps locked
down. The safety float located in the protective wire frame in the tank
stops the vacuum action of the motor head when the maximum recovery
of liquids is reached.
● Do not smoke when using the machine.
● Do not pick up anything that is burning or smoking, such as
cigarettes, matches, or hot ashes.
● Do not use without dust bag and/or filters in place.
● Do not pull or carry by cord, use cord as a handle, close door
on cord, or pull cord around sharp edges or corners. Keep cord
away from heated surfaces. Store cord properly when not in use.
WAND AND ATTACHMENT INSTRUCTIONS
STORAGE INSTRUCTIONS
Store appliance on floor, indoors, away from heated surfaces. Do not pull
or carry by cord, use cord as a handle, close door on cord, or pull cord
around sharp edges or corners. Keep cord away from heated surfaces.
Store cord properly when not in use.
To assemble the two piece wand:
1. Match the alignment ridges of the upper and lower wand sections.
2. Push the upper wand into the lower wand.
To assemble tools:
1. Slide the swivel cuff of the tool onto the tapered lower wand.
2. Turn swivel cuff 1/4 turn to tighten.
–2–
DRAINING
HOSE ATTACHMENT INSTRUCTIONS
When the tank is full, using the overturning mechanism to empty the tank.
1. Remove the top head.
2. Take out the filter with frame.
3. Unlock the knob.
4. Grip the handle with one hand, use one foot to brace the dolly and lift
the handle by the other hand to empty the tank.
NOTE: When the water level in the tank exceeds the safety level, the
safety devise will automatically block the inlet and motor turning sound
will be changed, but power will remain ON. The power must be turned
OFF before emptying the tank.
The hose and swivel connector are pre-assembled at the factory.
To attach the swivel connector to the intake fitting of the canister:
1. Push the grooved cuff straight into the intake fitting.
2. To remove, press the release button on top of the intake fitting
while pulling the grooved cuff out.
MAINTENANCE AND SERVICING
1. To dismantle, unclip both latches and remove top housing and filter
with frame.
2. Wash the filter with water and allow it to dry.
3. After washing, remove excess water with a gentle squeegee.
4. Replace the filter and top housing and fasten the latches.
NOTE: This cleaner is designed with a powerful suction. Do not be
alarmed if the motor noise increases when performing tougher cleaning
work.
REMOVE THE PAPER FILTER
The paper filter must be removed for wet recovery.
Push the metal ping counterclockwise to release the filter.
Remove the paper filter.
–3–
Model PF51 Parts
57
–4–
Model PF51 Parts
ref # item #
2
WD88
4
WD89
7
WD90
WD91
WD92
WD93
10
WD94
11
WD95
12
WD15
13
WD96
15
WD97
17
WD99
18
WD100
20
WD101
29
WD102
30
WD103
33
WD98
41
WD104
42
WD105
49
WD111
53
WD106
56
WD107
57
WD108
58
WD109
59
WD110
description
power cord
top cover
sponge
sponge
sponge
sponge
relief valve
gasket motor
motor
motor holder
cover
float
handle
switch
filter
tank
clamp
wheel holder
wheel
hose assy
wand
squeegee nozzle
floor tool
dust brush
crevice tool
Model PF51 Wiring Diagram
–5–
Model PF53 Parts
20
33
21
18
17
19
22
23
5
24
10
25
16
14
13
3
12
26
26
11
10
2
9
8
27
29
42
1
28
7
42
6
41
30
40
–6–
Model PF53 Parts
Dolly Assembly - ref #1
WD78
WD79
WD80
WD40
WD61
WD81
WD73
WD74
WD62
FM17
WD12
WD52
handle
holder
handle
front wheel
rear wheel
rear wheel shaft
plate
fixed plate
dolly
hex screw
screw
spring
Tank Assembly - ref #2
WD38
WD63
WD44
WD45
WD86
WD46
WD47
WD50
WD76
WD77
WD51
WD59
WD60
stainless tank
clamp assembly
nut
suction coupler
button base
button
spring
rubber washer
rubber washer
holder
fixed plate
lock cover
lock button
Top Head Assembly
ref # item #
10
17
WD20
16
WD65
18
WD66
description
screw
handle
top cover
power cord
ref # item #
WD17
19
WD87
13
WD16
11
WD14
WD69
WD70
WD82
WD83
WD84
WD68
WD54
12
WD15
WD85
9
WD87
8
WD10
7
WD9
6
WD8
42
WD37
41
WD36
40
WD35
description
wire plate
power switch
middle seat
base
sponge
sponge
base block
top block
blocker
gasket
gasket top
motor
stopper
housing base
base cover
float
frame
spring
paper filter
hook
Accessories
ref # item #
5
WD7
3
WD3
22
WD25
21
WD24
20
WD23
25
WD28
26
WD29
24
WD27
23
WD26
29
WD32
30
WD33
description
filter frame (long)
filter and gasket
hose assembly
connector
seal
bend connector
extension wand
fixer
connector
crevice tool
round brush
Model PF53-55 Wiring Diagram
–
Model PF55-PF57 Parts
20
33
21
18
17
19
22
23
5
24
10
25
16
14
13
3
12
26
26
11
10
2
9
8
27
29
42
1
28
7
42
6
41
30
40
–8–
Model PF55-PF57 Parts
ref # item #
Dolly Assembly - ref #1
WD71
WD72
WD75
WD40
FM17
WD41
WD42
WD43
WD12
WD74
WD1
handle
holder
handle
front wheel
hex screw
rear wheel
shaft of rear wheel
plate
screw
fixed plate
dolly
Tank Assembly - ref #2
WD2
WD43
WD44
WD45
WD86
WD46
WD47
WD50
WD76
WD77
WD51
WD59
WD60
WD52
stainless tank
clamp assembly
nut
suction coupler
button base
button
spring
rubber washer
washer
holder
fixed plate
fixed holder
fixed holder
spring
Filter Assembly
WD4
5
WD7
holder
frame
Top Assembly
17
WD20
16
WD19
13
WD16
WD53
WD15
12
WD54
WD55
WD56
description
handle
top cover
middle seat
gasket
motor
gasket
gasket
sponge
11
9
8
7
6
42
41
40
WD85
WD14
WD11
WD10
WD9
WD8
WD37
WD36
WD35
seal plate
holder
motor seat
base
float
frame
spring
paper filter
hook
Cord Assembly
18
WD21
WD17
WD18
19
WD22
power cord
cord plate
screw
power switch
Accessory
22
WD25
21
WD24
20
WD23
25
WD28
26
WD29
24
WD27
23
WD26
29
WD32
30
WD33
hose assembly
connector
seal
bend connector
extension wand
holder
connector
crevice tool
round brush
Nozzle
WD86
WD87
WD88
Nozzle Body
WD89
WD90
WD91
WD92
WD93
WD94
WD95
WD96
–9–
squeegee
wheels
shaft
bottom plate
base cover
rear wheel
shaft 15.5*8*26.5
small wheel
shaft for small wheel
squeegee (long)
squeegee (short)
Model PF57 Wiring Diagram
– 10 –
TROUBLE SHOOTING GUIDE
Loss of Suction
CAUSE:
1) Tank full.
2) Dry filter assembly clogged.
3) Clogged hose or wand.
4) Tank rim is dented.
5) Loose or broken fan.
6) Motor not working.
7) Float not functioning.
8) Seal worn.
SOLUTION:
1) Empty Tank
2) Clean cloth filter.
3) Remove obstruction.
4) Replace tank.
5) Contact manufacturer of service center.
6) Contact manufacturer or service center.
7) Check to see if float moves freely or tank is full.
8) Replace seal.
Motor is not running
CAUSE:
1) Broken switch.
2) Defective power cord.
3) Defective motor.
SOLUTION:
1) Contact manufacturer or service center.
2) Contact manufacturer or service center.
3) Contact manufacturer or service center.
Dust blowing from unit when running
CAUSE:
1) Cloth filter dirty.
2) Cloth filter is torn.
3) Cloth filter is not installed.
chimney soot or sheet rock.
Water blowing from unit when running
CAUSE:
1) Tank is full of liquid.
2) Sudsy or foamy liquid is being picked up.
SOLUTION:
1) Clean cloth filter.
2) Replace filter.
3) Install cloth filter, when vacuuming very fine dust,
SOLUTION:
1) Empty tank.
2) Add defoamer to tank.
The Powr-Flite Limited Warranty
The manufacturer warrants to the original purchaser that products manufactured are free from defects, provided such goods are
installed, operated and maintained in accordance with written manuals or other instructions for a period of 1 year from date of purchase on workmanship, motor, and parts. In case you, as our customer, meet any trouble with your machine, contact a Powr-Flite
representative, who will be happy to be of service to you and will take care of any warranty issues.
3101 Wichita Court
Fort Worth, TX 76140
800.880.2913