1
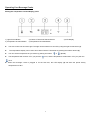
COMPACT BEVERAGE COOLER 268 68 40 01 INSTRUCTION MANUAL PLEASE READ THIS MANUAL CAREFULLY BEFORE INSTALLING AND OPERATING. 1 TABLE OF CONTENTS Contents ____________________Page Beverage Cooler Package Contents 3 Important Safety & Pre-Use Instructions 3 Installation Instructions 3 Operating Your Beverage Cooler 4 Temperature Settings 4 Layout & Storage 5 Care & Maintenance 5 Troubleshooting Guide 6 Technical Information 7 Warranty Information 7 2 Beverage Cooler Package Contents • • Instruction manual 2 Shelves IMPORTANT SAFETY INSTRUCTIONS To reduce the risk of fire, electrical shock, or injury when WARNING using your appliance, follow these basic precautions: Read all instructions before using the beverage cooler. DANGER: Risk of child becoming trapped in new cellar, old beverage cooler/refrigeration unit, or large boxes. Junked or abandoned appliances, boxes and other containers are still dangerous, even if they will “just sit in the garage for a few days”. Before you throw away your old beverage cooler or refrigeration unit: 1. Take off the door. 2. Leave the shelves in place so that children cannot climb inside. Never allow children to operate, play with, or crawl inside the appliance. Never clean appliance parts with flammable fluids. The fumes can create a fire hazard or explosion. Do not store in the vicinity of any other appliance. Do not store near gasoline or any other flammable vapors. The fumes can create a fire hazard or explosion. -Save these instructions- BEFORE USING YOUR beverage cooler Remove the exterior and interior packaging. Before connecting the beverage cooler to the power source, let it stand upright for approximately 2 hours. Clean the interior surface with lukewarm water using a soft cloth. This will reduce the possibility of a malfunction in the cooling system from handling during transportation. INSTALLATION INSTRUCTIONS (a) General Installation Instructions This appliance is designed for free standing installation. Place your beverage cooler on a flat, solid floor that is strong enough to support it when it is fully loaded. To Do not build-in or recess into closed cabinetry. level your beverage cooler, adjust the front leveling leg at the bottom of the beverage cooler. When moving your beverage cooler, please do not incline it more than 45 degrees. Locate the beverage cooler away from direct sunlight and sources of heat (stove, heater, radiator, etc.). Direct sunlight may affect the acrylic coating and heat sources may increase electrical consumption. Extreme cold ambient temperatures may also cause the unit to perform improperly. Avoid locating the unit in damp areas. Plug the beverage cooler into a dedicated (for this appliance only), properly installed and grounded wall outlet. Do not under any circumstances cut or remove the third (grounding) prong from the power cord. Any questions concerning power and/or electrical grounding should be directed to a certified electrician or authorized product service center. 3 Operating Your Beverage Cooler Setting the Temperature Control/Display panel 1) Light Control Button 2) Celsius / Fahrenheit Selector Button 4) Temperature Increase Button 5) Temperature Decrease Button 3) LED Display The wine cooler has an interior light. The light can be switched on and off by using the light control button (1). The temperature display can be set to show either Celsius / Fahrenheit by pushing the selector button (2). You can set the temperature as you desire by pushing the button The temperature will increase 1ºF if you push the or , (4 & 5) once, and the temperature will decrease 1ºF if you push the once. When the beverage cooler is plugged in for the first time, the LED display (3) will show the preset factory temperatures of 38°F. 4 LAYOUT AND STORAGE Your cabinet was designed to store a maximum number of bottles securely. We recommend that you observe the tips below to optimize loading. • Remove tape from shelves once unit is stable and ready for storage. • Disperse the bottles evenly to avoid concentrating weight in one place. Bottles must not touch either the back of the cabinet or the step at the bottom. • Make sure that the bottles are not all grouped together either at the top or bottom of the cabinet. • Only pull out one shelf at a time. Never attempt to pull more than one. • Maximum weight capacity per shelf is 55 lbs. CARE AND MAINTENANCE Cleaning Your beverage cooler. Turn off the power, unplug the appliance, and remove all items including all shelves. Wash the inside surfaces with a solution of warm water and baking soda (approximately 2 tablespoons of baking soda for each quart of water.) Wash the shelves with a mild detergent solution. Wring excess water out of the sponge or cloth when cleaning area of the controls, or any electrical parts. Wash the exterior with warm water and mild liquid detergent. Rinse well and wipe dry with a clean soft cloth. Vacuum the front grill and back of the unit twice yearly. Make sure the power is off before cleaning. It is recommended to clean the unit completely inside and out once a year to maximize the longevity of the beverage cooler. Power Loss Power failures that are corrected within a few hours should not affect the temperature of your appliance if you minimize the number of times the door is opened. If the power is going to be off for a longer period of time, you need to take other measures to protect your contents. If the unit is unplugged, loses power, or is turned off, you must wait 3 to 5 minutes before restarting. Attempting to restart the beverage cooler before this time has elapsed may prevent the beverage cooler from starting. Absence/Vacation Short vacations: You may leave the beverage cooler powered on and unattended for absences of less than three Long vacations: If the appliance will not be used for more than three weeks, remove all items and turn off the (3) weeks. appliance. Clean and dry the interior thoroughly. To prevent mold growth, leave the door open slightly, blocking it open if necessary. Moving Your beverage cooler Remove all items. Securely tape down all loose items (shelves) inside your appliance. Turn the adjustable leg up to the base to avoid damage. Tape the door shut. Be sure the appliance stays secure in the upright position during transportation. Also protect the outside of the appliance with a blanket or similar item. 5 Energy saving Tip The beverage cooler should be located in the coolest area of the room, away from heat producing appliances, and away from direct sunlight. TROUBLESHOOTING GUIDE Many common issues with your beverage cooler can be solved very easily. Try the troubleshooting tips below should you experience any problems. PROBLEM Beverage cooler does not operate. POSSIBLE CAUSE Not plugged in. The appliance is turned off. The circuit breaker tripped or a fuse has blown out. Beverage cooler is not cold enough. Check the temperature control setting. External environment may require a higher setting. (e.g. room needs to be air conditioned) The door is opened too often. The door is not closed completely. The door gasket is not sealing properly. Beverage cooler is turning on and off frequently. The room temperature is hotter than normal. The door is opened too often. The door is not closed completely. The temperature control is not set correctly. The door gasket does not seal properly. The light does not work. Not plugged in. The circuit breaker tripped or a fuse has blown. The light bulb has burned out. The light button is “OFF”. Vibrations. Check to assure that the beverage cooler is on a level surface. The cooler seems to make too much noise. A faint humming noise may come from the flow of the refrigerator, which is normal. As each cycle ends, you may hear gurgling sounds caused by the flow of refrigerator in your beverage cooler. Contraction and expansion of the inside walls may cause popping and crackling noises. The beverage cooler is not on a level surface. The door will not close properly. The beverage cooler is not on a level surface. The door was reversed and not properly installed. The gasket is dirty. The shelves are out of position. The area around the door, top, or side is hot. Your beverage cooler comes with a heating element near the door that keeps frost and condensation off the glass and it’s normal for this area to feel warm. temperature inside the beverage cooler. 6 It will not affect the TECHNICAL DATA 268 68 40 01 Model Number Total bottle capacity 2.2 C.F. Type of cooling Compressor Climate type ST Electricity protection grade I Nominal voltage/Frequency 115 Volts/60Hz 60-77 degrees Fahrenheit Ambient operating temperature Temperature Range 34-43 F Range of inside cabinet humidity 60%RH Item weight 45 lbs Item dimension (W X D X H) 17” X 19” 25 ½” WARRANTY INFORMATION Please speak to your retailer before calling Wine Enthusiast if you did not purchase your beverage cooler directly from Wine Enthusiast. Limited warranty – 90-day replacement plan with a free 9-month upgrade, totaling 1 year, on parts and labor from the date of shipment. For customer service, please contact Wine Enthusiast by e-mail ([email protected]) or by phone (800.648.6058). The limited warranty does not cover: Damage due to such things as accident, misuse, abuse, mishandling, neglect, unauthorized repair or any other cause beyond the control of the seller whether similar or dissimilar to the foregoing. Purchaser understands and acknowledges that the goods sold here are wine refrigerators, which house wine. Purchaser assumes all the risk of using these units, including risk of spoilage, humidity variations, temperature variations, leaks, fires, water damage, mold, mildew, dryness and similar perils that may occur. 7