1
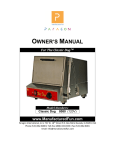
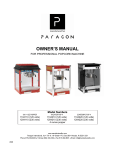
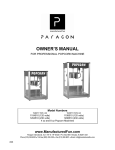
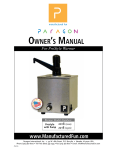
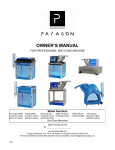
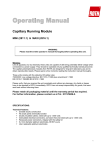
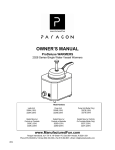
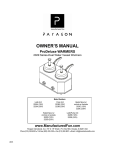
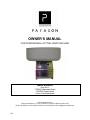
OWNER’S MANUAL FOR PROFESSIONAL COTTON CANDY MACHINE Model Numbers MAGIC SPIN 5” 7105200 (Aluminum Bowl) 7105300 (Plastic Bowl) Cotton Candy Machines www.manufacturedfun.com Paragon International, Inc 731 W. 18th Street P.O. Box 560 Nevada, IA 50201 USA Phone (515) 382-8000 Toll-free (800) 433-0333 Fax (515) 382-8001 Email: [email protected] A513 2 SAFETY PRECAUTIONS Paragon values your continued safety above all else. Please follow these guidelines when using your equipment to prevent injury and maximize product performance: No direct contact to equipment by the general public should be allowed when used in food service locations. Only trained personnel should operate this equipment. Carefully read any and all instructions before beginning operation of the equipment. Always wear safety glasses when servicing equipment. Floss head reaches high speeds during operation. To avoid injury, NEVER place body parts or objects near the floss head assembly while motor is running. Please keep spectators away. Paragon is not responsible for any injuries that may occur due to failure to follow safety precautions. Any alterations made to equipment by anyone other than certified Paragon personnel will void warranty and may also create unsafe working conditions. NEVER make alterations to the equipment. Machine must be properly grounded to prevent electrical shock. Do NOT immerse any other part of this equipment in water. Doing so may damage equipment and prevent it from working properly. Always unplug equipment before cleaning or servicing to prevent electric shock. 3 INTRODUCTION PARAGON IS PROUD TO BE YOUR PARTNER FOR MANUFACTUREDFUN. Our goal is to provide you with the best solutions to attract customers, expand your business, and improve your profits. That’s why this product has been specially-crafted to meet precise specifications for performance, efficiency, and output. Your Paragon Cotton Candy Machine features: • • • • High-performance head with extremely durable tubular styled heating element that won’t fail or clog like other style elements, built entirely with easy-to-clean, reliable metal parts. Heavy-duty, 1/12 hp motor with 3450 rpm, featuring suspension-mounting and protection from stray sugar granules. You can enjoy smooth, vibration-free cotton candy production for years to come. Professional controls like separate motor and heat switches and variable heat control give you complete flexibility during production. You have complete control to make the perfect product! Voltage meter clearly indicates the optimum settings for prime cotton candy production and for maximizing sugar-to-floss yield. Should you have any questions about your equipment, or would like to know more about our other innovative concession equipment and supplies, please contact us at 1-800-433-0333. Thank you for your purchase and enjoy! 4 ELECTRICAL REQUIREMENTS This product requires a properly-grounded 120 volt supply with a 15 amp circuit. (230 volts for export models) We recommend your Paragon Cotton Candy Machine be plugged directly into a dedicated outlet. Extension cords may create a safety hazard and reduce its performance. Be sure outlet accepts three (3) prong grounded plug. DO NOT use a three (3) prong to two (2) prong adapter. UNPACKING Paragon carefully inspects each product during assembly and after completion to adhere to strict quality guidelines, and packs it securely to ensure safe delivery to each of our customers. Be sure to carefully remove all packing material and adhesive before any operation. Please examine your product to guarantee all equipment has arrived, complete and in good condition. If you believe that any damage may have occurred during shipment or parts may be missing, please contact Paragon immediately for replacement. FREQUENTLY ASKED QUESTIONS How much will my cotton candy machine produce? Cotton candy is unique in that production is based largely on operator skill. You may be able to produce anywhere from 100-200 cotton candy cones per hour, based on practice. How much spun sugar will I use? One cone will hold approximately 1 oz. of spun cotton candy sugar – cones will likely not hold more than that. One 18-inch plastic bag will hold 2 oz. of spun cotton candy sugar, or two cones. Based on the amount of total cones you can realistically produce, you should then be able to bag anywhere from 50-100 bags per hour, again depending on your skill. How many cones will a case of floss sugar produce? Pre-made floss sugar comes in a case of six 3-1/4 lb. containers. Each container will yield 5060 cones of spun cotton candy; each case will then yield 300-360 cones. 5 OPERATING INSTRUCTIONS Be sure equipment is connected to properly grounded 120 volt power supply with 15 amp circuit. (230 volts for export models) OPERATION 1. Loosen the two shipping travel knobs. (These are the knurled knobs on either side of the motor cover, below the head.) 2. Press the MOTOR switch to the “ON” position. 3. Fill the spinner head with the desired amount of sugar floss. Never fill the head past the bottom level of the filler spout. (Note: For best results, keep the spinner head full.) 4. Press the HEAT switch to the “ON” position. 5. Turn the HEAT CONTROL knob to heat setting HIGH. 6. Once floss starts to flow out of the head, reduce the HEAT CONTROL to the green range as indicated on the METER. (Note: Too high of a setting will cause cutting of the floss and potentially clog the screen assembly.) 7. When the amount of floss that is being produced starts to slow, add more sugar. DO NOT adjust the HEAT CONTROL knob setting. 8. The typical operating setting on the HEAT CONTROL knob is in the green range on the METER. This will vary due to fluctuations in environmental situations. SHUTTING DOWN 1. Press the HEAT switch to the “OFF” position. 2. Wait 3-5 minutes for the spinner head to cool down. 3. Press the MOTOR switch to the “OFF” position. 4. For end of day procedures, operate the machine until the remaining sugar floss in the head is gone, and then do steps 1-3. 5. IF THE MACHINE IS TO BE MOVED. Retighten the two shipping travel knobs to prevent damage to the head during transit. (Note: Some smoking may appear as the head is run out of sugar. This is normal and will clean any residual sugar from the screen.) In Case of a Malfunction immediately shut-off the MOTOR and HEAT switches and correct the problem. 6 TROUBLESHOOTING 1. Bad vibration. Verify that the shipping travel knobs are loosened. Check to make sure there are no sugar lumps in the spinning head. Be sure machine is located on a firm and level surface. 2. Motor does not operate, but heater is operating. Motor protection has tripped off. Wait one minute and then restart. Capacitor defective: If motor is producing a low humming noise, try spinning the head by hand and if it does start, a capacitor kit may be needed. 3. Floss is being formed with clumps of sugar or floss is forming, but being cut. HEAT CONTROL is set at too high of a setting, lower HEAT CONTROL setting. 4. Head is full of sugar but no floss comes out. Check the setting of the HEAT switch and HEAT CONTROL. Empty head and follow routine cleaning procedures. CLEANING PROCEDURES ROUTINE CLEANING 1. Be sure the MOTOR and HEAT switches are in the “OFF” position. (Cord should also be unplugged from outlet.) 2. Allow the SPINNING HEAD unit and components to cool down to a temperature that is safe to the touch. 3. Remove the four retaining nuts and leather floaters on the top of the SPINNING HEAD unit. 4. Remove the top from the SPINNING HEAD unit by lifting it off. 5. Remove the slinger plate by loosening the two nylon acorn nuts in the center. 6. Disconnect the two heater lead terminations by removing the two nuts (3/8” Hex) and removing the leads from the studs. 7. Remove the outer screen assembly with the heating element by sliding it straight up. 8. The top and the screen assembly with heating element can be cleaned by immersing in hot water and mild detergent. 9. The head base is now accessible for removing the sugar residue by manual cleaning with a damp cloth. 10. After allowing the components to dry completely, the screen assembly with heating element can be reassembled by placing the items on the head base. 11. Reconnect the two heater lead terminations with the two nuts (3/8” Hex) be sure to route the wire leads as to avoid any sharp bends. 12. Reinstall the slinger plate using two nylon acorn nuts. 13. Reassemble the top and secure with the four retaining nuts. Leather floater should be installed on two opposing studs. 7 MAINTANENCE PROCEDURES SPINNING HEAD REMOVAL Note: Head removal is only required for maintenance or severely clogged heads. 1. Be sure the MOTOR and HEAT switches are in the “OFF” position. (Cord should also be unplugged from outlet.) 2. Remove plug button from the motor cover. 3. Align index mark on head apron with access hole on motor cover. 4. With a 1/8” Allen Wrench, loosen the set screw through the access hole. Note: DO NOT remove the set screw. 5. Pull head straight up from motor shaft. Note: For severe clogging, removed head may be inverted and submerged in hot water with a mild detergent to loosen burnt sugar. Use care not to expose the underside of the head, containing the slip rings, to moisture. Component should be dried completely before reassembly. SPINNING HEAD INSTALLATION 1. Align the set screw location with the FLAT on the motor shaft. 2. Lower head fully on motor shaft and tighten set screw through access hole. 3. Pull on head to assure correct seating. 4. Insert plug button in access hole on the motor cover. 8 Spin Magic Head Assembly Set of 2 Floaters 519052 Heating Element Located inside the screen 519106 Screen 519118 Complete Head Assembly (all assembled above): 519066 9 Motor Assembly Set of Brushes (4) ¼” X ¼” 519005 ¼” X 3/8” 519115 1/12 HP Motor 519010 10 Base Assembly Complete Head Assembly 519066 Set of Switches 512400 Voltage Meter 519036 Knob 519092 Other Parts Available: Heat Control 519074 Allen Wrench 513026 Set of 2 Labels 519069 11