1
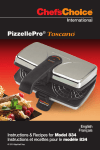
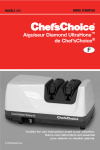
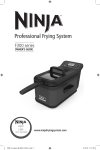
SmartKettle® Cordless Electric Kettle
Model 688
Important Safeguards
When using electrical appliances, basic safety precautions should always be followed,
including the following:
1. Read all instructions carefully.
2. Do not touch hot surfaces. Always lift by handle.
3. To protect against fire, electric shock and injury to persons, do not immerse cord, plug, SmartKettle®
or power base in water or other liquid.
4. Close adult supervision is necessary when any appliance is used by or near children, handicapped
persons or the infirm.
5. Always unplug the power base when not in use in order to avoid accidental electrical shock.
Allow SmartKettle® to cool before cleaning.
6. Do not operate with a damaged cord, or plug, or after a malfunction has occurred or the kettle has been
damaged in any manner. Return SmartKettle® to the EdgeCraft Corporation, Service Department for
examination, repair or adjustment.
7. The use of accessory attachments not recommended by the EdgeCraft Corporation may result in fire,
electric shock or injury to persons.
8. Do not use SmartKettle® outdoors.
9. Do not let power cord hang over edge of table or counter or touch hot surfaces.
10.Do not use this SmartKettle® or the power base for other than intended use.
11.Do not attempt to plug any device other than designated SmartKettle® into the power base.
12.Do not place on or near hot gas or electric burner or in a heated oven.
13.Do not operate SmartKettle® unless lid is fully closed.
14.Never fill SmartKettle® while it rests on the power base.
15.Do not turn on the Heat to the SmartKettle® unless there is sufficient water.
16.CAUTION: Unplug IMMEDIATELY if water spills onto bottom of SmartKettle®, onto power base or into
connector, to avoid electrical shock.
17.CAUTION: To avoid the risk of being scalded never fill SmartKettle® above the “MAX” line shown on
the water level gauge. For the same reason, extreme caution must be used when moving an appliance
containing hot water or other hot liquids. Always pour slowly and carefully.
18.Only operate SmartKettle® on a dry, flat, non-slip surface.
19.For household use only.
Save these instructions
2
You
made a
good
choice!
You have selected the world’s most advanced and exciting cordless water kettle, the
Chef’sChoice® SmartKettle® Model 688 that utilizes new electronic and computational
techniques that ensure the water is heated to precisely the temperature you select and
holds it there until you are ready to serve. The complex mechanical controls traditionally
use to detect boiling are eliminated and replaced by a patented concept that uses sensitive
electronics and a microcomputer that computes the “rate of rise” of the water temperature
to reliably detect boiling.
Electronics in the SmartKettle® detect low water levels and alert the user when it’s time to
add water in order to avoid boiling the kettle dry.
Digital temperature readings accurate to ±2 degrees Fahrenheit are displayed on a bright
LED display. The desired water temperature can be preselected with this same accuracy
and maintained at that temperature for up to 40 minutes, eliminating the need for reheating
or cooling that might otherwise be required for a second cup.
Those who want their water fully boiling (212°F at Sea Level) can select the Rolling Boil
option and obtain that automatically irrespective of the local altitude or barometric pressure.
For your safety, multiple levels of thermal, electrical and operational protection are built into
the SmartKettles®.
3
Figure 1. Chef’sChoice® SmartKettle®
Model 688.
Figure 2. Chef’sChoice® SmartKettle® control panel.
4
Understanding the Chef’sChoice SmartKettle® Model 688
Read all instructions carefully and take a minute to familiarize yourself with the user-friendly controls of the Model
688 SmartKettle® (Figures 1 and 2) before using it for the first time. As with any new kettle, do not use water from the
first use or boiling; discard it and rinse the inside of the kettle thoroughly with fresh cool water.
This appliance has two parts, the Kettle body and the power base unit with power cord.
The kettle can only be used with the power base provided. Base unit and Kettle must bear the same model
identification number. Unwind the power cord from the bottom of power base to the desired length before plugging
the cord into a powered outlet.
For your safety, this appliance plugs into a grounded 110-120 volt AC electrical outlet. Do not attempt to defeat this
feature by using a three-prong to two-prong adapter. If your receptacle is only a two prong type without a ground,
seek help from a licensed electrician.
A short power cord is provided with this appliance to reduce the risk of someone becoming entangled in or tripping
over a longer cord that could cause the kettle to overturn, discharging hot water.
While EdgeCraft does not recommend it, extension cords are available and may be used if care is exercised in their
use. If an extension cord is used it should be a grounded three conductor cord with a matching plug configuration and
rated at not less than 15 amperes. If a longer cord is used it should be arranged so it will not drape over counters or
table tops where it can be pulled, tugged on or tripped over by persons or pets.
The lid can easily be opened using only one hand. Simply grasp the handle and pull back on the lid release button
with the thumb (never force the lid open; always use the button).
The kettle lid must be fully closed when heating water. It is equipped with a snap lock so it does not open
unintentionally when the water is being poured. To close the lid, press it down lightly until it snaps completely shut.
Before closing, make certain the filter screen is in place (see page 9.)
Fill the kettle with at least 16 ounces of water (which is approximately the same as 0.5 liter) and place the kettle on
the power base. Do not fill the SmartKettle® above the MAX (maximum) line on the level gauge to prevent water from
splashing out through the spout during boiling. For greatest accuracy and convenience we recommend you fill the
SmartKettle® with 1 to 1.5 liters of water (approximately 1 to 1.5 quarts.)
If over filled and water flows down outside of kettle and on to its bottom of the power base, unplug the power base
unit, empty kettle and dry thoroughly. Refill before returning kettle to the power base.
Whenever the power base cord is plugged into a 120V outlet and the kettle is placed on the base the temperature
measuring circuits are active. However the water heater is not energized until the “ON/OFF” (O/I) Heat button is
depressed and the LED lamp is lighted. When the light is on, the heating kept warm for up to 40 minutes unless the
kettle is removed from its base or a low level is detected or the “ON/OFF” button is pressed.
5
Operating the Kettle (Heating Water)
Whenever the kettle body is placed on its electrically active power base (120 volt 60 Hz AC outlet) the SmartKettle®
will automatically display the Set Temperature for 3 seconds and the beeper will sound. The water heater controlled
by the Heat O/I button does not come on automatically. (As received from the factory the Set Temperature will be
122° displayed in degrees Fahrenheit). After 3 seconds the display will then update to the actual water temperature
inside the kettle.
Pressing the Up and/or Down button will first display the existing Set Temperature and then allow you to change the
Set Temperature to the water temperature you desire, The Set Temperature adjustment range of the SmartKettle® is
from 122° to 212° Fahrenheit, 50 to 100° Centigrade). You can also set the temperature to obtain a Rolling Boil as
explained on page 8.
With not less than 16 ounces of water in the kettle and the desired temperature selected, simply press the ON/OFF
(O/I) Heat button to activate the heating cycle. Heating will not start until the (O/I) button is pressed. You may hear a
soft click and the LED light (lamp) will come on steady, confirming that heating has begun.
Because it takes up to 30 seconds for the heater to reach its operating temperature there is a normal delay after the
start of the heating cycle before you will see an actual increase in water temperature. As the heating cycle starts,
the numbers on the digital display will flash the current temperature until a consistent and significant rise in water
temperature is detected. The flashing is to reassure you that the heating cycle is active.
If the heating cycle is not interrupted the temperature will continue to rise until your selected Set Temperature is
reached. At this point the SmartKettle® will generate 3 short beeps to alert you that the water has reached the
selected temperature and is ready for use. The LED light will then begin to flash intermittently indicating the
Keep Warm cycle is active.
To Stop the Heating
You can halt the process at any time during the Heating or Keep Warm cycles by pressing the ON/OFF (O/I) button.
The display will show “OFF”, the heating cycle will stop and the LED light will turn off, confirming that power has
been removed from he heater.
You can also interrupt the heating at any time by simply lifting the kettle off its power base. When you return the
kettle to its base power the heater will be OFF. To restart the heating, press the ON/OFF button and the LED with light,
confirming there is power to the heating circuit.
6
To Keep Warm
After the water reaches the Set Temperature, if the kettle is NOT removed from the power base for immediate use,
the SmartKettle® will automatically enter the Keep Warm mode and hold the water at the Set Temperature. In this
mode the SmartKettle® control will automatically cycle power on and off to the heating element to maintain the water
temperature you selected. During the Keep Warm period the LED light will be flashing to confirm that temperature
control is taking place.
If the kettle is removed from the power base to pour the hot water, power to the heater control is interrupted.
Returning the kettle to the power base will restore power to the display panel and temperature measuring circuits.
However, for your safety at this point the kettle heater control is in the OFF state. If you want to continue to maintain
the temperature (Keep it warm), simply press the ON/OFF (O/I) button. The LED will light and temperature control will
resume. Always check the water level before turning ON the heater to confirm there are at least 16 ounces of water
in the kettle.
For your safety, and to conserve energy, the Keep Warm function will not operate indefinitely. If no additional action
is taken within 40 minutes the unit will cease to maintain the temperature by exiting control of temperature and
the display will show “OFF”. The LED light will also go off (stop flashing). If you want to continue to maintain this
temperature simply press the ON/OFF button again and an additional Keep Warm cycle (40 minutes of temperature
control at the last Set Temperature) will begin.
If at any time a new Set Temperature is selected that is below the current water temperature, power to the heating
element will temporarily be off as the water cools to the lower Set Temperature. The LED light will remain on. Once
the water temperature cools to the lower Set Temperature the beeper will sound (3 short beeps) and the normal Keep
Warm mode will be activated. This is the process you might follow if you wish to boil (sterilize) the water before
actually using it at a lower temperature.
Note: The beeper will only sound once when the kettle reaches the Set Temperature and enters the Keep Warm mode.
As long as the kettle is in the Keep Warm mode, however, the LED light will be flashing.
To Change the Temperature Display from Fahrenheit to Centigrade
To change the display to indicate the displayed temperature in degrees Centigrade instead of Fahrenheit, press and
hold both the UP and DOWN buttons simultaneously for three (3) seconds. The display will show “-F-“ in the factory
default scale. Now pressing either the UP or DOWN button will display “C”. Press the ON/OFF button once and the
SmartKettle® will now display temperature values in degrees Centigrade. A small letter C will appear to the right of
the temperature on the digital display. Repeating the above procedure will allow the use to revert to Fahrenheit.
Note: The most recent selections of Set Temperature and °C or °F that you have made will be stored in the
SmartKettle’s® non-volatile memory until the next time you use the Kettle even if the power is removed. These will
automatically appear when the power is restored.
7
To Create a Rolling Boil (r b L)
To select a rolling boil, attempt to set the temperature above 212°F or above 100°C and the digital display will
show “r b L”. Follow this procedure regardless of your local altitude as explained further below. In this mode the
SmartKettle® will heat the water to boiling and continue boiling for approximately 45 seconds. As with the lower
temperature settings once the water is boiling the SmartKettle® will sound (3 short beeps) alerting you that the water
is ready. However in the Rolling Boil mode the SmartKettle® will not enter the Keep Warm mode after reading your
local boiling temperature. Instead, for safety reasons, it will revert to the “OFF” condition. You can however keep it hot
by turning the heater power ON and reducing the Set Temperature a few degrees below the local boiling temperature
(for example to 209°F or 98°C at sea level.)
Caution: The SmartKettle® gets hot during operation. DO NOT touch the metal body or lid: lift the SmartKettle® only
by the handle and lift the lid only by using the lid lever. Exercise care when opening the lid while the SmartKettle®
is still hot or contains hot water.
Boiling Temperature at Higher Elevations
The unique electronics in the SmartKettle® are designed to detect boiling and to display the actual boiling
temperature irrespective of the ground elevation at your location. At an elevation of 10,000 ft. for example,
such as in the upper Colorado mountains, water will boil at about 195°F while at sea level the boiling point is 212°.
If you are at 10,000 foot elevation, for example, and set the kettle temperature to 212°F the SmartKettle® will heat
the water until it reaches the local boiling point of 195°F. It will display bOL (signifying boiling), display that
temperature and automatically shut off. The general rule is that for every 1,000 feet above sea level the boiling point
of water will be lower by 1.73°F. At 3,000 feet it boils at 207°F; at 5,000 feet the boiling point is 203°F.
Digital temperature readings accurate to ±2 degrees Fahrenheit are displayed on the bright LED display. Temperature
of the water can be preselected with this same accuracy and maintained at that temperature for 40 minutes,
eliminating the need for reheating or cooling that might otherwise be required for a second cup.
Those who like their water fully boiling, can select the Rolling Boil option as described above and obtain that
automatically irrespective of the local altitude or barometric pressure.
Operation during “Brown Outs” and Periods of Low Voltage
During periods of extremely hot weather power companies in local areas allow the grid voltage to drop from the
standard 120 Volts to as low as 108 Volts. At such low voltages you will notice it takes longer for the water to boil.
At such times we recommend you keep water in the kettle above the 16 ounce level.
8
For the Tea Connoisseur
For your convenience the following table lists the brewing temperature ranges of water commonly preferred by many
experts for preparation of popular teas and coffee:
Beverage
Preferred Temperature Range
°F
°C
Herbal Teas
203° - 212°
95° - 100°
White Tea
167° - 158°
75° - 85°
Green Teas, regular
185° - 195°
85° - 91°
Green Teas, delicate
155° - 168°
68° - 75°
Oolongs
185° - 194°
85° - 90°
Coffee
185° - 196°
85° - 91°
Black Tea
203° - 212°
95° - 100°
Pu-Erh
210° - 212°
99° - 100°
The supplier of your tea will likely recommend an optimum temperature. Consider heating enough water so you can
preheat your cup with it before you steep your tea. You may wish to heat the water to a temperature slightly above
that recommended to compensate for the cooling effect of the cup.
To Change the Loudness of the Beeper
With the base plugged into a standard outlet, lift the kettle off of the base. Press all three buttons at once , and
. While holding all three buttons down replace the kettle onto its base to power it up. Once the display is on, you
may release the buttons. The kettle will display the software version number. After about 3 seconds, it will display
UL9. This is the factory setting. At this point you may press the up or down arrow to adjust the beeper loudness. The
maximum is 9 and the minimum is 1. At a setting of 1, the beeper is disabled. When you are finished, press the O/|
button once more to complete the process.
Protection/Safety
Indication of Low Water Level
The unique electronics of the SmartKettle® will alert you when the water level is low. This provides extra safety
by avoiding the unintentional activation of the dry boil switch condition. An extremely rapid rate of rise in water
temperature will be detected by the electronics and it will alert you that there is insufficient water in the kettle
(less than 0.3 liters) for safe operation. You will be alerted to this by the audible alarm and a three part message
displayed on the control panel as “LO … Add … H2O” (Low water level, Add Water).
The message “LO ... Add ... H2O” will flash until action is taken (push ON/OFF button or remove kettle from base)
or power to the heater will be automatically shut off.
9
Boil Dry Protection
For added protection in the event you inadvertently turn on the power to a kettle that is dry — (contains little or no
water), two safety switches will interrupt the power and shut all power OFF. These safety switches will automatically
reset once the kettle has cooled down. However since power will have been interrupted to the heater, when power is
restored to the kettle the Heat Control will be in the OFF state. The display will show the temperatures of the kettle.
Add water and press the Heat Control (O/I) button to ON if you wish to heat the water to your Set Temperature.
The LED will light confirming that the heater is warning. For your safety multiple levels of thermal, electrical and
operational protections are built into the SmartKettle®.
Care and Maintenance
The Chef’sChoice® SmartKettle® is designed specifically for heating water. Do not attempt to heat anything other
than water in the SmartKettle®.
Before cleaning, remove the power cord from the wall outlet and remove the kettle from its power base; then wait
until the SmartKettle® has cooled to room temperature. Do not attempt to clean any part of the SmartKettle® or base
in the dishwasher. Do not immerse. Rinse out the SmartKettle® at regular intervals and after extended non-use. The
interior of the SmartKettle® can be cleaned and decalcified at regular intervals. (See below).
Decalcification
In areas with high calcium carbonate content in the water supply, the SmartKettle® should be decalcified at regular
intervals. Fill the Kettle with a solution of 24 oz. (0.7L) water, add 10 tablespoons of white vinegar and bring to boil.
When this process is complete, rinse the SmartKettle® twice with cool clean water. Regular commercial decalcifier
also can be used to keep the SmartKettle® operating at peak performance and electrical efficiency.
Scale Filter
To prevent loose particles of limestone
being poured into your beverage, the
SmartKettle® is equipped with a scale
filter behind the spout. The filter is
removable for cleaning or replacement.
Before removing the filter make certain the
kettle is unplugged from the power source.
Do not attempt to remove when hot or kettle
contains hot water. To remove, open the lid
and pull tab upward. To reinsert hold the
screen by the tab, insert it into the plastic
grooves and slide it down the grooves firmly
into place. Never leave the filter loose inside
the kettle.
Figure 3. Chef’sChoice® SmartKettle® scale filter
(see enlarged detail).
10
Troubleshooting
Aside from alerting you that the water level is low, the SmartKettle® has other internal diagnostics to help
troubleshoot real or perceived problems.
Display
Other Symptoms
Problem
Action/Remedy
The temperature signal has
been lost.
Return to factory for service.
An overheated condition
is detected.
Allow kettle to cool and add water
to kettle.
Electronic command error.
Remove kettle from power base
and reseat on base. When
replacing kettle on base wait 3
seconds before giving a command.
Too little water in kettle.
Or ON/OFF pressed too often.
Rinse and refill the kettle with at
least 1 liter of water. Check the
Set Temperature.
Maximum temperature reached.
See: “Boiling Temperature at
Higher Elevations” (page 8).
Possible Causes
Checks
Display not lit or water not heating
No power to kettle, failed circuit
kettle not seated properly on
power base.
Be sure base is plugged in and
kettle is firmly on base.
Confirm that electrical outlet
is active.
Large Temperature swings
Too little water in kettle.
Rinse and refill the kettle with at
least 1 liter of water. Check the
Set Temperature.
11
Service
This appliance is for household use only. No user-serviceable parts are inside. Refer servicing to qualified personnel.
In the event post-warranty service is needed, return your SmartKettle® to EdgeCraft Corp., where the cost of repair
can be estimated before the repair is undertaken. Please include your return address and a brief description of the
problem or damage to the SmartKettle® on a separate sheet inside the box. PLEASE CAREFULLY PACKAGE THE
KETTLE TO AVOID SHIPPING DAMAGE.
Send your SmartKettle®, insured and postage prepaid to:
EdgeCraft Corporation
825 Southwood Road, Avondale, PA 19311 U.S.A.
Telephone 800-342-3255 or 610-268-0500
www.edgecraft.com
Retain evidence of shipping for your protection.
This product may be covered by one or more EdgeCraft patents and/or patents pending as marked on the product.
Conforms to: UL 1082 Certified to CAN/CSA: C22.2 No.64
120 volts/60Hertz, 1500 watts
© EdgeCraft Corporation 2011
H11 2011-31
T688004
Limited Warranty: Used with normal care, this EdgeCraft product is guaranteed against defective material and workmanship for a period of one (1) year from the date
of original purchase (“Warranty Period”). We will repair or replace, at our option, any product or part that is defective in material or workmanship without charge if the
product is returned to us postage prepaid with dated proof of purchase within the Warranty Period. This warranty does not apply to commercial use or any product
abuse. ALL IMPLIED WARRANTIES, INCLUDING IMPLIED WARRANTIES OF MERCHANTABILITY AND FITNESS FOR A PARTICULAR PURPOSE, ARE LIMITED TO THE
WARRANTY PERIOD. EDGECRAFT CORPORATION SHALL NOT BE LIABLE FOR ANY INCIDENTAL OR CONSEQUENTIAL DAMAGES. Some states do not allow limitations
on how long an implied warranty lasts and some states do not allow exclusions or limitation of incidental or consequential damages, so the above limitations or
exclusions may not apply to you. This Limited Warranty gives you specific legal rights, and you may also have other rights which vary from state to state.
12