1
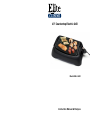
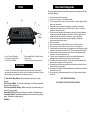
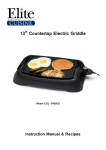
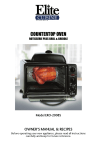
LIMITED WARRANTY* ONE (1) YEAR WARRANTY IS ONLY VALID WITH A DATED PROOF OF PURCHASE 1. Your small kitchen appliance is built with precision, inspected and tested before leaving our factory. 2. It is warranted, to the original purchaser to be free from any manufacturing defects under normal use and conditions for one (1) year, cord excluded. This warranty applies only to the original purchaser of this product. 3. If you need to exchange the unit, please return it in its original carton, with a valid sales receipt, to the store where you purchased it. If you are past the stores allowed return policy period, please see the enclosed Warranty. 4. If you use your appliance for household use and according to instructions, it should give you years of satisfactory service. 5. During the one-year warranty period, a product with a defect will be either repaired or replaced with a new or reconditioned comparable model (at our option) when the product is returned to our Service Center. (See the “Returns” section below). 6. The repaired or replacement product will be in warranty for the remaining balance of the oneyear warranty period and an additional one-month period. 7. This limited warranty covers appliances purchased and used within the 50 contiguous states plus the District of Columbia and does NOT cover: - Damages caused by unreasonable use, neglect, normal wear and tear, commercial use, improper assembly or installation of product. - Damages caused in shipping. - Damages caused by replacement or resetting of house fuses or circuit breakers. - Defects other than manufacturing defects. - Breakage caused by misuse, abuse, accident, alteration, lack of proper care and maintenance, or incorrect current or voltage. - Lost or missing parts of the product. Parts will need to be purchased separately. - Damages of parts that are not electrical; for example: cracked or broken plastic or glass. - Damage from service or repair by unauthorized personnel. - Extended warranties purchased via a separate company or reseller. - Consumer’s remorse is not an acceptable reason to return a product to our Service Center. *One Year Limited Warranty valid only in the 50 contiguous states plus the District of Columbia, excluding Puerto Rico and the Virgin Islands. This warranty is effective only if the product is purchased and operated in the USA; product usage which is in violation of the written instructions provided with the unit will void this warranty. For international warranty, please contact the local distributor. **Any instruction or policy included in this manual may be subject to change at any time. MAXI-MATIC, USA 18401 E. Arenth Ave. City of Industry, CA 91748 Customer Service Dept: (626) 912-9877 Ext: 120/107 MON-FRI 8am-5pm PST Website: www.maxi-matic.com email: [email protected] RETURN INSTRUCTIONS RETURNS: A. Any return of defective merchandise to the manufacturer must be processed accordingly by first contacting customer service (contact information shown below) to obtain an RA # (Return Authorization Number). We will NOT accept any returns of merchandise without an applicable RA #. B. IMPORTANT RETURN INSTRUCTIONS. Your Warranty depends on your following these instructions if you are returning the unit to Maxi-Matic USA: 1. Carefully pack the item in its original carton or other suitable box to avoid damage in shipping. 2. Before packing your unit for return, be sure to enclose: a) Your name, full address with zip code, daytime telephone number, and RA#, b) A dated sales receipt or PROOF OF PURCHASE, c) The model number of the unit and the problem you are having (Enclose in an envelope and tape directly to the unit before the box is sealed,) and d) Any parts or accessories related to the problem. 3. Maxi-Matic USA recommends you ship the package U.P.S ground service for tracking purposes. We cannot assume responsibility for lost or damaged products returned to us during incoming shipment. For your protection, always carefully package the product for shipment and insure it with the carrier. C.O.D shipments cannot be accepted. 4. All return shipping charges must be prepaid by you. 5. Mark the outside of your package: MAXI-MATIC USA 18401 E. ARENTH AVE. CITY OF INDUSTRY, CA 91748 6. Once your return has been received by our warehouse, Maxi-Matic USA will repair or replace the product if it is defective in material or workmanship, subject to the conditions in paragraph B. 7. Maxi-Matic will pay the shipping charges to ship the repaired or replacement product back to you. 13” Countertop Electric Grill Model EGL-3450 Instruction Manual & Recipes ……Parts …………….. ….Important Safeguards… .. When using electrical appliances, basic safety precautions should always be followed, including the following: 1. 2. 3. 4. 5. 6. 7. 8. 9. 10. 11. 12. A) Cool-Touch Grill Handles C) Thermostat Control Switch E) Cool-Touch Grill Base B) Removable Non-Stick Grilling Surface D) Power Cord F) Removable Drip Pan (Not pictured) ..Features .. Your new 13” Countertop Electric Grill has many unique features. Please read all instructions before operating your Grill so each of the features will function to its fullest capacity and give you wonderful years of satisfactory cooking. 13” Non-stick Grilling Surface: Easily removable from the unit for easy cleaning. Grill a Variety of Meals: Cook steaks, hamburgers, fish, chicken, vegetables and much more fast and easy. Cool-Touch Handles & Housing: Makes moving the unit safe and easy from countertop to serving table. Convenient Drip Tray: Non-stick coating and removable. Dishwasher safe. Thermostat Control: Adjustable temperature control to meet all your grilling needs. Removable for easy cleaning. 850 Watts. 1 13. 14. 15. 16. 17. Read all instructions before operating. Do not touch hot surfaces. Use handles or knobs. To protect against electrical shock, do not immerse cord, plug or appliance itself in water or any other liquids. Close supervision is necessary when appliance is used by or near children. Unplug from outlet when not in use and before cleaning. Allow to cool before putting on or taking off any parts. Do not operate any appliance with a damaged cord or plug or after the appliance malfunctions or has been damaged in any manner. Return the appliance to the nearest authorized service facility for examination, repair or adjustment. The use of accessory attachments is not recommended by the appliance manufacturer and may cause injuries. Do not use outdoors. Do not let cord hang over edge of table or counter or touch hot surfaces. Do not place on or near a hot gas or electric burner, or in a heated oven. Always attach the thermostat power cord to appliance first, and then plug cord into wall outlet. To disconnect, turn control to OFF then remove plug from wall outlet. Oversized foods or metal utensils must not be inserted in the appliance as they may cause a fire or risk of electrical shock. A fire may occur if the appliance is covered or touching flammable material including curtains, draperies, walls and the like when in operation. Do not clean with metal scouring pads. Pieces can break off the pad and touch electrical parts, involving a risk of electrical shock. Extreme caution should be exercised when using containers constructed of other material other than metal or glass. Do not store any materials other than manufacturers recommended accessories in this unit when not in use. Do not place any of the following materials in the unit: Paper, cardboard, plastic and the like. SAVE THESE INSTRUCTIONS THIS PRODUCT IS FOR HOUSEHOLD USE ONLY! 2 ..Before Using for First Time.. 1) 2) 3) 4) 5) 6) 7) 8) 9) Clean the grilling surface of the grill with a damp cloth to wipe off dust or any unwanted residue. NEVER soak the unit in water and NEVER use abrasive cleaners or scouring pads on the non-stick surface as they might damage the coating. Apply a light coat of cooking oil to the non-stick surface of the Grill. Attach the thermostat control to the grill. Plug the thermostat power cord into a 120V AC outlet. Set the temperature setting to HIGH and allow the grill to stay on for 3-5 minutes. After the allotted time, turn the thermostat to OFF and detach the cord. Unplug the cord and let the unit cool down. Note: When first using your unit for the first time, you may notice some smoke and odor. This is caused by the unit burning off the protective coating applied at the factory. It is normal and harmless. … Cooking Time Chart Please use the following cooking time chart as a guide for all your grilling needs for some of your favorite foods. Time may also vary due to differences in sizing and thickness of food. It may also need adjustments based on your food preferences. *Please note that the following cooking times are approximate and are only included for your reference. Operating Instructions……… CONNECTING THERMOSTAT CONTROL SWITCH: 1) Make sure the thermostat control is set to OFF and that it is NOT plugged in. 2) Insert the extended rod piece into the receptacle on the side of the grill until you feel it click into place. 3) Plug the cord into a wall outlet and set to desired temperature. SETTING THE TEMPERATURE: 1) When setting the temperature, the indicator light will light up indicating that the power is now ON. When the desired temperature setting has been reached, the light will shut off. *Please note that this does not mean the grill is OFF. COOKING: 1) Brush or spray a coating of cooking spray onto the surface of the grill. 2) Let the grill preheat for approximately 5 minutes. 3) Place desired food onto the grill to cook. 4) Always used wooden or heat resistant utensils. TIPS: 1) Always preheat the grill for approximately 5 minutes for that extra sealing of the food to retain its natural juices. 2) Use cooking spray when cooking fish, lean meats or vegetables. 3) When using wooden or bamboo skewers when cooking kebobs, it is highly recommended to soak the skewers in water for 10 minutes. This will prevent the skewers from scorching or burning during the grilling process. WARNING: Use caution when cooking. Hot oil, grease or juices may splatter when grilling. Do not touch any hot surfaces. Do not attempt to cut food on the grill during the cooking process. Do not use metal utensils to handle food. This will damage the non-stick coating of the grilling surface. Food Chicken Breasts 1/2" thick Temp. HIGH Time 10-15 minutes Steaks 1/2" - 1" thick HIGH 10-15 minutes Fish Fillets 1/2" thick MED 10 minutes Hamburgers Shrimp Sausages or hot dogs Bacon or ham Vegetables MED LOW LOW LOW LOW 8-10 minutes 5-7 minutes 8-10 minutes 8-10 minutes 3-5 minutes …Cleaning Instructions…….. 1) 2) 3) 4) 5) 6) 7) 8) Make sure the power cord is unplugged. Remove the grill off the base of the unit. Use paper towels to wipe off any excess grease or residue on the grill. Use wooden or plastic spatula to scrape off any food residue. Use a slightly wet sponge or damp cloth to wipe and clean the ridged grilling surface. Remove the oil/grease tray, wipe it with paper towel first and then was with warm soapy water. Let dry before reinserting the tray back under the grill. Use a wet sponge or damp cloth to clean the outside exterior of your Grill. Do not plug the power cord into the wall outlet if the grill is still wet. Parts are dishwasher safe excluding the thermostat control and base unit. WARNING: Never immerse the grill base in water or any liquids. This may cause electrical shortage and bodily harm. Do not use abrasives, scouring pads or steel wool to clean the surface! It may damage the coating. 4 3 . 1) 2) 3) Short Cord Purpose ……..… A short power-supply cord is provided to reduce risks of injuring yourself from becoming entangled in or tripping over a longer cord. Longer extension cords are available and may be used if you exercise caution during use. If a longer cord is used please note the following: The marked electrical rating of the extension cord should be at least as great as the electrical rating of the appliance. The longer cord should be arranged so that it will not drape over the counter top of tabletop where it can be pulled on by children or tripped over unintentionally - ……Polarized Plug … … If this appliance has a polarized plug (meaning one blade is wider than the other one), please follow the below instructions: To reduce the risk of electric shock, this plug is intended to fit into a polarized outlet only in one direction. If the plug does not fit fully into the outlet, reverse the plug. If it still does not fit, contact a qualified electrician. Do not attempt to modify the plug in any way. This appliance is intended for Household Use Only. 5 ….Recipes……… Grilled Steaks Garlic Dijon Grilled Steaks Ingredients: Pepper Steak with Cabernet Ingredients: 2 Whole garlic bulbs 1 Tbsp. Dijon mustard 1 Tbsp. Olive oil 4 (5oz.) Boneless beef bottom sirloin steaks Cut 12” square of heavy-duty foil; spray with non-stick cooking spray. Cut ½ inch from top of each garlic bulb; remove outer paperish layers. In small bowl, combine olive oil and mustard; mix well. Set aside. Place garlic bulbs in microwave and heat on High for 1-½ minutes or until tender. Let cool for 1 minute. Squeeze garlic bulb to release garlic cloves onto sprayed foil. Top with mustard mixture. Wrap securely in foil using double-fold seals. 6 Sirloin Steaks ½ Tsp. Salt 1 Tbsp. Olive Oil 1 Cup Cabernet wine 1 Cup Cream 4 Tbsp. Cracked Peppercorn mix (black, green and pink) 3 Shallots, sliced 1 ½ Cups beef broth 2 Tbsp. Butter Season steaks with peppercorn and salt. Place into Grill and cook for 10 minutes or until to desired doneness. Over medium heat, in a saucepan, combine olive oil and 1 Tbsp. Butter, shallots and cabernet. Stir and cook until the mixture thickens slightly to a glaze. Add cream and reduce mixture. Mix well and keep warm. Season with salt. When ready to grill, place garlic foil packet and steaks into the Grill. Cook for 10 minutes or until garlic is soft and steaks are of desired doneness. Remove steaks from grill and serve with sauce. With fork, carefully mash cloves of garlic and mix with mustard mixture until well blended. Serve with steaks. Maple and Dijon Steaks Ingredients: Grilled Steaks with Cheddar-Onion Butter Ingredients: Cheddar-Onion Butter ¼ Cup Butter, softened ½ Tsp. Dry mustard Steaks 4 Beef sirloin or T-Bone steaks (1 inch thick) ¼ Cup Sliced green onions 2 oz. (½ cup) Finely shredded Cheddar cheese ¼ Tsp. Salt ¼ Tsp. Coarse ground black pepper 4 Ribeye Steaks or Top loin strips ½ Tsp. Cracked Pepper 3 Tbsp. Coarse-grain Dijon mustard ¼ Tsp. Pepper 1 Tsp. Salt ¼ Cup Maple Syrup 2 Tsp. Cider Vinegar Mix salt and pepper and sprinkle onto both sides of steak strips. Place steaks into Grill and cook for 10 minutes or till desired doneness. Meanwhile, combine maple syrup, mustard, vinegar and pepper into a saucepan. Heat on medium heat stirring occasionally until mixture thickens. In small bowl, combine all butter ingredients; mix well. Set aside. During last 5-10 minutes of grilling, brush mixture onto the steaks making sure to cover the sides. When ready to grill, coat steaks with butter mixture. Place steaks into the Grill. Cook for 10 minutes or to desired doneness. Reserve remaining mixture and serve with steaks. Reserve left over butter mixture to serve with steaks. 7 8 ….Recipes……… Fish Lemon Sage Red Snapper Ingredients: Herb-Marinated Grilled Halibut 4 Red Snapper fillets (½ inch thick) ¼ Tsp. Scallion (minced) 3 Tbsp. Butter Ingredients: 2 Tbsp. Finely chopped fresh herbs (such as basil, tarragon, or dill) 2 Garlic cloves, minced ¼ Tsp. Salt 2 Tbsp. Fresh lemon juice ½ Tsp. Olive oil 4 (4oz.) Halibut steaks ¼ Tsp. Coarse ground black pepper In small bowl, combine herbs, lemon juice, oil and garlic; mix well. Place Halibut steaks on a plate; sprinkle with salt and pepper. Spoon herb mixture over fish and spread evenly. Let stand at room temperature for 15 minutes to marinate ½ Tsp. Salt 1 Tsp. Sage (crumbled) ½ Cup Chicken Broth Marinade fish in chicken broth for 4-5 hours or over night. Season fish on both sides with salt and pepper. Place fish onto Grill. Arrange lemon slices over fillets, sprinkled with scallion then top with sage. Dot with butter. Grill for 5-10 minutes or until fish flakes easily. Transfer fish into serving plates, spoon some of the chicken broth over the fish and serve right away. Cucumber Sauce with Swordfish Ingredients: When ready to grill, place fish onto the Grill. Cook 5-10 minutes or until fish flakes easily with fork. If desired, sprinkle fish with additional chopped fresh herbs before serving. 2 fresh or frozen Swordfish steaks (or Halibut) 1/3 Cup Plain Yogurt 2 Cloves crushed Garlic Savory Grilled Fish 1/4 Cup Finely chopped Cucumber, seeds removed. 1 Tsp. Dill weed Place fish steaks onto Grill and cook for 5-10 minutes or until fish flakes easily. For sauce, combine remaining ingredients into a bowl, mix well and let chill for an hour. Remove fish and serve hot with chilled sauce. Ingredients: Grilled Fish with Mushrooms 1/3 Cup Fat-free Mayonnaise 1 ½ lb. Swordfish, halibut, shark, 1 ½ Tbsp. Finely chipped fresh basil 1 Tbsp. Lemon Juice or salmon steaks 2 Tbsp. Bottled sun-dried tomato tuna, Ingredients: Combine the first four ingredients in a small bowl; mix well. Set aside 4 Tbsp. Of mixture for later use. Brush remaining mixture onto both sides of fish steaks. Let stand for 10 minutes for marinate. Place fish steaks onto Grill. Grill for 5-10 minutes or until fish flakes easily. To serve, transfer fish steaks onto plate and top each with the remaining mayonnaise mixture. 4 Fish Fillets (Any) 1 Tbsp. Lemon juice 1 Tsp. Salt 2 Tbsp. Chopped parsley 3 Tbsp. Butter slices 1½ Cups Chopped mushrooms ¼ Tsp. Lemon pepper Parsley sprigs and lemon wedges for garnish Place fillets onto Grill. Sprinkle with lemon juice, salt, and lemon pepper. Grill for 5-10 minutes or until fish flakes easily. Meanwhile, combine remaining ingredients in a saucepan and sauté over low heat for 5 to 7 minutes. To serve, spoon mushroom mixture over fish. Garnish with parsley springs and lemon wedges. 10 9 ….Recipes……… Miscellaneous Bahama-Rama Grilled Chicken Breasts Ingredients: Southern Grilled Shrimp Ingredients: 1 lb. Large shrimp 4 cloves garlic ¼ c Cholula Hot Sauce ½ medium onion 3 Tsp. lime juice 1 Tsp. chopped, fresh ginger Peel and de-vein shrimp. Place remaining ingredients in blender or food processor and puree until smooth. Pour contents of blender over shrimp in a non-metal container and marinate for at least one hour, or as long as eight hours. Place each individual shrimp onto Grill and grill for 3-5 minutes or until shrimp turns pink. If desired, baste with remaining sauce for more flavor. Old Fashioned Burgers Ingredients: 1 lb. Ground Beef 1 Egg, beaten 1 Tsp. Fresh Ginger Root, minced 1/2 Tsp. Of Salt & Pepper combined 1 Tsp. Red Wine 1 Tsp. Vegetable Oil 1/4 Minced Onions 2 Tbsp. Cornstarch Combine ground beef, salt & pepper, wine, ginger, egg, and cornstarch into a large bowl. Mix well. Flatten meat into 4 individual meat patties. Brush each pattie with vegetable oil on both sides. Place patties onto Grill. Grill for 10-12 minutes or to desired doneness. 4 Chicken Breasts Juice from 2 Fresh Limes 2 Tbs. Olive Oil 1/2 cup Red Onion, finely chopped Salt and Freshly Ground Black Pepper 1/4 cup Bacon, finely diced 1/2 cup Green Bell Pepper Strips, thinly sliced 1 cup Chicken Stock 1/2 tsp. Dried Thyme 1/2 cup Celery, finely chopped 2 cups Diced Canned Tomatoes (with juice) 1 Tbs. Worcestershire Sauce Season the chicken with salt and pepper and marinate in lime juice for about 2 hours. Place chicken breasts onto Grill and grill for 5-10 minutes. Meanwhile, heat oil and bacon in a large saucepan over medium heat. When bacon is browned, add the onion, green pepper, and celery, and sauté, cover the saucepan and reduce the heat to low. Simmer for about 10 minutes or until everything is tender. Add the tomatoes, chicken stock, Worcestershire sauce, and thyme. Continue to simmer, uncovered, for about 10 minutes. Season with salt and pepper to taste. Serve sauce over chicken and with steamed rice. Seafood Kebobs with Spicy Pimiento Sauce Ingredients: Sauce drained 1 Cup Mayonnaise 2 (4oz.) Jars sliced Pimientos, Spicy Grilled Lamb Chops 2 Small garlic cloves, minced ½ -1 Tsp. Crushed red pepper flakes ______________________________________________________________________ Ingredients: Kebobs 3 Tbsp. chili powder 2 tsp dried thyme -- crumbled 1 1/2 tsp salt 1 tsp freshly ground black pepper 2 C. hot pepper jelly 1 Tbsp. ground cumin 2 tsp. sugar 3/4 tsp. ground allspice 4 lamb chops each about 1 1/2" thick. Combine chili powder, cumin, thyme, sugar, salt, allspice, and black pepper into small bowl. Sprinkle the mixture over the chops, rub it evenly all over the meat. Chill the chops, covered, for at least overnight. Place chops onto Grill . Grill for 10-12 minutes. Serve chops with pepper jelly. ¼ Cup olive oil or vegetable oil ½ Tsp. Salt 18 Uncooked fresh medium shrimp, shelled, tails left on, de-veined. 4 Tsp. Fresh lemon juice ½ Tsp. Pepper 18 uncooked fresh sea scallops In food processor, blend all sauce ingredients at high speed until smooth. Set aside. In small bowl, combine oil, lemon juice, salt and pepper; mix well. Mix in shrimp and scallops so mixture covers thoroughly. Alternately skewer shrimp and scallops onto the six kebob rods. Place Spit Rods assembly into oven. Snap kebob rods into place on Spitting Wheels. Serve with Spicy Pimiento Sauce. 11 12