1
Microwave Oven
GEAppliances.com
Safety Instructions . . . . . . . .2–6
Operating Instructions
Convenience Features . . . . . . 12, 13
Microwave Terms . . . . . . . . . . . . . . 16
Oven Features . . . . . . . . . . . . . . . . 7, 8
Other Features . . . . . . . . . . . . . 14, 15
Power Levels . . . . . . . . . . . . . . . . . . . . 9
Time Features . . . . . . . . . . . . . . 10, 11
Owner’s Manual
JEM3072
JES1072
Care and Cleaning . . . . . . . . . 17
Troubleshooting Tips . . . . . . 18
Things That Are Normal . . . . . . . . 18
Consumer Support
Consumer Support. . . . . .Back Cover
Warranty . . . . . . . . . . . . . . . . . . . . . . 19
Write the model and serial
numbers here:
Model # __________________
Serial # ___________________
You can find them on a label inside the
oven.
49-40733 08-14 GE
IMPORTANT SAFETY INSTRUCTIONS.
READ ALL INSTRUCTIONS BEFORE USING.
WARNING!
For your safety, the information in this manual must be followed to minimize the risk of fire or explosion, electric shock,
or to prevent property damage, personal injury, or loss of life.
PRECAUTIONS TO AVOID POSSIBLE EXPOSURE
TO EXCESSIVE MICROWAVE ENERGY
(a) Do Not Attempt to operate this oven with the door
RSHQVLQFHRSHQGRRURSHUDWLRQFDQUHVXOWLQKDUPIXO
H[SRVXUHWRPLFURZDYHHQHUJ\,WLVLPSRUWDQWQRWWR
defeat or tamper with the safety interlocks.
( b) Do Not Place DQ\REMHFWEHWZHHQWKHRYHQIURQW
face and the door or allow soil or cleaner residue to
accumulate on sealing surfaces.
(c) Do Not Operate the oven if it is damaged. It is
particularly important that the oven door close properly
and that there is no damage to the:
(1) door (bent),
(2) hinges and latches (broken or loosened),
(3) door seals and sealing surfaces.
(d) The Oven Should NotEHDGMXVWHGRUUHSDLUHGE\
DQ\RQHH[FHSWSURSHUO\TXDOLILHGVHUYLFHSHUVRQQHO
IMPORTANT SAFETY INSTRUCTIONS.
Use this appliance only for its intended purpose as described in this Owner’s Manual.
When using electrical appliances basic safety precautions should be followed, including the following:
Read and follow the specific precautions in the
PRECAUTIONS TO AVOID POSSIBLE EXPOSURE TO
EXCESSIVE MICROWAVE ENERGY section above.
This appliance must be grounded. Connect only
to a properly grounded outlet. See the GROUNDING
INSTRUCTIONS section on page 5.
Install or locate this appliance only in accordance with the
provided installation instructions.
Be certain to place the front surface of the door 3" or more
back from the countertop edge to avoid accidental tipping
of the appliance in normal usage.
This microwave oven is not approved or tested for marine
use.
Do not mount this appliance over a sink.
Do not mount the microwave oven over or near any
portion of a heating or cooking appliance.
Do not store anything directly on top of the microwave
oven surface when the microwave oven is in operation.
Do not operate this appliance if it has a damaged power
cord or plug, if it is not working properly, or if it has been
damaged or dropped.
Do not cover or block any openings on the appliance.
Use this appliance only for its intended use as described
in this manual. Do not use corrosive chemicals or vapors
in this appliance. This microwave oven is specifically
designed to heat, dry or cook food, and is not intended for
laboratory or industrial use.
Do not store this appliance outdoors. Do not use this
SURGXFWQHDUZDWHU³IRUH[DPSOHLQDZHWEDVHPHQWQHDU
a swimming pool, near a sink or in similar locations.
2
Keep power cord away from heated surfaces.
Do not immerse power cord or plug in water.
Do not let power cord hang over edge of table or counter.
To reduce the risk of fire in the oven cavity:
³ 'RQRWRYHUFRRNIRRG&DUHIXOO\DWWHQGDSSOLDQFH
when paper, plastic or other combustible materials are
placed inside the oven while cooking.
³ 5HPRYHZLUHWZLVWWLHVDQGPHWDOKDQGOHVIURPSDSHURU
plastic containers before placing them in the oven.
³ 'RQRWXVHWKHRYHQIRUVWRUDJHSXUSRVHV'RQRWOHDYH
paper products, cooking utensils or food in the oven when
not in use.
³ ,IPDWHULDOVLQVLGHWKHRYHQLJQLWHNHHSWKHRYHQGRRU
closed, turn the oven off and disconnect the power cord,
or shut off power at the fuse or circuit breaker panel.
If the door is opened, the fire may spread.
See door surface cleaning instructions in the Care and
cleaning of the microwave oven section of this manual.
This appliance must only be serviced by qualified service
personnel. Contact the nearest authorized service facility
IRUH[DPLQDWLRQUHSDLURUDGMXVWPHQW
As with any appliance, close supervision is necessary
when used by children.
Do not use the oven to dry newspapers.
SAVE THESE INSTRUCTIONS
IMPORTANT SAFETY INSTRUCTIONS.
READ ALL INSTRUCTIONS BEFORE USING.
GEAppliances.com
WARNING!
ARCING
If you see arcing, press the CANCEL/OFF pad and correct the problem.
Arcing is the microwave term for sparks in the oven.
Arcing is caused by:
0HWDOVXFKDVWZLVWWLHVSRXOWU\SLQVRUJROG
rimmed dishes, in the microwave.
Metal or foil touching the side of the oven.
Recycled paper towels containing small metal
pieces being used in the microwave.
Foil not molded to food (upturned edges act
like antennas).
FOODS
Do not pop popcorn in your microwave oven
unless in a special microwave popcorn accessory
or unless you use popcorn labeled for use in
microwave ovens.
Some products such as whole eggs and sealed
FRQWDLQHUV³IRUH[DPSOHFORVHGMDUV³DUHDEOH
WRH[SORGHDQGVKRXOGQRWEHKHDWHGLQWKLV
microwave oven. Such use of the microwave oven
FRXOGUHVXOWLQLQMXU\
Do not boil eggs in a microwave oven. Pressure will
build up inside egg yolk and will cause it to burst,
SRVVLEO\UHVXOWLQJLQLQMXU\
Operating the microwave with no food inside for
more than a minute or two may cause damage
to the oven and could start a fire. It increases the
heat around the magnetron and can shorten
the life of the oven.
Foods with unbroken outer “skin” such as potatoes,
hot dogs, sausages, tomatoes, apples, chicken
livers and other giblets and egg yolks should be
pierced to allow steam to escape
during cooking.
$YRLGKHDWLQJEDE\IRRGLQJODVVMDUVHYHQ
with the lid off. Make sure all infant food is
thoroughly cooked. Stir food to distribute the
heat evenly. Be careful to prevent scalding when
warming formula. The container may feel cooler
than the formula really is. Always test the formula
before feeding the baby.
'RQ·WGHIURVWIUR]HQEHYHUDJHVLQQDUURZQHFNHG
bottles (especially carbonated beverages). Even
if the container is opened, pressure can build up.
This can cause the container to burst, possibly
UHVXOWLQJLQLQMXU\
SUPERHEATED WATER
Liquids, such as water, coffee or tea are able to
be overheated beyond the boiling point without
appearing to be boiling. Visible bubbling or boiling
when the container is removed from the microwave
oven is not always present. THIS COULD RESULT
IN VERY HOT LIQUIDS SUDDENLY BOILING OVER
WHEN THE CONTAINER IS DISTURBED OR A SPOON
OR OTHER UTENSIL IS INSERTED INTO
THE LIQUID.
7RUHGXFHWKHULVNRILQMXU\WRSHUVRQV
³ 'RQRWRYHUKHDWWKHOLTXLG
³ 6WLUWKHOLTXLGERWKEHIRUHDQGKDOIZD\WKURXJK
heating it.
³ 'RQRWXVHVWUDLJKWVLGHGFRQWDLQHUZLWKQDUURZ
necks.
³ $IWHUKHDWLQJDOORZWKHFRQWDLQHUWRVWDQGLQWKH
microwave oven for a short time before removing
the container.
³ 8VHH[WUHPHFDUHZKHQLQVHUWLQJDVSRRQRURWKHU
utensil into the container.
Hot foods and steam can cause burns. Be careful
when opening any containers of hot food, including
SRSFRUQEDJVFRRNLQJSRXFKHVDQGER[HV7R
SUHYHQWSRVVLEOHLQMXU\GLUHFWVWHDPDZD\IURP
hands and face.
Do not overcook potatoes. They could dehydrate
and catch fire, causing damage to your oven.
&RRNPHDWDQGSRXOWU\WKRURXJKO\³PHDWWRDW
least an INTERNAL temperature of 160°F and
poultry to at least an INTERNAL temperature
of 180°F. Cooking to these temperatures usually
protects against foodborne illness.
SAVE THESE INSTRUCTIONS
3
IMPORTANT SAFETY INFORMATION.
READ ALL INSTRUCTIONS BEFORE USING.
WARNING!
MICROWAVE-SAFE COOKWARE
Make sure all cookware used in your microwave oven
is suitable for microwaving. Most glass casseroles,
cooking dishes, measuring cups, custard cups, pottery
or china dinnerware which does not have metallic
trim or glaze with a metallic sheen can be used. Some
cookware is labeled “suitable
for microwaving.”
,I\RXDUHQRWVXUHLIDGLVKLVPLFURZDYHVDIH
use this test: Place in the oven both the dish
you are testing and a glass measuring cup filled
ZLWKFXSRIZDWHU³VHWWKHPHDVXULQJFXSHLWKHU
LQRUQH[WWRWKHGLVK0LFURZDYH²VHFRQGV
at high. If the dish heats, it should not be used for
microwaving.
If the dish remains cool and only the water in
WKHFXSKHDWVWKHQWKHGLVKLVPLFURZDYHVDIH
If you use a meat thermometer while cooking,
make sure it is safe for use in microwave ovens.
Do not use recycled paper products. Recycled
SDSHUWRZHOVQDSNLQVDQGZD[HGSDSHUFDQ
contain metal flecks which may cause arcing
or ignite. Paper products containing nylon or nylon
filaments should be avoided, as they
may also ignite.
Some styrofoam trays (like those that meat
is packaged on) have a thin strip of metal
embedded in the bottom. When microwaved,
the metal can burn the floor of the oven or
ignite a paper towel.
Do not use the microwave to dry newspapers.
Not all plastic wrap is suitable for use in microwave
ovens. Check the package for proper use.
3DSHUWRZHOVZD[HGSDSHUDQGSODVWLFZUDS
can be used to cover dishes in order to retain
moisture and prevent spattering. Be sure to
vent plastic wrap so steam can escape.
Cookware may become hot because of heat
transferred from the heated food. Pot holders may
be needed to handle the cookware.
“Boilable” cooking pouches and tightly closed
plastic bags should be slit, pierced or vented
as directed by package. If they are not, plastic
could burst during or immediately after cooking,
SRVVLEO\UHVXOWLQJLQLQMXU\$OVRSODVWLFVWRUDJH
containers should be at least partially uncovered
because they form a tight seal. When cooking
with containers tightly covered with plastic wrap,
remove covering carefully and direct steam away
from hands and face.
Use foil only as directed in this guide. TV dinners
may be microwaved in foil trays less than 3/4"
high; remove the top foil cover and return the tray
WRWKHER[:KHQXVLQJIRLOLQWKHPLFURZDYHRYHQ
keep the foil at least 1" away from the sides of the
oven.
3ODVWLFFRRNZDUH³3ODVWLFFRRNZDUHGHVLJQHGIRU
microwave cooking is very useful, but should be
XVHGFDUHIXOO\(YHQPLFURZDYHVDIHSODVWLFPD\
not be as tolerant of overcooking conditions as
are glass or ceramic materials and may soften or
FKDULIVXEMHFWHGWRVKRUWSHULRGVRIRYHUFRRNLQJ
,QORQJHUH[SRVXUHVWRRYHUFRRNLQJWKHIRRGDQG
cookware could ignite.
Follow these guidelines:
8VHPLFURZDYHVDIHSODVWLFVRQO\DQGXVH
them in strict compliance with the cookware
manufacturer’s recommendations.
1
2 Do not microwave empty containers.
Do not permit children to use plastic cookware
3 without
complete supervision.
SAVE THESE INSTRUCTIONS
4
IMPORTANT SAFETY INSTRUCTIONS.
READ ALL INSTRUCTIONS BEFORE USING.
GEAppliances.com
GROUNDING INSTRUCTIONS
WARNING³,PSURSHUXVHRIWKHJURXQGLQJSOXJFDQUHVXOWLQDULVNRIHOHFWULFVKRFN
This appliance must be grounded. In the event of an
electrical short circuit, grounding reduces the risk of
electric shock by providing an escape wire for the
electric current.
,IWKHRXWOHWLVDVWDQGDUGSURQJZDOORXWOHWLWLV
your personal responsibility and obligation to have
LWUHSODFHGZLWKDSURSHUO\JURXQGHGSURQJZDOO
outlet.
This appliance is equipped with a power cord having
a grounding wire with a grounding plug. The plug
must be plugged into an outlet that is properly
installed and grounded.
Do not under any circumstances cut or remove the
third (ground) prong from the power cord.
Consult a qualified electrician or service technician if
the GROUNDING INSTRUCTIONS are not completely
XQGHUVWRRGRULIGRXEWH[LVWVDVWRZKHWKHUWKH
appliance is properly grounded.
:HGRQRWUHFRPPHQGXVLQJDQH[WHQVLRQFRUGZLWK
this appliance. If the power cord is too short, have a
qualified electrician or service technician install an
outlet near the appliance. (See EXTENSION CORDS
section.)
For best operation, plug this appliance into its
own electrical outlet to prevent flickering of lights,
blowing of fuse or tripping of circuit breaker.
ADAPTER PLUGS
Usage situations where appliance’s power cord will be disconnected infrequently.
Because of potential safety hazards under certain conditions,
we strongly recommend against the use of an adapter plug.
However, if you still elect to use an adapter, where local codes
permit, a TEMPORARY CONNECTION may be made to a properly
JURXQGHGSURQJZDOOUHFHSWDFOHE\WKHXVHRID8/OLVWHGDGDSWHU
which is available at most local hardware stores.
(Adapter plugs not
permitted in Canada)
The larger slot in the adapter must be aligned with the larger slot in
the wall receptacle to provide proper polarity in the connection of
the power cord.
TEMPORARY
METHOD
Align large
prongs/slots
Ensure proper ground
and firm connection
before use.
CAUTION: Attaching the adapter ground terminal to the wall receptacle cover screw does not ground
the appliance unless the cover screw is metal, and not insulated, and the wall receptacle is grounded
through the house wiring.
You should have the circuit checked by a qualified electrician to make sure the receptacle is properly grounded.
When disconnecting the power cord from the adapter, always hold the adapter with one hand. If this
is not done, the adapter ground terminal is very likely to break with repeated use. Should this happen,
DO NOT USE the appliance until a proper ground has again been established.
Usage situations where appliance’s power cord will be disconnected frequently.
Do not use an adapter plug in these situations because frequent disconnection of the power cord places
undue strain on the adapter and leads to eventual failure of the adapter ground terminal. You should
KDYHWKHSURQJZDOOUHFHSWDFOHUHSODFHGZLWKDSURQJJURXQGLQJUHFHSWDFOHE\DTXDOLILHGHOHFWULFLDQ
before using the appliance.
SAVE THESE INSTRUCTIONS
5
IMPORTANT SAFETY INFORMATION.
READ ALL INSTRUCTIONS BEFORE USING.
WARNING!
EXTENSION CORDS
A short power supply cord is provided to reduce the risks resulting from becoming entangled in or tripping over
a longer cord.
([WHQVLRQFRUGVPD\EHXVHGLI\RXDUHFDUHIXOLQXVLQJWKHP
,IDQH[WHQVLRQFRUGLVXVHG³
7KHPDUNHGHOHFWULFDOUDWLQJRIWKHH[WHQVLRQFRUGVKRXOGEHDWOHDVWDVJUHDWDVWKHHOHFWULFDOUDWLQJRIWKH
appliance;
1
2 7KHH[WHQVLRQFRUGPXVWEHDJURXQGLQJW\SHZLUHFRUGDQGLWPXVWEHSOXJJHGLQWRDVORWRXWOHW
3 7KHH[WHQVLRQFRUGVKRXOGEHDUUDQJHGVRWKDWLWZLOOQRWGUDSHRYHUWKHFRXQWHUWRSRUWDEOHWRSZKHUHLW
can be pulled on by children or tripped over unintentionally.
,I\RXXVHDQH[WHQVLRQFRUGWKHLQWHULRUOLJKWPD\IOLFNHUDQGWKHEORZHUVRXQGPD\YDU\ZKHQWKHPLFURZDYH
oven is on. Cooking times may be longer, too.
PACEMAKERS
Most pacemakers are shielded from interference from electronic products, including microwaves.
However, patients with pacemakers may wish to consult their physicians if they have concerns.
READ AND FOLLOW THIS SAFETY INFORMATION CAREFULLY.
SAVE THESE INSTRUCTIONS
6
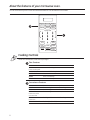
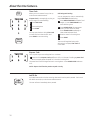
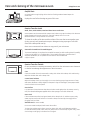
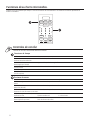
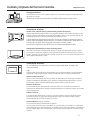
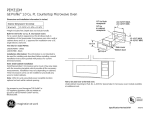
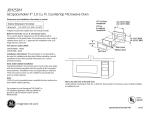
About the features of your microwave oven.
GEAppliances.com
Throughout this manual, features and appearance may vary from your model.
700 Watts
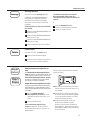
Features of the Oven
Door Latches.
Door Latch Release. Press latch release to
open door.
Window with Metal Shield. Screen allows
cooking to be viewed while keeping
microwaves confined in the oven.
Removable Turntable. Turntable and support
must be in place when using the oven. The
turntable may be removed for cleaning.
Convenience Guide.
Removable Turntable Support. The turntable
support must be in place when using the oven.
Touch Control Panel Display.
NOTE: Rating plate is located on the front of the
mircowave oven. Oven vent(s) and oven light is
located on the inside walls of the microwave oven.
Optional Accessories
$YDLODEOHDWH[WUDFRVWIURP\RXU*(VXSSOLHU
JXA019K Hanging Kit allow JEM3072 to be mounted under a cabinet.
7
About the features of your microwave oven.
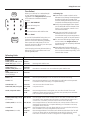
You can microwave by time or with the convenience features. Not all features on all models.
Popcorn Beverage
Potato
Weight
Defrost
Time
Defrost
Reheat
Express Cook
1
2
3
4
5
6
7
8
9
Power
Level
0
Add
30 Sec
Timer
On/Off
Clock
Sound
Cancel
Off
Start
Pause
Time
Cook
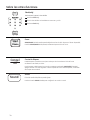
Cooking Controls
Check the Convenience Guide before you begin.
Time Features
Press
TIME COOK
Press number pads
TIME DEFROST
POWER LEVEL
30 SEC
EXPRESS COOK
Enter
Amount of cooking time
Amount of defrosting time
Power level 0 to HI
Starts immediately!
Starts immediately!
Convenience Features
Press
POTATO
POPCORN
BEVERAGE
Press once, twice
or three times
REHEAT
Press once
WEIGHT DEFROST
8
Enter
(QWHUVHUYLQJVL]H
Enter serving size
Enter serving size
Option
VHUYLQJV
3.0 oz or 2.5 oz
4 oz, 8 oz or 12 oz
)RRG7\SH
VHUYLQJV
)RRG:HLJKWOEV
GEAppliances.com
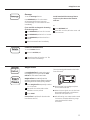
Changing the Power Level
Power
Level
The power level may be entered or
changed before entering the time for
Time Cook.
Express Cook
1
2
3
4
5
6
7
8
9
0
Start
Pause
Press POWER LEVEL repeatedly to
1 select
power level 0 to HI.
2 Enter cooking time.
3 Press START.
9DULDEOHSRZHUOHYHOVDGGIOH[LELOLW\WR
microwave cooking. The power levels on
the microwave oven can be compared to
the surface units on a range. Each power
level gives you microwave energy a certain
percent of the time. Power level 7 is
microwave energy 70% of the time. Power
level 3 is energy 30% of the time. Most
cooking will be done on HI which gives you
100% power. HI power level will cook faster
but food may need more frequent stirring,
rotating or turning over. A lower setting
will cook more evenly and need less stirring
or rotating of the food. Some foods may have
EHWWHUIODYRUWH[WXUHRUDSSHDUDQFH
if one of the lower settings is used. Use a
lower power level when cooking foods
that have a tendency to boil over, such as
scalloped potatoes.
Rest periods (when the microwave energy
cycles off) give time for the food to “equalize”
or transfer heat to the inside
RIWKHIRRG$QH[DPSOHRIWKLVLVVKRZQZLWK
power level 3³WKHGHIURVWF\FOH
If microwave energy did not cycle off,
the outside of the food would cook before
the inside was defrosted.
Here are some examples of uses for various
power levels:
HI: Fish, bacon, vegetables, boiling liquids.
Med-High 7: Gentle cooking of meat and
poultry; baking casseroles and reheating.
Medium 5: Slow cooking and tenderizing for
stews and less tender cuts of meat.
Low 2 or 3: Defrosting; simmering; delicate
sauces.
Warm 1: Keeping food warm; softening
butter.
9
About the time features.
Time Cook
Time
Cook
Allows you to microwave for any time up
to 99 minutes and 99 seconds.
Express Cook
1
2
3
4
5
6
7
8
9
HI power level is automatically set, but you
PD\FKDQJHLWIRUPRUHIOH[LELOLW\
1
2 Enter cooking time.
3 Press START.
Press TIME COOK.
You may open the door during Time Cook
to check the food. Close the door and
press START to resume cooking.
0
Start
Pause
Defrosting and Cooking
You can program the oven to automatically
begin Time Cook after defrosting.
Press WEIGHT DEFROST and select food
1 weight,
or press TIME DEFROST and
enter defrosting time.
Press POWER LEVEL. Change power
2 level
if you don’t want full power.
(Press POWER LEVEL repeatedly to
select a desired power level.)
3 Enter the amount of cooking time.
4 Press START.
The oven will begin defrosting. After
defrosting is complete, Time Cook will
count down.
Express Cook
Express Cook
1
2
3
4
5
6
This is a quick way to set cooking time fro 1-6 minutes.
Press one of the Express CookSDGVIURPIRUPLQXWHVRIFRRNLQJDWpower level
1 10.)RUH[DPSOHSUHVVWKH
2 pad for 2 minutes of cooking time.
The power level can be changed as time is counting down. Press POWER LEVEL and enter
NOTE: Express Cook function pertains to pads 1-6 only.
Add 30 Sec
Add
30 Sec
10
It will add 30 seconds to the time counting down each time the pad is pressed. Each touch
will add 30 seconds, up to 99 minutes and 99 seconds.
The oven will start immediately when pressed.
GEAppliances.com
Time Defrost
Time
Defrost
Express Cook
1
2
3
4
5
6
7
8
9
0
Start
Pause
Allows you to defrost for a selected length
of time. See the Defrosting Guide for
suggested times. (Weight Defrost H[SODLQHG
in the About the convenience features
section.)
1 Press TIME DEFROST.
2 Enter defrosting time.
3 Press START.
4 Turn the food over after half the time.
5 Press START.
At one half of selected defrosting time, turn
food over and break apart or rearrange
pieces for more even defrosting. Shield any
warm areas with small pieces of foil. The
oven will continue to defrost if you don’t open
the door and turn the food.
A dull thumping noise may be heard during
defrosting. This is normal when oven is not
operating at HI power.
Defrosting Tips
Foods frozen in paper or plastic can be
defrosted in the package. Closed packages
should be slit, pierced or vented AFTER
food has partially defrosted. Plastic storage
containers should be partially uncovered.
)DPLO\VL]HSUHSDFNDJHGIUR]HQGLQQHUV
can be defrosted and microwaved. If the
food is in a foil container, transfer it to a
PLFURZDYHVDIHGLVK
Foods that spoil easily should not be
allowed to sit out for more than one
hour after defrosting. Room temperature
promotes the growth of harmful bacteria.
For more even defrosting of larger foods,
such as roasts, use Weight Defrost. Be
sure large meats are completely defrosted
before cooking.
When defrosted, food should be cool
but softened in all areas. If still slightly icy,
return to the microwave very briefly, or let
it stand a few minutes.
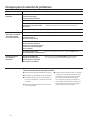
Defrosting Guide
Food
Time
Comments
Breads, Cakes
Bread, buns, or rolls (1 piece)
Sweet rollsDSSUR[R]
1/4 min.
2 to 4 min.
Rearrange after half the time.
Fish and Seafood
Fillets, frozen (1 lb.)
Shellfish, small pieces (1 lb.)
6 to 9 min.
3 to 7 min.
Place block in casserole. Turn over and break up after half the time.
Fruit
3ODVWLFSRXFK³RU
R]SDFNDJH
1 to 5 min.
Meat
Bacon (1 lb.)
2 to 5 min.
Place unopened package in oven. Let stand 5 minutes after defrosting.
Franks (1 lb.)
2 to 5 min.
3ODFHXQRSHQHGSDFNDJHLQRYHQ0LFURZDYHMXVWXQWLOIUDQNVFDQEHVHSDUDWHG
Let stand 5 minutes, if necessary, to complete defrosting.
Ground meat (1 lb.)
4 to 6 min.
Turn meat over after first half of time.
Roast: beef, lamb, veal, pork
9 to 13 min.
per lb.
Use power level 10.
Steaks, chops and cutlets
4 to 8 min.
per lb.
Place unwrapped meat in cooking dish. Turn over after first half of time and
shield warm areas with foil. After second half of time, separate pieces with table
knife. Let stand to complete defrosting.
Poultry
Chicken, broiler-fryer, cut up
(21ø2 to 3 lbs.)
14 to 20 min.
Chicken, whole (21ø2 to 3 lbs.)
20 to 25 min.
Cornish hen
7 to 13 min. per lb.
3 to 8 min.
per lb.
Place wrapped chicken in dish. Unwrap and turn over after first half of time. After
second half of time, separate pieces and place in cooking dish. Microwave 2 to 4
minutes more, if necessary. Let stand a few minutes to finish defrosting.
Place wrapped chicken in dish. After half the time, unwrap and turn chicken over.
Shield warm areas with foil. To complete defrosting, run cold water in the cavity
until giblets can be removed.
3ODFHXQZUDSSHGKHQLQWKHRYHQEUHDVWVLGHXS7XUQRYHUDIWHUILUVWKDOIRIWLPH
Run cool water in the cavity until giblets can be removed.
3ODFHXQZUDSSHGEUHDVWLQPLFURZDYHVDIHGLVKEUHDVWVLGHGRZQ$IWHUILUVWKDOI
RIWLPHWXUQEUHDVWVLGHXSDQGVKLHOGZDUPDUHDVZLWKIRLO'HIURVWIRUVHFRQG
half of time. Let stand 1 to 2 hours in refrigerator to complete defrosting.
Turkey breast (4 to 6 lbs.)
11
About the convenience features.
Popcorn
Popcorn
Use only with prepackaged
microwave popcorn weighing
2.5 to 3.0 ounces.
or
To use the Popcorn feature:
Follow package instructions, using
1 Time
Cook if the package is less than 2.5
ounces or larger than 3.0 ounces. Place
the package of popcorn in the center of
the microwave.
2
Press POPCORN once for a 3.0 ounce
package of popcorn, the oven will start
immediately.
POPCORN once for a 3.0 ounce
1 Press
package of popcorn, the oven will start
immediately.
Then enter 1 for 2.0 ounce bag or 2 for
2 3.0
ounce bag.
Your popcorn bag may get stuck and stop
rotating, but this will not effect the cooking
performance. Do not open the door even if
the bag is not rotating.
Press POPCORN again for a 2.5 ounce
package.
Reheat
Reheat
1 Press Reheat pad.
Enter the food type 1 for one serving
2 (see
Reheat Guide below)
QWHUWKHQXPEHURIVHUYLQJV7KHQ
3 (the
microwave will start immediately.
You may open the door during cooking
to check the food. Close the door and
press START to resume cooking.
Cooking Guide for REHEAT feature
Enter Code
1
2
3
12
Food Choice
Pasta
Meats, casseroles, pizza
Fruits and Vegetables
Comments
Cover with lid or vented plastic wrap
Cover with lid or vented plastic wrap
Cover with lid or vented plastic wrap
GEAppliances.com
Beverage
Beverage
To use the Beverage feature:
Press BEVERAGE pad. The microwave
will automatically be set to heat an 8
ounce beverage. The microwave will start
immediately.
If you would like to change the the setting
for the beverage size:
1 Press BEVERAGE pad once for 8 ounces.
2 Press BEVERAGE pad twice for 12 ounces.
BEVERAGE pad three times for 4
3 Press
ounces.
4 The microwave will start immediately.
Drinks heated with the Beverage feature
may be very hot. Remove the container
with care.
or
1 Press BEVERAGE pad.
1 for 4.0 ounce, 2 for 8.0 ounce or 3
2 Enter
for 12 ounces.
Potato (on some models)
Potato
To use the Potato feature:
1 Press the POTATO pad.
2 3UHVVWKHQXPEHURIVHUYLQJV7KH
oven will start immediately.
Weight
Defrost
Start
Pause
Weight Defrost
Use Weight Defrost for meat, poultry and
fish weighing up to 2.5 pounds. Use Time
Defrost for most other frozen foods.
There is a handy guide located on the inside
front of the oven.
Weight Defrost automatically sets the
defrosting times and power levels to give even
defrosting results for meats, poultry and fish.
1 Press Weight Defrist repeatedly to select
1 to 2.5 pounds.
Remove meat from package and place
RQPLFURZDYHVDIHGLVK
between 0.1 to 6.0 pounds.
When the oven signals, turn the food over.
Remove defrosted meat or shield warm
areas with small pieces of foil.
2 Then press the number pad to select
3 Press START.
(Time DefrostLVH[SODLQHGLQWKHAbout the
time features section.)
After defrosting, most meats need to stand
5 minutes to complete defrosting. Large
roasts should stand for about
30 minutes.
13
About the other features.
Clock
Clock
Press to enter the time of day.
Express Cook
1
2
3
4
5
6
7
8
9
1 Press CLOCK.
2 Enter time of day.
3 Press CLOCK.
0
Start
Pause
Start
Pause
Cancel
Off
Pause
START/PAUSE allows you to stop cooking without opening the door or clearing the display.
Press START/PAUSE again to restart the oven.
Child Lock-Out
You may lock the control panel to prevent the microwave from being accidentally
started or used by children.
To lock or unlock the controls, press and hold Cancel/Off for about three seconds.
When the control panel is locked, the lock indicator will be lit.
Sound
Sound
7KHEHHSHUVRXQGFDQEHDGMXVWHG
Press SOUND for mute or normal.
14
GEAppliances.com
Timer
On/Off
Timer
This pad performs the following functions:
It operates as a minute timer.
It can be used as a hold setting after defrosting.
How to Use as a Minute Timer
The Timer operates without microwave energy.
1 Press TIMER.
2 Enter the amount of time you want to count down.
3 Press START. When the time is up, the timer will signal.
How to Set a delay start for Time Defrost
1
2
3
4
5
Press WEIGHT DEFROST and select food weight, or press TIME DEFROST and
enter defrosting time.
Press START
Press TIMER.
Enter the amount of time you want the oven to hold.
Press START.
The oven will begin defrosting. After defrosting is complete, the holding time
will count down.
To cancel, press the TIMER button.
When time is up, the oven will signal with beeps and “End” on display.
To turn off the timer signals, press TIMER.
NOTE: Any options/settings menu is not accessible until the Timer End signals are cleared
by pressing the TIMER pad.
15
Microwave terms.
Term
Definition
Arcing
Arcing is the microwave term for sparks in the oven. Arcing is caused by:
metal or foil touching the side of the oven.
foil that is not molded to food (upturned edges act like antennas).
PHWDOVXFKDVWZLVWWLHVSRXOWU\SLQVJROGULPPHGGLVKHV
recycled paper towels containing small metal pieces.
Covering
Covers hold in moisture, allow for more even heating and reduce cooking time. Venting plastic wrap
RUFRYHULQJZLWKZD[SDSHUDOORZVH[FHVVVWHDPWRHVFDSH
Shielding
,QDUHJXODURYHQ\RXVKLHOGFKLFNHQEUHDVWVRUEDNHGIRRGVWRSUHYHQWRYHUEURZQLQJ:KHQ
microwaving, you use small strips of foil to shield thin parts, such as the tips of wings and legs
on poultry, which would cook before larger parts.
Standing Time When you cook with regular ovens, foods such as roasts or cakes are allowed to stand to finish cooking
or to set. Standing time is especially important in microwave cooking. Note that a microwaved cake
is not placed on a cooling rack.
Venting
16
After covering a dish with plastic wrap, you vent the plastic wrap by turning back one corner so
H[FHVVVWHDPFDQHVFDSH
Care and cleaning of the microwave oven.
GEAppliances.com
Helpful Hints
An occasional thorough wiping with a solution of baking soda and water keeps the
inside fresh.
Unplug the cord before cleaning any part of this oven.
How to Clean the Inside
Walls, Floor, Inside Window, Metal and Plastic Parts on the Door
Some spatters can be removed with a paper towel; others may require a damp cloth. Remove
greasy spatters with a sudsy cloth, then rinse with a damp cloth. Do not use
abrasive cleaners or sharp utensils on oven walls.
To clean the surface of the door and the surface of the oven that come together upon
closing, use only mild, nonabrasive soaps or detergents using a sponge or soft cloth.
Rinse with a damp cloth and dry.
Never use a commercial oven cleaner on any part of your microwave.
Removable Turntable and Turntable Support
7RSUHYHQWEUHDNDJHGRQRWSODFHWKHWXUQWDEOHLQWRZDWHUMXVWDIWHUFRRNLQJ:DVKLWFDUHIXOO\
in warm, sudsy water or in the dishwasher. The turntable and support can be broken if
dropped. Remember, do not operate the oven without the turntable and
support in place.
How to Clean the Outside
Do not use cleaners containing ammonia or alcohol on the microwave oven. Ammonia
or alcohol can damage the appearance of the microwave.
Case
Clean the outside of the microwave with a sudsy cloth. Rinse with a damp cloth and then dry.
Wipe the window clean with a damp cloth.
Control Panel and Door
Wipe with a damp cloth. Dry thoroughly. Do not use cleaning sprays, large amounts of soap
DQGZDWHUDEUDVLYHVRUVKDUSREMHFWVRQWKHSDQHO³WKH\FDQGDPDJHLW6RPHSDSHUWRZHOV
can also scratch the control panel.
Door Surface
It is important to keep the area clean where the door seals against the microwave. Use only
PLOGQRQDEUDVLYHGHWHUJHQWVDSSOLHGZLWKDFOHDQVSRQJHRUVRIWFORWK5LQVHZHOO
Power Cord
If the cord becomes soiled, unplug and wash with a damp cloth. For stubborn spots, sudsy
water may be used, but be certain to rinse with a damp cloth and dry thoroughly before
plugging cord into outlet.
Stainless Steel (on some models)
Do not use a steel-wood pad; it will scratch the surface.
To clean the stainless steel surface, use a hot, damp cloth with a mild detergent suitable
for stainless steel surfaces. Use a clean, hot, damp cloth to remove soap. Dry with a dry, clean
cloth. Always scrub lightly in the direction of the grain.
17
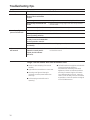
Troubleshooting Tips.
Problem
Possible Causes
What To Do
Oven will not start
A fuse in your home may be blown or the circuit breaker
tripped.
5HSODFHIXVHRUUHVHWFLUFXLWEUHDNHU
Power surge.
8QSOXJWKHPLFURZDYHRYHQWKHQSOXJLWEDFNLQ
Plug not fully inserted into wall outlet.
0DNHVXUHWKHSURQJSOXJRQWKHRYHQLVIXOO\LQVHUWHG
into wall outlet.
Door not securely closed.
2SHQWKHGRRUDQGFORVHVHFXUHO\
Door not securely closed.
2SHQWKHGRRUDQGFORVHVHFXUHO\
START pad not pressed after
entering cooking selection.
3UHVVSTART.
Control panel lighted,
yet oven will not start
Another selection entered
3UHVVCANCEL/OFF.
already in oven and CANCEL/OFF
pad not pressed to cancel it.
Microwave oven control
will not work
CANCEL/OFF was pressed
accidentally.
5HVHWFRRNLQJSURJUDPDQGSUHVV START.
The control has been locked.
(When the control panel is
locked, the lock indicator
will be lit.)
3UHVVDQGKROGCANCEL/OFF for about three seconds
to unlock the control.
Things That Are Normal With Your Microwave Oven
Steam or vapor escaping from around
the door.
Light reflection around door or outer case.
Dimming oven light and change in
the blower sound at power levels other
than high.
Dull thumping sound while oven is
operating.
18
TV/radio interference might be noticed while
using the microwave. Similar to
the interference caused by other small
appliances, it does not indicate a problem
with the microwave. Plug the microwave
into a different electrical circuit, move the
radio or TV as far away from the microwave
as possible, or check the position and signal
of the TV/radio antenna.
GE Microwave Oven Warranty.
All warranty service provided by our Factory Service Centers,
or an authorized Customer Care® technician. To schedule service,
on-line, 24 hours a day, visit us at GEAppliances.com, or call 800.
GE.CARES (800.432.2737). Please have serial and model numbers
available when calling for service.
Staple your receipt here.
Proof of the original purchase
date is needed to obtain service
under the warranty.
For The Period Of:
GE Will Replace:
One Year
From the date of the
original purchase
Any part of the microwave oven which fails due to a defect in materials or workmanship.
During this limited one-year warranty, GE will also provide, free of charge, all labor and related
service to replace the defective part.
For the above limited warranty: To avoid any trip charges, you must take the microwave oven to a General Electric Customer
Care ® servicer and pick it up following service. In-home service is also available, but you must pay for the service technician’s
travel costs to your home.
What GE Will Not Cover:
Service trips to your home to teach you how to
use the product.
Replacement of house fuses or resetting of circuit
breakers.
Improper installation, delivery or maintenance.
Damage to the product caused by accident, fire, floods
or acts of God.
Product not accessible to provide required service.
Failure of the product or damage to the product if it is
abused, misused (for example, cavity arcing from wire
rack or metal/foil), or used for other than the intended
purpose or used commercially.
Incidental or consequential damage caused by possible
defects with this appliance.
Damage caused after delivery.
(;&/86,212),03/,(':$55$17,(6³<RXUVROHDQGH[FOXVLYHUHPHG\LVSURGXFWUHSDLUDVSURYLGHGLQ
this Limited Warranty. Any implied warranties, including the implied warranties of merchantability or
fitness for a particular purpose, are limited to one year or the shortest period allowed by law.
This warranty is extended to the original purchaser and any succeeding owner for products purchased for home use
within the USA. If the product is located in an area where service by a GE Authorized Servicer is not available, you may
be responsible for a trip charge or you may be required to bring the product to an Authorized GE Service Location for
service. In Alaska, the warranty excludes the service calls to your home.
Some states do not allow the exclusion or limitation of incidental or consequential damages. This warranty gives you
specific legal rights, and you may also have other rights which vary from state to state. To know what your legal rights
are, consult your local or state consumer affairs office or your state’s Attorney General.
Warrantor: General Electric Company. Louisville, KY 40225
19
Consumer Support.
GE Appliances Website
GEAppliances.com
Have a question or need assistance with your appliance? Try the GE Appliances Website 24 hours a day,
any day of the year! For greater convenience and faster service, you can now download Owner’s Manuals,
RUGHUSDUWVFDWDORJVRUHYHQVFKHGXOHVHUYLFHRQOLQH<RXFDQDOVR´$VN2XU7HDPRI([SHUWV™”
your questions, and so much more…
Schedule Service
GEAppliances.com
([SHUW*(UHSDLUVHUYLFHLVRQO\RQHVWHSDZD\IURP\RXUGRRU*HWRQOLQHDQGVFKHGXOH\RXUVHUYLFHDW
your convenience 24 hours any day of the year! Or call 800.GE.CARES (800.432.2737) during normal business
hours.
Real Life Design Studio
GEAppliances.com
*(VXSSRUWVWKH8QLYHUVDO'HVLJQFRQFHSW³SURGXFWVVHUYLFHVDQGHQYLURQPHQWVWKDWFDQEHXVHGE\
people of all ages, sizes and capabilities. We recognize the need to design for a wide range of physical and
mental abilities and impairments. For details of GE’s Universal Design applications, including kitchen design
ideas for people with disabilities, check out our Website today. For the hearing impaired, please call 800.TDD.
GEAC (800.833.4322).
Extended Warranties
GEAppliances.com
3XUFKDVHD*(H[WHQGHGZDUUDQW\DQGOHDUQDERXWVSHFLDOGLVFRXQWVWKDWDUHDYDLODEOHZKLOH\RXUZDUUDQW\
LVVWLOOLQHIIHFW<RXFDQSXUFKDVHLWRQOLQHDQ\WLPHRUFDOOGXULQJQRUPDOEXVLQHVVKRXUV
*(&RQVXPHU+RPH6HUYLFHVZLOOVWLOOEHWKHUHDIWHU\RXUZDUUDQW\H[SLUHV
Parts and Accessories
GEAppliances.com
Individuals qualified to service their own appliances can have parts or accessories sent directly to their homes
9,6$0DVWHU&DUGDQG'LVFRYHUFDUGVDUHDFFHSWHG2UGHURQOLQHWRGD\KRXUVHYHU\GD\RU
by phone at 800.626.2002 during normal business hours.
Instructions contained in this manual cover procedures to be performed by any user. Other servicing generally
VKRXOGEHUHIHUUHGWRTXDOLILHGVHUYLFHSHUVRQQHO&DXWLRQPXVWEHH[HUFLVHGVLQFHLPSURSHUVHUYLFLQJPD\
cause unsafe operation.
Contact Us
GEAppliances.com
If you are not satisfied with the service you receive from GE, contact us on our Website with all the details
including your phone number, or write to:
General Manager, Customer Relations
GE Appliances, Appliance Park
Louisville, KY 40225
Register Your Appliance
GEAppliances.com
5HJLVWHU\RXUQHZDSSOLDQFHRQOLQH³DW\RXUFRQYHQLHQFHTimely product registration will allow for enhanced
communication and prompt service under the terms of your warranty, should the need arise.
<RXPD\DOVRPDLOLQWKHSUHSULQWHGUHJLVWUDWLRQFDUGLQFOXGHGLQWKHSDFNLQJPDWHULDO
Printed in China
Hornomicroonda
GEAppliances.com
Instrucciones de seguridad . . . . . . 2–6
Instrucciones de operación
Funciones de preparación rápida . . . . 11-14
Términos de microondas . . . . . . . . . . . . . . . 16
Funciones de su horno microondas . . . . 7-8
Otras funciones . . . . . . . . . . . . . . . . . . . . .15, 16
Nivel de Potencia. . . . . . . . . . . . . . . . . . . . . . . . 9
Tiempo de Cocción . . . . . . . . . . . . . . . . . . . . . 10
Manual del
propietario
JEM3072
JES1072
Cuidado y limpieza . . . . . . . . . . . . . . . . . 17
Consejos para la solución
deproblemas . . . . . . . . . . . . . . . . . . . . . . . . 18
Cosas que son normales . . . . . . . . . . . . . . . 18
Soporte al consumidor
Soporte al consumidor . . . . . . . . . . . . . . . . . . . 20
Garantía . . . . . . . . . . . . . . . . . . . . . . . . . . . . . . . 19
Escriba los números de modelo
y de serie aquí:
Número de modelo _________
Número de serie ___________
Estos números están en una etiqueta
en el interior del horno.
49-40733 08-14 GE
INFORMACIÓN IMPORTANTE DE SEGURIDAD.
LEA TODAS LAS INSTRUCCIONES ANTES DE USAR
¡ADVERTENCIA!
A fin de reducir el riesgo de quemaduras, descargas eléctricas, incendios, lesiones a personas, o exposición a excesos de
potencia del microondas:
PRECAUCIONES PARA EVITAR EXPOSICIÓN POSIBLE A
UNA ENERGÍA EXCESIVA DE MICROONDAS
(a) No Intente operar este horno con la puerta abierta ya
que esto podría resultar en una exposición a energía
microondas dañina. Es importante no cancelar ni
manipular de forma indebida los dispositivos de seguridad.
(b) No SitúeQLQJ~QREMHWRHQWUHODSDUWHIURQWDOGHOKRUQR\
la puerta ni permita que se acumule suciedad o residuos
limpios en las gomas de cierre hermético.
(c) No Use el horno si está dañado. Es especialmente
importante que la puerta del horno se cierre correctamente
y que no se dañe:
(1) la puerta (doblada),
(2) bisagras y pasadores (rotos o sueltos),
(3) sellos de la puerta y gomas de cierre hermético.
(d) (OKRUQRQRGHEHUtDDMXVWDUVHQLUHSDUDUVHSRUQDGLHTXHQR
sea personal de servicio adecuadamente calificado.
INFORMACIÓN IMPORTANTE DE SEGURIDAD.
Use este electrodoméstico sólo para su propósito original, como se describe en el Manual del Propietario. Al usar
electrodomésticos eléctricos se deberán seguir las precauciones básicas de seguridad, incluyendo lo siguiente:
Lea y obedezca las precauciones específicas en la sección
de Precauciónes para evitar exposición posible a una energía
excesiva de microondas de arriba.
Este electrodoméstico debe estar conectado a tierra.
Conéctelo sólo a una toma de corriente con toma de tierra.
Vea la sección de Instrucciones de toma de tierra en la
página 5.
Instale o coloque este electrodoméstico siguiendo sólo las
Instrucciones de Instalación provistas.
Asegúrese de colocar la superficie frontal de la puerta a más
de tres pulgadas del borde del mostrador, a fin de evitar que
el aparato se voltee accidentalmente durante el uso normal.
Este horno de microondas no es aprobado o probado para
uso marino.
No coloque este electrodoméstico sobre un lavabo.
No coloque el horno de microondas sobre ni cerca de cualquier
parte de un electrodoméstico para calentar o cocinar.
No guarde nada directamente sobre la superficie del horno
microondas cuando el mismo se encuentre funcionando.
No utilice este electrodoméstico si posee un cable o enchufe
dañado, si no funciona correctamente, o si fue dañado o
sufrió una caída.
No cubra ni bloquee cualquier abertura del
electrodoméstico.
Use this appliance only for its intended use as described in
this manual. Do not use corrosive chemicals or vapors in this
appliance. This microwave oven is specifically designed to
heat, dry or cook food, and is not intended for laboratory or
industrial use.
No almacene este electrodoméstico al aire libre. No use este
SURGXFWRFHUFDGHODJXD³SRUHMHPSORHQXQVyWDQRPRMDGR
cerca de una alberca, de un fregadero o de lugares similares.
0DQWHQJDHOFDEOHGHFRUULHQWHDOHMDGRGHVXSHUILFLHV
calientes.
1RVXPHUMDHOFDEOHGHFRUULHQWHQLHOHQFKXIHHQDJXD
No permita que el cable de corriente cuelgue sobre el borde
de la mesa o el mostrador.
Para reducir el riesgo de incendio en la apertura del horno:
³ No cocine demasiado la comida. Preste atención cuidadosa
al electrodoméstico cuando se coloca papel, plástico u otro
material combustible en el horno mientras se cocina.
³ 4XLWHODVFLQWDVGHFLHUUHFRQPHWDO\ODVDVDVPHWiOLFDV
de los recipientes de papel o plástico antes de
introducirlos en el horno.
³ 1RDOPDFHQHFRVDVHQHOKRUQR1RGHMHSURGXFWRV
de papel, utensilios de cocinar ni comida en el horno
mientras no lo esté usando.
³ 6LVHLQFHQGLDDOJ~QPDWHULDOGHQWURPDQWHQJDODSXHUWD
del horno cerrada, apague el horno y desconecte el cable
de corriente eléctrica, o apague la corriente en el fusible o
panel del diferencial. Si se abre la puerta, el fuego podría
expandirse.
Lea las instrucciones de limpieza de la superficie de la puerta
en la sección de Cuidado y Limpieza del horno microondas
de este manual.
Las reparaciones de este electrodoméstico deberían
ser realizadas sólo por personal cualificado. Póngase en
contacto con el centro de servicio autorizado más cercano
SDUDVXUHYLVLyQUHSDUDFLyQRDMXVWH
Al igual que con cualquier electrodoméstico, se deberá
realizar una supervisión de cerca si es usado por niños.
No use las funciones del sensor dos veces seguidas con
la misma porción de comida. Si la comida no se cocina
luego de la primera cuenta regresiva, use TIME COOK
(Temporizador de Cocción) para adicionar tiempo.
No use su horno microondas para secar periódicos.
GUARDE ESTAS INSTRUCCIONES
2
INFORMACIÓN IMPORTANTE DE SEGURIDAD.
LEA TODAS LAS INSTRUCCIONES ANTES DE USAR
GEAppliances.com
¡ADVERTENCIA!
FORMACIÓN DE ARCO ELÉCTRICO
Si ve que se forman arcos eléctricos, presione el botón CANCEL/OFF (Cancelar/Apagar) y resuelva el
problema.
Arco eléctrico es lo que, en la terminología de los
microondas, describe las chispas en el horno. El arco
eléctrico se produce cuando:
Hay un metal o papel de aluminio tocando el lado del
horno.
El papel de aluminio no está envolviendo bien la
comida (hay bordes doblados hacia arriba que
actúan como antenas.)
Hay algún metal, como cintas de cierre con metal,
pinchos de pollo, o platos con decoración de oro
dentro del microondas.
Se está usando papel toalla reciclado que contienen
pequeñas porciones de metal en el microondas.
COMIDAS
No haga rosetas o palomitas de maíz en el
microondas a no ser que esté usando un accesorio
especial para prepararlas o que esté empleando
rosetas o palomitas de maíz que indiquen ser válidas
para el uso de hornos microondas.
Algunos productos como las yemas de huevo y
UHFLSLHQWHVVHOODGRV³SRUHMHPSORMDUUDVFHUUDGDV³
podríanexplotar y no deben calentarse en el
horno microondas. Si se usa de esaforma el horno
microondas puedencausarse daños personales.
No hierva huevos dentro de un horno microondas. Se
generará presión dentro de la yema del huevo que
causará que explote pudiendo, posiblemente, dañar a
alguien.
Si se pone en marcha el microondas sin tener comida
en su interior por más de un minuto o dos podrían
causarse daños al horno y podría empezar un fuego.
Esto hace aumentar la temperatura alrededor del
magnetrón y puede reducir el período de vida útil del
horno.
Debería cortarse la “piel” externa de aquellos
alimentos que no la tengan rota como las patatas,
salchichas, embutidos, tomates, manzanas, hígados
de pollo y demás menudillos de aves y yemas de
huevos, para permitir la salida de vapor mientras se
cocinan.
1RFDOLHQWHODFRPLGDGHOEHEpHQMDUUDVGHFULVWDO
incluso si están destapadas. Asegúrese de que
los alimentos de los niños estén bien cocinados.
Mueva la comida para distribuir el calor de forma
SDUHMD7HQJDFXLGDGRGHTXHHOQLxRQRVHTXHPH
al calentar la leche de fórmula. El contenedor puede
parecer más frío de lo que realmente está la fórmula.
Pruebe siempre la fórmula antes de dársela al bebé.
No descongele bebidas congeladas en botellas
de cuello estrecho (especialmente bebidas
carbonatadas). Incluso con el contenedor abierto,
podría generarse un aumento de presión. Esto puede
causar que el contenedor explote, lo cual podría
producir daños personales.
AGUA SOBRECALENTADA
Líquidos, como agua, café o té se podrían
sobrecalentar más allá del punto de ebullición sin dar
ODDSDULHQFLDGHTXHHVWiQKLUYLHQGR/DVEXUEXMDV
visibles o el hecho de estar hirviendo cuando el
envase es removido del horno de microondas no
siempre están presentes. ESTO PODRÍA RESULTAR
(1/Ë48,'2608<&$/,(17(65(3(17,1$0(17(
+,59,(1'2<5(%26È1'26(&8$1'2(/(19$6((6
MOVIDO O SI UNA CUCHARA U OTRO UTENSILIO ES
,16(57$'2(1(//Ë48,'2
Para reducir el riesgo de lesiones personales:
³1RVREUHFDOLHQWHHOOtTXLGR
³0XHYDHOOtTXLGRWDQWRDQWHVFRPRDPLWDGGHO
calentamiento.
³1RXVHHQYDVHVGHODGRVGHUHFKRVRFRQFXHOORV
estrechos.
³'HVSXpVGHFDOHQWDUGHMHHOHQYDVHHQHOKRUQR
microondas por un corto tiempo antes de
remover el envase.
³8VHFXLGDGRH[WUHPRFXDQGRLQVHUWHXQDFXFKDUD
u otro utensilio en el envase.
Los alimentos calientes y el vapor pueden
causar quemaduras. Tenga cuidado al abrir
cualquier contenedor con comida caliente, incluso
bolsas de rosetas o palomitas demaíz, bolsas o
FDMDVGHFRFLQDU3DUDSUHYHQLUSRVLEOHVGDxRV
SHUVRQDOHVPDQWHQJDHOYDSRUDOHMDGRGHVXVPDQRV
y rostro.
No cocine demasiado las patatas. Podrían
deshidratarse e incendiarse, causando daños a su
horno.
&RFLQHODFDUQH\HOSROORSRUFRPSOHWR³ODFDUQH
hasta que alcance una temperatura mínima
INTERIOR de 160°F, y el pollo hasta una temperatura
INTERNAmínima de 180°F. Cuando se cocinan
a estas temperaturas se evita la contracción de
enfermedades por intoxicación.
GUARDE ESTAS INSTRUCCIONES
3
MPORTANTE DE SEGURIDAD.
LEA TODAS LAS INSTRUCCIONES ANTES DE USAR
¡ADVERTENCIA!
UTENSILIOS DE COCINA PARA MICROONDAS
Asegúrese de que todos los utensilios de cocina que
use en su horno sean aptos para microondas. Pueden
usarse la mayoría de las cazuelas, platos para cocinar,
tazas de medir, tazas de flanes y botes de cristal, o
ODVYDMLOODVGHSRUFHODQDTXHQRWLHQHQGHFRUDFLRQHV
metálicas o barnices con brillo metálico. Algunos
utensilios tienen la siguiente inscripción: “puede usarse
en microondas.”
Si no está seguro de que un plato pueda usarse en
el microondas, haga esta prueba: Coloque el plato
que esté probando y un vaso de medir con 1 taza de
DJXDHQHOKRUQR³SRQJDODWD]DGHPHGLUGHQWURR
al lado del plato. Ponga el microondas en marcha,
a máxima potencia, durante 1 minuto. Si el plato se
calienta, no debería usarse en el microondas.
Si el plato se mantiene frío y sólo se calienta la taza,
entonces el plato puede usarse de forma segura en
el microondas.
Si usa un termómetro de carne al cocinar, asegúrese
que sea uno seguro para usarse en hornos
microondas.
No use productos de papel reciclado. El papel toalla,
las servilletas y el papel de cera reciclados pueden
contener motas metálicas que podrían causar la
formación de arcos eléctricos o incendiarse. Los
productos de papel que contengan nilón o filamentos
de nilón tampoco deberían usarse ya que se podrían
incendiar de igual modo.
$OJXQDVEDQGHMDVGHSOiVWLFRFRPRHQODVTXHVH
empaqueta la carne) tienen una cinta fina de metal
incrustada en el plato. Al ponerse en el microondas,
el metal puede quemar el suelo del horno o incendiar
un papel toalla.
No use su horno microondas para secar periódicos.
No todo film plástico puede usarse en hornos
microondas. Revise el uso adecuado del paquete.
Pueden usarse papel toalla, papel encerado y film
plástico para los recipientes de forma que retengan
la humedad y para prevenir salpicaduras. Asegúrese
de proveer una forma de ventilación para que el
vapor pueda escapar del film plástico.
Podrían calentarse los utensilios por el calor
transferido por los alimentos calientes. Puede
QHFHVLWDUXVDUPDQRSODVGHFRFLQDSDUDPDQHMDUORV
utensilios.
Las bolsas de cocinar que puedan hervir y cualquier
bolsa de plástico firmemente cerrada, deberían
cortarse, pincharse o proveer cualquier tipo de
ventilación que indique el paquete. En caso contrario,
el plástico podría explotar mientras se cocina o
después, pudiendo causar daños físicos. Además,
los recipientes de plástico deberían permanecer, al
menos, parcialmente destapados ya que pueden
sellarse fuertemente. Cuando cocine con recipientes
firmemente cubiertos con film plástico, retire la
FXELHUWDFRQFXLGDGR\PDQWHQJDHOYDSRUDOHMDGRGH
sus manos y rostro.
Use papel de aluminio sólo de la forma detallada
en este manual. Los alimentos preparados en
porciones listas para calentar y servir (TV Dinners)
SXHGHQFRFLQDUVHFRQPLFURRQGDVHQEDQGHMDVGH
papel aluminio de una altura menor a 3/4ļ; remueva
la cubierta superior de aluminio y vuelva a colocar
ODEDQGHMDHQODFDMD&XDQGRXVHDOXPLQLRGHQWUR
de un horno microondas, mantenga el aluminio, al
menos, a una pulgada de distancia de los lados del
horno.
8WHQVLOLRVGHSOiVWLFR³/RVXWHQVLOLRVGHSOiVWLFR
diseñados para su uso en microondas son muy
prácticos, pero deben usarse con cuidado. Incluso
aquellos utensilios autorizados para su uso en
microondas podrían no ser tan tolerantes como el
cristal o los materiales de cerámica en condiciones
de sobrecalentamiento y podrían ablandarse o
carbonizarse al someterlos a períodos cortos de
sobrecalentamiento. En exposiciones más largas
a sobrecalentamiento, la comida y los utensilios
podrían incendiarse.
Siga estas normas:
1 Use solamente plásticos aptos para microondas
y úselos siguiendo estrictamente las
recomendaciones del fabricante de los utensilios.
2 No introduzca en el microondas recipientes
vacíos.
3 No permita que los niños usen utensilios de
plástico sin completa supervisión.
SAVE THESE INSTRUCTIONS
4
MPORTANTE DE SEGURIDAD.
LEA TODAS LAS INSTRUCCIONES ANTES DE USAR
GEAppliances.com
INSTRUCCIONES DE TOMA DE TIERRA
¡ADVERTENCIA!³(OXVRLQDGHFXDGRGHOHQFKXIHGHFRQH[LyQDWLHUUDSXHGHSURYRFDUULHVJRV
de descargas eléctricas..
Este electrodoméstico debe estar conectado a tierra. Si
VHSURGXMHUDXQFRUWRFLUFXLWRODWRPDGHWLHUUDUHGXFH
el riesgo de descarga eléctrica al proveer un cable de
escape para la corriente eléctrica.
Este electrodoméstico está equipado con un cable de
corriente que dispone de un hilo para toma de tierra
con un enchufe con toma de tierra. El enchufe debe
estar conectado a una toma de corriente que esté
debidamente instalada y con salida a tierra.
Consulte con un electricista cualificado o un técnico
de reparaciones si no entiende completamente las
instrucciones sobre la toma de tierra, o si tuviese alguna
duda sobre si su aparato está debidamente conectado
a tierra.
ENCHUFES ADAPTADORES
Si la toma de corriente es un modelo estándar de dos
FODYLMDVHVVXUHVSRQVDELOLGDGSHUVRQDO\VXREOLJDFLyQ
el reemplazarla por una toma adecuada para tres
FODYLMDVFRQFRQH[LyQDWLHUUD
%DMRQLQJXQDFLUFXQVWDQFLDGHEHFRUWDURTXLWDUOD
WHUFHUDFODYLMDWLHUUDGHOFDEOHGHFRUULHQWH
No recomendamos el uso de un cable de prolongación
con este electrodoméstico. Si el cable de corriente es
demasiado corto, haga que un electricista cualificado
o un técnico de reparaciones instalen una toma de
corriente cerca del electrodoméstico. (Consulte la
VHFFLyQ$'9(57(1&,$³&$%/(6'(352/21*$&,Ï1
3DUDXQPHMRUIXQFLRQDPLHQWRHQFKXIHHVWH
electrodoméstico en una toma de corriente exclusiva
para evitar parpadeos de luz, fusibles quemados o que
salte el diferencial.
Situaciones de uso en las que el cable de corriente del aparato se desconectará con poca
frecuencia.
'HELGRDOSRWHQFLDOGHULHVJRVGHVHJXULGDGEDMRFLHUWDVFRQGLFLRQHV
enérgicamente recomendamos contra el uso de enchufes adaptadores.
Sin embargo, si usted se veen la necesidad de usar un adaptador, donde los
códigos legales locales lo permitan, puede hacer una CONEXIÓN TEMPORAL a
XQLQWHUUXSWRUGHWRPDVVLHPSUHTXHVHXVHXQWRPDFRUULHQWHOLVWDGREDMD8/
disponible en la mayoría de las ferreterías.
The larger slot in the adapter must be aligned with the larger slot in the wall
receptacle to provide proper polarity in the connection of the power cord.
PRECAUCIÓN: Unir el terminal de conexión a tierra del adaptador a un tornillo de
(No se permite usar enchufes
adaptadores en Canadá)
Alinee las
púas/ ranuras
grandes
MÉTODO
TEMPORAL
Asegúrese de que
exista una debida
conexión a tierra
antes de usar.
la cubierta en la pared no conecta a tierra el electrodoméstico apropiadamente a
no ser que el tornillo de la cubierta sea metálico y no esté aislado, y el tomacorriente de la casa esté apropiadamente
conectado a tierra a través del cableado de la casa.
Haga que un técnico calificado inspeccione el circuito de la casa para cerciorarse que está conectado a tierra
apropiadamente.
Cuando se disponga a desconectar el cable de corriente del adaptador, siempre sostenga el adaptador en su
lugar con una mano mientras tira del cable de corriente con la otra mano. Si no hace esto, la terminal de tierra
del adaptador podría romperse después de que este proceso se repita varias veces. Si se rompe el terminal de
conexión a tierra del adaptador, NO USE el electrodoméstico hasta que la conexión a tierra se haya restablecido.
Situaciones de uso en las que el cable de corriente del aparato se desconectará con
frecuencia:
No utilice un enchufe adaptador HQHVWRVFDVRVSRUTXHODGHVFRQH[LyQIUHFXHQWHGHOFDEOHGHFRUULHQWHHMHUFHXQD
tensión excesiva en el adaptador y produce la falla eventual del terminal a tierra del adaptador. Debería hacer que
un electricista calificado reemplace el receptáculo de pared de dos patas por uno de tres patas (con conexión a
tierra) antes de utilizar el electrodoméstico.
GUARDE ESTAS INSTRUCCIONES
5
MPORTANTE DE SEGURIDAD.
LEA TODAS LAS INSTRUCCIONES ANTES DE USAR
¡ADVERTENCIA!
CABLES DE PROLONGACIÓN
Se incluye un cable de corriente corto a fin de reducir los riesgos que resultan de enredarse o tropezarse con un
cable más largo.
Los cables de prolongación pueden utilizarse si se tiene cuidadoal hacerl
6LVHXWLOL]DXQFDEOHGHSURORQJDFLyQ³
1
El calibre eléctrico marcado en el cable de prolongación debe ser al menos igual al calibre eléctrico del
electrodoméstico;
2
El cable de prolongación debe ser un cable de 3 hilos con conexión a tierra y debe conectarse a un
tomacorriente de tres ranuras;
3
El cable de prolongación debe acomodarse de modo que no cuelgue sobre la encimera o el mostrador donde
puedan tirarlo los niños o donde puedan tropezarse y caerse involuntariamente.
Si utiliza un cable de prolongación, es posible que la luz interior parpadee y el sonido del ventilador varíe cuando el
horno microondas esté encendido. Además, los tiempos de cocción pueden prolongarse.
AVISO: MARCAPASOS
La mayoría de los marcapasos se encuentran protegidos contra la interferencia de productos electrónicos, incluyendo
microondas. Sin embargo, los pacientes que tengan marcapasos deberían consultar a sus médicos si tienen alguna
duda.
FAVOR DE LEER Y SEGUIR CUIDADOSAMENTE ESTA
INFORMACIÓN DE SEGURIDAD.
GUARDE ESTAS INSTRUCCIONES
6
Funciones de su horno microondas.
GEAppliances.com
Su modelo puede tener otras características y apariencia que las ilustradas en este manual.
700 Watts
Features of the Oven
Plato giratorio desmontable. El plato giratorio y
el soporte deben estar en la ubicación correcta al
usar el horno. El plato giratorio se podrá retirar
para su limpieza.
Enganches de la puerta.
Ventana con cobertura metálica. La pantalla
permite que usted pueda ver lo que cocina, al
tiempo que mantiene las microondas confinadas
en el horno.
Soporte Extraíble del Plato Giratorio. El plato
giratorio deberá estar en la ubicación correcta al
usar el horno.
Guía de conveniencia.
Panel de control de toque y pantalla.
Botón de liberación de los enganches de la
puerta. Presione el botón de liberación de los
enganches para abrir la puerta.
NOTA: La placa de calificación está ubicada en el frente
del horno microondas. La ventilación(es) y la luz del
horno están ubicadas en las paredes internas del horno
microondas.
Accesorios Opcionales
Disponible con costo adicional a través de su proveedor de GE.
El Kit para Colgar JXA019KSHUPLWHTXH-(0VHDPRQWDGRGHEDMRGHXQJDELQHWH
7
Funciones de su horno microondas.
Puede usar el microondas por tiempo o con las funciones de conveniencia. No todas las funciones aparecen en
todos los modelos.
Popcorn Beverage
Potato
Weight
Defrost
Time
Defrost
Reheat
Express Cook
1
2
3
4
5
6
9
7
8
Power
Level
0
Add
30 Sec
Timer
On/Off
Clock
Sound
Cancel
Off
Start
Pause
Time
Cook
Controles de cocción
Consulte la Guía de Conveniencia antes de comenzar.
Funciones de tiempo
Presione
Time Cook
Presione las teclas numéricas
TIME DEFROST
(Descongelar por Tiempo)
POWER LEVEL
(nivel de potencia)
30 SEC (30 Segundos)
EXPRESS COOK
(cocción express)
Entre
Calcule el tiempo de cocción
Ingrese el tiempo de descongelación
Nivel de corriente de 0 a HI (Alto)
Comienza inmediatamente.
Comienza inmediatamente.
Funciones de sensor
Presione
Entre
POTATO (en algunos modelos)
Entre en el tamaño que sirve.
(papa)
POPCORN
Entre en el tamaño que sirve.
(palomitas de maíz)
BEVERAGE%HELGD
(QWUHHQHOWDPDxRTXHVLUYH
Presione una vez, dos veces o tres veces
REHEAT (en algunos modelos)
Presione una vez
Tipo de Comida 1 a 3
WEIGHT DEFROST
(Descongelación por Peso)
Peso de Alimento (0.1-6lbs)
8
Option
1-4
3 oz. o 2.5 oz.
R]R]RR]
1 a 3 Porciones
GEAppliances.com
Cómo Modificar el Nivel de Potencia
Power
Level
El nivel de potencia se puede ingresar o
modificar antes de introducir Time Cook
(Tiempo de Cocción).
Express Cook
1
2
3
4
5
6
7
8
9
0
Start
Pause
1
Presione el botón Time Cook (Tiempo de
Cocción) una vez.
2
3
Ingrese el Tiempo de Cocción.
4
Presione Power Level (Nivel de Potencia)
una vez y luego presione la tecla numérica
para seleccionar el nivel de potencia.
Presione Start (iniciar).
Los niveles de potencia variables agregan
flexibilidad a la cocción en el hornomicroondas.
Los niveles de potencia en el hornomicroondas
se pueden comparar con las unidades de
superficie en la estufa. Cada nivel de potencia
proporciona energía demicroondas cierta
porción deltiempo. Power level 7 (nivel de
potencia 7) es energía de microondas 70%del
tiempo. Power level 3 (nivel de potencia 3) es
energía demicroondas 30% del tiempo. La
mayoría de las cocciones se harán en el nivel
de potencia High (nivel de potencia 10) (energía
demicroondas 100% del tiempo). HI power
level (nivel de potencia Alto) hará la cocción
más rápido pero será necesario revolver, rotar
o dar vuelta la comida con mayor frecuencia.
Un nivelmenor cocinará conmayor uniformidad
y necesitará que los alimentos semuevan o
se rotenmenos. Algunos alimentos quizás
WHQJDQXQPHMRUVDERUXQDPHMRUWH[WXUDR
XQDDSDULHQFLDPiVDWUDFWLYDVLVHXVDQDMXVWHV
PHQRUHV8VHXQQLYHOGHSRWHQFLDPiVEDMR
cuando esté cocinando aquellos alimentos que
tienen la tendencia de derramarse, como las
patatas al gratén.
Los períodos de descanso (aquellos en que el
horno de microondas está haciendo ciclo de
potencia apagada) da tiempo a los alimentos
a “ecualizar” o transferir el calor hacia su
LQWHULRU8QHMHPSORGHHVWRVHPXHVWUDFRQ
3RZHU/HYHOQLYHOGHSRWHQFLD³HOFLFORGH
descongelado. Si la energía delmicroondas no
hizo ciclo de apagado, la parte externa de los
alimentos se podría cocinar antes que la parte
interna se descongelara.
A continuación le presentamos algunos
ejemplos de la forma en que se usan los varios
niveles de potencia:
High 10 (alto): Pescado, tocino, vegetales,
líquidos hervidos.
Med-High 7 (altomedio): Cocción leve de
carnes y aves; guisos y alimentos recalentados.
Medium 5 (medio): Cocción lenta y suave,
como estofados y cortes de carnemenos
suaves.
Low 2 ó 3 (bajo): Descongelación sin cocción;
alimentos hervidos a fuego lento; salsas
delicadas.
Warm1 (tibio): Paramantener alimentos tibios;
para suavizarmantequilla.
9
Sobre las características de tiempo.
Tiempo de Cocción
Time
Cook
Le permite la cocción en microondas hasta un
tiempo de 99 minutos y 99 segundos.
1
2
3
El nivel de potencia alta se configura
automáticamente, pero usted puede cambiarlo
para más flexibilidad.
4
5
6
1
Presione el botón TIME COOK (Tiempo de
Cocción).
7
8
9
2
3
Ingrese el Tiempo de Cocción.
Express Cook
0
Presione Start (Iniciar).
Puede abrir la puerta durante la cocción para
controlar la comida. Cierre la puerta y presione
Start (Iniciar) para reiniciar la cocción.
Start
Pause
Descongelación y Cocción
Puede programar el horno para que comience
en forma automática Time Cook (Cocción con
Temporizador) luego de la descongelación.
1 Presione WEIGHT DEFROST
(Descongelación por Peso) una vez y
seleccione el peso de la comida, o presione
TIME DEFROST (Descongelar por Tiempo)
dos veces e ingrese el tiempo de
descongelación
Presione
TIME COOK (Cocción con
2
Temporizador) e ingrese la cantidad de
tiempo de cocción.
Presione
POWER LEVEL (Nivel de Potencia)
3
una vez y luego presione la tecla numérica
para seleccionar el nivel de potencia.
Presione
START (Iniciar).
4
El horno empezará a descongelar. Una
vez finalizada la descongelación, Time Cook
(Cocción con Temporizador) realizará la cuenta
regresiva.
COCCIÓN EXPRESS
Express Cook
1
2
3
4
5
6
Esta es una manera rápida de configurar el tiempo de cocción en 1-6 minutos.
1
Presione una de las teclas de Express Cook (Cocción Express) (de 1 a 6) para una cocción entre
\PLQXWRVHQSRZHUOHYHOQLYHOGHSRWHQFLD3RUHMHPSORSUHVLRQHODWHFODSDUDXQ
tiempo de cocción de 2 minutos.
El nivel de potencia se puede modificar mientras se está realizando la cuenta regresiva. Presione
POWER LEVEL (Nivel de Potencia) e ingrese una opción del 1 al 10.
NOTA: La función Express Cook (Cocción Express) se activa sólo con las teclas 1 a 6.
Add 30 Sec (añada 30 segundos)
Add
30 Sec
10
La misma agrega 30 segundos al tiempo de la cuenta regresiva cada vez que el botón es
presionado. Cada vez que presione se sumarán 30 segundos, hasta 99 minutos y 59 segundos.
El horno comenzará a funcionar de inmediato cuando se presione.
Sobre las funciones de preparación rápida.
Time Defrost (descongelación temporizada)
Time
Defrost
Express Cook
1
2
3
4
5
6
7
8
9
0
Start
Pause
Guía de descongelación
Alimento
Panes, pasteles
Pan, panecillos o bollitos (1 unidad)
Bollitos dulces (aprox. 12 oz.)
Pescados y frutos de mar
Filetes, congelados (1 lb.)
Mariscos, piezas pequeñas (1 lb.)
Fruta
%ROVDSOiVWLFD³R
(Paquete de 10 oz.)
Carne
Tocino (1 lb.)
Salchichas (1 lb.)
Carne molida (1 lb.)
Asado: Res, cordero, ternera, cerdo
Filetes, chuletas y
cortes pequeños
Carne de ave
Pollo, cortado para asaderafreidora (21/2 a 3 lbs.)
Pollo, entero (21ø2 a 3 lbs.)
Le permite descongelar alimentos durante un
período detiempo seleccionado. Ver la Guía de
descongelacióncon lostiempos su geridos. (Weight
Defrost [Descongelación por Peso] se explica en la
sección Sobre las características automáticas.)
1 Presione TIME DEFROST (Descongelación por Peso/
Tiempo) dos veces.
2
3
4
Ingrese el tiempo de descongelación.
5
Presione START (Iniciar).
Presione START (Iniciar).
Dé vuelta la comida una vez transcurrida la mitad
del tiempo.
Una vez transcurrida la primera mitad del tiempo
de descongelación, dé vuelta la comida y divida o
vuelva a ordenar las partes para una descongelación
PiVSDUHMD&XEUDFXDOTXLHUiUHDFDOLHQWHFRQWUR]RV
pequeños de papel aluminio. El horno continuará
descongelando si no abre la puerta y da vuelta la
comida.
Se escucharán ruidos de golpes secos durante la
descongelación. Esto es normal ya que el horno no está
funcionado en el nivel de potencia HI (Alta).
GEAppliances.com
Consejos para la Descongelación
Las comidas congeladas en papel o plástico se
podrán descongelar en el paquete. Los paquetes
cerrados se deberán cortar, perforar o ventilar
LUEGO de que la comida se haya descongelado
parcialmente. Los envases de plástico deberán estar
descubiertos en forma parcial.
Las comidas de tamaño familiar preempaquetadas
se podrán descongelar y cocinar en el horno
microondas. Si la comida se encuentra en el envase
de papel de aluminio, traslade la misma a un plato
para uso seguro en el horno microondas.
Las comidas que se echan a perder con facilidad
QRVHGHEHUiQGHMDUUHSRVDUSRUPiVGHXQD
hora luego de la descongelación. La temperatura
ambiente estimula el desarrollo de bacterias
nocivas.
3DUDXQDGHVFRQJHODFLyQPiVSDUHMDGHFRPLGDV
más grandes, tales como asado, use Weight Defrost
(Descongelación por Peso). Asegúrese de que las
carnes queden totalmente descongeladas antes de
cocinar.
Una vez descongelada, la comida debería estar
fría pero ablandada en todas las áreas. Si aún está
un poco congelada, vuelva a colocarla en el horno
PLFURRQGDVPX\EUHYHPHQWHRGHMHUHSRVDUOD
misma por unos pocos minutos.
Tiempo
Comentarios
1/4 min.
2 a 4 min.
Vuelva a arreglar luego de la mitad del tiempo.
6 a 9 min.
3 a 7 min.
Coloque el bloque en un recipiente. Gire y separe después de la mitad del tiempo.
1 a 5 min.
2 a 5 min.
2 a 5 min.
&RORTXHHOSDTXHWHVLQDEULUHQHOKRUQR'HMHUHSRVDUSRUPLQXWRVGHVSXpVGHGHVFRQJHODU
Coloque el paquete sin abrir en el horno. Accione el microondas hasta que las salchichas
SXHGDQVHSDUDUVH'HMHUHSRVDUPLQXWRVVLIXHUDQHFHVDULRSDUDFRPSOHWDUOD
descongelación.
4 a 6 min.
Dé vuelta la carne después de la mitad del tiempo.
9 a 13 min. por lb. Utilice el nivel de potencia 10.
4 a 8 min.
Coloque la carne en el recipiente de cocción. Dé vuelta después de la mitad del tiempo de
por lb.
cocción y cubra las áreas tibias con papel de aluminio. Luego de la segunda mitad del
tiempo, separe los trozos con un cuchillo de mesa. Espere hasta que se complete
la descongelación.
14 a 20 min.
20 a 25 min.
Gallina de Cornualles
7 a 13 min.
por lb.
Pechuga de pavo (4 a 6 lbs.)
3 a 8 min.
por lb.
&RORTXHHOSROORHQYXHOWRHQXQUHFLSLHQWH4XLWHODHQYROWXUD\GpYXHOWDODFDUQHGHVSXpV
de la mitad del tiempo. Cuando haya terminado, separe las piezas y use el microondas
PLQXWRVPiVVLIXHUDQHFHVDULR'HMHUHSRVDUSDUDWHUPLQDUODGHVFRQJHODFLyQ
Coloque el pollo envuelto en un recipiente. Después de la mitad del tiempo, quite
la envoltura y gire. Cubra las áreas tibias con papel de aluminio. Termine de descongelar.
Para completar la descongelación, haga correr agua fría en la cavidad hasta que las
menudencias puedan quitarse.
Coloque la gallina sin envoltura en el horno con lapechuga hacia arriba. Dé vuelta
después de la mitad del tiempo. Haga correr agua fría en la cavidad hasta que las
menudencias puedan quitarse.
&RORTXHODSHFKXJDVLQHQYROWRULRVREUHXQUHFLSLHQWHFRQODSHFKXJDKDFLDDEDMR
Dé vuelta después de la mitad del tiempo, gire y cubra las áreas tibias con papel
de aluminio. Descongele durante la segunda mitad del tiempo.'HMHUHSRVDUGXUDQWH²
horas en el refrigerador para completar la descongelación.
11
Sobre las funciones de preparación rápida.
Popcorn
Popcorn (palomitas demaíz)
O
Para usar la función de Popcorn (Palomitas de
Maíz):
1
2
1
Use only with prepackaged
microwave popcorn weighing
3.0 to 3.5 ounces.
2
Reheat
Siga las instrucciones del paquete, usando
Time Cook (Tiempo de Cocción) si el
paquete tiene menos de 2.5 onzas o más
de 3.0 onzas. Coloque el paquete de
palomitas de maíz en el centro del horno
microondas.
Presione POPCORN (Palomitas de Maíz).
Presione 1 para 2.5 onzas o 2 para 3.0
onzas.
Es posible que su bolsa de palomitas de maíz
TXHGHDWDVFDGD\GHMHGHJLUDUSHURHVWRQR
afectará el rendimiento de la cocción. No abra
la puerta, incluso aunque la bolsa no esté
girando.
Presione POPCORN (Palomitas de Maíz) una
vez para un paquete de palomitas de maíz
de 3.0 onzas, y dos veces para un paquete
de 2.5 onzas. El horno se inicia de
inmediato
Volver a Calentar
1
Presione la tecla Reheat (Volver a Calentar).
2
Ingrese el tipo de comida de 1 a 3 para una
porción (lea la Guía para Recalentar a
continuación)
3
El horno microondas comenzará de
inmediato si la puerta está cerrada.
controlar la comida. Cierre la puerta y presione
START (Iniciar) para reiniciar la cocción.
IMPORTANTE: No use las funciones del sensor
dos veces seguidas con la misma porción de
comida. Si la comida no se cocina luego de
la primera cuenta regresiva, use TIME COOK
(Temporizador de Cocción) para adicionar
tiempo.
Puede abrir la puerta durante la cocción para
Guía de Cocción para la función REHEAT (Volver a Calentar)
Ingrese el
Código
1
2
3
12
Elección de Comida
Rango de Peso
Pasta
Frutas y Verduras
Plato para la Cena
4-16 oz.
4-16 oz.
8-24 oz.
GEAppliances.com
Beverage (Bebida)
Beverage
Para usar la función Beverage%HELGD
3UHVLRQHODWHFOD%(9(5$*(%HELGD(O
microondas se configurará de forma
automática para calentar una bebida
de 8 onzas. El microondas se iniciará de
inmediato.
Si desea modificar la selección del tamaño
de la bebida:
1 3UHVLRQHODWHFOD%(9(5$*(%HELGDXQD
Las bebidas calentadas con la función
Beverage (Bebida) podrán estar muy
calientes. Retire las mismas del envase con
cuidado.
o
Presione BEVERAGE%HELGD
1 Presione 1 para 4.0 onzas, 2 para 8.0
2 onzas, o 3 para 12 onzas
vez para 8 onzas.
2 3UHVLRQHODWHFOD%(9(5$*(%HELGDGRV
veces para 12 onzas.
3 3UHVLRQHODWHFOD%(9(5$*(%HELGDWUHV
veces para 4 onzas.
4 El microondas se iniciará de inmediato
Potato (Papa)
Potato
Para usar la función de Potato (Papa):
1 Presione la tecla POTATO (Papa).
el número de porciones de 1 a
2 4.Presione
El horno se iniciará de inmediato.
Weight
Defrost
Start
Pause
WEIGHT DEFROST (Descongelación por
Peso)
Use Weight Defrost (Descongelación por
Peso) (en algunos modelos) para carnes, aves
y pescados que pesen hasta 2.5 libras. Use
Time Defrost (Descongelación por Tiempo)
(en algunos modelos) para la mayoría del
resto de las comidas congeladas.
Weight Defrost (Descongelación por Peso)
configura automáticamente los tiempos de
descongelación y niveles de potencia para
SURGXFLUUHVXOWDGRVSDUHMRVFRQFDUQHVDYHV
y pescados.
Hay una guía manual ubicada en el frente
interior del horno.
Retire la carne del paquete y coloque la
misma en el plato para uso seguro en el
microondas.
Presione WEIGHT DEFROST
1 (Descongelación
por Peso) de forma
Cuando el horno dé la señal, dé vuelta
la comida. Retire la carne descongelada
o cubra las partes calientes con trozos
pequeños de papel aluminio.
2 Presione START (Iniciar).
Luego de descongelar, la mayoría
de las carnes necesitan reposar
durante 5 minutos para completar la
descongelación. Al asar durante tiempo
SURORQJDGRVHGHEHUtDGHMDUUHSRVDUSRU
unos 30 minutos.
repetida para seleccionar entre 1 y 2.5
onzas.
(Time Defrost (Descongelación por
Tiempo) se explica en la sección About
the time features (sobre las funciones con
temporizador)).
13
Sobre las otras funciones.
Clock (reloj)
Clock
Presione para ingresar la hora del día.
Express Cook
1
2
3
4
5
6
7
8
9
1
2
3
Presione Clock (reloj).
Entre la hora del día. La hora debe ser entre 1:00 y 12:59.
Presione Clock (reloj).
0
Start
Pause
Start
Pause
Cancel
Off
Pausa
START/PAUSE (Iniciar/Pausa) OHSHUPLWHGHMDUGHFRFLQDUVLQDEULUODSXHUWDQLERUUDUODSDQWDOOD
Presione START/PAUSE (Iniciar/Pausa) nuevamente para reiniciar el horno.
Control de Bloqueo
Puede bloquear el panel de control para evitar que el microondas se inicie de forma
accidental o sea usado por niños.
Para bloquear o desbloquear los controles, mantenga presionado CANCEL/OFF (Cancelar/
Apagar) durante unos tres segundos. Cuando el panel de control esté bloqueado, el indicador
de bloqueo se encenderá.
Sonido
Sound
(OQLYHOGHVRQLGRGHOSLWLGRVHSXHGHDMXVWDU
Presione la tecla SOUND (Sonido) para configurarlo en mudo o normal.
14
Sobre las otras funciones.
Timer
On/Off
GEAppliances.com
Timer (Temporizador)
Esta tecla realiza las siguientes funciones:
Funciona como temporizador por minuto.
Se puede usar como espacio para guardar luego de descongelar.
Cómo Usar como Temporizador por Minuto
El Timer (Temporizador) funciona sin corriente del horno de microondas.
1 Presione TIMER (Temporizador).
2 Ingrese la cantidad de tiempo durante el cual desea que se realice la cuenta regresiva.
3 Presione TIMER (Temporizador) nuevamente para iniciar la función. Cuando el tiempo concluya,
el temporizador emitirá una señal.
Cómo Usar para Establecer un Tiempo de Espera
1 Presione WEIGHT DEFROST (Descongelación por Peso) y seleccione pesar la comida, o
presione TIME DEFROST (Descongelación por Tiempo) e ingrese el tiempo de descongelación.
2
3
4
5
Presione START (Iniciar).
Presione TIMER (Temporizador).
Ingrese la cantidad de tiempo durante el cual desea que el horno quede en espera.
Presione TIMER (Temporizador) nuevamente para iniciar la función.
Para cancelar, presione el botón TIMER (Temporizador).
Una vez finalizado el tiempo, el horno emitirá una señal a través de pitidos y exhibirá “End” (Fin) en
la pantalla.
Para apagar las señales del temporizador, presione TIMER (Temporizador).
NOTA: Cualquier menú de opciones/ configuraciones no estará accesible hasta que las señales
de Timer End (Fin del Temporizador) sean borradas presionando la tecla TIMER (Temporizador).
15
Términos de su horno microondas.
Término
Definición
Arco eléctrico
El arco eléctrico es lo que, en la terminología de losmicroondas, describe las chispas en el horno.
El arco eléctrico se produce cuando:
hay unmetal o papel de aluminio tocando el lado del horno.
el papel de aluminio no está envolviendo bien a los alimentos (hay bordes doblados hacia arriba
que actúan como antenas).
hay algúnmetal, como cintas de cierre conmetal, pinchos de pollo o platos con decoración de oro.
toallas de papel reciclado que contengan pedazos demetal.
Cubiertas
/DVFXELHUWDVPDQWLHQHQODKXPHGDGGHQWURSHUPLWLHQGRXQFDOHQWDPLHQWRPiVSDUHMR\UHGXFLHQGR
HOWLHPSRGHFRFFLyQ&XDQGRVHDJXMHUHDHOHQYROWRULRGHSOiVWLFRRVHFXEUHFRQSDSHOGHFHUD
se permite la salida del vapor
Resguardar
En un horno convencional, se tapan o resguardan las pechugas de pollo o las comidas horneadas para
que no se doren demasiado. Al usar elmicroondas, use pequeñas cintas de papel de aluminio para cubrir
partes finas, como las puntas de las alas en las aves, que podrían cocinarse antes que las partesmayores.
Tiempo
de reposo
&XDQGRFRFLQDHQKRUQRVUHJXODUHVORVDOLPHQWRVFRPRORVDVDGRVRSDVWHOHVVHGHMDQUHSRVDUSDUD
que acaben de cocinarse o se asienten. El tiempo de reposo es especialmente importante al cocinar
conmicroondas. Tenga en cuenta que un pastel cocido en horno microondas no se coloca en un estante
de enfriamiento.
Ventilación
Una vez que haya cubierto un plato con una envoltura plástica, ventile la envoltura plástica levantando
una esquina para que el vapor pueda escapar.
16
Cuidado y limpieza del hornomicroondas.
GEAppliances.com
Consejos prácticos
Paramantener el interior fresco, pásele un paño con una solución de agua y bicarbonato sódico
de cuando en cuando.
Desenchufe el cable de corriente antes de limpiar cualquier parte de este horno.
Cómo limpiar el interior
Paredes, suelo, ventana interior y piezas demetal y plástico de la puerta
Algunas salpicaduras pueden limpiarse con una toalla de papel; otras pueden necesitar un paño
K~PHGR4XLWHODVVDOSLFDGXUDVFRQXQSDxRHQMDERQDGR\DFODUHFRQXQSDxRK~PHGR1RXVH
limpiadores abrasivos ni utensilios afilados en las paredes del horno.
Cuando limpie las superficies de la puerta y el horno que entran en contacto al cerrar la
puerta, utilice únicamente jabones suaves y no abrasivos o detergentes, aplicándolos con
una esponja o un paño suave. Enjuague con un paño húmedo y seque.
Nunca use un limpiador comercial de horno en ninguna parte delmicroondas.
Plato giratorio desmontable y el apoyo del plato giratorio
3DUDTXHQRVHURPSDQRSRQJDHOSODWRJLUDWRULRHQDJXDMXVWRGHVSXpVGHFRFLQDU/tPSLHOD
FRQFXLGDGRHQDJXDWLELDFRQMDEyQRHQHOODYDSODWRVDXWRPiWLFR(OSODWRJLUDWRULR\HODSR\R
pueden romperse si se caen. Recuerde, no ponga enmarcha el horno sin que el plato giratorio y el
DSR\RHVWpQHQFDMDGDVHQVXOXJDU
Cómo limpiar el exterior
No use limpiadores con amoniaco o alcohol, ya que pueden dañar el aspecto del
hornomicroondas.
Caja
/LPSLHODSDUWHH[WHUQDGHOKRUQRGHPLFURRQGDVFRQXQSDxRKXPHGHFLGRFRQDJXDMDERQRVD
(QMXiJXHOD\OXHJRVpTXHOD3iVHOHXQSDxRKXPHGHFLGROLPSLRDODYHQWDQDSDUDOLPSLDUOD
Panel de control y la puerta
Pásele un paño humedecido para limpiar. Seque completamente. No use esprays limpiadores,
JUDQGHVFDQWLGDGHVGHGHWHUJHQWH\DJXDDEUDVLYRVXREMHWRVILORVRVVREUHHOSDQHO\DTXHOR
podría dañar. Algunas toallas de papel podrían también dañar el panel de control.
Superficie de la puerta
Es importantemantener el área donde la puerta se sella con el horno demicroondas limpia.
6RODPHQWHXVHGHWHUJHQWHVQRDEUDVLYRVVXDYHVDSOLFDGRVFRQXQDHVSRQMDOLPSLDRFRQXQSDxR
VXDYH(QMXDJXHELHQ
Cable de Corriente
Si el cable se daña, desenchufe y limpie con una tela húmeda. En espacios difíciles de limpiar,
VHSXHGHXVDUDJXDFRQMDEyQSHURDVHJ~UHVHGHHQMXDJDUFRQXQDWHODK~PHGD\VHTXH
totalmente antes de enchufar el cable en el enchufe
Acero Inoxidable (en algunos modelos)
No use virutas de acero; éstas dañarán la superficie.
Para limpiar la superficie de acero inoxidable, use una tela caliente y húmeda con un detergente
suave adecuado para superficies de acero inoxidable. Use una tela limpia, caliente y húmeda para
HOLPLQDUHOMDEyQ6HTXHFRQXQDWHODOLPSLD\VHFD6LHPSUHIURWHODVXSHUILFLHHQODGLUHFFLyQGHO
veteado.
17
Consejos para la solución de problemas.
Problema
Posibles causas
Qué hacer
El horno no se pone
enmarcha
Un fusible en su casa
o elcircuito interruptor
podrían haberse aterrizado.
5HHPSODFHHOIXVLEOHRUHDMXVWHHOFLUFXLWRLQWHUUXSWRU
Una subida del voltaje.
'HVFRQHFWHHOKRUQRPLFURRQGDVOXHJRFRQpFWHORRWUDYH]
El enchufe no está insertado
totalmente en el tomacorriente
de la pared.
$VHJ~UHVHGHTXHHOHQFKXIHGHS~DVGHOKRUQRHVWi
insertado totalmente en el tomacorriente de la pared.
La puerta no está bien cerrada.
$EUDODSXHUWD\FLpUUHODELHQ
La puerta no está bien cerrada.
$EUDODSXHUWD\FLpUUHODELHQ
El botón Start (iniciar) no fue
presionado después
de seleccionar la cocción.
3UHVLRQHStart (iniciar).
El panel de control está
iluminado; sin embargo,
el hornomicroondas
no se pone enmarcha
Previamente se había
3UHVLRQHCANCEL/OFF (Cancelar/Apagar).
seleccionado otra opción en
el horno y no se presionó el botón
CANCEL/OFF (Cancelar/Apagar)
para cancelarla.
Se presionó CANCEL/OFF
Reinicie el programa de cocción y presione START (Iniciar).
(Cancelar/Apagar) accidentalmente.
El control del horno
microondas no
funcionará.
El control fue bloqueado. (Cuando el panel de control
esté bloqueado, el indicador
de bloqueo se encenderá).
0DQWHQJDSUHVLRQDGRCANCEL/OFF (Cancelar/Apagar)
por unos tres segundos para desbloquear el control.
Cosas normales de su hornomicroondas
Sale vapor de agua de alrededor de la puerta.
6HUHIOHMDXQDOX]DOUHGHGRUGHODFDMDH[WHULRU
A niveles de potencia que no sea elmayor la
luz interior pierde brillo y cambia el sonido del
ventilador.
Ruido sordo de golpesmientras el horno está
en funcionamiento.
18
Pueden notarse interferencias en la TV/radio
cuando elmicroondas está enmarcha. Esto
es parecido a las interferencias causadas
por otros electrodomésticos pequeños,
no es indicativo de ningún problema con
elmicroondas. Enchufe elmicroondas a otro
FLUFXLWRHOpFWULFRPXHYDOD79WDQDOHMDGD
delmicroondas como sea posible.
Garantía de Horno Microondas GE.
Todos los servicios de garantía los proporcionan nuestros Centros de Reparación de
Fábrica o nuestros técnicos Customer Care ® autorizados. Pare concertar una cita de
reparación, en línea, visite ge.com, o llame al 800.GE.CARES (800.432.2737). Cuando
llame para solicitar servicio, por favor tenga a mano el número de serie y el número
de modelo.
Grape aquí su recibo.
Se requiere facilitar prueba de
la fecha de compra original
para hacer un reclamo de
garantía.
Por el período de:
GE reemplazará:
Un año
A partir de la fecha
de la compra original
Cualquier recambio del horno microondas que falle debido a un defecto en sus materiales o en
su fabricación. Durante esta garantía limitada de un año, GE proporcionará, sin costo adicional,
mano de obra y servicio relacionado para reemplazar las partes defectuosas.
En relación a la garantía limitada que figura más arriba: Para evitar cualquier costo de traslado, deberá llevar su horno de
microondas a un Servicio al Cliente de General Electric® y retirar el mismo luego de recibir el servicio. También contamos con servicio
a domicilio, pero deberá pagar los costos de traslado del técnico del servicio hasta su hogar.
Lo que GE no cubrirá:
Viajes de reparación a su hogar para enseñarle cómo
usar el producto.
Reemplazo de fusibles de su hogar o reajuste de los
diferenciales.
Instalación o entrega inapropiada, o mantenimiento
impropio.
Daño al producto causado por accidente, fuego,
inundaciones o actos de Dios.
Producto no accesible para facilitar el servicio requerido.
Daño incidental o consecuencial a su propiedad causado
por posibles defectos con el aparato.
Fallos del producto si hay abuso, mal uso (por ejemplo,
chispas dentro de horno microondas del estante
metálico/papel de aluminio), o uso para otros propósitos
que los propuestos, o si se usa con fines comerciales.
Causar daños después de la entrega.
(;&/86,Ï1'(*$5$17Ë$6,03/Ë&,7$6³6X~QLFR\H[FOXVLYRGHUHFKRHVODUHSDUDFLyQGHOSURGXFWR
tal y como se indica en esta Garantía limitada. Cualquier garantía implícita, incluyendo las garantías
implícitas de comerciabilidad o adecuación para un fin determinado, están limitadas a un año
o el período de tiempo más breve permitido por la ley.
Esta garantía se extiende al comprador original y cualquier comprador posterior de productos comprados para
uso residencial dentro de Estados Unidos. Si el producto está situado en un área que no dispone de servicio
por parte de un proveedor de servicio autorizado de GE, podría tener que hacerse cargo de los costes de envío
o bien podría solicitársele que lleve el producto a una centro de servicio de GE autorizado para realizar la
reparación. En Alaska, la garantía excluye el costo de envío o las visitas de servicio a su casa.
Algunos estados no permiten la exclusión o limitación de daños incidentales o consecuenciales. Esta garantía
le proporciona derechos legales específicos, y puede tener otros derechos que pueden variar de un estado a
otro. Para conocer los derechos legales de su estado, consulte con su oficina local de asuntos del consumidor o
al procurador general de su estado.
Garantizador: General Electric Company. Louisville, KY 40225
19
Ayuda al cliente.
Página Web de GE Appliances
GEAppliances.com
¿Tiene alguna pregunta sobre su electrodoméstico? ¡Pruebe la página Web de GE Appliances 24 horas al día,
cualquier día del año! Para mayor conveniencia y servicio más rápido, ya puede descargar los Manuales de
los Propietarios, pedir piezas o incluso hacer una cita en línea para que vengan a realizar una reparación.
Solicite una reparación
GEAppliances.com
El servicio de expertos GE está a tan sólo un paso de su puerta. ¡Entre en línea y solicite su reparación
cuando le venga cualquier día del año! O llame al 800.GE.CARES (800.432.2737) durante horas normales de
oficina.
Real Life Design Studio (Estudio de diseño para la vida real)
GEAppliances.com
*(DSR\DHOFRQFHSWRGH'LVHxR8QLYHUVDO³SURGXFWRVVHUYLFLRV\DPELHQWHVTXHSXHGHQXVDUJHQWHGH
todas las edades, tamaños y capacidades. Reconocemos la necesidad de diseñar para una gran gama de
habilidades y dificultades físicas y mentales. Para más detalles cobre las aplicaciones de GE Diseño Universal,
incluyendo ideas de diseño para la cocina para personas con discapacidades, mire nuestra página Web hoy
mismo. Para personas con dificultades auditivas, favor de llamar al 800.TDD.GEAC (800.833.4322).
Para personas con dificultades auditivas, favor de llamar al 800.TDD.GEAC (800.833.4322).
Garantías ampliadas
GEAppliances.com
Compre una garantía ampliada y obtenga detalles sobre descuentos especiales disponibles mientras su
garantía está aún activa. Puede comprarla en línea en cualquier momento, o llamar al (800.626.2224)
durante horas normales de oficina. GE Consumer Home Services estará aún ahí cuando su garantía termine.
Piezas y accesorios
GEAppliances.com
Aquellos individuos con la calificación necesaria para reparar sus propios electrodomésticos pueden
SHGLUTXHVHOHVPDQGHQODVSLH]DVRDFFHVRULRVGLUHFWDPHQWHDVXVKRJDUHVDFHSWDPRVODVWDUMHWDV
VISA, MasterCard y Discover). Haga su pedido en línea hoy, 24 horas cada día o llamar por teléfono al
800.626.2002 durante horas normales de oficina.
Las instrucciones descritas en este manual cubren los procedimientos a seguir por cualquier usuario.
Cualquier otra reparación debería, por regla general, referirse a personal calificado autorizado. Debe
HMHUFHUVHSUHFDXFLyQ\DTXHODVUHSDUDFLRQHVLQFRUUHFWDVSXHGHQFDXVDUFRQGLFLRQHVGHIXQFLRQDPLHQWR
inseguras.
Póngase en contacto con nosotros
GEAppliances.com
Si no está satisfecho con el servicio que recibe de GE, póngase en contacto con nosotros en nuestra página
Web indicando todos los detalles así como su número de teléfono o escríbanos a:
General Manager, Customer Relations
GE Appliances, Appliance Park
/RXLVYLOOH.<
Registre su electrodoméstico
GEAppliances.com
£5HJLVWUHVXQXHYRHOHFWURGRPpVWLFRHQOtQHD³FXDQGRXVWHGSUHILHUDEl registrar su producto a tiempo le
SURSRUFLRQDUiVLVXUJLHUDODQHFHVLGDGXQDPHMRUFRPXQLFDFLyQ\XQVHUYLFLRPiVUiSLGREDMRORVWpUPLQRV
GHVXJDUDQWtD7DPELpQSXHGHHQYLDUVXWDUMHWDGHUHJLVWURSUHLPSUHVDTXHVHLQFOX\HHQHOPDWHULDOGH
HPEDODMHRUHFRUWH\XVHHOIRUPXODULRGHHVWH0DQXDOGHO3URSLHWDULR
20
Impreso en China