Transcript
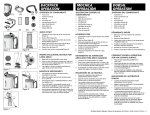
(3)
(2)
(1)
(7)
(5)
(6)
(4)
(8)
CANISTER
OPERATIONS
RECEPTÁCULO
OPERACIÓN
CHARIOT
OPÉRATION
Overview OF COMPONENTS
• Vacuum (1)
• Extension Cord (2)
DESCRIPCIÓN GENERAL DE
COMPONENTES
•
Overveiw des composants
Aspirateur (1)
• Aspiradora (1)
•
Cordon d’extension (2)
• Hose (3)
• Cable de extensión (2)
•
Boyau (3)
• Accessories (4)
• Manguera (3)
•
Accessoires (4)
• Intercept Micro Filter (5)
• Accesorios (4)
•Microfiltre Intercept (5)
• Micro Cloth Filter (6)
•Intercept Micro Filtro (5)
•
Microfiltre en tissu (6)
• Dome Filter (7)
• Microfiltro de tela (6)
•
Filtre en dôme (7)
• Exhaust Filter (8)
• Filtro de domo (7)
•
Filtre de sortie (8)
• Filtro de espuma (8)
Quick Start
1. Tip the vacuum upright and remove the top cap
(Figure A).
2. Remove filters (Figure B).
Figure A
Figure B
3. Check to make sure the Dome Filter has not shifted
during shipping (Figure C).
4. Replace the filters and cap (Figure D).
5. Push the long cuff on the end of the hose completely into the cap opening (Figure E).
Figure C
Figure D
NOTE: To easily remove the hose, twist off the
top cap. Set the cap on any flat surface so that the
center of the cap rests on the top lip of the vacuum
canister and push down on the cap (Figure F). The
hose can then easily be pulled out of the cap.
Operating the Canister Vacuum
1. Fasten the ends of the wands together, snapping
them into place (Figure G).
2. Attach the floor tool to the end of the wand. Align
the brass ring with the groove on the floor tool, this
will ensure a secure fit (Figure H).
3. Twist the wand into the end of the hose (Figure I).
Figure E
Figure F
Figure I
Placez l’aspirateur en position verticale et enlevez son
couvercle supérieur (Figure A).
2.
Retirez les filtres (Figure B).
2. Retire los filtros (Figure B).
3.
3. Revise para asegurarse filtro de domo no se movieron
durante el envío (Figure C).
Vérifiez que les filtres n’ont pas bougé durant
l’expédition (Figure C).
4.
Remettez les filtres et le couvercle en place (Figure D).
4. Cambie los filtros y la tapa (Figure D).
5.
Poussez le long manchon à l’extrémité du tuyau, en
l’insérant complètement dans l’orifice du couvercle
(Figure E).
REMARQUE : Pour retirer facilement le boyau,
enlevez le couvercle supérieur en le tournant. Placez
le couvercle sur une surface plane, de manière à ce
que son centre repose sur le bord supérieur du
chariot de l’aspirateur, puis poussez le couvercle
vers le bas (Figure F). Il est ensuite facile de retirer le
boyau du couvercle.
5. Presione completamente el puño largo en el extremo
de la manguera, hacia el orificio de la tapa (Figure E).
NOTA: Para retirar fácilmente la manguera, gire la
tapa superior. Coloque la tapa en cualquier superficie
plana para que el centro de ésta repose sobre el borde
superior del receptáculo de la aspiradora y presione
la tapa (Figure F). La manguera se puede sacar
fácilmente de la tapa.
Funcionamiento de la
aspiradora tipo receptáculo
1. Apriete los extremos de los tubos, ajustándolos en su
lugar (Figure G).
CANISTER ERGONOMICS
3. Gire el tubo en el extremo de la manguera (Figure I).
• Use the proper attachments for the job. ProTeam has
attachments to perform most jobs without requiring
you to bend over or get into difficult positions.
Figure H
1.
2. Conecte la herramienta de piso al extremo del
tubo. Alinee el aro de bronce con la muesca en la
herramienta de piso para garantizar un ajuste seguro
(Figure H).
• The weight of the vacuum is very well-balanced and
easy to carry by the handle.
Démarrage rapide
1. Incline la aspiradora en posición vertical y retire la tapa
superior (Figure A).
4. Turn the unit on, and proceed with vacuuming. The
on/off switch is conveniently located on the top of
the canister.
• The vacuum is lightweight and rolls smoothly.
Figure G
Inicio rápido
4.Encienda la unidad y comience a aspirar. El
interruptor de encendido/apagado está ubicado
convenientemente en la parte superior del
receptáculo.
Utilisation de l’aspirateurchariot
1. Emboîtez les extrémités des deux tubes (Figure G).
2.
Attachez l’accessoire de plancher à l’extrémité du
tube. Alignez l’anneau en laiton sur l’indentation de
l’accessoire afin d’obtenir une bonne fixation
(Figure H)
3.
Avec un mouvement de torsion, fixez le tube à
l’extrémité du boyau (Figure I).
4.
Mettez l’aspirateur en marche et effectuez le travail.
Le commutateur marche/arrêt se trouve sur le dessus
du chariot.
• La aspiradora es liviana y rueda sin problemas.
ERGONOMIE DE L’ASPIRATEURCHARIOT
• El peso de la aspiradora está bien equilibrado y es fácil
de transportar utilizando la manilla.
•
L’aspirateur est léger et roule facilement.
•
Le poids de l’aspirateur est très bien équilibré. Il est
facile à transporter par sa poignée.
•
Utilisez les accessoires convenant au travail à
effectuer. ProTeam offre des accessoires adaptés à
la plupart des travaux et conçus pour vous éviter
de vous pencher ou d’adopter une position
inconfortable.
ERGONOMÍA DEL RECEPTÁCULO
• Use los accesorios adecuados para el trabajo. ProTeam
tiene accesorios para realizar la mayoría de los trabajos
sin que deba doblarse o adoptar posiciones difíciles.
ProTeam Owner's Manual / Manual del propietario de ProTeam / Mode d’emploi ProTeam – 29