1
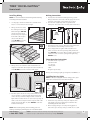
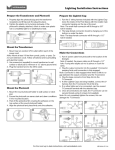
TREX® DECKLIGHTING™
Site Preparation and Planning
General Information
Parts
A
B
x2
Post Cap
Light
C
x2
x2
Deck Rail
Light
D
x2
Riser
Light
x2
Recessed
Deck Light
» ALWAYS consult local codes before beginning a project.
»A maximum of 60 lights can be powered by one 60W
transformer. If your project requires more than 60
lights, contact 1-800-BUY-TREX for transformer sizing.
»Straight runs over 100' (30.5 m) may require larger wire
such as 16 or 14 gauge.
» Use Trex Transformer only. Use of any other
transformer voids warranty.
Planning
Tools Needed
1/4"
(0.6 cm)
1"
(2.5 cm)
Lighting and Wiring Overview
NOTE: When designing your deck, plan locations of lights,
power supply, timer, and dimmer. These should be accessible
for service.
1.The dimmer remote will work
To Lights
in a 30' (9 m) radius of the unit.
GFCI
2.The dimmer must be installed Outlet
in a dry location. Keep dimmer
remote ID # in a safe place in
Dimmer
case a replacement remote is
Timer
(Optional)
needed.
3.The timer must be installed vertically
with the receptacle facing downwards
and not reaching ground level.
Transformer
The timer must be in view of the sun
to use the dusk/dawn feature.
NOTE: Avoid railing brackets and locations for
deck rail lights when running wires up posts.
A
D
B
NOTE: It is recommended to install
wiring before decking and railing have been installed.
DO NOT run wires between joists and deck boards.
Have Questions?
1–800–BUY–TREX
Note: Construction methods are always improving. Please ensure you
have the most up-to-date installation instructions by visiting: trex.com
C
1
TDL-1110
TREX® DECKLIGHTING™
How to Install
Installing Wiring
NOTE: It is recommended to install wiring before decking
and railing have been installed.
»Use 18 gauge stranded outdoor wire (available from
Trex) to connect wires from each light.
1.Wiring must be run under
the decking structure and
behind stringers. DO NOT
run wires between deck
boards and joists. Staple to
frame with cable staples
at least 1/4" (0.6 cm)
wide. DO NOT crush wire
insulation with staple.
1
Making Connections
»Polarity must be maintained through wiring system.
Always attach the same side of the 18 gauge wire to the
red wires on the lights. The red wires are positive.
»The wire nuts supplied by Trex are gel-filled and
waterproof. These wire nuts can safely attach four wires.
2
1
Strip
5/8"
(1.6 cm)
2
1
2
1.Strip wires to 5/8" (1.6 cm). Align any frayed strands of
the conductors. Pre-twisting is unnecessary.
2.Place stripped wires together with insulation even.
Twist connector onto wires pushing firmly until handtight. DO NOT over torque. Wipe sealant in and around
conductors and connector opening while tightening.
DO NOT reuse.
Timer Operation Instructions
2.Wiring can be run under the deck and behind risers.
Staple to frame with cable staples at least 1/4" (0.6 cm)
wide. DO NOT crush wire insulation with staple.
3
1.Select the mode of operation:
» Dusk to Dawn
» 1 - 8 hours
» Always On
» Off
Program repeats daily
When power is flowing to lights, green light above POWER is on.
Installing Post Cap Lights
NOTE: Install post cap lights after the railing system, post
sleeve skirt, and post sleeve have been installed.
6"
(15.2 cm)
1
6"
(15.2 cm)
3.Run wire up the outside of each post that will have either
a post cap light or a deck rail light. Avoid running wire
on the side of post where railing brackets or deck rail
lights will be installed. Leave a 6" (15.2 cm) loop at top to
make connections. Staple to frame and posts with cable
staples at least 1/4" (0.6 cm) wide. DO NOT crush wire
insulation with staple.
NOTE: After installing wiring, finish installing your Trex
decking and railing by following the Trex Installation Guide.
Have Questions?
1–800–BUY–TREX
2
2
1
3
1.Cut the wire loop at the top of the post. Strip the wire
ends. Make connections with the provided wire nuts.
See Making Connections above.
2.After verifying wiring is correct by turning lights on,
attach the cap to the top of the post with silicone caulk.
Note: Construction methods are always improving. Please ensure you
have the most up-to-date installation instructions by visiting: trex.com
2
TDL-1110
TREX® DECKLIGHTING™
How to Install
Installing Deck Rail Lights
Note: Install deck rail lights after the railing system, post
sleeve skirt, and post sleeve have been installed.
1
Installing Riser Lights
Note: Install riser lights after stair and risers have
been installed.
1
2
Post
Post
Sleeve
1.Mark desired height, centered on post sleeve for deck
rail light location.
2.Drill a 1" (2.5 cm) hole through post sleeve. Use care to
stop drill before cutting into post.
4
3
4"
(10.2 cm)
1.Mark the locations for each light, generally 4" (10.2 cm)
above the tread. Consult local codes for lighting
requirements.
2
6"
(15.2 cm)
NOTE: If possible, avoid locations over stringers as holes will
be more difficult to create.
1
2
3.Fish wire from deck rail light through hole and up to top of
post. Cut wire loop at the top of the post. Strip the two wire
ends. Make connections with the provided wire nuts. See
Making Connections on page 2.
4.Push back housing and wires into hole. Align holes for
screws vertically and attach fixture base to post with
provided screws as indicated above.
5
1
2
3
2.Drill a 1" (2.5 cm) diameter hole at least 1" (2.5 cm) deep
into riser. If the riser material is thicker than 1" (2.5 cm), use
a 1/4" (0.6 cm) drill bit to create a passage for the wires.
3.Thread wires through hole.
4.Press light into hole,
4
ensuring lens is horizontal.
Make connections behind
the stairs with the provided
wire nuts. See Making
Connections on page 2.
NOTE: DO NOT install Riser
Light or Deck Rail Light into top
or bottom rails or balusters.
5.Line up polycarbonate lens with fixture housing. Twist
onto fixture base.
Have Questions?
1–800–BUY–TREX
Note: Construction methods are always improving. Please ensure you
have the most up-to-date installation instructions by visiting: trex.com
3
TDL-1110
TREX® DECKLIGHTING™
How to Install
Installing Recessed Deck Lights
Note: Install recessed deck lights after installing decking.
1
1.Mark locations for lights in deck boards.
NOTE: If possible, avoid locations over joists as holes will be
more difficult to create.
2
3
1
2
3/4" (1.9 cm)
2.Drill a 1" (2.5 cm) diameter hole 3/4" (1.9 cm) deep
into deck board. Hole cannot go all the way through
deckboard or light will fall through. Ensure drill bit is
perpendicular to board. Drill a 1/4" (0.6 cm) diameter
hole in base of the first hole through deck board.
3.Thread wires through hole. DO NOT pull LED into hole
by pulling on wires. This may damage wires or LED.
4.Press light into hole until
flush with surface. Make
4
connections under deck
with the provided wire nuts.
See Making Connections
on page 2.
Have Questions?
1–800–BUY–TREX
Note: Construction methods are always improving. Please ensure you
have the most up-to-date installation instructions by visiting: trex.com
4
TDL-1110