1
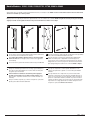
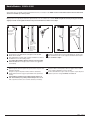
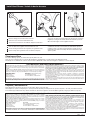
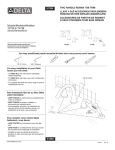
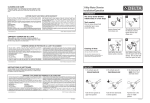
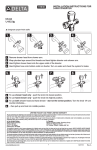
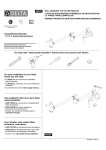
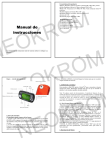
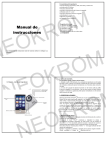
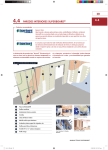
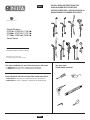
INSTALLATION INSTRUCTIONS FOR
HAND SHOWER WITH SLIDE BAR
72631
INSTRUCCIONES PARA LA INSTALACION DE LA
DUCHA MANUAL CON BARRA DESLIZANTE
ASME A112.18.1 / CSA B125.1
Models/Modelos
51501▲, 51502WH, 51505▲,
51508▲, 51521WH, 51701▲,
51708▲, 53001▲ & 55083▲
Series/Series
Write purchased model number here.
Escriba aquí el número del modelo comprado.
▲ Designate proper finish suffix
▲ Designe el sufijo del acabado adecuado
For easy installation of your Delta faucet you will need:
s4OREAD ALL the instructions completely before beginning.
s4OREAD ALL warnings, care, and maintenance information.
You may need
Usted puede necesitar
Para instalación fácil de su llave Delta usted necesitará:
sLEER TODAS las instrucciones completamente antes de empezar.
sLEER TODOS los avisos, cuidados, e información de mantenimiento.
1
www.deltafaucet.com
72631
10/14/11
Rev. A
Models/Modelos: 51501, 51502, 51508, 51701, 51708, 53001 & 55083
Select wall position for wall bar or wall mount bracket based on your family’s needs. NOTE: Locate so there will be slack in the hose when hand
shower is in extreme up or down position.
Elija la posición en la pared para la barra de pared basada en las necesidades de su familia. NOTA: Ubíquela de manera que tenga la manguera
algo floja cuando use la regadera manual, en la posición extrema hacia arriba o hacia abajo.
A.
B.
C.
D.
E.
2
26"
1
A. Locate stud for secure mounting. Mark mounting locations at 26 inches
on center. Use a level to make sure it is vertical.
D. Place the escutcheons against the wall, locating them to the pre-drilled
holes, and secure with the included wood screws.
B. For ceramic tile installation drill 9/32" holes in grout (if possible)
and insert anchors. For fiberglass/acrylic surfaces use toggle bolts
(not included).
E. Place the bar in the escutcheons in upward position (indicated by
yellow arrow label). Note: If adjustment is needed for proper fit,
loosen the set screw on either side of the bar and move into position.
Retighten the set screw once proper fit is achieved. Secure the bar in
place by tightening the escutcheon set screws. Continue to Step F.
C. Loosen set screws (1) and remove wall escutcheons (2) from Slide Bar.
A. Ubique el entramado para obtener un montaje seguro. Marque los
sitios de montaje a 26 pulgadas en el centro. Utilice un nivel para
asegurarse que está vertical.
D. Coloque los chapetones contra la pared, ubicándolos en los
agujeros pre-perforados y fijando con los tornillos para madera
incluidos.
B. Para instalación en baldosas de cerámica perfore agujeros
de 9/32” en la lechada (si es posible) e inserte anclajes. Para
fibra de vidrio / superficies acrílicas use los tornillos de fiador (no
incluidos).
E. Coloque la barra en los chapetones en posición hacia arriba
(indicado en la etiqueta en forma de flecha, amarilla). Nota: Si el
ajuste es necesario para el encaje apropiado, afloje el tornillo de
fijación en cada lado de la barra y muévalo en posición. Vuelva a
apretar el tornillo de ajuste una vez que logre un ajuste adecuado.
Fije la barra en su lugar apretando los tornillos de fijación de los
chapetones o placas. Continúe con el Paso F
C. Afloje los tornillos de ajuste (1) y retire los chapetones o placas de
pared (2) de la barra de barra deslizante.
2
72631
Rev. A
Models/Modelos: 51505 & 51521
Select wall position for wall bar or wall mount bracket based on your family’s needs. NOTE: Locate so there will be slack in the hose when hand
shower is in extreme up or down position.
Elija la posición en la pared para la barra de pared basada en las necesidades de su familia. NOTA: Ubíquela de manera que tenga la manguera
algo floja cuando use la regadera manual, en la posición extrema hacia arriba o hacia abajo.
A.
B.
C.
D.
Slide mount
setting button.
Botón de ajuste
del soporte.
E.
Snap bracket
covers into place.
Coloque a presión
las cubiertas de
los soportes en su
lugar.
Use a level to
position the bar
in a level, vertical
position.
Utilice un nivel
para colocar la
barra en una
posición vertical
nivelada.
A. Pressing down on the Slide Mount’s setting button, slide the Slide
Mount onto the wall bar.
B. Place wall brackets onto both ends of the bar and mark the location for
the drilled holes onto the mounting surface..
C. For ceramic tile installation drill 3/16” holes in grout (if possible)
and insert anchors. For fiberglass/acrylic surfaces use toggle bolts
(not included).
D. Hold bar to wall and align screw holes with drilled holes. Install screws.
E. Slide each bracket cover over its respective wall bracket and snap into
place. Continue to Step F.
A. Mientras aprieta el botón de ajuste del soporte, deslice el soporte en la
agarradera de pared.
Coloque
los soportes de pared en ambos extremos de la barra y
B.
marque la ubicación de los agujeros para taladrar en la superficie de
montaje.
C. Para instalación en baldosas de cerámica perfore agujeros de
3/16” en la lechada (si es posible) e inserte anclajes. Para fibra de
vidrio / superficies acrílicas use los tornillos de fiador (no incluidos).
D. Coloque la barra contra la pared y alinee los agujeros de los tornillos
con los agujeros taladrados. Inserte los tornillos.
Deslice
cada cubierta de soporte sobre su respectivo soporte de pared
E.
y fíjelas a presión en su lugar. Continúe con el Paso F.
3
72631
Rev. A
Install Hand Shower / Instale la ducha de mano
F.
G.
H.
F. Remove existing shower head from shower arm.
G. Connect hose to shower arm and hand shower.
H. 4OMOUNTTHEHANDSHOWERTOTHEWALLBARSIMPLYINSERTTHEHAND
shower into the slide mechanism. Adjust the hand shower to desired
height by loosening the knob and slide the mechanism up or down.
When desired height is reached, tighten the knob.
F. Retire la cabeza de la regadera existente del brazo de esta.
G. Conecte la manguera al brazo de la regadera y la regadera de mano.
H. Para el montaje de la regadera de mano en la barra de la pared,
sencillamente insértela en el mecanismo de deslizamiento. Ajuste la
regadera de mano a la altura deseada aflojando la perilla y deslice el
mecanismo hacia arriba o hacia abajo. Al alcanzar la altura deseada,
apriete la perilla.
Cleaning and Care
For surface cleaning of parts, use water and soap. Dry with a soft cloth.
Note: Any other cleaning product not specifically designed for cleaning plastic or metal surfaces may damage the finish.
Periodically it is recommended to soak the shower head in a 50/50 mix of warm water and vinegar for 15 minutes to remove deposits.
LIFETIME FAUCET AND FINISH LIMITED WARRANTY
All parts and finishes of the Delta® faucet are warranted to the original consumer purchaser to be
free from defects in material & workmanship for as long as the original consumer purchaser owns
their home. Delta Faucet Company recommends using a professional plumber for all installation
& repair.
Delta will replace, FREE OF CHARGE, during the warranty period, any part or finish that proves
defective in material and/or workmanship under normal installation, use & service. Replacement
PARTSMAYBEOBTAINEDBYCALLING$%,4!INTHE53AND#ANADAORBYWRITINGTO
In the United States:
Delta Faucet Company
Product Service
55 E. 111th Street
Indianapolis, IN 46280
In Canada:
Masco Canada Limited, Plumbing Group
350 South Edgeware Road,
3T4HOMAS/NTARIO#ANADA.0,
4HISWARRANTYISEXTENSIVEINTHATITCOVERSREPLACEMENTOFALLDEFECTIVEPARTSANDEVENFINISHBUT
these are the only two things that are covered. LABOR CHARGES AND/OR DAMAGE INCURRED
).).34!,,!4)/.2%0!)2/22%0,!#%-%.4!37%,,!3!.9/4(%2+).$/&,/33/2
DAMAGES ARE EXCLUDED. Proof of purchase (original sales receipt) from the original consumer
PURCHASER MUST BE MADE AVAILABLE TO $ELTA FOR ALL WARRANTY CLAIMS 4()3 )3 4(% %8#,53)6%
7!22!.49"9$%,4!&!5#%4#/-0!.97()#($/%3./4-!+%!.9/4(%27!22!.49
/&!.9+).$).#,5$).'4(%)-0,)%$7!22!.49/&-%2#(!.4!"),)49
4HIS WARRANTY EXCLUDES ALL INDUSTRIAL COMMERCIAL BUSINESS USAGE WHOSE PURCHASERS ARE
hereby extended a five year limited warranty from the date of purchase, with all other terms of this
WARRANTYAPPLYINGEXCEPTTHEDURATIONOFTHEWARRANTY4HISWARRANTYISAPPLICABLETO$ELTA® faucets
manufactured after January 1, 1995.
Some states/provinces do not allow the exclusion or limitation of incidental or consequential
damages, so the above limitation or exclusion may not apply to you. Any damage to this faucet as
a result of misuse, abuse, or neglect, or any use of other than genuine Delta® replacement parts
7),,6/)$4(%7!22!.49
4HISWARRANTYGIVESYOUSPECIFICLEGALRIGHTSANDYOUMAYALSOHAVEOTHERRIGHTSWHICHVARYFROM
state/province to state/province. It applies only for Delta® faucets installed in the United States of
America, Canada, and Mexico.
© 2011 Masco Corporation of Indiana
Limpieza y Mantenimiento
Para la limpieza de la superficie de las piezas, use agua y jabón. Seque con un paño suave.
Nota: Cualquier otro producto de limpieza que no esté específicamente diseñado para la limpieza de las superficies de plástico o de metal, puede dañar el acabado.
Se recomienda que periódicamente remoje durante 15 minutos la cabeza de la regadera en una mezcla 50/50 de agua tibia y vinagre para eliminar los depósitos.
GARANTÍA LIMITADA DE POR VIDA DE LA LLAVE Y SU ACABADO
4ODAS LAS PIEZAS Y ACABADOS DE LA LLAVE $ELTA ® están garantizados al consumidor comprador
original, de estar libres de defectos de material y fabricación, por el tiempo que el consumidor
comprador original sea dueño de su casa. Delta Faucet Company recomienda que use un plomero
profesional para todas las instalaciones y reparaciones.
Delta reemplazará, LIBRE DE CARGO, durante el período de garantía, cualquier pieza o acabado
que pruebe tener defectos de material y/o fabricación bajo instalación normal, uso y servicio.
Piezas de repuesto pueden ser obtenidas llamando al 1-877-345-BRIZO (2749) (en los Estados
Unidos y Canada) o escribiendo a:
En los Estados Unidos:
En Canada:
Delta Faucet Company
Masco Canada Limited, Plumbing Group
Product Service
350 South Edgeware Road,
55 E. 111th Street
3T4HOMAS/NTARIO#ANADA.0,
Indianapolis, IN 46280
#/-/ 4!-")². #5!,15)%2 /42/ 4)0/ $% 0²2$)$! / $!º/3 %34«. %8#,5¶$/3
Prueba de compra (recibo original de venta) del comprador consumidor original debe de ser
DISPONIBLE A $ELTA PARA TODOS LOS RECLAMOS %34! %3 ,! '!2!.4¶! %8#,53)6! $% $%,4!
&!5#%4 #/-0!.9 15% ./ (!#% #5!,15)%2 /42! '!2!.4¶! $% #5!,15)%2 4)0/
).#,59%.$/,!'!2!.4¶!)-0,¶#)4!$%#/-%2#)!,):!#)».
Esta garantía excluye todo uso industrial, comercial y de negocio, a cuyos compradores se les
da una garantía limitada extendida de cinco años desde la fecha de compra, con todos los otros
términos de esta garantía aplicados, excepto el de duración de ésta. Esta garantía es aplicable a
las llaves de Delta ® fabricadas después de Enero 1, 1995.
Algunos estados/provincias no permiten la exclusión o limitación de daños incidentales o
consecuentes, de manera que la limitación o exclusión arriba escrita puede no aplicarle a usted.
Cualquier daño a esta llave, resultado del mal uso, abuso, o descuido, o cualquier otro uso de
piezas de repuesto que no sean genuinas de Delta ®!.5,!2«.,!'!2!.4¶!
derechos que
Esta garantía es extensiva en lo que cubre el reemplazamiento de todas las piezas defectuosas y Esta garantía le da derechos legales específicos, y usted puede, también tener otros
®
hasta el acabado, pero éstas son las únicas dos cosas que están cubiertas. CARGOS DE LABOR varían de estado/provincia a estado/provincia. Es aplicable sólo a las llaves Delta instaladas en
9/ $!º/3 ).#522)$/3 %. ,! ).34!,!#)». 2%0!2!#)». / 2%%-0,!:!-)%.4/ los Estados Unidos de America, Canada y Mexico.
© 2011 Masco Corporación de Indiana
4
72631
Rev. A