1
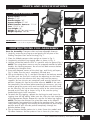
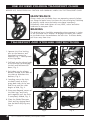
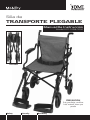
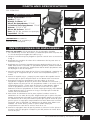
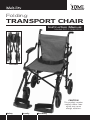
Folding
TRANSPORT CHAIR
Instruction Manual
Model 501-1058-0200
FOLDED
CAUTION
This product contains
natural rubber latex
which may cause
allergic reactions.
Safety
Security
Durability
1-YEAR LIMITED WARRANTY
Your Duro-Med Industries (DMI) Folding Transport Chair is guaranteed to be free of
manufacturing defects for a period of one year from the date of purchase under normal use. This
limited warranty does not apply to use in any clinical or commercial applications. If the unit fails
to operate during the warranty period, return it postage prepaid along with a copy of the original
dated purchase receipt and $10.00 for return shipping and insurance to: MABIS Healthcare, Attn:
Repair Department, 1931 Norman Drive South, Waukegan, IL 60085. When returning a product,
please also include a letter with your name, address, phone number and brief description of the
specific problem. Please carefully package the product to avoid any damage that may occur
during transit. If DMI determines that the unit failed to operate due to a manufacturing defect,
the unit will be repaired or replaced at the option of DMI. Repair or replacement of the unit is
the sole remedy under this limited warranty. This warranty gives you specific legal rights, which
vary from state to state.
Parts or materials which are subject to normal wear resulting from the use of this product, and
which must be replaced or repaired due to such normal wear, are the owner’s responsibility and
are not covered by this warranty.
Products which have been subject to negligence, abuse, improper storage or handling, improper
operation, unauthorized modifications or damages beyond reasonable control are not covered by
this warranty.
This limited warranty constitutes DMI’s only responsibility and obligation to repair and/or replace
materials or components. We make no other express or implied warranties, arising by operation of
law or otherwise, or any warranty of merchantability or fitness for a particular use or purpose
whether or not the use or purpose has been disclosed to DMI in specifications, drawings or
otherwise, and whether or not DMI’s products are specifically designed and/or manufactured by
DMI for the buyer’s use or purposes, except for the limited warranty stated above. DMI will not
be responsible for any indirect, incidental, special, consequential, or punitive damages or other
loss, including, but not limited to, damage to or loss of other property or equipment and
personal injuries, whether to purchaser or others. DMI shall in no event be liable to the
purchaser for any amount in excess of the cost of repair and/or replacement of the unit. This
limited warranty supercedes any other warranty expressly written or implied.
WARNING! READ BEFORE USING
This unit is not intended to be used as a wheelchair. At regular intervals, check and tighten all
fasteners and hinged parts. Check all plastic parts often for wear. Units are not designed to assist
users from a sitting to a standing position. The brakes are not designed to withstand excessive
pressure.
Failure to observe this warning may result in injury.
CAUTION! CHECK BRAKES BEFORE USING
Always check your brakes before using your transport chair. Keep brakes in excellent condition at
all times. Always check for loose parts and cleanliness. It is best to keep your transport chair fully
assembled at all times.
Specifications subject to change without notice.
Distributed by:
Duro-Med Industries
Div. of DMS Holdings Inc.
1931 Norman Drive South
Waukegan, IL 60085 USA
www.duromed.com
Made in China
2
501-1058-0200 Folding Transport Chair
Toll-Free Customer
Care Help Line
877-505-6190
Monday-Friday
8:00 a.m. - 4:30 p.m. CST
#910-1058-0200 08/08
©2008 Duro-Med Industries
PARTS AND SPECIFICATIONS
501-1058-0200
SPECIFICATIONS
Overall Width: 22-1/2”
Wheels: 7-1/2”
Handle Height: 36”
Armrest Height: 27-1/4”
Width Between Armrests: 17-1/4”
Seat: 17-1/2” x 18”
Seat Height: 19”
Weight: 20-1/2” lbs. (with footrests)
Weight Capacity: 250 lbs.
Fig. 1
IMPORTANT! Read all instructions before
assembly and/or use of this transport chair.
Fig. 2
INSTRUCTIONS FOR ASSEMBLY
Parts for Assembly: Transport chair and two adjustable footrests
1. Carefully unzip the carrying case and gently pull all parts of the
Folding Transport Chair out of the bag, Fig. 1.
2. Place the folded transport chair upright as shown in Fig. 2.
3. Completely unfold the leg rigging tubes as shown in Fig. 3.
4. Halfway unfold the backrest until it is parallel with the ground Fig. 3.
NOTE: The swing down armrests may be wrapped around the brake
handles for shipping purposes. Be sure to free both armrests before
unfolding the transport chair.
5. Grasp two diagonal corners of the chair legs, and firmly pull apart,
Fig. 4. Make sure the seat is completely flat and taut.
6. Flip up the backrest, Fig. 5, and push the top of the backrest toward
the chair until the silver pins snap into the openings on the frame.
7. Firmly pull up on the armrests until they snap into the armrest
supports. Be sure the pins are completely and securely locked into
position. Repeat this step for the other armrest. NOTE: If the seat is
not completely flat and taut before attaching the armrests, you may
need to grasp the armrest with one hand and place the other hand
on the front leg. Pull up on the armrest while at the same time push
forward on the front leg as shown in Fig. 6. Be sure the spring
loaded locking pin locks into place.
8. To attach the leg riggings, squeeze the locking pins and insert the
riggings into the leg tubing. Make sure the silver pins lock into place
at the appropriate height. Repeat this step for the other leg rigging.
NOTE: The post that anchors the nylon foot strap to the footrest
should always face toward the inside of the transport chair. For your
safety, both leg riggings must always be locked into the same height
position and all pins must be pushed completely through the
pinholes before using.
9. Flip up footrests before patient sits in chair. Fasten the seatbelt and
flip down footrests. Position patient’s feet in front of nylon straps.
Fig. 3
Fig. 4
Fig. 5
Fig. 6
501-1058-0200 Folding Transport Chair
3
USE OF NEW FOLDING TRANSPORT CHAIR
BEFORE USE, PLEASE READ ALL CAUTION AND WARNING LABELS ON THE TRANSPORT CHAIR
MAINTENANCE
Always make sure the brake levers are operating correctly before
use. Keep the brake levers free from dirt, dust and grime. Build-up
of particles could cause the brakes to engage improperly.
Periodically check and tighten all nuts, bolts, screws and other
hardware on transport chair.
BRAKING
The braking levers should be engaged anytime someone is sitting
in the chair and not in motion. To engage the brake, press down
on the brake levers located above the rear tires. To release brake,
pull lever away from tires.
TRANSPORT AND STORAGE INSTRUCTIONS
1. Squeeze the silver locking
pins on the footrests and
completely remove the
footrests, Fig. 1. Fold up both
of the leg tubes.
2. Pull back on the release knob
of the armrests to disengage
the lock and fold armrests
down, Fig. 2.
Fig. 1
Fig. 2
Fig. 3
Fig. 4
Fig. 5
Fig. 6
3. Push down on the release
buttons located at the back of
the chair to fold down the
backrest, Fig. 3.
4. Standing next to the chair,
use both hands to firmly
grasp both sides of the seat
and lift up until the chair
begins to fold, Fig. 4.
5. Grasp two diagonal corners of
the chair legs, and firmly
push together until the chair
is completely folded, Fig. 5.
6. Place the Folded Transport
Chair and leg riggings back
into the black carrying case,
Fig. 6.
4
501-1058-0200 Folding Transport Chair
Silla de
TRANSPORTE PLEGABLE
Manual De Instrucción
Model 501-1058-0200
FOLDED
PRECAUCION
Este producto contiéne
hule natural latex que
puede
Safety
Security
Durability
GARANTÍA LIMITADA DE UN AÑO
ricación por un período de un año a partir de la fecha de compra y en condiciones de uso
normal. Esta garantía limitada no aplica al uso clínico o comercial. Si esta unidad no funciona
durante la garantia, devuela la unidad postado pagado con copia del recibo, original y $10.00
para regreso y seguridad a: MABIS Healthcare, Attn: Departmento de repara, 1931 Norman Drive
South, Waukegan, IL 60085. En regresar el producto, favor de incluyír una carta con su nombre,
direccion, numero de telephon y una, descripcion sensilla de la problema specifica.
Cuidadosamente por favor empaque el producto para evitar cualquier daño que puede ocurrír
durante transito. Si DMI determina que la unidad dejó de funcionar debido a un defecto de
fabricación, DMI optará por cambiarla o repararla. La reparación o cambio de la unidad es el
único recurso que contempla esta garantía limitada. Esta garantía le brinda derechos legales
específicos que varían de estado a estado.
Las partes o los materiales que son sujetos al uso normal que es resultado del empleo de este
producto, y que debe ser reemplazado o reparados debido al uso normal, son la responsabilidad
del dueño y no son cubiertos según esta garantía.
Los productos que han sido sujetos a la negligencia, el abuso, el almacenaje impropio o el
manejo, de operación impropia, modificaciones no autorizadas o daño y perjuicios más allá de el
control razonable no son cubiertos según esta garantía.
Esta garantía limitada constituye la única responsabilidad y obligación de DMI de reparar y/o
cambiar materiales o componentes. No otorgamos otras garantías expresas o implícitas, que
surjan de la operación de la ley o de otra manera, o cualquier garantía de comerciabilidad o
adaptabilidad para un uso o propósito específico, ya fuera o no que el uso o propósito hubiese
sido divulgado a DMI en especificaciones, dibujo o de otra manera, y ya fuera o no que los
productos de DMI hubiesen sido específicamente diseñados y/o fabricados por DMI para el uso o
propósito del comprador, excepto por la garantía limitada indicada anteriormente. DMI no será
responsable por los daños indirectos, incidentales, especiales, consecuentes o punitivos, u otras
pérdidas, incluyendo, sin limitación, daños o pérdidas de otros bienes o equipos y lesiones
personales, ya sea al comprador o a otros. DMI no será de ninguna manera responsable frente al
comprador por cualquier monto que supere el costo de reparación y/o cambio de la unidad. Esta
garantia limitada reemplaza cualquier otra garantia expresamente escrita insinúa.
¡ADVERTENCIA! LEA ANTES DE USAR
Esta unidad no es querida para ser usado como una silla de ruedas. A intervalos regulares,
comproba y apriete todos los sujetadores y partes de la bisagra. Compruebe todas las partes
plásticas a menudo para uso.
Esta unidad no ha sido diseñada para asistir a usuarios que esten de pie a la posición sentada. Los
frenos no son diseñados para soportar la presión excesiva.
Omitir estas observaciones de advertencia puede causar una herida.
¡CUIDADO! REVISE FRENOS ANTES DE USARLO
Siempre revise sus frenos antes de usar su silla de transporte. Cuide sus frenos en excelentes
condiciones todo el tiempo. Siempre revise por partes flojas y limpieza. Lo mejor es mantener su
silla de transporte en buen estado todo el tiempo.
Las especificaciones están sujetas
a cambios sin previo aviso.
Fabricado por:
Duro-Med Industries
Div. of DMS Holdings Inc.
1931 Norman Drive South
Waukegan, IL 60085 USA
www.duromed.com
Hecho en China
6
501-1058-0200 Folding Transport Chair
Línea para Llamadas con
Pago Revertido de Ayuda de
Cuidados para Clientes
877-505-6190
Lunes-Viernes
8:00 a.m. - 4:30 p.m. CST
#910-1058-0200 08/08
©2008 Duro-Med Industries
PARTS AND SPECIFICATIONS
501-1058-0200
Especificaciones
Ancho Apróximado: 22-1/2”
Ruedas: 7-1/2”
Maneje la Altura: 36”
Altura de Apoyabrazos: 27-1/4”
La Anchura entre Apoyabrazos: 17-1/4”
Asiento: 17-1/2” x 18”
Altura del Asiento: 19-1/2”
Peso: 20-1/2 lbs. (Incluidos los Apouapies)
Capacidad: 250 lbs.
Fig. 1
¡IMPORTANTE! Lea todas las
instrucciones antes de ensamblar y/o
usar esta silla de transporte.
Fig. 2
INSTRUCCIONES DE EMSAMBLE:
Partes de Emsamble: Silla de transporte, dos (2) apoyapies ajustables
1. Con cuidado baje el cierre del estuche y suavemente quite todas las piezas de
la Silla de Transporte Plegable de la bolsa, Fig. 1.
2. Coloque la silla de transporte plegada en posición vertical como se muestra en
la Fig. 2.
3. Despliegue por completo los tubos de los aditamentos de las patas como se
muestra en la Fig. 3.
Fig. 3
4. Despliegue por la mitad el respaldo hasta que quede paralelo al piso, Fig. 3.
NOTA: Para facilitar su traslado, los apoyabrazos giratorios pueden enroscarse
alrededor de las asas de freno. Asegúrese de liberar ambos apoyabrazos antes
de desplegar la silla de transporte.
5. Tome dos esquinas de las patas de las sillas en forma diagonal y sepárelas con
firmeza, Fig. 4. Asegúrese de que el asiento esté completamente plano y
tirante.
6. Levante el respaldo, Fig. 5 y empuje la parte superior del respaldo hacia la
silla hasta que los pernos de plata calcen en las aberturas de la estructura.
Fig. 4
7. Firmemente levante los reposabrazos hasta que calcen en los portaapoyabrazos. Asegúrese de que los pernos estén trabados en forma total y
segura. Repita este paso para el otro apoyabrazos. NOTA: Si el asiento no está
completamente plano y tirante antes de colocar los reposabrazos, deberá
tomar el apoyabrazos con una mano y colocar la otra mano en la pata
delantera. Levante el apoyabrazos al mismo tiempo que empuja hacia delante
la pata delantera como se muestra en la Fig. 6. Verifique que la traba de
resortes cierre correctamente.
8. Para colocar los aditamentos de las patas, apriete la traba e inserte los
aditamentos en los tubos de las patas. Asegúrese de que los pernos de plata
queden correctamente colocados a la altura apropiada. Repita este paso para
los aditamentos de la otra pata. NOTA: El poste que sujeta la correa de nylon
para los pies a los apoyapies siempre debe mirar hacia adentro de la silla de
transporte. Para su seguridad, los aditamentos de ambas patas deben estar
trabados a la misma altura y todos los pernos deben empujarse
completamente a través de los orificios antes de su uso.
9. Levante los apoyapies antes de que el paciente se siente en la silla. Ajuste el
cinturón y baje los apoyapies. Coloque los pies del paciente en frente de las
correas de nylon.
Fig. 5
Fig. 6
501-1058-0200 Folding Transport Chair
7
USO DE SILLA DE TRANSPORTE
ANTES DE USAR, FAVOR LEA TODAS PRECAUCIONES Y ETIQUETAS DE ADVERTENCIA
MANTENIMIENTO
Siempre verifique que las palancas de freno funcionen correctamente antes
de su uso. Mantenga las palancas de freno libres de tierra, polvo y
suciedad. La acumulación de partículas podría hacer que los frenos no
enganchen correctamente. Periódicamente revise y ajuste todas las tuercas,
pernos, tornillos y otras piezas de ferretería de la silla de transporte.
FRENOS
Siempre coloque los frenos en posición cuando alguien esté sentado en la
silla y la silla no está en movimiento. Para colocar el freno en posición,
presione hacia abajo en las palancas de freno ubicadas encima de las
ruedas traseras. Para soltar el freno, tire de la palanca hacia fuera de las
ruedas.
INSTRUCCIÓNES PARA GUARDAR LA SILLA DE TRANSPORTE
1. Apriete los pernos de plata
sobre los apoyapies y quite
los apoyapies por completo.
Pliegue los tubos de ambas
patas, Fig. 1.
2. Hale hacia atrás la perilla de
liberación de los
apoyabrazos para abrir la
cerradura y luego pliegue
los reposabrazos hacia
abajo, Fig. 2.
Fig. 1
Fig. 2
Fig. 3
Fig. 4
Fig. 5
Fig. 6
3. Empuje hacia abajo los
botones de liberación
ubicados en la parte trasera
de la silla para plegar el
respaldo, Fig. 3.
4. Párese al lado de la silla y
con ambas manos tome
firmemente los lados del
asiento y levante hasta que
la silla comience a plegarse,
Fig. 4.
5. Tome dos esquinas de las
patas de la silla
diagonalmente y júntelas
con firmeza hasta que la silla
quede plegada
completamente, Fig. 5.
6. Coloque la Silla de
Transporte Plegable y los
aditamentos de las patas en
el estuche negro, Fig. 6.
8
501-1058-0200 Folding Transport Chair