1
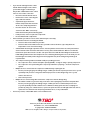
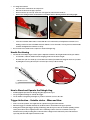
• • To change the tooth bar o Disconnect the unit from the air compressor. o Raise the tooth bar to the upper position. o Remove the two 3/8”-16 x 3/4” short neck carriage bolts, nuts and lock washers. o Remove the existing tooth bar, and install the new tooth bar with the attaching hardware turned finger tight. o Lower the tooth bar until it makes contact with the roof or flat surface, and adjust the tooth bar so it is making contact across the full width of the bar with the roof or flat surface. Insert your wrench behind the tooth bar and tighten the hardware securely. Reconnect the hose between the compressor and The Shingle Hog. Handle Positioning • The handle has multiple angle location options. Adjust the handle to the height which best fits your stature. o To assemble, rotate the handle from the shipping position to the desire height. o Insert the two 5/16” hex head cap screws with lock washers (included in the bag) into the holes (location A) and tighten securely all four 5/16” hex head cap screws (locations A & B). MIDDLE POSITION U LO W ER PP HA ER ND H AN LE B D HE SHIPPING P OSITION LE IG H EI HT G H PO T PO SI TI SI TI ON O N A B A How to Stand and Operate the Shingle Hog • • • Stand upright and position The Shingle Hog directly in front of you. Use your right index finger to activate the trigger Let the handle rest against your thighs as you move down the roof or to the side. Trigger Activation – Variable stroke – When and How • • • In the rest or idle position, air is applied to the cylinder forcing the tooth bar down. When the trigger is activated and held, the tooth bar will rise and remain in the upper position. Pulling and releasing the trigger quickly (“feathering”) will allow you to raise the tooth bar partially (shorter stroke) and return it to its original position. This “feathering” feature causes the tooth bar to move up and down more quickly resulting in the removal of more shingles in the same time period. This feature is especially effective with staples and shorter nails. Starting a Roof Tear-off Based on our experience, the most effective method is to: • Face the peak • Slide the teeth under the tabs of the shingles about three rows down from peak. • Break the roofing free up to and including the cap, extending across the entire peak. • Repeat the same from the other side of roof. • Start down the roof beginning from where the shingles and cap are already removed by sliding the teeth of tool under the shingles. Every time the teeth are under shingles pull the trigger. Move down the roof several feet and then return to the top and shift to the right or left and repeat the process. o Note: It is not necessary to jamb or push hard under the shingles; The Shingle Hog will do the work for you. o Feathering the trigger can often help speed up the shingle removing process. • As shingles start to come loose, slide the tool under more of the attached shingles and pull the trigger. • As the shingles start to gather in front of the machine, pull the trigger and hold; this will keep the teeth in the raised position. Then push the pile downward toward the edge of the roof. • The Shingle Hog can also be used to remove all of the nails or staples on the roof, including the metal edgings. Maintenance • • • • Disconnect the unit from the compressed air source before performing maintenance. Periodically inspect the unit checking to see if shingle material is in the slotted area where the arms project through the housing or if material is collecting inside the housing; it needs to be removed. To clean, remove the shingle material from the slots, or if inside the housing, turn the unit upside down and remove the eight (8) - ”¼ hex head cap screws from the base and remove the bottom. Clean out the housing and then re-install the bottom with the eight (8) - ”¼ hex head cap screws lock washer, flat washers and nuts to their original locations. Do not use solvents to clean the plastic handle. Lubricate monthly by placing a couple of drops of compressor and air tool lubricant oil into the supply air line. DO NOT USE WD40. Trouble Shooting • If you hear air leaking from the housing area without using the unit or when you hold the trigger continuously, it may be dirt contamination in the quick exhaust valves or a loose tube connection. o Disconnect the unit from air source, turn the unit upside down and remove the bottom. o Check to ensure the tubes are securely attached by pushing the tubes completely into the fittings. o Reconnect to the air source and check for leaks. Make sure to keep hands and feet clear of moving parts. o If leak persists, locate the source and clean or replace the component. o Re-attach the bottom. • • • If you hear air leaking from the control handle without using the unit or when you hold the trigger continuously, it may be dirt contamination in the control valve or a loose tube connection. o Disconnect the unit from air source o Remove the screws connecting the upper and lower handle. o Separate the upper and lower handle components and ensure the air lines are completely pushed in. o Reconnect to the air source and check for leaks. Make sure to keep hands and feet away from all moving parts. o If leak persists, clean or replace the component. o Re-assemble handle components If the tooth bar cycle time is slow or slows down it may be caused by: o A restriction in the line restricting the airflow Check for dirt or frozen water in your filter. Check for dirt or frozen water in the lines, quick disconnects & valves (especially when the temperature is near or below freezing). o A limited flow rate through a quick disconnect: Not all quick disconnects have the same performance. Some restrict the flow of air more than others. An easy test to demonstrate the difference in flow rate between two quick disconnects is to take each quick disconnect with the male fitting inserted into the female fitting and blow into it and compare the ease of blowing air through it. The one in which you can blow through easiest will permit a larger flow of air (high flow rate) to The Shingle Hog allowing it to respond faster. o The compressor being unable to maintain a 100 psi operating pressure: The compressor does not have adequate capacity (SCFM) – change to a large capacity compressor The compressor is not performing to the expected performance (capacity) - check the compressor system. o Multiple devices connected to the compressor simultaneously requiring the air. Insert a pressure gauge by The Shingle Hog to confirm you have the required pressure as it is cycled repeatedly. If air pressure is not greater than 85 psi pressure at The Shingle Hog as it is cycled, remove other devices. Recheck air pressure. o Multiple hoses connected together between the compressor and The Shingle Hog The airflow resistances (pressure drop) in the hose and coupling may not allow for adequate flow. Insert a pressure gauge by The Shingle Hog to confirm you have recommended pressure as it is cycled repeatedly. Possible solutions are to eliminate as many quick disconnect couplings as possible by using one continuous hose, replace the quick disconnects with higher flow rate devices, replace the hose with a shorter and/or larger diameter hose, or any combination. If an issue persists, contact TBD² at the service number below. 1424 Dewey St. PO Box 2140, Manitowoc, WI 54221-2140 www.tbd2inc.com | Phone: 866.451.7558 Copyright 2008 PATENTS PENDING TBD² reserves the right to make changes or improvements to the product Instruction Manual Effective Date 1/5/09 System Requirements: • • • Air Compressor o Horsepower o Performance o Pressure Switch o Operating Pressure Clean dry air Hose Size 2 HP 4 CFM @ 100 psi Starts compressor @ 110 psi 100 to 110 psi One continuous 3/8” diameter hose between compressor and The Shingle Hog General Safety Rules • • • • • • • For your personal safety, READ and UNDERSTAND all instructions and cautionary markings before using. Wear protective eye wear when operating. Only use on roofs you can safely walk on. Use separate safety harnesses while working on the roof for the person and the machine. Use clean air and lubricate monthly. Keep hands and feet away from moving tooth bar and arm assembly. Periodically inspect the unit checking to see if shingle material is in the slotted area where the arms project through the housing. If material is collecting disconnect unit from the air compressor and raise the tooth bar up and removed any roofing materials. Reconnect to the air compressor. Setting up the System & Tooth Bar Selection Note: The efficiency of the pneumatic system will greatly impact the performance of The Shingle Hog. In a typical dynamic condition at the above system requirements, the average pressure range at The Shingle Hog will be 85 to 100 psi. For hose lengths greater then 100’ use ½” diameter hose or if you are using shorter length of hoses with multiple quick disconnect couplings use a ½” diameter hose in place of the 3/8” diameter hose. The larger diameter lines provide for a lower pressure drop through the hose and quick disconnect fittings, and result in increased pressure and airflow to the Shingle Hog. Note: 1/4” diameter hoses and/or compressors systems less than 2 HP may result in lower performance (cycle time of the tooth bar will be reduced and under difficult nail pull-out conditions, the tooth bar may not raise immediately until adequate pressure and flow builds up in The Shingle Hog air cylinder). • • Air Compressor o Locate the air compressor at the job site on a flat, secure area, clear of falling debris. o Adjust the operating pressure control on the compressor to 100 - 110 psi. Tooth bar selection & installation o The variety of roofing nails, staples, types of shingles, the number of layers of shingles being removed, roof sheeting materials and nailing patterns on existing roofs effects performance. However, start with attaching the widest tooth bar that you have, and if there is difficulty, move to a smaller tooth bar. o IN GENERAL – For a single layer tear off, use the 15” wide tooth bar. For a 2 layer tear off use the 15” or 9” wide tooth bar. For more than 2 layers 9” wide tooth bar. o Note: If you find that the Shingle Hog is slower in pulling out the nails, it maybe because The Shingle Hog is pulling several nails at one time from multiple layers. By reducing the length of the tooth bar, you can improve your speed.