Transcript
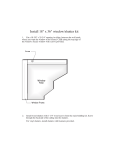
Surface Master
Installation Instructions
CAUTION: All electrical connections must be in accordance with state and local codes, ordinances, and the National Electrical
Code. If you are unfamiliar with methods of installing electrical wiring and devices, secure the services of a qualified licensed
electrician.
Note: Although the Octagon Surface Master is shown below, the same installation techniques are used for all
styles of Surface Masters.
apply caulk here
Step 1
Cut the desired opening in the Surface Master by cutting along
the patterns provided on the back of the part. There's also a drilling
support in the middle of the Surface Master. This is supplied for drilling
custom sized round holes if needed. See figure at right.
drill support for
custom sized holes
Step 2
Apply caulk in the groove in the back of the Surface Master. The caulk
will create a seal between the siding and the Surface Master. Any moisture
and condensation that does build up will drain out the bottom of the part
from the weep hole. See figure at right.
weep hole
Step 3
With the caulk applied, place the Surface Master over the desired location and hold in place. Make all wire
connections to the fixture in accordance with electrical code. A second person may be needed to hold the Surface
Master on the wall while these connections are being made.
Step 4
Once the connections have been made, the Surface Master can now be fastened to the wall. This is done by attaching
the light fixture to the wall and using the fixtures mounting hardware to "sandwich" the Surface Master between the
siding and light fixture.
7-27-00
I-0069
Note: Common sense, caution and care are factors which cannot be built into any product. These conditions must be supplied by the person(s) installing the fixture.