1
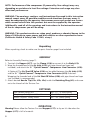
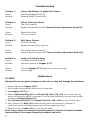
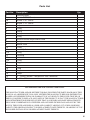
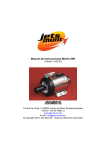
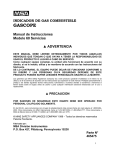
Professional
Texture Gun
& Hopper
Operating Instructions
Pistola de textura con tolva de uso profesional
Instrucciones de manejo
Homax Products, Inc.
P.O. Box 5643
Bellingham, WA 98227
800-729-9029
www.homaxproducts.com
Professional Texture Gun & Hopper
Manufactured in China for Homax
Specifications
Capacity
1.25 Gallons (5L)
Air Inlet
Recommended PSI
1/4” NPS (Male)
50 - 70 PSI
Hopper Dimensions
10” x 9-7/8” x 9”
Nozzle Sizes
.177” (4.5mm), .236” (6mm), .314” (8mm)
Top Opening
7-7/8” x 4-3/16”
CFM Required
4-6 CFM
Funnel Opening
1-5/8”
Save This Manual
Retain this manual for the safety warnings and precautions, assembly instructions, operating and maintenance procedures, parts list and diagram.
Safety Warnings and Precautions
WARNING: When using tool, basic safety precautions should always be followed
to reduce risk of personal injury and damage to equipment.
READ INSTRUCTIONS BEFORE USE!
1. Keep work area clean. Cluttered areas invite injuries.
2. Observe work area conditions. Do not use machines or power tools in damp or wet
locations. Don’t expose to rain. Keep work area well lit. Do not use electric power tools
in the presence of flammable gases or liquids.
3. Keep children away. Children should not be allowed in the work area. Do not let them
handle machines, tools, or extension cords.
4. Store idle equipment. When not in use, tools should be stored in a dry location to
inhibit rust. Always lock up tools and keep out of reach of children.
5. Do not force tool. Use tool as intended only. Do not use inappropriate attachments in
an attempt to exceed the tool capacity.
6. Use the right tool for the job. Do not attempt to force smaller attachments to do the
work of a larger industrial tool. There are certain applications for which this tool was
designed. Do not modify this tool and do not use this tool for a purpose for which it was
not intended.
7. Dress properly. Do not wear loose clothing or jewelry as they can be caught in
moving parts. Protective, electrically non-conductive clothes and non-skid footwear are
recommended when working. Wear restrictive hair covering to contain long hair.
8. Use eye and breathing protection. Always wear ANSI approved impact safety
goggles. Wear an ANSI approved respirator when spraying.
1
9. Maintain tools with care. Keep tools clean for better and safer performance. Follow
instructions for lubricating and changing accessories. Inspect tool cords and hoses
periodically and, if damaged, have them repaired by an authorized technician. The
handles must be kept clean, dry, and free from oil and grease at all times.
10. Disconnect power. When not in use disconnect from compressor.
11. Avoid unintentional starting. Do not carry any tool with your finger on the trigger,
whether it is plugged in or not.
12. Stay alert. Watch what you are doing, use common sense. Do not operate any tool
when you are tired.
13. Do not operate tool if under the influence of alcohol or drugs. Read warning
labels on prescriptions to determine if your judgment or reflexes are impaired while
taking drugs. If there is any doubt, do not operate the tool.
14. Check for damaged parts. Before using any tool, any part that appears damaged
should be carefully checked to determine that it will operate properly and perform its
intended function. Check for alignment and binding of moving parts; any broken parts
or mounting fixtures; and any other condition that may affect proper operation. Any
part that is damaged should be properly repaired or replaced by a qualified technician.
Do not use the tool if any switch does not turn On and Off properly.
15. Guard against electric shock. Prevent body contact with grounded surfaces such as
pipes, radiators, ranges, and refrigerator enclosures.
16. Replacement parts and accessories. When servicing, use only identical
replacement parts. Use of any other parts will void any warranty.
17. Use proper size and type extension cord. If an extension cord is required, it must
be of the proper size and type to supply the correct current to the air compressor
without heating up. Otherwise, the extension cord could melt and catch fire, or cause
electrical damage to the air compressor. Check air compressor manual.
18. Keep aware of air hoses. Be careful not to trip over air hoses while working. Check
air connections periodically.
19. Do not operate Spray Gun near open flames, pilot lights, heaters, or any other
heat source. Make sure you have adequate ventilation. Most solvents and paints are
extremely flammable, especially when sprayed. Never smoke cigarettes in the same
room you are working in.
20. Read labels on cleaning solvents and paint coatings. Chlorinated solvents
such as 111-Trichloroethane and Methylene Chloride (also known as methyl-chloride)
can chemically react with aluminum and may explode. Many paint sprayers contain
aluminum. Contact solvent manufacturer or paint supplier if you are in doubt.
21. Paints and solvents may be harmful or fatal if swallowed or inhaled. Always
use a respirator that is appropriate for type of paint/solvent being used when spraying.
Avoid prolonged skin contact with solvents or paints as they will irritate skin. After
contact, immediately wash off exposed are with hot, soapy water.
22. Check all Spray Gun seals and air connection. Before use, make sure the Hopper
(#17) is fully tightened to the Body (#3). Make sure the air hose is securely fastened
to the Air Inlet (#13).
23. Read and understand all warnings and instructions provided in the
instruction manual of the air compressor being used.
24. Never point Texture Gun at people or animals.
2
NOTE: Performance of the compressor (if powered by line voltage) may vary
depending on variations in local line voltage. Extension cord usage may also
affect tool performance.
WARNING: The warnings, cautions, and instructions discussed in this instruction
manual cannot cover all possible conditions and situations that may occur. It
must be understood by the operator that common sense and caution are factors
which cannot be built into this product, but must be supplied by the operator.
Additionally, read all of the warnings and instructions in the instruction manual
of the air compressor you will be using.
WARNING: This product contains or, when used, produces a chemical known to the
State of California to cause cancer and birth defects or other reproductive harm.
(California Health & Safety Code 25249, et seq.)
Unpacking
When unpacking, check to make sure the parts listed on page 6 are included.
ASSEMBLY
Refer to Assembly Drawing (page 7).
1. To attach the Hopper (#17), use the Clamp (#18) to connect it to the Body (#3).
2. Wrap the threaded end of the Air Inlet (#13) with pipe thread seal tape (not
included), and attach the ¼˝ “Quick-Connect” Compressor Line Connector (#19).
(Optional) The Air Shut-Off Valve (#20) can be added between the Air Inlet (#13)
*and
the ¼˝ “Quick-Connect” Compressor Line Connector (#19) if desired.
Wrapping the threaded end of the Air Shut-Off Valve (#20) with pipe thread seal tape
(not included) is recommended.
3. Attach desired Nozzle Tip (#2a, #2b, #2c) inside the Retaining Ring (#1) and screw
on to the threads of the Texture Gun.
PATTERNS
Light - Medium Orange Peel
Heavy Orange Peel - Splatter & Knockdown
Acoustic “Popcorn” Ceiling Texture
#2a - .177” (4.5mm) opening
#2b - .236” (6mm) opening
#2c - .314” (8mm) opening
OPERATION
Warning! Never allow the Texture Gun and Hopper (#17) to lay on it’s side when the
Hopper (#17) is full of material.
3
PREPARATION
1. For best results prepare the provided ¼˝ “Quick-Connect” Compressor
Line Connector (#19) to connect to the Air inlet (#13). First, wrap
the threaded end of the Air inlet (#13) with pipe thread seal tape and
attach the ¼˝ “Quick-Connect” Compressor Line Connector (#19).
(Optional) The Air Shut-Off Valve (#20) can be added between the Air Inlet
(#13) and the ¼˝ “Quick-Connect” Compressor Line Connector (#19) if desired.
Wrapping the threaded end of the Air Shut-Off Valve (#20) with pipe thread seal tape
(not included) is recommended.
2. Attach air source hose to the Air Inlet (#13) or the ¼˝ “Quick-Connect” Compressor
Line Connector (#19) (Recommended) on the Texture Gun.
3. Set the pressure to 50-70 PSI. DO NOT EXCEED the recommended air pressure of 70 PSI.
4. Check air connection for leaks.
5. Turn off the compressor and disconnect the air source hose in preparation to load material.
*
Note: It is normal for air to continuously flow through the spray gun while
connected to the air supply. Material will not flow unless the trigger in depressed.
If you wish to stop the air flow, turn the Ball Valve handle 90 degrees or
disconnect the air hose.
APPLICATION
1. Mix material in a separate container. Average consistency should be similar to pancake
batter. Material may be thicker or thinner depending on desired texture/pattern.
2. Attach the Hopper (#17) by tightening the Clamp (#18). Fill with no more than 1.25
Gallons (5L) of material.
3. Connect the air hose to the Air Inlet (#13) and set the pressure to 50-70 PSI. Do not
exceed 70 PSI.
4. Squeeze the Trigger (#14) to test pattern.
5. Spray from a distance of approximately 12” to 24”, maintaining distance as you spray.
6. When you finish spraying, release the Trigger (#14), and disconnect the air hose.
7. Empty the Hopper (#17). DO NOT store the Hopper (#17) filled with material.
Note: It is recommended that you test the Texture Gun on scrap material, to become
familiar with the available adjustments, prior to use.
ADJUSTMENTS
1. You can regulate the fluid flow with the Texture Volume Adjustment Knob (#8).
Slowly turn the Texture Volume Adjustment Knob (#8) and fine tune it to meet your
needs. You may also adjust the pressure with the air compressor. Make sure you do not
exceed the recommended 70 PSI.
2. You can change Nozzle Tips (#2a, #2b, #2c) for different texture patterns. Disconnect
the air hose before changing nozzles. Test Nozzle Tips (#2a, #2b, #2c) on scrap
material to match desired pattern.
4
Troubleshooting
Problem 1: Cause:
Solution:
Heavy Top/Bottom, or Right/Left Pattern
Partially plugged Nozzle Tip
Remove Nozzle Tip and clean
Problem 2:
Cause:
Solution: Heavy Texture in Center
Too much material
Reduce texture volume with Texture Volume Adjustment Knob (#8)
Cause:
Solution:
Material too thick
Thin out material
Problem 3:
Cause:
Solution:
Split Spray Pattern
Pressure too high
Reduce air pressure at regulator
Cause:
Solution:
Not enough texture material
Increase texture volume with Texture Volume Adjustment Knob (#8)
Problem 4:
Cause:
Solution:
Jerky or Fluttering Spray Insufficient texture material
Add more texture to Hopper (#17)
Cause:
Solution:
Gun and Hopper (#17) tipped at an excessive angle
Correct angle
Maintenance
CLEANING
Warning! Do not use paint strippers on this unit as they will damage the aluminum.
1. Empty and remove Hopper (#17).
2. Rinse under running water until texture is removed.
3. Wipe Hopper (#17) dry.
4. Remove Retaining Ring (#1) and Nozzle Tip (#2a, #2b, #2c) rinse under running
water until texture material is removed. A soft bristled toothbrush can be used to clean
threads on Retaining Ring (#1).
5. Wipe Retaining Ring (#1) and Nozzle Tip (#2a, #2b, #2c) dry with lint free cloth.
6. Rinse Texture Gun Body (#3) under running water until texture is removed. A
toothbrush can be inserted through top and front opening to clean.
7. Wipe Texture Gun Body (#3) dry with lint free cloth.
Note: Always dispose of texture materials properly. Consult the local hazardous
waste authority for proper disposal procedures and sites.
5
Parts List
Part No.
1
2a
2b
2c
3
4
5
6
7
8
8a
9
10
11
11a
12
13
13a
14
15
16
17
18
19
20
Description
Retaining Ring
Nozzle .177” (4.5mm)
Nozzle .236” (6mm)
Nozzle .314” (8mm)
Body
O-ring
Fitting
O-ring
O-ring
Texture Volume Adjustment Knob
O-ring
Needle Shaft
O-ring
Assembly Set
O-ring
Clip Ring
Air Inlet
O-ring
Trigger
Pin
E-ring
Hopper
Clamp
¼˝ “Quick-Connect” Compressor Line Connector
Air Shut-Off Valve
Qty.
1
1
1
1
1
1
1
1
1
1
1
1
2
1
1
1
1
1
1
1
1
1
1
1
1
PLEASE READ THE FOLLOWING CAREFULLY
THE MANUFACTURER AND/OR DISTRIBUTOR HAS PROVIDED THE PARTS DIAGRAM IN THIS
MANUAL AS A REFERENCE TOOL ONLY. NEITHER THE MANUFACTURER NOR DISTRIBUTOR
MAKES ANY REPRESENTATION OR WARRANTY OF ANY KIND TO THE BUYER THAT HE OR
SHE IS QUALIFIED TO REPLACE ANY PARTS OF THE PRODUCT. IN FACT, THE MANUFACTURER
AND/OR DISTRIBUTOR EXPRESSLY STATES THAT ALL REPAIRS AND PART REPLACEMENTS
SHOULD BE UNDERTAKEN BY CERTIFIED AND LICENSED TECHNICIANS AND NOT BY THE
BUYER. THE BUYER ASSUMES ALL RISK AND LIABILITY ARISING OUT OF HIS OR HER REPAIRS TO THE ORIGINAL PRODUCT OR REPLACEMENT PARTS THERETO, OR ARISING OUT OF
HIS OR HER INSTALLATION OR REPLACEMENT PARTS THERETO.
6
Assembly Drawing / Gráfico de Ensamblaje
7
Pistola de Textura con Tolva de uso Profesional
Fabricado en China para Homax
Especificaciones
Capacidad
1.25 galones (5L)
Toma de aire
PSI recomendado
NPS de 1/4” (macho)
50 a 70 PSI
Dimensiones de la
tolva
Tamaños de las boquillas
Abertura superior
10” x 9-7/8” x 9”
CFM requeridos
4 a 6 CFM
Abertura del embudo
1-5/8”
0.177” (4.5 mm), 0.236” (6 mm), 0.314” (8
mm)
7-7/8” x 4-3/16”
Guarde este manual
Conserve este manual para consultar las advertencias y precauciones de seguridad, las instrucciones de montaje, los procedimientos de mantenimiento y funcionamiento, la lista de piezas y el
diagrama de montaje.
Advertencias y precauciones de seguridad
ADVERTENCIA: Al usar esta herramienta, siempre se deben seguir las precauciones
de seguridad básicas para reducir el riesgo de lesiones personales y daño al equipo.
¡ANTES DE USAR LA HERRAMIENTA, LEA LAS INSTRUCCIONES!
1. Mantenga limpia el área de trabajo. El desorden facilita la ocurrencia de lesiones.
2. Preste atención a las condiciones del área de trabajo. No use máquinas ni herramientas
eléctricas en lugares húmedos o mojados. No trabaje bajo la lluvia. Mantenga el área bien
iluminada. No use herramientas eléctricas en presencia de líquidos o gases inflamables.
3. Mantenga a los niños alejados. No permita que los niños permanezcan en el área de
trabajo. No deje que manipulen máquinas, herramientas ni cables de extensión.
4. Guarde el equipo que no use. Cuando las herramientas no se usan, deben guardarse en un
lugar seco para evitar que se oxiden. Guárdelas siempre bajo llave y fuera del alcance de los
niños.
5. No fuerce las herramientas. Úselas para el fin para el que fueron diseñadas solamente. No
use aditamentos inadecuados con el objeto de extralimitar la capacidad de la herramienta.
6. Use la herramienta adecuada para el trabajo. No intente forzar aditamentos más
pequeños para hacer el trabajo de una herramienta industrial más grande. Esta herramienta
fue diseñada para determinadas aplicaciones. No la modifique ni la use para un propósito
distinto del fin para el que fue diseñada.
7. Use ropa adecuada. No use ropa holgada ni alhajas, ya que pueden quedar atrapadas
entre las piezas móviles. Al trabajar, se recomienda el uso de zapatos antideslizantes y ropa
protectora que no favorezca la conducción eléctrica. Para contener el cabello largo, use
alguna clase de gorro restrictivo.
8
8. Use protección respiratoria y visual. Use siempre gafas protectoras contra impactos
aprobadas por ANSI. Al rociar, use un respirador aprobado por ANSI.
9. Cuide las herramientas. Mantenga las herramientas limpias en pos de un desempeño
más seguro y superior. Siga las instrucciones para lubricar y cambiar los accesorios.
Examine periódicamente las mangueras y los cables de la herramienta y, si presentan
daños, solicite a un técnico autorizado que los repare. Los mangos deben estar limpios,
secos y libres de grasa y aceite en todo momento.
10. Desconecte la energía. Cuando no use la herramienta, desconéctela del compresor.
11. Evite el arranque accidental. No transporte ninguna herramienta con el dedo en el
disparador, ya sea que esté enchufada o no.
12. Permanezca alerta. Preste atención a lo que hace y use el sentido común. No opere
ninguna herramienta si está cansado.
13. No opere ninguna herramienta bajo el efecto de alcohol o medicamentos. Lea
las etiquetas de advertencia de las recetas para determinar si los medicamentos que toma
afectarán su juicio o sus reflejos. En caso de duda, no opere la herramienta.
14. Verifique si existen piezas rotas. Antes de usar cualquier herramienta, examine
detenidamente cualquier pieza que aparentemente esté dañada para determinar si
funcionará correctamente y desempeñará la función correspondiente. Verifique la
alineación y la unión de las piezas móviles, si existen piezas y accesorios de montaje
rotos, y cualquier otra condición que pueda afectar el correcto funcionamiento. Cualquier
pieza dañada deberá ser adecuadamente reemplazada o reparada por un técnico calificado.
No use la herramienta si algún interruptor no enciende o apaga correctamente.
15. Protéjase contra los shocks eléctricos. Evite el contacto del cuerpo con las superficies
puestas a tierra, como las tuberías, los radiadores, las cocinas y los espacios destinados al
refrigerador.
16. Accesorios y piezas de repuesto. Al hacer los mantenimientos, use solamente piezas
de repuesto idénticas. El uso de cualquier otra pieza anulará la garantía.
17. Use el cable de extensión del tipo y el tamaño adecuados. Si se requiere el uso de
un cable de extensión, debe ser un cable del tipo y el tamaño adecuados para suministrar
la corriente correcta al compresor de aire sin causar calentamiento. De lo contario, el
cable de extensión se derretirá e incendiará, o el compresor de aire se dañará. Consulte el
manual del compresor de aire.
18. Preste atención a las mangueras de aire. Tenga cuidado de no tropezar con éstas al
trabajar. Verifique las conexiones periódicamente.
19. No opere la pistola rociadora cerca de llamas, pilotos, calentadores o cualquier
otra fuente de calor. Asegúrese de que la ventilación sea adecuada. La mayoría de los
solventes y las pinturas son extremadamente inflamables, en especial al rociarlos. Nunca
fume cigarrillos en la misma habitación en la que trabaja.
20. Lea las etiquetas de los solventes de limpieza y los recubrimientos de pintura.
Los solventes clorinados, como el tricloroetano 111 y el cloruro de metileno (también
conocido como cloruro de metilo), pueden reaccionar químicamente con el aluminio y
pueden explotar. Muchos rociadores de pintura contienen aluminio. En caso de duda,
póngase en contacto con el proveedor de la pintura o el fabricante del solvente.
21. La ingestión o la inhalación de pinturas y solventes puede resultar tóxica o
mortal. Use siempre un respirador que sea apropiado para el tipo de pintura o solvente
que se está rociando. Evite el contacto prolongado de la piel con solventes o pinturas,
puesto que pueden irritarla. Tras el contacto, lave de inmediato las zonas expuestas con
agua jabonosa caliente.
9
22. Examine todas las conexiones y sellos de la pistola rociadora. Antes de usarla,
asegúrese de que la Tolva (#17) esté ajustada por completo al Cuerpo (#3). Corrobore que
la manguera de aire esté sujeta con firmeza a la Toma de Aire (#13).
23. Lea y entienda todas las advertencias e instrucciones que se suministran en el
manual de instrucciones del compresor de aire que se use.
24. Nunca apunte la pistola de textura hacia personas o animales.
NOTA: El desempeño del compresor (si se activa mediante tensión de línea) puede variar
según las fluctuaciones de la tensión de la línea local. El uso de un cable de extensión
también puede afectar el desempeño de la herramienta.
ADVERTENCIA: Las advertencias, las precauciones y las instrucciones que se detallan en
este manual de instrucciones no cubren todas las condiciones y situaciones posibles.
El operador debe entender que el sentido común y la precaución son factores que
no pueden ser incorporados a este producto, sino que debe ejercerlos el operador.
Además, lea todas las advertencias y las instrucciones en el manual de instrucciones del
compresor de aire que usará.
ADVERTENCIA: Según el estado de California, este producto contiene o, cuando se usa,
produce una sustancia química causante de cáncer, defectos de nacimiento u otros daños
a la salud reproductiva. (Código de Salud y Seguridad de California 25249, et seq.)
Desembalaje
Al desembalar, asegúrese de que las piezas detalladas en la página 13 estén incluidas.
MONTAJE
Consulte el diagrama de montaje (página 7).
1. Para acoplar la Tolva (#17), use la Abrazadera (#18) para conectarla al Cuerpo (#3).
2. Envuelva el extremo roscado de Toma de Aire (#13) con cinta selladora de roscas (no
incluida) y acople el “Rápido-Conecta” la Línea Conector del Compresor del ¼˝ (#19).
la Válvula de Cierre del Aire (#20) se puede añadir entre la Toma de Aire (#13)
*y (Opcional)
el “Rápido-Conecta” la Línea Conector del Compresor del ¼˝ (#19) si está deseada. Se
recomienda el embalaje del extremo roscado de la Válvula de Cierre del Aire (#20).
3. Coloque la Boquilla (#2a, #2b, #2c) deseada dentro del Anillo de Retención (#1) y
enrósquela en la pistola de textura.
PATRONES
Piel de naranja de textura ligera a media
Salpicado/Acabado planchado
Textura acústica para cielos rasos con textura de tirol
Abertura #2a de 0.177” (4.5 mm)
Abertura #2b de 0,236” (6 mm)
Abertura #2c de 0,314” (8 mm)
10
FUNCIONAMIENTO
¡Advertencia! Nunca deje la pistola de textura con Tolva (#17) colocada sobre un lado cuando
la Tolva (#17) esté llena de material.
PREPARACIÓN
1. Para obtener mejores resultados, prepare un Rápido-Conecta” la Línea Conector del
Compresor del ¼˝ (#19) para acoplarlo a la Toma de Aire (#13). Primero, envuelva el
Rápido-Conecta” la Línea Conector del Compresor del ¼˝ (#19) con cinta selladora para
roscas antes de conectarlo a la manguera de una fuente de aire (no incluida). (Opcional)
la Válvula de Cierre del Aire (#20) se puede añadir entre la Toma de Aire (#13) y el
“Rápido-Conecta” la Línea Conector del Compresor del ¼˝ (#19) si está deseada. Se
recomienda el embalaje del extremo roscado de la Válvula de Cerre del Aire (#20).
2. Acople la manguera de aire a la Toma de Aire (#13) o Rápido-Conecta” la Línea Conector
del Compresor del ¼˝ (#19) de la pistola de textura.
3. Configure la presión en 50-70 PSI. NO SUPERE la presión de aire recomendada de 70 PSI.
4. Examine las conexiones en busca de pérdidas.
5. Apague el compresor y desconecte la manguera de la fuente de aire cuando se prepara para
cargar el material.
*
Nota: Es normal que siga fluyendo aire en forma continua a través de la pistola
rociadora mientras ésta esté conectada a un suministro de aire. El material no fluirá a
menos que el disparador esté presionado. Si desea interrumpir el flujo de aire, gire 90
grados el mango de la válvula de bola o desconecte la manguera de aire.
APLICACIÓN:
1. Mezcle el material en un recipiente. La consistencia promedio debe ser similar a la mezcla
para panqueques. El material puede ser más espeso o más ligero, según el patrón o la textura
deseados.
2. Coloque la Tolva (#17) ajustando la Abrazadera (#18). Llénela con 1.25 galones (5L) de
material como máximo.
3. Conecte la manguera de aire a la Toma de Aire (#13) y configure la presión en 50-70 PSI. No
supere los 70 PSI.
4. Apriete el Disparador (#14) para probar el patrón.
5. Rocié a una distancia de aproximadamente 12” a 24” (30 cm a 60 cm).
6. Al terminar de rociar, suelte el Disparador (#14) y desconecte la manguera de aire.
7. Vacíe la Tolva (#17). NO la guarde con material.
Nota: Ante de usarla, le recomendamos que pruebe la pistola de textura en algún material de
descarte para que se familiarice con los ajustes disponibles.
ADJUSTES
1. Puede regular el flujo del fluido con la Botón del Ajuste del Volumen de la Textura (#8).
Gírela despacio para ajustar la Botón del Ajuste del Volumen de la Textura (#8) según sus
necesidades. También puede ajustar la presión con el compresor de aire. Asegúrese de no
superar la presión recomendada de 70 PSI.
2. Puede cambiar las Boquillas (#2a, #2b, #2c) para lograr patrones diferentes. Antes de
cambiar las boquillas, desconecte la manguera de aire. Pruebe las Boquillas (#2a, #2b, #2c)
en algún material de descarte para determinar el patrón deseado.
11
Resolución de problemas
Problema 1: Parte superior/inferior densa o patrón hacia la izquierda/derecha
Causa:
Boquilla parcialmente obstruida
Solutión:
Quite la boquilla y límpiela
Problema 2:Textura densa en el centro
Causa:
Demasiado material
Solutión: Disminuya el flujo del fluido con la Botón del Ajuste del Volumen de la Textura (#8)
Causa:
Solutión:
Material muy espeso
Diluya el material
Problema 3:Patrón de rociado dividido
Causa:
Presión demasiado alta
Solutión:
Disminuya la presión de aire con el regulador
Causa:
Solutión:
Material de textura insuficiente
Aumente el flujo del fluido con la Botón del Ajuste del Volumen de la Textura (#8)
Problema 4:Rociado ondulado o entrecortado Causa:
Material de textura insuficiente
Solutión:
Agregue más material de textura a la Tolva (#17)
Causa:
Solutión:
La pistola con la Tolva (#17) gotea si se coloca en un ángulo pronunciado
Corrija el ángulo
Mantenimiento
LIMPIEZA
¡Advertencia! No use decapantes de pintura con esta unidad, ya que dañarán el aluminio.
1.
2.
3.
4.
Vacíe y quite la tolva.
Lávela con agua corriente hasta eliminar todo el material de textura.
Séquela con un paño seco que no genere pelusas.
Quite el Anillo de Retención (#1) y la Boquilla (#2a, #2b, #2c) y lávelos con agua corriente
hasta eliminar todo el material de textura. Para limpiar las roscas del Anillo de Retención
(#1), se puede usar un cepillo de dientes de cerdas suaves.
5. Seque el Anillo de Retención (#1) y la Boquilla (#2a, #2b, #2c) con un paño seco que no
genere pelusas.
6. Lave el Cuerpo (#3) de la pistola de textura con agua corriente hasta eliminar todo el material
de textura. Para limpiarlo, puede insertar un cepillo de dientes a través de la abertura delantera
superior.
7. Seque el Cuerpo (#3) de la pistola de textura con un paño seco que no genere pelusas.
Nota: Deseche siempre los materiales de textura de manera correcta. Consulte a la
autoridad local encargada de la eliminación de desechos peligrosos para conocer los
lugares y los procedimientos adecuados de eliminación.
12
Parts List
Pieza n.º
1
2a
2b
2c
3
4
5
6
7
8
8a
9
10
11
11a
12
13
13a
14
15
16
17
18
19
20
Descripción
Anillo de Retención
Boquilla de 0.177” (4.5 mm)
Boquilla de 0,236” (6 mm)
Boquilla de 0,314” (8 mm)
Cuerpo
Junta Tórica
Adaptador
Junta Tórica
Junta Tórica
Botón del Ajuste del Volumen de la Textura
Junta Tórica
Eje de Aguja
Junta Tórica
Conjunto de Montaje
Junta Tórica
Anillo de Sujeción
Toma de Aire
Junta Tórica
Disparador
Vástago
Anillo en E
Tolva
Abrazadera
“Rápido-Conecta” la Línea Conector del Compresor del ¼˝
Válvula de Cierre del Aire
Cant.
1
1
1
1
1
1
1
1
1
1
1
1
2
1
1
1
1
1
1
1
1
1
1
LEER DETENIDAMENTE
EL FABRICANTE O EL DISTRIBUIDOR SUMINISTRARON EL DIAGRAMA DE LAS PIEZAS QUE
FIGURA EN ESTE MANUAL COMO UNA HERRAMIENTA DE REFERENCIA SOLAMENTE. NI EL
FABRICANTE NI EL DISTRIBUIDOR PROPORCIONAN CERTIFICACIÓN O GARANTÍA ALGUNA
AL COMPRADOR DE QUE ESTE ÚLTIMO ESTÉ CALIFICADO PARA REEMPLAZAR LAS PIEZAS
DEL PRODUCTO. DE HECHO, EL FABRICANTE O EL DISTRIBUIDOR ACLARAN EXPRESAMENTE QUE TODAS LAS REPARACIONES Y LOS REEMPLAZOS DE PIEZAS DEBEN SER LLEVADOS A CABO POR TÉCNICOS CERTIFICADOS Y CON LICENCIA, Y NO POR EL COMPRADOR. EL
COMPRADOR ASUME TODOS LOS RIESGOS Y LA RESPONSABILIDAD QUE SURGEN DE LAS
REPARACIONES POR ÉL EFECTUADAS AL PRODUCTO ORIGINAL O LAS PIEZAS DE REEMPLAZO, O QUE SURGEN DE LA INSTALACIÓN POR EL EFECTUADA DE LAS PIEZAS DE REEMPLAZO.
13