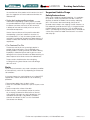
1
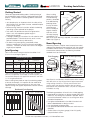
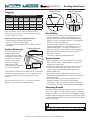
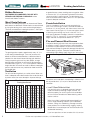
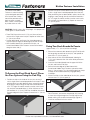
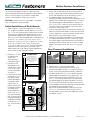
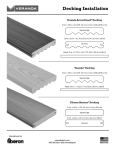
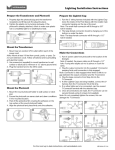
HORIZON
®
Veranda ArmorGuard Decking,
Veranda Composite Decking and
Fiberon Horizon Composite Decking
Installation Instructions
VerandaDeck.com
800.566.3337 (800.HomeDepot)
HORIZON
Decking Profiles
®
Veranda ArmorGuard® Decking
Fiberon Horizon® Decking
5.3 in. x .93 in. x 8 or 20 ft. (13 cm x 2.3 cm x 3.66,4.88 & 6.1 m)
5.4 in. x .94 in. x 12 ft. (14 cm x 2.4 cm x 610 cm)
Square Edge
Square Edge
5.4 in. x .94 in. x 16 ft. (14 cm x 2.4 cm x 4.88 m)
.93 in. x 5.3 in. x 12, 16 or 20 ft. (13 cm x 2.3 cm x 3.66 m)
Grooved
Grooved
Fascia .75 in. x 11.25 in. x 8 or 12 ft. (2cm x 29 cm x 3.66 m)
Veranda® Decking
5.3 in. x .93 in. x 8 or 20 ft. (13 cm x 2.3 cm x 3.66,4.88 & 6.1 m)
Square Edge
Fascia .75 in. x 11.25 in. x 12 ft. (2cm x 29 cm x 3.66 m)
1
For the most up-to-date instructions, visit VerandaDeck.com.
HORIZON
Decking Installation
®
3
Getting Started
Follow local approved building codes. Careful planning of
the finished deck layout will result in better looking finished
projects. Failure to follow installation guidelines could void
warranty.
• Joist location plays an important role in the safety of the
deck itself but may also affect the ease, method and price
of your railing system.
• Before starting, read the instructions of both the decking
and railing systems planned for the project.
• Dark colors will absorb more heat than lighter colors
and as such, will experience greater ranges in
expansion/contraction.
• Thoroughly reading all instructions first will make for more
profitable projects. Failure to do so may result in more
difficult installation and may void warranty.
• For decks using metal joisting, specialized surface
fasteners are required. Do not use ArmorGuard Hidden
Fasteners. Fasteners for metal that install at a 90 degree
angle only are required.
Joist Spacing
Joists used in deck frame construction should be 2"x 8"
(5 cm x 20 cm) or larger (Figure 3).
Commercial
Brand
Perpendicular
Diagonal
Stairs
Perpendicular
Diagonal
Stairs
Veranda
ArmorGuard
16
12
9
12
8
9
Veranda
16
12
9
12
8
9
Horizon
16
12
12
12
8
9
* Secure stair treads over and in contact with a treated
pine 2x6, installed flat, not on edge, as under support, and
secured with Simpson A23 approved connectors and 10d x
1-1/2" hot galvanized nails.
When installing heavy loads on top of your decking project,
a hot tub, for example, it is important to also understand
the requirements of the manufacturer as they may have
specific framing and support requirements for their warranty
coverage.
Residential Joist Spacing
1
Joists
Deck Boards
16" o.c. (41 cm)
3
2
Board Spacing
All decking materials, whether wood, composite or metal,
undergo some degree of linear expansion with the changes
of weather and the season. To compensate for the effects
of contraction and expansion, the following installation
standards must be maintained:
End Gapping
Joist/Stringer Spacing
Residential
Blocking
When installing
blocking for more
Stringers or Joists
intricate decking
patterns, remember
that solid blocking
(blocking laid on
the flat) will inhibit
water flow and
result in buildup of
organic materials
over time, which
will make cleaning
more difficult. For
best results when blocking is required, it should be installed
ladder style (Figure 3).
Joists
Deck Boards
12" o.c. (31 cm)
5
Side-To-Side Spacing
WALL
Determined by
Temperature
Determined by
Temperature
4
LEDGER
JOISTS/BlOCKING
Note: Special consideration should be taken when working
with dark colors as they will experience larger temperature
swings during normal use. To help control end-to-end
spacing, dark color decking should be kept at ambient
temperature and shaded from direct sun prior to cutting and
immediate securing.
The following procedures will result in less visible gapping:
• Keep boards out of direct sun during storage and cutting
processes, and through to installation if possible. Never
cut and install boards in direct sun assuming them to be
at ambient temperature.
• Use lighter colored boards in the field of the deck with
darker colored boards as design accents.
• Use short boards where possible.
• Use splitter/divider boards between each continuous run
of boards.
• Surface fasten using heavy gauge (#9 or #10) quality
composite deck screws.
For the most up-to-date instructions, visit VerandaDeck.com.
HORIZON
®
Gapping
End-To-End Spacing by Temperature
Brand
30˚ &
Under
50˚ - 69˚
70˚ - 89˚
90˚ - 109˚
110˚ & Up
Veranda
ArmorGuard
1/4"
3/16"
1/8"
1/16"
1/32"
Veranda
1/4"
3/16"
1/8"
1/16"
1/32"
Horizon
1/4"
3/16"
1/8"
1/16"
1/32"
Note: For locations with extreme temperture swings,
double-joisting and surface fastening may be required to
minimize shifting of material.
Adhering to these spacing parameters will:
• Promote proper drainage and ventilation
• Aid in the removal of organic debris
• Meet board spacing requirements for Fiberon warranty
coverage
Surface Fasteners
The use of stainless steel
composite deck screws
is strongly recommended.
Composite surface fasteners
may be used - check with
manufacturer for coating
warranty. Pre-drilling is
recommended. Plain,
galvanized surface fasteners
are not recommended.
Fastener Setback
1-1/2" (4 cm) Setback
Deck
Board #1
Deck
Board #2
6
Added Joist/
Blocking
Screw heads must be flush with board surface. Use caution
to avoid over-tightening fasteners. Excess tightening may
cause immediate or eventual cracking of the fastener
locations.
Do not surface fasten within 11/2" (4 cm) of the end of a
board or 1" (3 cm) from the side of the board.
Decking Installation
Do Not Toe-Nail
Proper Installation
7
8
1-1/2"
(4 cm)
90-Degrees
Deck Board
Deck
Board
Deck
Deck
Deck
Deck Board
Board
Joist
Joist
Joist/
Blocking
Joist/
Blocking
Pre-drilling
• It is necessary to pre-drill end of board screw holes to
prevent immediate or eventual end splitting (Figure 6).
• Pre-drilling all holes will result in better looking finished
projects. DO NOT over-tighten fasteners. Over-tightening
will induce cracking at board ends.
• Surface fasteners should always be driven in at a 90˚
angle to the decking surface. Toe-nailing screws is not
recommended (Figure 7). Instead, the placement of
blocking/sister joists, when needed, is recommended to
allow perpendicular installation of surface fasteners at
board ends (Figure 8).
• Pre-drilling is required in cold temperatures.
Requirements
• Clean, straight lines of fasteners look better than wobbly
lines. Use white chalk, straight boards or string lines as
templates for straight lines.
• All brands of Fiberon decking may be surface fastened.
Annular thread, ring shank and spiral shank nails, of
sufficient length, have excellent holding power and
produce good results.
• Screws have superior holding power. Use only screws
designed for composite decking. DO NOT USE traditional
bugle-head screws.
• For a cleaner look, stainless steel composite screws
are recommended. These screws are engineered
specifically to work with composite decking and prevent
mushrooming, resulting in better looking finished projects.
Fastening Boards
Veranda and Fiberon decking requires two fasteners at every
joist location (Figure 9). While surface fastening is allowed on
all decking products, the use of ArmorGuard Hidden Fasteners
are highly recommended with grooved (GV) decking to create a
smooth, unblemished, decking surface. GV boards cannot be
used as stair treads.
9
For the most up-to-date instructions, visit VerandaDeck.com.
HORIZON
®
Hidden Fasteners
FASTENERS RECOMMENDED FOR USE WITH
VERANDA OR FIBERON GV DECKING include
ArmorGuard Hidden Fasteners.
Wood Grain Patterns
Note that the wood grain patterns on Veranda and Fiberon
deck boards are directional. Different looks can be achieved
by laying the decking in the same or alternating directions.
There are several different wood grain patterns. See Figure
10 below for one of these patterns.
10
Decking Installation
or grade flat areas where standing water may gather. Allow
a minimum of 6" (15 cm) between the bottom of the deck
substructure/joists and the ground. The deck design must
allow unrestricted airflow under at least 50% of its perimeter
to permit adequate ventilation.
Fascia Installation
Fascia is intended as a non-structural covering for rim
joists, risers and stringers. Screws should be installed at a
maximum 12" (30 cm) interval, with three screws across the
face at each interval (Figure 12). Do not over-tighten screws
as buckling and cracking may result. Install with 1/8" (3
mm) spacing between the edges and ends in temperatures
above 50˚ F (10˚ C). Leave 3/16" (5 mm) space between
edges and ends in temperatures below 50˚ F (10˚ C).
Fire and Unusual Heat Sources
The graining pattern repeats approximately every 44" (1.12
m) feet along the board length. To ensure you orient the
boards to achieve the desired effect, a directional label is
noted on the side of each board showing grain direction.
During the planning phase of any deck project, arrange
decking before installation to achieve the desired pattern
and color effect (Figure 11). This is also important if different
lengths/bundles of material are used as different wood grain
patterns and color tones may need to be mixed to achieve
the desired look.
Composite decking will retain heat when exposed to direct
or reflective sunlight. Exercise caution if walking barefoot
as footwear may be required. Fire and unusual sources of
heat and heat buildup can potentially damage Veranda and
Fiberon decking surfaces. Examples would include fire,
reflected light from different types of glass (ex. low-e glass),
12
Proper Fascia Installation
Ventilation
Do not install decking directly to a solid surface. Make sure
there is adequate and unobstructed air flow under the deck
to prevent excessive water absorption. Improve drainage
11
Wood Grain Orientation
During Installation
12"
fire features and under-deck waterproofing installations that
do not provide the 6" (15 cm) of un-obstructed net free
ventilation.
• Low-E Glass/Reflected Heat
Low-emissivity glass is designed to prevent heat gain
inside the house by reflecting sunlight outward. This
reflective property can result in excessive heat buildup
on the surface of Veranda and Fiberon decking and on
exterior surfaces.
Same Direction
Alternating Direction
When the sunlight is reflected and concentrated it can
harm a range of building materials that include doors,
windows, siding, trim and decking. Damage caused to
these products can include melting, sagging, warping,
discoloration, increased expansion and contraction and
accelerated weathering.
If you have questions on how to reduce this risk, contact
5
For the most up-to-date instructions, visit VerandaDeck.com.
HORIZON
®
the manufacturer of the product which contains the Low-E
glass for suggestions on how to reduce or eliminate the
reflected heat.
• Under-deck waterproofing systems
Under-deck waterproofing systems, properly installed,
can provide additional living or storage space. Improper
installations are those that restrict air flow and result
in buildup of heat and/or humidity which can result in
unwanted consequences.
Contact the manufacturer of the specific under-deck
waterproofing system for installation instructions to
ensure required 6" (15 cm) of un-obstructived net-free
ventilation is achieved for Veranda and Fiberon decking. If
already installed, seek methods to achieve the ventilation
requirement.
Decking Installation
Important Ladder Usage
Safety Instructions
When using a ladder on composite decking, it is mandatory
to lay down a sheet of plywood over the deck surface to
disperse the load of the ladder’s feet to nearby underlying
joists. Drill fasteners downward through the top of the
plywood sheet to keep it from slipping. Position fasteners so
they adequately protrude and rest firmly in the gaps between
the deck boards and into the joists. This will avoid leaving
holes in your decking once the plywood sheet is removed. Be
sure to always follow the ladder manufacturer’s instructions
and safety tips.
• Fire Features/Fire Pits
Fire features and fire pits are increasingly popular in
outdoor living environments. Fire can damage many
building products including Veranda and Fiberon decking.
Improperly installed fire features and fire pits can cause
damage to the surface of Veranda and Fiberon decking via
direct exposure to the flame or excessive radiated heat.
Proper caution should be taken when designing,
installing and using these features to ensure damage
does not result.
Static
Dry or windy environments may create a temporary condition
of static electricity, which will vary depending on climate and
site conditions.
In the case of excessive static buildup on an installed HDPE
capped deck, Fiberon recommends to use the following
procedure:
1.Remove loose debris from the deck surface.
2.Dilute ACL Staticide® Concentrate 1 part to 39 parts water
(1:39).
3.Spray or mop entire surface of the deck.
4.Allow to air dry - do not attempt to wipe the surface
dry as wiping will reduce the effectiveness of the antistatic coating (*Although very safe in diluted form, ACL
Staticide® Concentrate is considered a hazardous
chemical non-diluted. DO NOT use ACL Staticide®
Concentrate non-diluted.)
For the most up-to-date instructions, visit VerandaDeck.com.
FIB-0098-LIT 3/14
Hidden Fastener Installation
2. Position the clip on the outside of the rim joist securing
it with a single screw inserted perpendicular to the joist.
After positioning the last deck board in place, secure it by
angling a screw through the clip and into the board at a
30˚- 45˚ angle. Be careful to make sure the screw inserts
fully and pulls the board down (3). Space no more than
12" (30 cm) apart.
The ArmorGuard Hidden
Fastener is a deck fastening
system designed specifically
for a fastener-free surface
around the perimeter of the
deck to create a smooth
deck surface, uninterrupted
by visible screws or nails.
3
CAUTION: Contains parts with sharp edges. Use proper care.
Use of gloves is recommended.
• Place End Clip a minimum of 1/4" (6 mm) from wall and
secure with a single screw into joist. Repeat no further than
12" (30 cm) on center.
• Position deck board, and insert clips into edge groove. It
may be helpful to angle the board slightly to start the clips.
• With the deck board fully inserted into the clips, use
ArmorGuard Hidden Deck Fasteners to secure the board
along the other side (1).
1
To Secure the Final Deck Board, There
Are Two Options Using the End Clip
1. Position the clip on the inside of the rim joist securing it
with a single screw inserted perpendicular to the joist. After
positioning the last deck board in place, secure the board
by angling a screw through the clip and into the board at
a 30˚- 45˚ angle. Be careful to make sure the screw inserts
fully and pulls the board down (2). When thickness of rim
joist exceeds 11/2" (4 cm), End Clips should be secured to
the outer edge of the joist. Space no more than 12" (30 cm)
apart.
2
Using Two Deck Boards As Fascia
(approximately 111/8" (28 cm) of fascia coverage)
1. Secure the outermost deck board using the End Clip with
the longer leg secured into the rim joist, and spaced no
more than 12" (30 cm) apart (3).
2. Size and cut the first fascia/deck board, allowing for
1/4" (6 mm) clearance from the wall or other permanent
structures.
3. Insert the fascia/deck board over the upper half of the
rim joist and into the End Clips.
4. Secure the lower edge of the deck board with
ArmorGuard Hidden Deck Fasteners spaced no more
than 12" (30 cm) apart. Tip: Use a field-made jig or clamp
to keep the fascia/deck board fully engaged during
installation.
5. Attach End Clips to the underside of the rim joist, spaced
no more than 12" (30 cm) apart (4).
4
6. Insert the lower deck board into the ArmorGuard Hidden
Deck Fasteners, and secure the board by fully inserting
a screw at an angle through the End Clip and into the
board, making sure to draw the board tight (Figure 5).
7. Continue around entire fascia surface.
5
7
For the most up-to-date instructions, visit VerandaDeck.com.
Hidden Fastener Installation
The ArmorGuard Hidden Fastener is a deck fastening
system designed specifically for grooved (GV) deck boards,
and is a fast and simple way to create a smooth deck
surface, uninterrupted by visible screws or nails.
5. Secure the first deck board by face-fastening with a
stainless steel or high quality composite decking screw
in each pre-drilled hole. Do not over-tighten screws.
6. On opposite side of first deck board, insert a
ArmorGuard Hidden Fastener into the side groove of the
board at every support joist (single tab first). The single
tab should engage the deck board by a minimum of
5/16" (1 cm) (8-10). Center the screw hole on the joist.
To secure the ends of two boards use the Butt Joint
fastener as shown below. (7B)
7. Install a screw (provided with the fasteners) through the
hole in the ArmorGuard Hidden Fastener into the center
of each support joist. Angle the fastener toward the first
deck board (8). Do not over-tighten screws.
8. Position the next deck board against the fastener tabs
and slide the board onto the tabs. If necessary, slightly
lift the outer edge of the board to ease the assembly of
the board onto the fastener tabs (8-9). When installed
properly, the fastener will ensure a 3/16" (5 mm) gap
(10).
CAUTION: Contains parts with sharp edges. Use proper
care. Use of gloves is recommended.
Initial Installation of Deck Boards
1. Refer to figure 6 - typical joist spacing is 16" (41 cm)
o.c.. Diagonal installations typically require 12" (30 cm)
o.c.. 1/4" (6 mm) spacing from any permanent structure
(wall or post) is required. Side board spacing: 3/16" (5
mm); between board and any permanent structure or
post 1/4" (6 mm). Between board ends: at temperatures
up to 30°F (-1C°) space 1/4" (6 mm); at 50°F (10°C)
space 3/16" (5 mm); at 70°F (21°C) space 1/8" (3 mm);
at 90°F (32°C) space 1/16" (2 mm); at temps over
110°F (43°C) space 1/32" (1 mm). ArmorGuard Hidden
Fasteners are not to be used on stair treads. (Stair
treads require the use of Fiberon square-edge boards
and must be surface fastened/screwed).
Typical residential joist
spacing is 16" (41 cm) o.c..
For diagonal applications 12"
(31 cm) o.c.. Always check
local building codes before
construction.
Ledger Board
Structural Joist
Rim Joist
8
Preparation
16" O.C.*
Permanent Structure
6
Structural Joist
7
First Board
Deck
Board
A
Permanent Structure
B
Rim Joist
2. Requires 6" (15 cm)
of unobstructed
airflow. See
deck ventillation
information page 9.
3. Position the first
deck board on the
support joists. Leave
a 1/4" (6 mm) gap
from any permanent
structure (7).
4. Pre-drill the first deck
board with a 1/8" (3
mm) drill bit along
the outside edge of
the board at every
support joist. To
prevent cracking of
the board, the holes
at the end of the
board should be a
minimum of 11/2" (4
cm) from the board
end. The holes along
the grooved edge of
the board should be
a minimum of 1" (3
cm) from the board
side.
Line Fastener Installation
9
10
9. Repeat steps 6 - 8 for each deck board.
10. Position the final deck board onto the last set of
ArmorGuard Hidden Fasteners. For face fastening, to
ensure a consistent gap between boards, predrill the
final deck board with a 1/8" (3 mm) drill bit along the
outside edge of the board at every support joist. The
holes at the end of the board should be a minimum
of 11/2" (4 cm) from the board end. The holes along
the grooved edge of the board should be a minimum
of 1" (3 cm) from the board side. See ArmorGuard for
installing hidden fastener end clips around the perimeter
of the deck for a fastener-free surface.
11. Secure the final deck board by fastening a minimum
#8 x 2 1/2" (6 cm minimum) long stainless steel or
composite deck screw in each pre-drilled hole. Do not
over-tighten screws.
Fastener
For the most up-to-date instructions, visit VerandaDeck.com.
VER-0036-LIT 3/14
HORIZON
®
VerandaDeck.com
800.566.3337 (800.HomeDepot)