1
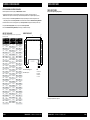
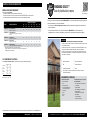
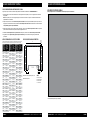
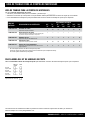
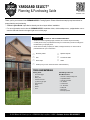
YARDGARD SELECT™
Planning & Purchasing Guide
Scan to view
installation video
Thank you for your interest in the YARDGARD SELECT™ Fencing System. Please follow these step-by-step instructions for
proper planning and purchasing.
• A Fence Layout Guide is provided to sketch your fence layout before installation.
• For more information and to view the YARDGARD SELECT™ installation video, visit homedepot.com, yardgardselect.com or scan the QR-code found in the upper right corner of this page.
IMPORTANT
AS PART OF THE PLANNING PROCESS...
• Check local codes regarding height, locations, etc. Permits may be necessary.
• Consult plat of survey or professional surveyor to ensure that your fence footings are located within your property lines.
• Check with local utility company for cables, underground lines, etc. A check list is provided below for your convenience.
£
Electricity Cable
£
Sprinkler System
£
Gas
£
TV/Internet Cable
£
Sewer Pipe
£
Water
£
Others (List your own check list at the note area below.)
TOOLS AND MATERIALS
Setting Posts
•
•
•
•
•
•
•
•
Post Hole Digger
Shovel
Mixing Tub
Fast Set Concrete (1) 50 lb bag per post
Tape Measure
String
Stakes
Level
Assembling Frame and
Wire Mesh Panels
•
•
•
•
•
•
•
•
•
Hacksaw or Reciprocating Saw
Adjustable Wrench
Channel-Lock Pliers
1/8˝ Drill Bit
Cordless Drill
1/4˝ Nut Driver
Phillips Bit
Wire Cutter
Black Spray Paint
© 2014 Midwest Air Technologies, Inc • 6700 Wildlife Way. Long Grove, IL 60047 • Customer Service: 800-628-8815
PLANNING & PURCHASING GUIDE
FENCE LAYOUT GUIDE
FENCE LAYOUT GUIDE
STEPS FOR PLANNING YOUR FENCE INSTALLATION
Follow the steps below to successfully plan your YARDGARD SELECT™ installation.
Draw your fence layout using the grid below.
1. Measure the length and width of your fence installation, making sure you are at least 4˝ inside of the property line.
NOTE: At least 4˝ is required for concrete footings to be placed an adequate distance from an adjacent neighbor’s property.
2. Draw your fence layout on the Fence Layout Guide with each square representing one foot. Write the length next to each corresponding fence line on the Fence Layout Guide. This information will be used later on the Material Purchasing Worksheet.
3. Mark the location for all corner, end, and gate posts on your Fence Layout Guide. The gate posts should always be 48˝ apart.
4. Using the Line Post Spacing Guide, mark your line posts on the Fence Layout Guide.
5. Next, use the Material Purchasing Worksheet (found on Page 4) to determine what to buy.
LINE POST SPACING GUIDE
SAMPLE FENCE LAYOUT
Determine line post spacing by measuring from corner, end, or gate post to the next
corner, end, or gate post.
8 ft.
N/A
39 ft.
7 ft. 9 in.
70 ft.
7 ft. 9 in.
9 ft.
10 ft.
4 ft. 6 in.
40 ft.
8 ft.
71 ft.
7 ft. 10 in.
5 ft.
41 ft.
6 ft. 10 in.
72 ft.
8 ft.
11 ft.
5 ft. 6 in.
42 ft.
7 ft.
73 ft.
7 ft. 4 in.
12 ft.
6 ft.
43 ft.
7 ft. 2 in.
74 ft.
7 ft. 5 in.
13 ft.
6 ft. 6 in.
44 ft.
7 ft. 4 in.
75 ft.
7 ft. 6 in.
14 ft.
7 ft.
45 ft.
7 ft. 6 in.
76 ft.
7 ft. 8 in.
15 ft.
7 ft. 6 in.
46 ft.
7 ft. 8 in.
77 ft.
7 ft. 9 in.
16 ft.
8 ft.
47 ft.
7 ft. 10 in.
78 ft.
7 ft. 10 in.
17 ft.
5 ft. 8 in.
48 ft.
8 ft.
79 ft.
7 ft. 11 in.
18 ft.
6 ft.
49 ft.
7 ft.
80 ft.
8 ft.
19 ft.
6 ft. 4 in.
50 ft.
7 ft. 2 in.
81 ft.
7 ft. 5 in.
20 ft.
6 ft. 8 in.
51 ft.
7 ft. 4 in.
82 ft.
7 ft. 6 in.
21 ft.
7 ft.
52 ft.
7 ft. 5 in.
83 ft.
7 ft. 7 in.
22 ft.
7 ft. 3 in.
53 ft.
7 ft. 7 in.
84 ft.
7 ft. 8 in.
23 ft.
7 ft. 8 in.
54 ft.
7 ft. 9 in.
85 ft.
7 ft. 9 in.
24 ft.
8 ft.
55 ft.
7 ft. 10 in.
86 ft.
7 ft. 10 in.
25 ft.
6 ft. 3 in.
56 ft.
8 ft.
87 ft.
7 ft. 11 in.
26 ft.
6 ft. 6 in.
57 ft.
7 ft.
88 ft.
8 ft.
27 ft.
6 ft. 9 in.
58 ft.
7 ft. 3 in.
89 ft.
7 ft. 5 in.
28 ft.
7 ft.
59 ft.
7 ft. 5 in.
90 ft.
7 ft. 6 in.
29 ft.
7 ft. 3 in.
60 ft.
7 ft. 6 in.
91 ft.
7 ft. 7 in.
30 ft.
7 ft. 6 in.
61 ft.
7 ft. 8 in.
92 ft.
7 ft. 8 in.
31 ft.
7 ft. 9 in.
62 ft.
7 ft. 9 in.
93 ft.
7 ft. 9 in.
32 ft.
8 ft.
63 ft.
7 ft. 10 in.
94 ft.
7 ft. 10 in.
33 ft.
6 ft. 8 in.
64 ft.
8 ft.
95 ft
7 ft. 11 in.
34 ft.
6 ft. 9 in.
65 ft.
7 ft. 3 in.
96 ft.
8 ft.
35 ft.
7 ft.
66 ft.
7 ft. 4 in.
97 ft.
7 ft. 6 in.
36 ft.
7 ft. 6 in.
67 ft.
7 ft. 5 in.
98 ft.
7 ft. 6 in.
37 ft.
7 ft. 5 in.
68 ft.
7 ft. 7 in.
99 ft.
7 ft. 4 in.
38 ft.
7 ft. 6 in.
69 ft.
7 ft. 8 in.
100 ft.
7 ft. 8 in.
PAGE 2 CP
40´
Set Line
Posts Apart
Property Line
L
L
L
L
L
CP
L
L
L
L
L
L
L
L
CP
EP
HOUSE
8´
Total linear feet (including gate): 144´
Total number of posts: 21
EP
48˝ Walk
Gate
GP GP
2´
4´
40´
Set Line
Posts Apart
Corner,
END, Or
GATE Post
Spacing
Property Line
Set Line
Posts Apart
Corner,
END, Or
GATE Post
Spacing
Property Line
Corner,
END, Or
GATE Post
Spacing
Property
Line
Stake
48´
CP
2´
KEY
CP = Corner Post
EP = End Post
GP = Gate Post
L = Line Post
Each square represents one square foot.
YARDGARD SELECT™ - PLANNING & PURCHASING GUIDE
YARDGARD SELECT™ - PLANNING & PURCHASING GUIDE
PAGE 3
MATERIAL PURCHASING WORKSHEET
YARDGARD SELECT™
Guía de planificación y compra
MATERIAL PURCHASING WORKSHEET
Using your Fence Layout Guide:
• Calculate the total linear feet for your installation and write here. - __________
• Select the column that corresponds to your total linear feet to determine the number of cartons needed.
• Use the Post Hardware Calculator to determine the number of Post Hardware Kits required.
LINEAR FEET OF FENCING
Item #
Material Description
1000-035-156
1000-034-742
1000-034-747
1000-034-736
1000-034-737
49´ 72´
73´ 96´
97´ 120´
121´ 144´
145´ 168´
169´ 192´
193´ 216´
Fence Framework*
provides 24´ of Framework.
3
4
5
6
7
8
9
Post Hardware Kit
–
–
–
–
–
–
–
Tension Wire
1
1
1
1
1
1
2
Fence Panels
3
4
5
6
7
8
9
Auto Close Gate
1
1
1
1
1
1
1
provides all the necessary fittings for a Corner, End, or
Gate Post.
provides 200´ of Tension Wire.
provides 24´ of Fence Panels.
provides 1 Walk Gate with all the necessary hardware.
* Three posts are included in each Fence Framework Carton.
Count the number of posts to confirm if you have enough posts to complete the job.
Additional posts are sold separately.
Escanee para ver el
video de instalación
Gracias por su interés en el Sistema de Vallado YARDGARD SELECT™. Por favor, siga estas instrucciones paso a paso para
realizar una planificación y una compra adecuadas.
• Se proporciona una Guía de disposición de la valla para dibujar un boceto de la disposición de su valla antes de
realizar la instalación.
• Para obtener más información y ver el video de instalación de YARDGARD SELECT™, visite homedepot.com o yardgardselect.com, o escanee el código QR que se encuentra en la esquina superior derecha de esta página.
IMPORTANTE
COMO PARTE DEL PROCESO DE PLANIFICACIÓN...
• Consulte los códigos locales en relación con la altura, las ubicaciones, etc. Es posible
que se necesiten permisos.
• Consulte el plano parcelario o a un topógrafo profesional para asegurase de que los
cimientos de su valla estén ubicados dentro de las líneas de su propiedad.
• Consulte a la compañía local de servicios públicos para averiguar la ubicación de
cables, tuberías subterráneas, etc. A continuación se proporciona una lista de verificación para su conveniencia.
POST HARDWARE KIT CALCULATOR
Use the Post Hardware Kit Calculator to determine the number of Post Hardware Kits required.
# of posts
Corner Post
(CP)
End Post
(EP)
Gate Post
(GP)
£
£
£
x2
x1
x1
Boxes (Add CP + EP + GP)
Total
£
£
£
£
£
Cable de electricidad
£
Sistema de aspersores
£
Gas
£
Cable de TV/Internet
£
Tubería de alcantarillado
£
Agua
£
Otros (prepare su propia lista de verificación en el área de notas que se
encuentra más adelante.)
HERRAMIENTAS Y MATERIALES
Instalación de los postes
•
•
•
•
•
•
•
•
Ahoyador para postes
Pala
Cubeta para mezclar
Concreto de fraguado rápido:
(1) saco de 50 lb por poste
Cinta métrica
Cordel
Estacas
Nivel
Ensamblaje del armazón y los paneles
de malla de alambre
•
•
•
•
•
•
•
•
•
Sierra para metales o sierra alternativa
Llave ajustable
Alicates ajustables
Broca taladradora de 1/8 de pulgada
Taladro inalámbrico
Aprietatuercas de 1/4 de pulgada
Broca Phillips
Cortador de alambre
Pintura negra en aerosol
Fencing installation instructions can be found in all fence kit boxes and online at www.homedepot.com or www.yardgardselect.com.
PAGE 4 YARDGARD SELECT™ - PLANNING & PURCHASING GUIDE
™
YARDGARD
SELECT
- Air
GUÍA
DE PLANIFICACIÓN
Y COMPRA
PÁGINA 5
© 2014
Midwest
Technologies,
Inc • 6700 Wildlife
Way. Long Grove, IL 60047 • Servicio al cliente: 800-628-8815
GUÍA DE PLANIFICACIÓN Y COMPRA
GUÍA DE DISPOSICIÓN DE LA VALLA
GUÍA DE DISPOSICIÓN DE LA VALLA
PASOS PARA PLANIFICAR LA INSTALACIÓN DE SU VALLA
Siga los pasos que se indican a continuación para planificar exitosamente la instalación de su YARDGARD SELECT™.
Dibuje la disposición de su valla utilizando la cuadrícula que aparece a continuación.
1. Mida la longitud y la anchura de la instalación de su valla, asegurándose de que esté por lo menos 4 pulgadas dentro de la línea de propiedad.
NOTA: Se requieren por lo menos 4 pulgadas para que los cimientos de concreto se coloquen a una distancia adecuada de la
propiedad del vecino colindante.
2. Dibuje la disposición de su valla en la Guía de disposición de la valla de manera que cada cuadrado represente un pie. Anote la
longitud junto a cada línea de valla correspondiente en la Guía de disposición de la valla. Esta información se usará más tarde en
la Hoja de trabajo para la compra de materiales.
3. Marque la ubicación de todos los postes de esquina, de extremo y de portón en su Guía de disposición de la valla. Los postes de
portón bidireccional deberán estar separados siempre 48 pulgadas uno de otro.
4. Utilizando la Guía de separación de los postes de línea, marque sus postes de línea en la Guía de disposición de la valla.
5. Seguidamente, use la Hoja de trabajo para la compra de materiales (que se encuentra en la Página 4) para determinar qué comprar.
GUÍA DE SEPARACIÓN DE LOS POSTES DE LÍNEA
DISPOSICIÓN DE UNA VALLA DE MUESTRA
Determine la separación entre los postes de línea midiendo desde un poste de esquina,
de extremo o de portón hasta el siguiente poste de esquina, de extremo o de portón.
Estaca de
la línea de
propiedad
48´
Línea de propiedad
SEPARACIÓN
ENTRE LOS
POSTES DE
ESQUINA, DE
EXTREMO O
DE PORTÓN
Instale
los postes
de línea
separándolos
SEPARACIÓN
ENTRE LOS
POSTES DE
ESQUINA, DE
EXTREMO O
DE PORTÓN
Instale
los postes
de línea
separándolos
SEPARACIÓN
ENTRE LOS
POSTES DE
ESQUINA, DE
EXTREMO O
DE PORTÓN
Instale
los postes
de línea
separándolos
8 ft.
N/A
39 ft.
7 ft. 9 in.
70 ft.
7 ft. 9 in.
9 ft.
4 ft. 6 in.
40 ft.
8 ft.
71 ft.
7 ft. 10 in.
10 ft.
5 ft.
41 ft.
6 ft. 10 in.
72 ft.
8 ft.
11 ft.
5 ft. 6 in.
42 ft.
7 ft.
73 ft.
7 ft. 4 in.
12 ft.
6 ft.
43 ft.
7 ft. 2 in.
74 ft.
7 ft. 5 in.
13 ft.
6 ft. 6 in.
44 ft.
7 ft. 4 in.
75 ft.
7 ft. 6 in.
14 ft.
7 ft.
45 ft.
7 ft. 6 in.
76 ft.
7 ft. 8 in.
15 ft.
7 ft. 6 in.
46 ft.
7 ft. 8 in.
77 ft.
7 ft. 9 in.
16 ft.
8 ft.
47 ft.
7 ft. 10 in.
78 ft.
7 ft. 10 in.
17 ft.
5 ft. 8 in.
48 ft.
8 ft.
79 ft.
7 ft. 11 in.
18 ft.
6 ft.
49 ft.
7 ft.
80 ft.
8 ft.
19 ft.
6 ft. 4 in.
50 ft.
7 ft. 2 in.
81 ft.
7 ft. 5 in.
20 ft.
6 ft. 8 in.
51 ft.
7 ft. 4 in.
82 ft.
7 ft. 6 in.
21 ft.
7 ft.
52 ft.
7 ft. 5 in.
83 ft.
7 ft. 7 in.
22 ft.
7 ft. 3 in.
53 ft.
7 ft. 7 in.
84 ft.
7 ft. 8 in.
PX = Poste de extremo
23 ft.
7 ft. 8 in.
54 ft.
7 ft. 9 in.
85 ft.
7 ft. 9 in.
PP = Poste de portón
24 ft.
8 ft.
55 ft.
7 ft. 10 in.
86 ft.
7 ft. 10 in.
25 ft.
6 ft. 3 in.
56 ft.
8 ft.
87 ft.
7 ft. 11 in.
26 ft.
6 ft. 6 in.
57 ft.
7 ft.
88 ft.
8 ft.
27 ft.
6 ft. 9 in.
58 ft.
7 ft. 3 in.
89 ft.
7 ft. 5 in.
28 ft.
7 ft.
59 ft.
7 ft. 5 in.
90 ft.
7 ft. 6 in.
29 ft.
7 ft. 3 in.
60 ft.
7 ft. 6 in.
91 ft.
7 ft. 7 in.
30 ft.
7 ft. 6 in.
61 ft.
7 ft. 8 in.
92 ft.
7 ft. 8 in.
31 ft.
7 ft. 9 in.
62 ft.
7 ft. 9 in.
93 ft.
7 ft. 9 in.
32 ft.
8 ft.
63 ft.
7 ft. 10 in.
94 ft.
7 ft. 10 in.
33 ft.
6 ft. 8 in.
64 ft.
8 ft.
95 ft
7 ft. 11 in.
34 ft.
6 ft. 9 in.
65 ft.
7 ft. 3 in.
96 ft.
8 ft.
35 ft.
7 ft.
66 ft.
7 ft. 4 in.
97 ft.
7 ft. 6 in.
36 ft.
7 ft. 6 in.
67 ft.
7 ft. 5 in.
98 ft.
7 ft. 6 in.
37 ft.
7 ft. 5 in.
68 ft.
7 ft. 7 in.
99 ft.
7 ft. 4 in.
38 ft.
7 ft. 6 in.
69 ft.
7 ft. 8 in.
100 ft.
7 ft. 8 in.
40´
L
L
L
L
PE
L
L
L
L
L
L
L
PE
PX
CASA
8´
40´
Línea de propiedad
L
Línea de propiedad
PÁGINA 6 PE
L
Portón
bidireccional de
48 pulgadas
PX
PE
PP PP
2´
4´
2´
Pies lineales totales (incluyendo el portón): 144´
CLAVE
Número total de postes: 21
PE = Poste de esquina
L = Poste de línea
Cada cuadrado representa un pie cuadrado.
YARDGARD SELECT™ - GUÍA DE PLANIFICACIÓN Y COMPRA
YARDGARD SELECT™ - GUÍA DE PLANIFICACIÓN Y COMPRA
PÁGINA 7
HOJA DE TRABAJO PARA LA COMPRA DE MATERIALES
HOJA DE TRABAJO PARA LA COMPRA DE MATERIALES
Uso de su Guía de disposición de la valla:
• Calcule los pies lineales totales para su instalación y anótelos aquí. - __________
• Seleccione la columna que corresponda a sus pies lineales totales para determinar el número de cajas que se necesitan.
• Use la Calculadora de herrajes de poste para determinar el número de Kits de herrajes de poste que se requieren.
PIES LINEALES DE VALLA
Núm. de
artículo
Descripción de los materiales
1000-035-156
1000-034-742
49´ 72´
73´ 96´
97´ 120´
121´ 144´
145´ 168´
169´ 192´
193´ 216´
Armazón de valla*
proporciona 24 pies de armazón.
3
4
5
6
7
8
9
Kit de herrajes de poste
–
–
–
–
–
–
–
1
1
1
1
1
1
2
3
4
5
6
7
8
9
1
1
1
1
1
1
1
proporciona todos los acoplamientos necesarios para
un poste de esquina, de extremo o de portón.
1000-034-747
Alambre tensor
proporciona 200 pies de alambre tensor.
1000-034-736
1000-034-737
Paneles de valla
proporciona 24 pies de paneles de valla.
Portón de cierre automático
proporciona 1 portón bidireccional con todos los herrajes necesarios.
* En cada caja de armazón de valla se incluyen tres postes.
Cuente el número de postes para confirmar si tiene suficientes para completar el trabajo.
Se venden postes adicionales por separado.
CALCULADORA DEL KIT DE HERRAJES DE POSTE
Utilice la Calculadora del kit de herrajes de poste para determinar el número de Kits de herrajes de poste que se requieren.
Poste de
esquina (PE)
Poste de
extremo (PX)
Poste de
portón (PP)
Núm. de
postes
Total
£
£
£
£
£
£
x2
x1
x1
Cajas (Sume PE + PX + PP)
£
Las instrucciones de instalación de vallas se pueden encontrar en todas las cajas de kits de vallas y en Internet en
www.homedepot.com o www.yardgardselect.com.
PÁGINA 8 YARDGARD SELECT™ - GUÍA DE PLANIFICACIÓN Y COMPRA