1
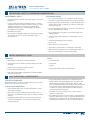
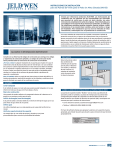
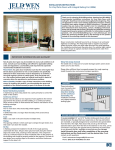
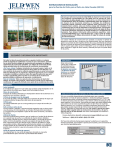
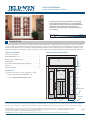
CARE & MAINTENANCE Interior & Exterior Doors (JCM005) This guide provides important information that will help keep wood, fiberglass and steel doors looking beautiful and operating smoothly for many years while maintaining warranty coverage. Regular inspections and minor maintenance are the best ways to keep these products in good condition. Do-It-YourselfTechnician INTRODUCTION For optimal performance, new primed or unfinished products should be finished or painted with an even number of coats on all six sides as soon as possible after installation. Finishing is necessary because by nature, door construction materials are susceptible to the elements and changes in moisture levels can cause damage. Painting and finishing seals the surfaces, maintains, protects and enhances the beauty of the product by keeping it less susceptible to debris and easier to clean. Keeping doors properly finished is the first step in effective maintenance. TABLE OF CONTENTS DOOR & DOOR SYSTEM PARTS Precautions and Safety. . . . . . . . . . . . . . . . . . . . . . . . . . . . . . . 2 Needed Materials & Tools . . . . . . . . . . . . . . . . . . . . . . . . . . . . 2 Basic Inspections & Maintenance. . . . . . . . . . . . . . . . . . . . . . . 2 Lite Cleaning Glass. . . . . . . . . . . . . . . . . . . . . . . . . . . . . . . . . . . . . . 4 Door Surface Cleaning & Hardware Lubrication. . . . . . . . . . . 4 Glossary. . . . . . . . . . . . . . . . . . . . . . . . . . . . . . . . . . . . . . . . . . . 5 Transom Inspection Checklist . . . . . . . . . . . . . . . . . . . . . . . . . . . . . . . . . 6 Rail Mull post CONTACT US For questions, feel free to contact us by phone or email: Lite • Email: [email protected] Lite • Phone: 1-(800)-JELD-WEN/1-(800)-535-3936 Lite Rail Stile Mullion Panel Panel Brickmould Rail Sidelight Sweep Sill The advice offered herein can be done by a homeowner with some mechanical aptitude. If you are unsure, it is recommended that you hire a trained service provider such as a competent and licensed construction contractor or building professional. JELD-WEN disclaims any and all liability associated with the use and/or provision of these instructions. Any reliance upon the information or advice is at the risk of the party so relying. The information contained herein may be changed from time to time without notification. ©2011 JELD-WEN, inc.; This publication and its contents are owned by JELD-WEN, inc. and are protected under the U.S. Copyright Act and other intellectual property laws. All trademarks, service marks, logos and the like (whether registered or unregistered) are owned or controlled by JELD-WEN, inc. or others. Unauthorized use or duplication of JELD-WEN intellectual property is prohibited. JELD-WEN reserves the right to change product specifications without notice. Please check our web site, jeld-wen.com, for current information. (11/11) CARE & MAINTENANCE Interior & Exterior Doors (JCM005) PRECAUTIONS, SAFETY & CLEANING RECOMMENDATIONS PRECAUTIONS & SAFETY RECOMMENDATIONS • Never mix cleaners or solvents. This may be dangerous as well as ineffective. • Do not power-wash doors or use a garden hose; this can cause seal failure in glass units and allow water to enter the structure. • If using commercial cleaning or finishing products or solvents, carefully read and follow safety instructions, warnings, cautions and disposal instructions on manufacturer’s labels. Wear appropriate safety gear (e.g. clothing, goggles, gloves) and provide plenty of ventilation. • Avoid using metal tools, razor blades, or other sharp objects and abrasive cleaners. They can damage door surfaces, scratch glass and remove coatings. • Immediately clean spills. • Most solvents are flammable and/or toxic and must be handled with extreme care. Do not use near open flame, sparks, or electrical motors. • Do not allow aggressive cleaners to come into contact with door surfaces. Immediately rinse and dry. • Do not allow cleaners to puddle or collect at glass edges near glazing materials. • Avoid cleaning in direct sunlight or in temperatures too hot or too cold. • Avoid excessive rubbing and over-cleaning. • Do not scour. • Clean and rinse one area at a time. • Clean twice a year (monthly in coastal areas) or when dirty. • After-market tints and films are not recommended on glass, as they may cause damage to the glass and/or sealant. NEEDED MATERIALS & TOOLS MATERIALS TOOLS • Baby shampoo or mild soap, or vinegar, and water • Soft bristle brush • Several clean, soft, non-abrasive, absorbent lint-free dry cloths (cleaning) • Spray bottle • Commercial glass cleaning products or solvents • Sponge • Plastic putty knife (for paint or label removal) • Plastic wrap (for label removal) • High quality sealant (100% polyurethane if painted and 100% silicone if left exposed) BASIC INSPECTIONS & MAINTENANCE GUTTERS & OVERHANGS Gutters and overhangs protect doors from excess exposure to water. Clear at least once a year or as necessary. SLAB & FRAME INSPECTION • Inspect annually (due to the corrosive environment of coastal areas, inspect monthly). • Inspect stiles and rails for damage (excessive warp, cracks or splits in wood or fiberglass surfaces, dents or scratches in metal surfaces). • Immediately repair scratches or cracks in painted or finished surfaces. Re-finish surfaces as necessary when finishes fade, crack, peel, split etc. 2 • Inspect stile and rail wood doors for crooked panels and/or mullions. These can be gently tapped with a wood block and rubber mallet until straight. Panels can also develop “light lines” around the perimeter from shrinkage. These areas should be touched up with a matching finish. Allowing the door to “condition” in a warm, dry environment for 24 hours before touch up will yield the best results. • Check glass for cracks. If cracked, call us or your local glass supplier for replacement. • For insulating glass units, look for moisture or fogging between glass panes (most likely to occur on cold mornings). This may be an indication of seal failure. See our Seal Failure Document at www.jeld-wen.com/resources or call us for recommendations. CARE & MAINTENANCE Interior & Exterior Doors (JCM005) BASIC INSPECTIONS & MAINTENANCE – CONTINUED WEATHERSTRIP & SWEEP INSPECTION Foam Wedge Inspection Inspecting and maintaining weatherstrip can help avoid costly structural damage from water leakage and energy loss due to air and/or water infiltration. Replace weatherstrip, that has gaps or is missing, torn, cracked, brittle, discolored, gummy, or that has no “bounce back” when pressed down. A foam wedge should be installed at each lower corner where the door slab is when it's closed. If the foam wedge is torn or missing, call us for a replacement. Precautions Foam wedge • Solvents such as mineral spirits or petroleum-based products may damage or dissolve weatherstrip. • When using alcohol, always test small area first to avoid product damage. • Do not allow solvents or silicone to touch surfaces around weatherstrip. • Do not use abrasives, sanders, or anything sharp near weatherstrip. Light Cleaning 1. Clean with damp cloth or mild soap and water. 2. Rinse and dry thoroughly. 3. Repeat if necessary. Non Water-Soluble Cleaning Clean with denatured alcohol on soft cloth. Test on inconspicuous area first. If denatured alcohol doesn’t work: 1. Clean with small amount of lacquer thinner on soft cloth. Follow all instructions and do not get lacquer thinner on fiberglass. BLINDS BETWEEN THE GLASS For easiest operation, keep the slats in a fully open position while operating. Adjustments 1. If the operator comes off of the track, hold the operator at a sharp angle to the glass and reinsert the two legs under the track opening. 2. Re-couple the operator magnets. Re-couple operator magnets 1. Slide the operator until the first click. 2.Full travel blinds will fully engage when you hear the first click. Half travel (those units with a single side operation) will require you to continue moving the operator up until you hear the second click. This will ensure the magnets are fully engaged. 2. Repeat if necessary. 3. Clean with mild soap and water, then rinse. If unsuccessful, consider replacing weatherstrip. Weatherstrip Repair If weatherstrip is loose or falling out of the kerf: 1. Carefully remove weatherstrip. 2. Apply thin bead of silicone sealant into kerf. 3. Reinstall weatherstrip. 4. Hold in place with tape for 24 hours. 5. Carefully remove tape. Sweep Inspection Visually inspect the sweep for tears and missing Door components. If the sweep is sweep damaged, consider replacing it. See our product guide for replacement instructions. When the door is closed, the sweep should be compressed by the threshold Threshold by approximately 1/8". If the threshold has screws visible on the top, it can be adjusted by turning the adjustment screws on the threshold clockwise to lower the threshold or counterclockwise to raise it. Adjust each screw until the threshold applies uniform compression on the sweep. 3 EXTERIOR SIDING & PRODUCT SEALANT JOINTS A proper seal of the joints in the door system and between the door and the exterior surface of the structure will provide a proper shield from the elements and will keep water and/or air from leaking into the house. 1.Inspect sealant in the joints for: • Cracks Sealant • Voids • Deteriorating areas (e.g. loss of adhesion) 2.Repair damaged sealant with a best quality sealant. Note! Do not apply sealant to areas where installer or contractor did not originally seal. Seek professional advice from an installer or contractor if unsure. When repairing a sealant joint, 100% silicone sealant is the most durable, but it cannot be painted. Use 100% polyurethane sealant if painted. Follow sealant manufacturer’s instructions for proper application. CARE & MAINTENANCE Interior & Exterior Doors (JCM005) CLEANING GLASS GENERAL CLEANING LABEL REMOVAL Prepare cleaning solution (1 tsp. baby shampoo to one gallon of water or 1 1/2 cups vinegar to one gallon of water). Slowly peel from one corner. If label tears or sticks, moisten with soapy water and gently scrape with plastic putty knife. Stubborn labels can be soaked with soapy water and covered overnight with plastic wrap. Gently remove with plastic putty knife. 1. Rinse surface with clean water from top to bottom. 2. Clean with mild soap and water and sponge or soft brush with uniform pressure horizontally, then vertically. 3. Promptly rinse thoroughly with clean water (sponging while rinsing may be helpful; do not allow cleaning solution to dry on the surface or collect and puddle). 4. Wipe dry with lint-free dry cloth. 5. If necessary, repeat steps above until clean. 6. Dry door with separate cloth. PAINT REMOVAL 1. Soak dried latex paint drips with warm water and baby shampoo solution. For oil-based paint, consult a paint professional. 2. Wipe with damp cloth or sponge. If needed, 3. Scrape gently with plastic putty knife. Repeat soak and scrape. 4. Repeat if necessary. STUBBORN STAIN REMOVAL Commercial glass cleaning products may be necessary. • Apply small amount directly to the stain. Avoid spilling or dripping down the glass. • Some persistent stains may need higher strength cleaning solutions that contain active ingredient chemicals such as denatured alcohol or acetone. Special care must be taken when using these types of cleaners. • For oil and grease: try baking soda and water. MORE INFORMATION ON GLASS CLEANING • The Glass Association of North America (GANA): www.glasswebsite.com Note on Web sites! Web site content is subject to change and should be used for informational purposes only. JELD-WEN is not responsible for third-party information. DOOR SURFACE CLEANING & HARDWARE LUBRICATION Cleaning and lubrication help to maintain and restore smooth operation to movable parts such as hinges and locksets and, in most cases, offers some corrosion protection. Clean door surface and maintain hardware any time doors are not opening or closing properly or at least biannually (monthly for coastal areas): • Clean dirt/debris with mild soap and water and rinse clean • Tighten loose screws • Replace damaged hardware Folding doors: Tracks and Bearings Wipe visible track surfaces with a damp soft cloth and a mild detergent, then wipe dry with a clean cloth. Using a suitable applicator spread a small amount of clear petroleum jelly or similar lubricant where the carrier wheels pass so that it is distributed evenly along the track. Place additional lubricant around the bearings. The lubrication reduces wear, improves operation and protects against corrosion. In severe environments, apply a thin film of WD40 . ® PRECAUTIONS The following substances may damage protective finishes. Do not use: Hangers, Pivots and Brackets • Citrus-based cleaners (lemon, etc.) Exposed surfaces should be wiped down with warm soapy water and a soft rag, and then rinsed clean before applying new surface protectant. A light spray application of WD40 , followed by a light wipe with a dry cloth to remove any excess. • Paint removers Hinges • Window cleaners Wipe down the visible surfaces with warm, soapy water and a soft rag, then rinse off and dry by wiping with a clean rag. Application of a thin film of WD40 will help maintain the original luster of the metal finish, and lubricate the moving contact surfaces. Be careful not to get these compounds on any wood components as it may cause staining. For oil-rubbed bronze finish, care should be taken when cleaning or re-applying surface protectant. • Vinegar-based cleaners (use on glass only) ® • Brick/siding washes • Any other industrial or abrasive cleaners 1. Lubricate hinges with light oil (3-InOne oil or equivalent) annually or when noisy. ® 2. Spray keyway lock with graphite lubricant. 4 ® Flushbolts Spray WD40 to the sliding pin inside the bolt and to the lock cylinder. There are access holes or slots on all drop bolts so that this can be completed without removing the locks from the doors. ® CARE & MAINTENANCE Interior & Exterior Doors (JCM005) GLOSSARY Astragal The vertical trim attached to one of the panels of a French door that bridges the gap between the panels when closed to provide weather and overswing protection. Door System An assembly of a door slab and frame where the slab has been pre-hung in the frame. Frame The assembly of structural members (head, sill and jambs) used to fasten the door to the structure. Insulated Glass Unit A sealed assembly of two or more panes of glass separated by a spacer. Kerf A groove that often holds weatherstrip. Keyway The slot in the lock where the key is inserted. Lite A framed piece of glass within the door slab, sidelight or transom. Rail The horizontal pieces of a door slab. Seal Failure The airtight seal between two panes of an insulating glass unit has broken and is usually discovered when excess moisture fogs the inside of the glass panes. Sidelight A fixed, usually rectangular decorative glass component on either side, or both sides of a door system. Slab The operating part of the door system. Stile The vertical pieces of a door slab. Sweep The flexible seal material attached to the bottom of the door slab. Threshold The bottom component of a door system. Transom The decorative glass component installed above the door system. Weatherstrip A strip of material that covers the joint between the door slab and frame and is used to help prevent rain, snow and air from entering. 5 CARE & MAINTENANCE Interior & Exterior Doors (JCM005) INSPECTION CHECKLIST EXTERIOR • Paint or Finish Dirty Cracks, scratches, blisters, fading, flaky other damage • Sealant Joint Cracks, voids, other damage Deterioration, loss of adhesion • Glass (if applicable) Dirty Scratched, cracked, other damage Moisture between Panes (insulating glass only) • Weatherstrip Missing or loose Tears, cracks, other damage Brittle, gummy, discolored No “bounce back” • Gutters Dirty or clogged Damaged Missing • All Product Hardware Dirty or damaged Discolored or tarnished Hinges or locksets loose or need lubrication INTERIOR • Paint or Finish Dirty Scratched, cracked, other damage • Glass (if applicable) Dirty Moisture between Panes (insulating glass only) • All Product Hardware 6 Dirty or damaged Discolored or tarnished Hinges or locksets loose or need lubrication INSPECTION DATE _____/_____/_____ NOTES