1
NBG334W
802.11g Wireless Firewall Router
Quick Start Guide
Version 3.60
6/2007
Edition 1
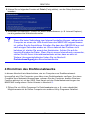
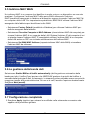
DEFAULT LOGIN
IP Address http://192.168.1.1
Password
1234
CONTENTS
ENGLISH
2
DEUTSCH
12
ESPAÑOL
24
FRANÇAIS
36
ITALIANO
48
SVENSKA
60
Copyright © 2007. All rights reserved.
ENGLISH
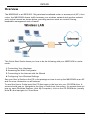
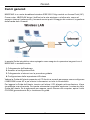
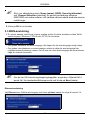
Overview
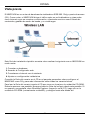
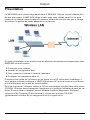
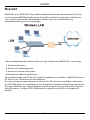
The NBG334W is an IEEE 802.11b/g wireless broadband router or access point (AP). As a
router, the NBG334W directs traffic between your wireless network and another network
such as the Internet as shown below, providing services such as content filtering,
bandwidth management and a firewall.
This Quick Start Guide shows you how to do the following with your NBG334W in router
mode:
1 Connecting Your Hardware
2 Accessing the Web Configurator
3 Connecting to the Internet with the Wizard
4 Configuring Your Wireless Settings
See your User’s Guide on the CD in the package on how to set up the NBG334W as an AP
and for more information on all features.
To read the User’s Guide insert the CD that came in the box into your CD-ROM drive. A
screen should pop up. Navigate to the User’s Guide from this screen. If a screen does not
pop up, open Windows Explorer (click My Computer), click on the CD-ROM drive (usually
drive D:) and navigate to it from there.
2
ENGLISH
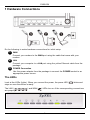
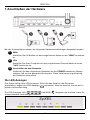
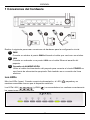
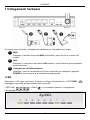
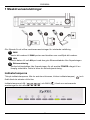
1 Hardware Connections
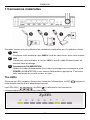
Do the following to make hardware connections for initial setup.
1
WAN
Connect your modem to the WAN port using the cable that came with your
modem.
2
LAN
Connect your computer to a LAN port using the yellow Ethernet cable from the
package.
3
POWER Connection
Use the power adapter from the package to connect the POWER socket to an
appropriate power source.
The LEDs
Look at the LEDs (lights). When you connect the power, the power LED (
stays on once the device is ready.
The LAN (
are properly made.
) and WAN (
) blinks and
) LEDs turn on if the corresponding connections
3
ENGLISH
V
If an LED does not turn on, check your connections. If this doesn’t help,
disconnect the NBG334W from its power source, wait for a few seconds
and turn it back on.
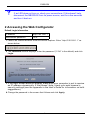
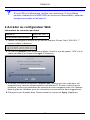
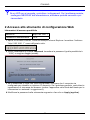
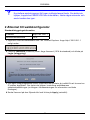
2 Accessing the Web Configurator
Default Login Information
IP address
http://192.168.1.1
administrator password
1234
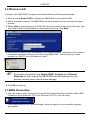
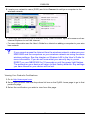
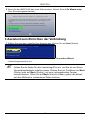
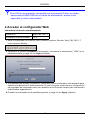
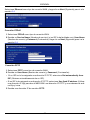
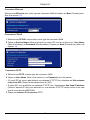
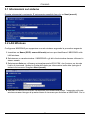
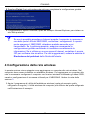
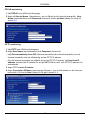
1 Launch an Internet browser such as Internet Explorer. Enter “http://192.168.1.1” as
shown below.
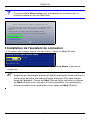
2 The Password window displays. Enter the password (“1234” is the default) and click
Login.
3 If the login screen does not display, make sure your computer is set to receive
an IP address dynamically. If that doesn’t help, check your web browser’s
security settings (see the appendix in the User’s Guide for information on both
suggestions).
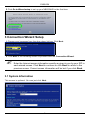
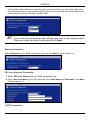
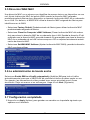
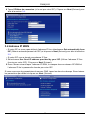
4 Change the password in the screen that follows and click Apply.
4
ENGLISH
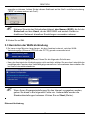
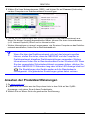
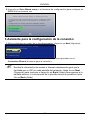
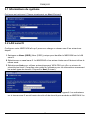
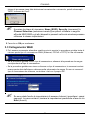
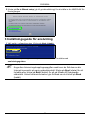
5 Click Go to Wizard setup to set up your NBG334W for the first time
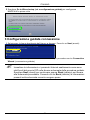
3 Connection Wizard Setup
1 Choose your language from the drop-down list box. Click Next.
2 Click Next in the following screen to proceed with the Connection Wizard.
"
Enter the Internet access information exactly as given to you by your ISP in
each wizard screen. Click Next to continue or click Back to return to the
previous screen. Current screen information will be lost if you click Back.
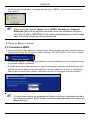
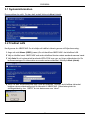
3.1 System Information
This screen is optional. You can just click Next.
5
ENGLISH
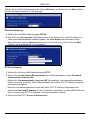
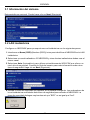
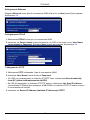
3.2 Wireless LAN
Configure your NBG334W to support a wireless network by following these steps.
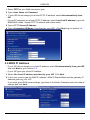
1 Enter a unique Name (SSID) to identify the NBG334W on the wireless LAN.
2 Select a wireless channel. The NBG334W and other wireless clients must use the same
channel.
3 Select Auto to automatically use WPA-PSK which provides a high level of security. See
your User’s Guide for information on other kinds of security. Click Next.
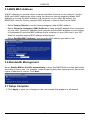
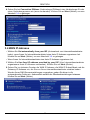
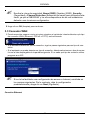
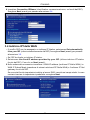
4 Write down the security key that displays in the pop-up screen. Computers on the wireless
network will need this security key to access the NBG334W. The security key is casesensitive so “ABCD” is not the same as “abcd”.
"
Write down the security key, Name (SSID), Security and Channel
Selection for later use as the NBG334W and other devices on your
wireless network must use the same settings.
5 Click OK to continue.
3.3 WAN Connection
1 You may need to wait several minutes while the wizard attempts to detect which WAN
connection type (Ethernet, PPP over Ethernet or PPTP) you are using.
• If the wizard detects your connection type, follow the steps for your connection type as
given below.
6
ENGLISH
• If the wizard cannot detect a connection type, you must select your connection type from
the drop-down list box in the screen below. If you do not know what connection type to use,
check with your Internet Service Provider (ISP).
"
If you were given Internet access settings, type them in the following fields.
Otherwise leave the default settings and click Next.
Ethernet Connection
Select Ethernet as your WAN connection type and click Next to go to section 3.4.
PPP over Ethernet Connection
1 Select PPP over Ethernet as your WAN connection type
2 Type a Service Name (if your ISP gave you one), User Name and Password. Click Next
to go to section 3.4.
PPTP Connection
7
ENGLISH
1 Select PPTP as your WAN connection type.
2 Type a User Name and Password.
• If your ISP did not assign you a fixed PPTP IP address, select Get automatically from
ISP.
• If your ISP assigned you a fixed PPTP IP address, select Use fixed IP address to give the
NBG334W a fixed, unique PPTP IP address and subnet mask.
3 Type a PPTP Server IP Address.
4 Type a Connection ID/Name (if provided by your ISP). Click Next to go to section 3.4.
3.4 WAN IP Address
• If your ISP did not assign you a fixed IP address, select Get automatically from your ISP
and click Next to go to section 3.5.
• If your ISP gave you a fixed IP address:
1 Select Use fixed IP address provided by your ISP. Click Next.
2 In the next screen type the WAN IP address, WAN IP Subnet Mask and the gateway IP
address given by your ISP.
If you were given DNS server settings, type them in the fields. Otherwise leave the default
settings and click Next.
8
ENGLISH
3.5 WAN MAC Address
A MAC address is a number which uniquely identifies a device on any network. Set the
WAN port’s MAC address by either using your device’s factory assigned default MAC
address or cloning the MAC address of a computer on your LAN. By default, the
NBG334W uses the factory assigned MAC address to identify itself on the WAN.
• Select Factory Default to use the factory-assigned, default MAC address.
• Select Clone the Computer’s MAC Address to clone the MAC address from a computer
on your LAN. Type the IP address of the computer with the MAC address you are cloning.
It is advisable to clone the MAC address from a computer on your LAN even if your ISP
does not presently require MAC address authentication.
• Select Set WAN MAC Address if you know the MAC address you want to use.
3.6 Bandwidth Management
Select Enable BM for all traffic automatically to have the NBG334W prioritize data traffic
according to the its use. For example, video streaming may have higher priority than email.
Leave unchecked if unsure. Click Next.
3.7 Setup Complete
1 Click Apply to save your changes in the next screen that appears in the wizard.
9
ENGLISH
2 Click Finish in the screen below to complete the wizard setup.
3 Congratulations. Open a web browser, such as Internet Explorer, to visit your favorite
website.
V
If you cannot access the Internet when your computer is connected to one
of the NBG334W’s LAN ports, check your connections. Then turn the
NBG334W off, wait for a few seconds and turn it back on. If this doesn’t
work run the wizard again, making sure you type the information correctly.
Also, if you are using a new Internet account, contact your ISP to make
sure it is active. See Troubleshooting in the User’s Guide for more
suggestions.
4 Wireless Network Setup
Use this section to add a computer to your wireless network. The computer must have a
wireless adapter installed. To add a computer to your wireless network, you need to
configure your wireless-enabled computer with the same SSID, channel and security
settings as the NBG334W. See the note from section 3.
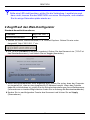
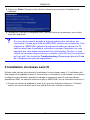
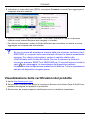
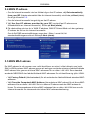
1 Open a wireless adapter utility such as the one shown below. The wireless utility on
your computer may look different from the one shown below.
10
ENGLISH
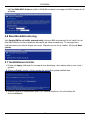
2 Locate your network’s name (SSID) and click Connect to add your computer to the
wireless network.
3 Follow the instructions on your wireless utility. When finished, open a browser such as
Internet Explorer to surf the Internet.
• For more information see the User’s Guide for a tutorial on adding a computer to your wireless network.
V
If you cannot access the Internet from the wireless network, make sure your
NBG334W and the computers on your wireless network are using the same
wireless settings. See the chapter on Wireless LAN in the User’s Guide for
more information. If you do not know what your security key is, press
RESET on your NBG334W for 10 seconds or until the power light flashes.
The settings on your device will return to their factory defaults. Any settings
you have saved on your device will be lost.
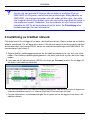
Viewing Your Product’s Certifications
1 Go to http://www.zyxel.com.
2 Select your product from the drop-down list box on the ZyXEL home page to go to that
product's page.
3 Select the certification you wish to view from this page.
11
DEUTSCH
Übersicht
Der NBG334W ist ein drahtloser IEEE 802.11b/g-Breitbandrouter und Access-Point (AP).
Als Router leitet der NBG334W den Datenverkehr zwischen dem Drahtlosnetzwerk und
einem anderen Netzwerk wie dem Internet wie unten dargestellt weiter und bietet Dienste
an wie Inhaltsfilter, Bandbreitenverwaltung und Firewall.
In dieser Kurzanleitung erfahren Sie, wie Sie Folgendes mit Ihrem NBG334W im RouterModus tun können:
1 Anschließen der Hardware
2 Zugreifen auf den Web-Konfigurator
3 Herstellen der Verbindung zum Internet mit dem Assistenten
4 Konfigurieren der Wireless-Einstellungen
Weitere Informationen zu allen Funktionen, z. B., wie Sie den NBG334W als AP
verwenden, finden Sie im Benutzerhandbuch auf der CD.
Um das Benutzerhandbuch zu lesen, legen Sie die enthaltene CD in das CD-ROMLaufwerk Ihres Computers ein. Auf dem Bildschirm erscheint ein Fenster. Rufen Sie über
dieses Fenster das Benutzerhandbuch auf. Sollte dieses Fenster nicht angezeigt werden,
rufen Sie Windows Explorer auf (klicken Sie auf Arbeitsplatz), klicken Sie auf das CDROM-Laufwerk (normalerweise Laufwerksbezeichnung D:), und klicken Sie dann auf die
Datei des Benutzerhandbuchs.
12
DEUTSCH
1 Anschließen der Hardware
Bei der Erstinstallation müssen die folgenden Hardwareverbindungen hergestellt werden.
1
WAN
Schließen Sie Ihr Modem mit dem mitgelieferten Kabel an den "WAN"-Anschluss
an
2
LAN
Schließen Sie Ihren Computer mit dem mitgelieferten Ethernet-Kabel an einen
"LAN"-Anschluss an.
3
Anschließen an das Stromnetz
Schließen Sie das mitgelieferte Netzkabel an den POWER-Anschluss (Netzanschluss) und an eine geeignete Stromquelle. Diese Verbindung ist gleichzeitig
die Powerline-Verbindung.
Die LED-Anzeigen
Das Gerät verfügt über LED-Anzeigen. Wenn Sie das Gerät an das Stromnetz
anschließen, beginnt die LED-Anzeige (
) zu blinken. Wenn es bereit ist, hört sie auf zu
blinken und leuchtet stetig.
Die LED-Anzeigen LAN (
) und WAN (
entsprechenden Verbindungen bestehen.
13
) beginnen zu leuchten, wenn die
DEUTSCH
VSollte
eine LED nicht leuchten, prüfen Sie die Verbindung. Leuchtet sie auch
dann nicht, trennen Sie den NBG334W von seiner Stromquelle, und schalten
Sie ihn einige Sekunden später wieder an.
2 Zugriff auf den Web-Konfigurator
Standard-Anmeldeinformationen
IP-Adresse
http://192.168.1.1
Administratorkennwort
1234
1 Starten Sie einen Internet-Browser, z. B. Internet Explorer. Geben Sie wie unten
dargestellt “http://192.168.1.1” ein.
2 Das Fenster Password (Kennwort) erscheint. Geben Sie das Kennwort ein ("1234" ist
das Standardkennwort), und klicken Sie auf Login (Anmelden).
3 Wenn das Anmeldefenster nicht angezeigt wird, stellen Sie sicher, dass der Computer
so eingestellt ist, dass er eine dynamische IP-Adresse bezieht. Wenn das Problem
dadurch nicht behoben ist, prüfen Sie die Sicherheitseinstellungen Ihres Webbrowsers
(Informationen zu beiden Möglichkeiten finden Sie im Anhang des Benutzerhandbuchs).
4 Ändern Sie im nachfolgenden Fenster das Kennwort und klicken Sie auf Apply
(Übernehmen).
14
DEUTSCH
5 Wenn Sie den NBG334W das erste Mal benutzen, klicken Sie auf Go Wizard setup
(Zum Einrichtungsassistenten).
3 Assistent zum Einrichten der Verbindung
1 Wählen Sie aus dem Listenfeld Ihre Sprache aus. Klicken Sie auf Next (Weiter).
2 Klicken Sie auf Next (Weiter) und fahren Sie mit dem Connection Wizard
(Verbindungsassistent) fort.
"
Geben Sie die Daten für den Internetzugriff so ein, wie Sie sie von Ihrem
Internetdienstanbieter erhalten haben. Klicken Sie zum Fortfahren auf Next
(Weiter) oder auf Back (Zurück), um zum vorhergehenden Fenster
zurückzukehren. Wenn Sie auf Back (Zurück) klicken, gehen alle aktuell
auf dem Bildschirm vorhandenen Daten verloren.
15
DEUTSCH
3.1 Systeminformationen
Dieses Fenster ist optional. Sie können einfach auf Next (Weiter) klicken.
3.2 Wireless-LAN
Führen Sie die folgenden Schritte aus, um den NBG334W so zu konfigurieren, dass er ein
drahtloses Netzwerk unterstützt.
1 Geben Sie einen Namen (SSID) ein, mit dem der NBG334W im Wireless-LAN eindeutig
identifiziert wird.
2 Wählen Sie einen Wireless-Kanal aus. Der NBG334W und andere Wireless-Clients
müssen denselben Kanal verwenden.
3 Wählen Sie Auto (Automatisch), damit für einen hohen Sicherheitsstandard
automatisch WPA-PSK verwendet wird. Informationen zu anderen Arten der Sicherheit
finden Sie im Benutzerhandbuch. Klicken Sie auf Next (Weiter).
4 Notieren Sie sich den Sicherheitsschlüssel, der im Pop-up-Fenster angezeigt wird.
Computer im Drahtlosnetzwerk benötigen diesen Schlüssel, um auf den NBG334W
16
DEUTSCH
zugreifen zu können. Achten Sie bei diesem Schlüssel auf die Groß- und Kleinschreibung
("BCD" ist etwas anderes als "bcd").
"
Notieren Sie sich den Sicherheitsschlüssel, den Namen (SSID), die Art der
Sicherheit und den Kanal, da der NBG334W und andere Geräte im
drahtlosen Netzwerk dieselben Einstellungen verwenden müssen.
5 Klicken Sie auf OK .
3.3 Herstellen der WAN-Verbindung
1 Es kann einige Minuten lang dauern, bis der Assistent erkennt, welcher WANVerbindungstyp (Ethernet, PPPoE oder PPTP) gerade verwendet wird.
• Hat er den Verbindungstyp erkannt, führen Sie die folgenden Schritte aus.
• Kann der Assistent den Verbindungstyp nicht ermitteln, wählen Sie aus dem Listenfeld des
nachfolgenden Fensters den Verbindungstyp manuell aus. Informationen dazu erhalten Sie
bei Ihrem Internetdienstanbieter.
"
Wenn Ihnen Zugangseinstellungen für das Internet vorgegeben wurden,
geben Sie diese in die folgenden Felder ein. Anderenfalls werden die
Standardeinstellungen belassen. Klicken Sie auf Next (Weiter).
Ethernet-Verbindung
17
DEUTSCH
Wählen Sie als WAN-Verbindungstyp die Option Ethernet, und klicken Sie auf Next (Weiter),
um zum nächsten Abschnitt 3.4 zu gelangen.
PPPoE-Verbindung
1 Wählen Sie als WAN-Verbindungstyp PPPoE.
2 Geben Sie bei Servicename (Dienstname) einen Dienstnamen ein (falls Sie diesen von
Ihrem Internetdienstanbieter erhalten haben), bei User Name (Benutzername) Ihren
Benutzernamen und bei Password (Kennwort) Ihr Kennwort ein. Klicken Sie auf Next
(Weiter), um zum Abschnitt 3.4 zu gelangen.
PPTP-Verbindung
1 Wählen Sie als Ihren WAN-Verbindungstyp PPTP.
2 Geben Sie bei User Name (Benutzername) Ihren Benutzernamen und bei Password
(Kennwort) Ihr Kennwort ein.
• Wählen Sie Get automatically from your ISP (Automatisch vom Internetdienstanbieter
laden), wenn Sie von Ihrem Internetdienstanbieter keine feste PPTP IP-Adresse zugewiesen bekommen haben.
• Wenn Ihr Internetdienstanbieter Ihnen eine feste PPTP IP-Adresse zugewiesen hat,
wählen Sie Use fixed IP address (Feste IP-Adresse verwenden), um dem NBG334W eine
feste und einmalige PPTP IP-Adresse und Subnetzmaske zu geben.
3 Geben Sie eine PPTP Server IP-Adresse ein.
18
DEUTSCH
4 Geben Sie bei Connection ID/Name (Verbindungs-ID/Name) eine Verbindungs-ID oder
einen Verbindungsnamen ein (wenn vorhanden). Klicken Sie auf Next (Weiter), um zum
Abschnitt 3.4 zu gelangen.
3.4 WAN IP-Adresse
• Wählen Sie Get automatically from your ISP (Automatisch vom Internetdienstanbieter
laden), wenn Ihnen Ihr Internetdienstanbieter keine feste IP-Adresse zugewiesen hat.
Klicken Sie auf Next (Weiter), um zum Abschnitt 3.5 zu gelangen.
• Wenn Ihnen Ihr Internetdienstanbieter eine feste IP-Adresse zugewiesen hat,
1 Wählen Sie Use fixed IP address provided by your ISP (Vom Internetdienstanbieter
zugewiesene feste IP-Adresse verwenden). Klicken Sie auf Next (Weiter).
2 Geben Sie im nächsten Fenster die WAN IP-Adresse, die WAN IP Subnet-Mask und die
Gateway-IP-Adresse ein, die Sie von Ihrem Internetdienstanbieter erhalten haben.
Wurden Ihnen DNS-Servereinstellungen vorgegeben, geben Sie diese in die
entsprechenden Felder ein. Anderenfalls werden die Standardeinstellungen belassen.
Klicken Sie auf Next (Weiter).
19
DEUTSCH
3.5 MAC-Adresse des WAN
Eine MAC-Adresse ist eine Nummer, die ein Gerät in jedem Netzwerk eindeutig
identifiziert. Konfigurieren Sie die MAC-Adresse des WAN-Ports entweder mit den
Standardeinstellungen oder "klonen" Sie die MAC-Adresse eines Computers Ihres LAN.
Standardmäßig verwendet der NBG334W die werkseitig zugewiesene MAC-Adresse, um
sich selbst im WAN zu identifizieren.
• Wählen Sie Factory Default (Standardwerte), um die werkseitig festgelegte StandardMAC-Adresse zu verwenden.
• Wählen Sie Clone the Computer’s MAC Address (MAC-Adresse des Computers
klonen), um die MAC-Adresse eines Computers im LAN zu klonen. Geben Sie die IPAdresse des Computers mit der MAC-Adresse ein, die geklont werden soll. Es wird empfohlen, die MAC-Adresse eines Computers im LAN zu kopieren, auch wenn Ihr Internetdienstanbieter gegenwärtig keine Authentifizierung der MAC-Adresse erfordert.
• Wählen Sie Set WAN MAC Address (WAN-MAC-Adresse einstellen), und geben Sie die
gewünschte MAC-Adresses ein.
3.6 Bandbreitenverwaltung
Wählen Sie Enable BM for all traffic automatically (BM automatisch für den gesamten
Verkehr aktualisieren), damit der NBG334W den Datenverkehr entsprechend der
Verwendung zu prioritisiert. Z. B. hat Video-Streaming eine höhere Priorität als E-Mails.
Wenn Sie sich nicht sicher sind, lassen Sie diese Funktion deaktiviert. Klicken Sie auf Next
(Weiter).
3.7 Setup abgeschlossen
1 Klicken Sie auf Apply (Übernehmen), um die Änderungen im nächsten Fenster des
Assistenten zu speichern.
20
DEUTSCH
2 Klicken Sie im folgenden Fenster auf Finish (Fertig stellen), um den Setup-Assistenten zu
beenden.
3 Herzlichen Glückwunsch. Öffnen Sie einen Internetbrowser (z. B. Internet Explorer),
um die gewünschte Website aufzurufen.
V
Wenn Sie keine Verbindung zum Internet herstellen können, während der
Computer an einem der LAN-Anschlüsse des NBG334W angeschlossen
ist, prüfen Sie die Anschlüsse. Schalten Sie dann den NBG334W aus und
nach einigen Sekunden wieder an. Wenn dadurch das Problem nicht
behoben ist, starten Sie erneut den Assistenten. Achten Sie auf die
korrekte Eingabe der Daten. Wenn Sie ein neues Internetkonto verwenden,
stellen Sie bei Ihrem Internetdienstanbieter sicher, dass es aktiv ist.
Weitere Lösungsmöglichkeiten finden Sie im Abschnitt
Problembeseitigung des Benutzerhandbuchs.
4 Einrichten des Drahtlosnetzwerks
In diesem Abschnitt wird beschrieben, wie ein Computer zum Drahtlosnetzwerk
hinzugefügt wird. Der Computer muss über einen Drahtlosadapter verfügen. Um einen
Computer zum Netzwerk hinzuzufügen, müssen Sie den Computer, dessen WirelessFunktion aktiviert ist, mit der SSID, dem Kanal und den Sicherheitseinstellungen des
NBG334W konfigurieren. Siehe Hinweis in Abschnitt 3.
1 Öffnen Sie ein Utility-Programm für Drahtlosadapter wie z. B. unten abgebildet.
Möglicherweise ist auf Ihrem Computer ein anderes Utility-Programm installiert.
21
DEUTSCH
2 Wählen Sie Ihren Netzwerknamen (SSID), und klicken Sie auf Connect (Verbinden),
um den Computer zum Drahtlosnetzwerk hinzuzufügen.
3 Führen Sie die Anweisungen des Utility-Programms für das Drahtlosnetzwerk aus.
Wenn Sie diesen Vorgang abgeschlossen haben, können Sie einen Internetbrowser
(z. B. Internet Explorer) öffnen und im Internet surfen.
• Weitere Informationen zu einem Lernprogramm, wie Sie einen Computer an das Drahtlosnetzwerk anschließen, finden Sie im Benutzerhandbuch.
V
Wenn Sie über das Drahtlosnetzwerk nicht auf das Internet zugreifen
können, stellen Sie sicher, dass der NBG334W und die Computer im
Drahtlosnetzwerk dieselben Drahtloseinstellungen verwenden. Weitere
Informationen finden Sie im Benutzerhandbuch unter Wireless LAN. Wenn
Sie den verwendeten Sicherheitsschlüssel vergessen haben, drücken Sie
auf dem NBG334W 10 Sekunden lang oder bis die LED-Anzeige blinkt auf
( ). Die Einstellungen des Geräts werden auf die Standardwerte
zurückgesetzt. Alle geänderten Einstellungen gehen dabei verloren.
Ansehen der Produktzertifizierungen
1 Zu www.zyxel.com.
2 Wählen Sie Ihr Produkt aus der Drop-down-Liste in dem Feld auf der ZyXELHomepage, und gehen Sie auf diese Produktseite.
3 Wählen Sie auf dieser Seite die gewünschte Zertifizierung.
22
DEUTSCH
23
ESPAÑOL
Vista previa
El NBG334W es un router de banda ancha inalámbrico IEEE 802.11b/g o punto de acceso
(PA). Como router, el NBG334W dirige el tráfico entre su red inalámbrica y otras redes
como Internet como se muestra a continuación, ofreciendo servicios como filtrado de
contenidos, gestión de ancho de banda y un cortafuegos.
Esta Guía de instalación rápida le muestra cómo realizar lo siguiente con su NBG334W en
modo router:
1 Conectar su hardware
2 Acceder al Configurador web
3 Conectarse a Internet con el asistente
4 Ajustar su configuración inalámbrica
Consulte la Guía del usuario en el CD en el paquete para saber cómo configurar el
NBG334W como PA y para más información sobre todas las características.
Para leer la Guía del usuario inserte el CD que viene en la caja en la unidad de CD-ROM.
Debería aparecer una pantalla. Navegue hasta la Guía del usuario desde esta pantalla. Si
no aparece una pantalla, abra Windows Explorer (haga clic en Mi PC), haga clic en la
unidad de CD-ROM (normalmente unidad D:) y navegue hasta ella desde ahí.
24
ESPAÑOL
1 Conexiones del hardware
Realice lo siguiente para crear conexiones de hardware para la configuración inicial.
1
WAN
Conecte su módem al puerto WAN utilizando el cable que venía con su módem.
2
LAN
Conecte su ordenador a un puerto LAN con el cable Ethernet amarillo del
paquete.
3
Conexión de ALIMENTACIÓN
Utilice el cable de alimentación del paquete para conectar el zócalo POWER en
una fuente de alimentación apropiada. Esto también es su conexión de línea
eléctrica.
Los LEDs
Mire los LEDs (luces). Cuando conecta la alimentación, el LED (
mantiene encendido una vez que el dispositivo está listo.
Los LEDs LAN (
) y WAN (
las conexiones correspondientes.
) parpadea y se
) se encenderán si se realizan correctamente
25
ESPAÑOL
VSidesconecte
un LED no se enciende, compruebe sus conexiones.Si esto no ayuda,
el NBG334W de su fuente de alimentación, espere unos
segundos y vuelva a encenderlo.
2 Acceder al configurador Web
Información de acceso predeterminada
Dirección IP
http://192.168.1.1
contraseña de administrador
1234
1 Abra un explorador de Internet como Internet Explorer. Escriba “http://192.168.1.1”
como aparece debajo..
2 Aparecerá la pantalla Password (Contraseña). Introduzca la contraseña ("1234" es la
predeterminada) y haga clic en Login (Acceso).
3 Si la pantalla de acceso no aparece, compruebe que su ordenador esté ajustado para
obtener una dirección IP dinámicamente. Si eso no ayuda, compruebe la configuración
de seguridad del explorador web (ver apéndice en la Guía del usuario para información
sobre ambas sugerencias).
4 Cambie la contraseña en la pantalla siguiente y haga clic en Apply (Aplicar).
26
ESPAÑOL
5 Haga clic en Go to Wizard setup (Ir al Asistente de configuración) para configurar su
NBG334W por primera vez.
3 Asistente para la configuración de la conexión
1 Elija su idioma en el cuadro de la lista desplegable. Haga clic en Next (Siguiente)..
2 .Haga clic en Next (Siguiente) en la siguiente pantalla para proceder con el
Connection Wizard (Asistente para la conexión).
"
Escriba la información de acceso a Internet exactamente igual que la
facilitada por su ISP en cada pantalla del asistente. Haga clic en Next
(Siguiente) para continuar o haga clic en Back (Atrás) para regresar a la
pantalla anterior. La información de la pantalla actual se perderá si hace
clic en Back (Atrás).
27
ESPAÑOL
3.1 Información del sistema
Esta pantalla es opcional. Puede hacer clic en Next (Siguiente).
3.2 LAN inalámbrica
.Configure su NBG334W para que soporte una red inalámbrica con los siguientes pasos.
1 Introduzca un Name (SSID) (Nombre (SSID)) único para identificar al NBG334W en la LAN
inalámbrica.
2 Seleccione un canal inalámbrico. El NBG334W y otros clientes inalámbricos deben usar el
mismo canal.
3 Seleccione Auto (Automático) para utilizar automáticamente WPA-PSK que ofrece un
nivel alto de seguridad. Consulte la Guía del usuario para más información sobre otros
tipos de seguridad. Haga clic en Next (Siguiente).
4 Escriba la clave de seguridad que aparece en la pantalla emergente. Los ordenadores de
la red inalámbrica necesitarán esta clave de seguridad para acceder al NBG334W. La
clave de seguridad distingue mayúsculas así que "BCD" no es igual que "bcd".
28
ESPAÑOL
"
Escriba la clave de seguridad, Name (SSID) (Nombre (SSID), Security
(Seguridad) y Channel Selection (Selección del canal) para utilizarlos más
tarde, ya que el NBG334W y los otros dispositivos de su red inalámbrica
deberán usar la misma configuración.
5 Haga clic en OK (Aceptar) para continuar.
3.3 Conexión WAN
1 Puede necesitar esperar varios minutos mientras el asistente intenta detectar qué tipo
de conexión WAN (Ethernet, PPPoE o PPTP) está utilizando.
• Si el asistente detecta su tipo de conexión, siga los pasos siguientes para su tipo de conexión.
• Si el asistente no puede detectar un tipo de conexión, deberá seleccionar su tipo de conexión en la lista desplegable de la pantalla siguiente. Si no sabe qué tipo de conexión utiliza,
pregunte a su ISP.
"
Si se le ha facilitado una configuración de acceso a Internet, escríbala en
los campos siguientes. De lo contrario, deje la configuración
predeterminada y haga clic en Next (Siguiente).
Conexión Ethernet
29
ESPAÑOL
Seleccione Ethernet como tipo de conexión WAN y haga clic en Next (Siguiente) para ir a la
sección 3.4.
Conexión PPPoE
1 Seleccione PPPoE como tipo de conexión WAN.
2 Escriba un Service Name (Nombre de servicio) (si su ISP le ha facilitado uno), User Name
(Nombre de usuario) y Password (Contraseña). Haga clic en Next (Siguiente) para ir a la
sección 3.4.
Conexión PPTP
1 Seleccione PPTP como tipo de conexión WAN.
2 Escriba un User Name (Nombre de usuario) y Password (Contraseña).
• Si su ISP no le ha asignado una dirección IP PPTP, seleccione Get automatically from
ISP (Obtener automáticamente de su ISP).
• Si su ISP le ha asignado una dirección IP PPTP, seleccione Use fixed IP address (Utilizar
una dirección IP fija) para dar al NBG334W una dirección IP PPTP y una máscara de subred fija y única.
3 Escriba una dirección IP de servidor PPTP.
30
ESPAÑOL
4 Escriba un Connection ID/Name (Nombre/Identificador de conexión) (si se lo ha
facilitado su ISP). Haga clic en Next (Siguiente) para ir a la sección 3.4.
3.4 Dirección IP WAN
• Si su ISP no le ha asignado una dirección IP fija, seleccione Get automatically from your
ISP (Obtener automáticamente de su ISP) y haga clic en Next (Siguiente) para ir a la sección 3.5.
• Si su ISP le ha facilitado una dirección IP fija:
1 Seleccione Use fixed IP address provided by your ISP (Utilizar la dirección IP fija
facilitada por su ISP). Haga clic en Next (Siguiente).
2 En la pantalla siguiente escriba la WAN IP address (Dirección IP WAN) WAN IP Subnet
Mask (Máscara de subred IP WAN) y la dirección IP de puerta de enlace facilitadas por
su ISP.
Si se le ha facilitado una configuración de servidor DNS, escríbala en los campos. De lo
contrario, deje la configuración predeterminada y haga clic en Next (Siguiente).
31
ESPAÑOL
3.5 Dirección WAN MAC
Una dirección MAC es un número que identifica de manera única a un dispositivo en una
red. Ajuste la dirección MAC del puerto WAN usando la dirección MAC asignada
predeterminada de fábrica de su dispositivo o clonando la dirección MAC de un ordenador
en su LAN. Por defecto, el NBG334W utiliza la dirección MAC asignada de fábrica para
identificarse en la WAN.
• Seleccione Factory Default (Predeterminado de fábrica) para utilizar la dirección MAC
predeterminada asignada de fábrica.
• Seleccione Clone the Computer’s MAC Address (Clonar la dirección MAC del ordenador) para clonar la dirección MAC de un ordenador de su LAN. Escriba la dirección IP del
ordenador con la dirección MAC que está clonando. Es aconsejable que clone la dirección
MAC de un ordenador de su LAN incluso aunque su ISP no requiera actualmente autenticación de dirección MAC.
• Seleccione Set WAN MAC Address (Ajustar la dirección MAC WAN) y escriba la dirección
MAC que desee utilizar.
3.6 La administración de banda ancha
Seleccione Enable BM for all traffic automatically (Habilitar BM para todo el tráfico
automáticamente) para que el NBG334W dé prioridad al tráfico de datos según su uso.
Por ejemplo, las secuencias de vídeo pueden tener mayor prioridad que el correo
electrónico. Dejar sin marcar si no está seguro. Haga clic en Next (Siguiente).
3.7 Configuración completada
1 Haga clic en Apply (Aplicar) para guardar sus cambios en la pantalla siguiente que
aparece en el asistente.
32
ESPAÑOL
2 Haga clic en Finish (Finalizar) en la pantalla siguiente para completar el asistente para la
configuración.
3 Enhorabuena. Abra un explorador de web, como Internet Explorer, para visitar su sitio
web favorito.
V
Si no puede acceder a Internet cuando su ordenador está conectado a uno
de los puertos LAN del NBG334W, compruebe sus conexiones. Luego
apague el NBG334W, espere unos segundos y vuelva a encenderlo. Si
esto no da resultado, ejecute el asistente de nuevo, asegurándose de
escribir la información correctamente. Además, si utiliza una cuenta de
Internet nueva, contacte con su ISP para comprobar que está activa.
Consulte Solución de problemas en la Guía del usuario para más
sugerencias.
4 Configuración de la red inalámbrica
Utilice esta sección para añadir un ordenador a su red inalámbrica. El ordenador debe
tener un adaptador inalámbrico instalado. Para agregar un ordenador a su red, necesita
configurar su ordenador con conexión inalámbrica con la misma configuración de SSID,
canal y seguridad que el NBG334W. Consulte la nota de la sección 3.
1 Abra una utilidad de adaptador inalámbrico como la mostrada a continuación. La
utilidad inalámbrica de su ordenador puede ser diferente a la mostrada aquí.
33
ESPAÑOL
2 Localice su nombre de red (SSID) y haga clic en Connect (Conectar) para agregar el
ordenador a la red inalámbrica.
3 Siga las instrucciones de su utilidad inalámbrica. Cuando finalice, abra un explorador
como Internet Explorer para navegar por Internet.
• Para más información, consulte la Guía del usuario para un tutorial sobre cómo agregar un
ordenador a su red inalámbrica.
V
Si no puede acceder a Internet desde la red inalámbrica, compruebe si su
NBG334W y los ordenadores de su red inalámbrica están usando la misma
configuración inalámbrica. Consulte el capítulo sobre LAN inalámbrica en
la Guía del usuario para más información. Si no sabe cuál es su clave de
seguridad, pulse RESET en su NBG334W durante 10 segundos o hasta
que la luz de alimentación (
) parpadee. La configuración de su
dispositivo volverá a sus valores predeterminados de fábrica. Se perderán
todas las configuraciones guardadas en el dispositivo.
Ver los certificados de su producto
1 Visite http://www.zyxel.com.
2 Seleccione su producto de la lista desplegable en la página inicial de ZyXEL para ir a la
página de ese producto.
3 Seleccione el certificado que desee visualizar en esta página.
34
ESPAÑOL
35
FRANÇAIS
Présentation
Le NBG334W est un routeur large bande sans fil IEEE 802.11b/g ou un point d’accès (AP).
En tant que routeur, le NBG334W dirige le trafic entre votre réseau sans fil et un autre
réseau tel qu’Internet comme indiqué ci-dessous, offrant des services tels que le filtrage
de contenu, la gestion de bande passante et un pare feu.
Ce guide d’installation vous montre comment effectuer les opérations suivantes avec votre
NBG334W en mode routeur:
1 Connecter votre matériel
2 Accéder au configurateur Web
3 Vous connecter à Internet à l’aide de l’assistant
4 Configurer vos paramètres sans fil
Consultez votre guide de l’utilisateur qui se trouve sur le CD inclus dans l’emballage, il
vous indique comment configurer le NBG334W comme AP (point d’accès) et vous donne
plus d’informations sur toutes les fonctionnalités.
Pour lire le guide de l’utilisateur insérez le CD qui accompagne le boîtier dans votre lecteur
CD-ROM. Un écran devrait apparaître. Naviguez sur le guide de l'utilisateur à partir de cet
écran. Si aucun écran n’apparaît, ouvrez Windows Explorer (Explorateur Windows)
(cliquez sur My Computer (Poste de travail)), cliquez sur le lecteur CD-ROM
(généralement le lecteur D:) et naviguez sur celui-ci à partir de là.
36
FRANÇAIS
1 Connexions matérielles
Procédez comme suit pour effectuer les connexions matérielles pour l'installation initiale.
1
WAN
Connectez votre modem au port WAN à l'aide du câble fourni avec votre modem.
2
LAN
.Connectez votre ordinateur à un port LAN à l'aide du câble Ethernet jaune se
trouvant dans le package.
3
Connexion de l'ALIMENTATION
Utilisez le cordon d'alimentation fourni dans le package pour connecter la prise
POWER (ALIMENTATION) à une source d'alimentation appropriée. C’est aussi
votre connexion de courant porteur en ligne.
The LEDs
Observez les LED (voyants). Quand vous connectez l’alimentation, la LED (
reste allumée une fois que le périphérique est prêt.
Les LEDs LAN (
) et WAN (
) s'allument si les connexions
correspondantes sont correctement effectuées.
37
) clignote et
FRANÇAIS
V
Si une LED ne s'allume pas, vérifiez vos connexions. Si le problème
persiste, débranchez le NBG334W de sa source d’alimentation, patientez
quelques secondes et rallumez-le.
2 Accéder au configurateur Web
Informations de connexion par défaut
Adresse IP
http://192.168.1.1
mot de passe administrateur
1234
1 Lancez un navigateur Internet tel qu’Internet Explorer. Entrez “http://192.168.1.1”
comme indiqué ci-dessous.
2 La fenêtre Password (Mot de passe) s'affiche. Entrez le mot de passe (“1234” est la
valeur par défaut) et cliquez sur Login (Connexion).
3 Si l’écran d’ouverture de session n’apparaît pas, vérifiez que votre ordinateur est
paramétré pour recevoir dynamiquement une adresse IP. Si cela ne résout pas le
problème, vérifiez les paramètres de sécurité de votre navigateur web (voir l'annexe
dans le guide de l'utilisateur pour les informations concernant les deux suggestions).
4 Changez le mot de passe dans l'écran suivant et cliquez sur Apply (Appliquer).
38
FRANÇAIS
V
Cliquez sur Go to Wizard setup (Aller à installation de l'assistant) pour la
première installation de votre NBG334W.
3 Installation de l'assistant de connexion
1 Choisissez votre langue dans la liste déroulante. Cliquez sur Next (Suivant).
2 Cliquez sur Next (Suivant) pour continuer avec Connection Wizard (Assistant de
connexion).
"
Saisissez les informations d'accès à Internet exactement telles qu'elles ont
été fournies par votre fournisseur d'accès à Internet (FAI) dans chaque
écran de l'assistant. Cliquez sur Next (Suivant) pour continuer ou cliquez
sur Back (Retour) pour retourner à l’écran précédent. Les informations
d'écran actuelles seront perdues si vous cliquez sur Back (Retour).
39
FRANÇAIS
3.1 Informations du système
Cet écran est optionnel. Cliquez simplement sur Next (Suivant).
3.2 LAN sans fil
Configurez votre NBG334W afin qu’il prenne en charge un réseau sans fil en suivant ces
étapes.
1 Saisissez un Name (SSID) (Nom (SSID)) unique pour identifier le NBG334W sur le LAN
sans fil.
2 Sélectionnez un canal sans fil. Le NBG334W et les autres clients sans fil doivent utiliser le
même canal.
3 Sélectionnez Auto pour utilisez automatiquement WPA-PSK qui offre un niveau de
sécurité plus élevé. Consultez votre guide de l’utilisateur pour les informations concernant
les autres types de sécurité. Cliquez sur Next (Suivant).
4 Notez la clé de sécurité qui s’affiche dans l’écran contextuel qui apparaît. Les ordinateurs
sur le réseau sans fil auront besoin de cette clé de sécurité pour accéder au NBG334W. La
40
FRANÇAIS
clé de sécurité est sensible à la casse de sorte que « ABCD » n’est pas la même chose
que « abcd ».
"
Notez la clé de sécurité, Name (Nom) (SSID), Security and Channel
Selection (Sécurité et sélection de canal) pour une utilisation ultérieure
étant donné que le NBG334W et les autres périphériques sur votre réseau
sans fil doivent utiliser les même paramètres.
5 Cliquez sur OK pour continuer.
3.3 Connexion WAN
1 Vous devrez peut-être patienter quelques minutes le temps que votre assistant essaye
de détecter le type de connexion WAN (Ethernet, PPPoE ou PPTP) que vous utilisez.
• Si l’assistant détecte votre type de connexion, suivez les étapes pour votre type de connexion comme indiqué ci-dessous.
• Si l’assistant n’arrive pas à détecter un type de connexion, vous devez sélectionner votre
type de connexion dans la liste déroulante de l’écran ci-dessous. Si vous ne connaissez
pas le type de connexion à utiliser, contactez votre FAI (Fournisseur d’accès Internet).
"
Si vous avez obtenu les paramètres d'accès à Internet, saisissez-les dans
les champs suivants. Sinon laissez les paramètres par défaut et cliquez sur
Next (Suivant).
41
FRANÇAIS
Connexion Ethernet
Sélectionnez Ethernet pour votre type de connexion WAN et cliquez sur Next (Suivant) pour
aller à la section 3.4.
Connexion PPPoE
1 Sélectionnez PPPoE comme étant votre type de connexion WAN.
2 Tapez un Service Name (Nom de service) (si votre ISP vous en a donné un), User Name
(Nom d’utilisateur) et Password (Mot de passe). Cliquez sur Next (Suivant) pour aller à la
section 3.4.
Connexion PPTP
1 Sélectionnez PPTP comme type de connexion WAN.
2 Tapez un User Name (Nom d'utilisateur) et un Password (mot de passe).
• Si votre ISP ne vous a pas attribué une adresse IP PPTP fixe, sélectionnez Get automatically from ISP (Obtenir automatiquement de l'ISP).
• Si votre ISP vous a attribué une adresse IP PPTP fixe, sélectionnez Use fixed IP address
(Utiliser l’adresse IP fixe) pour attribuer au une adresse IP PPTP unique et fixe et un masque de sous-réseau.NBG334W.
3 Tapez une adresse IP du serveur PPTP.
42
FRANÇAIS
4 Tapez l’ID/Nom de connexion (si fourni par votre ISP). Cliquez sur Next (Suivant) pour
aller à la section 3.4.
3.4 Adresse IP WAN
• Si votre ISP ne vous a pas attribué d’adresse IP fixe, sélectionnez Get automatically from
ISP (Obtenir automatiquement de l'ISP) et cliquez sur Next (Suivant) pour aller à la section
3.5.
• Si votre ISP vous a donné une adresse IP fixe:
1 Sélectionnez Use fixed IP address provided by your ISP (Utiliser l’adresse IP fixe
fournie par votre ISP). Cliquez sur Next (Suivant).
2 Dans l’écran suivant tapez l’adresse IP WAN, le masque de sous-réseau d’IP WAN et
l’adresse IP de la passerelle donnée par votre ISP.
Si vous avez reçu des paramètres de serveur DNS, tapez-les dans les champs. Sinon laissez
les paramètres par défaut et cliquez sur Next (Suivant).
43
FRANÇAIS
3.5 Adresse MAC WAN
Une adresse MAC est un numéro qui identifie de façon unique un appareil sur tout réseau.
Configurez l'adresse MAC du port WAN en utilisant l’adresse MAC de votre appareil par
défaut attribuée en usine ou en clonant l'adresse MAC d'un ordinateur sur votre LAN. Par
défaut, le NBG334W utilise l’adresse MAC attribuée en usine pour s’identifier sur le WAN.
• Sélectionnez Factory Default (Par défaut d'usine) pour utiliser l'adresse MAC par défaut
attribuée en usine.
• Sélectionnez Clone the Computer’s MAC Address (Cloner l’adresse MAC de l’ordinateur) pour cloner l’adresse MAC d’un ordinateur sur votre LAN. Tapez l’adresse IP de l’ordinateur avec l’adresse MAC que vous clonez. Il est conseillé de cloner l’adresse MAC d’un
ordinateur sur votre LAN même si votre ISP ne nécessite pas actuellement d’authentification d’adresse MAC.
• Sélectionnez Set WAN MAC Address (Définir l’adresse MAC du WAN) et entrez l’adresse
MAC que vous voulez utiliser.
3.6 La gestion de bande passante
Sélectionnez Enable BM for all traffic automatically (Activer automatiquement BM pour
tout trafic) pour que le NBG334W donne la priorité au trafic de données selon le qu’il
utilise. Par exemple, le flux vidéo peut avoir une priorité supérieure aux emails. Ne cochez
pas en cas de doute. Cliquez sur Next (Suivant).
3.7 Installation terminée
1 Cliquez sur Apply (Appliquer) pour enregistrer vos modifications dans l’écran suivant
qui apparaît dans l’assistant.
44
FRANÇAIS
2 Cliquez sur Finish (Terminer) dans l’écran ci-dessous pour terminer l'installation par
l'assistant.
3 Félicitations. Ouvrez un navigateur web, Internet Explorer par exemple, pour visiter
votre site web favori.
V
Si vous n'arrivez pas à accéder à Internet quand votre ordinateur est
connecté à l’un des ports LAN du NBG334W, vérifiez vos connexions. Puis
éteignez le NBG334W, patientez quelques secondes et rallumez-le. Si
cela ne résout pas le problème, exécutez à nouveau l’assistant, en vous
assurant que vous tapez correctement les informations. De plus, si vous
utilisez un nouveau compte Internet, contactez votre ISP pour vous assurer
qu'il est actif. Voir la section Troubleshooting (Dépannage) dans le Guide
de l'utilisateur pour plus de suggestions.
4 Installation du réseau sans fil
Utilisez cette section pour ajouter un ordinateur à votre réseau sans fil. L’ordinateur doit
être équipé d’un adaptateur sans fil. Pour ajouter un ordinateur à votre réseau, vous devez
configurer votre ordinateur prenant en charge la connexion sans fil avec les mêmes
paramètres SSID, de canal et de sécurité que le NBG334W. Voir la note dans la section 3.
1 Ouvrez un utilitaire d’adaptateur sans fil tel que celui indiqué ci-dessous. L’utilitaire
sans fil de votre ordinateur peut être différent de celui indiqué ci-dessous.
45
FRANÇAIS
2 Repérez le nom de votre réseau (SSID) et cliquez sur Connect (Connecter) pour
ajouter votre ordinateur au réseau sans fil.
3 Suivez les instructions sur votre utilitaire sans fil. Quand c’est terminé, ouvrez un
navigateur Internet, comme Internet Explorer par exemple pour naviguer sur Internet.
• Pour plus d’informations consultez le guide de l’utilisateur pour trouver un didacticiel vous
indiquant comment ajouter un ordinateur à votre réseau sans fil.
V
Si vous n’arrivez pas à accéder à Internet à partir du réseau sans fil,
vérifiez que votreNBG334W et les ordinateurs sur votre réseau sans fil
utilisent les mêmes paramètres sans fil. Voir le chapitre sur le LAN sans fil
dans le guide de l'utilisateur pour plus d'informations. Si vous ne
connaissez pas votre clé de sécurité, appuyez sur RESET
(RÉINITIALISER) sur votre NBG334W pendant 10 secondes ou jusqu’à ce
que le témoin lumineux ( ) (ALIMENTATION) clignote. Les paramètres de
votre périphérique retourneront à leurs valeurs par défaut d’usine. Tous les
paramètres que vous avez enregistrés sur votre appareil seront perdus.
Visualiser les certifications de votre produit
1 Allez à http://www.zyxel.com.
2 Sélectionnez votre produit dans la liste déroulante dans la page d'accueil du ZyXEL
pour aller à la page de ce produit.
3 Sélectionnez la certification que vous désirez consulter dans cette page.
46
FRANÇAIS
47
ITALIANO
Cenni generali
NBG334W è un router broadband wireless IEEE 802.11b/g nonché un Access Point (AP).
Come router, NBG334W dirige il traffico tra la rete wireless e un'altra rete, come ad
esempio Internet (vedere sotto), fornendo servizi quali il filtraggio dei contenuti, la gestione
della banda dati e firewall.
In questa Guida introduttiva viene spiegato come eseguire le operazioni seguenti con il
NBG334W in modalità router:
1 Collegamento dell'hardware
2 Accesso al configuratore Web
3 Collegamento a Internet con la procedura guidata
4 Configurazione delle impostazioni Wireless
Vedere la Guida dell'utente presente sul CD fornito a corredo per sapere come configurare
il NBG334W come AP e per ulteriori informazioni su tutte le funzionalità.
Per leggere la Guida dell'utente, inserire nel lettore il CD allegato nella confezione. Viene
visualizzata una schermata. Da questa schermata è possibile esplorare il contenuto della
Guida dell'utente. Se la schermata non appare, aprire Risorse del computer, aprire l'unità
CD-ROM (generalmente D:) e localizzare la guida.
48
ITALIANO
1 Collegamenti hardware
Di seguito sono illustrati i collegamenti hardware per l'installazione iniziale.
1
WAN
Collegare il modem alla porta WAN utilizzando il cavo fornito a corredo del
modem.
2
LAN
Collegare il computer a una porta LAN tramite il cavo Ethernet giallo presente
nella confezione.
3
Collegamento dell'alimentazione
Utilizzare il cavo di alimentazione fornito a corredo per collegare l'ingresso
POWER a una sorgente di alimentazione appropriata.
I LED
Osservare i LED (spie luminose). Quando si collega l'alimentazione, il LED?PWR (
lampeggia e poi resta acceso quando l'unità è pronta.
I LED LAN (
) e WAN (
corrispondenti sono corretti.
) si accendono quando i collegamenti
49
)
ITALIANO
VSescollegare
un LED non si accende, controllare i collegamenti. Se il problema persiste,
NBG334W dall'alimentazione, attendere qualche secondo e poi
riaccenderlo.
2 Accesso allo strumento di configurazione Web
Informazioni di accesso predefinite
Indirizzo IP
http://192.168.1.1
Password di amministratore
1234
1 Aprire un browser Internet, come ad esempio Internet Explorer. Immettere l'indirizzo
“http://192.168.1.1” come raffigurato sotto.
2 Viene visualizzata la finestra Password. Immettere la password (quella predefinita è
“1234”) e scegliere Login (accedi).
3 Se la schermata di login non viene visualizzata, verificare che il computer sia
configurato per ottenere un indirizzo IP dinamico. Se il problema persiste, controllare le
impostazioni di sicurezza del browser (vedere l'appendice nella Guida dell'utente per le
informazioni su entrambi i suggerimenti).
4 Modificare la password nella schermata seguente e fare clic su Apply (applica).
50
ITALIANO
5 Scegliere Go to Wizard setup (vai a configurazione guidata) per configurare
NBG334W la prima volta.
3 Configurazione guidata connessione
1 Selezionare la lingua desiderata dall'elenco a discesa. Fare clic su Next (avanti).
2 Scegliere Next (avanti) nella schermata successiva per procedere con la Connection
Wizard (connessione guidata).
"
Immettere le informazioni e i parametri Internet esattamente come sono
stati forniti dal proprio ISP nelle diverse schermate della procedura guidata.
Scegliere Next (avanti) per continuare oppure Back (indietro) per tornare
alla schermata precedente. Facendo clic su Back (indietro) le informazioni
presenti nella schermata corrente vengono perse.
51
ITALIANO
3.1 Informazioni sul sistema
Questa schermata è opzionale. È unicamente possibile fare clic su Next (avanti).
3.2 LAN Wireless
Configurare NBG334W per supportare una rete wireless seguendo la procedura seguente
1 Immettere un Name (SSID, nome della rete) univoco per identificare il NBG334W sulla
LAN wireless.
2 Selezionare un canale wireless. Il NBG334W e gli altri client wireless devono utilizzare lo
stesso canale.
3 Selezionare Auto per utilizzare automaticamente WPA-PSK, che fornisce un elevato
livello di sicurezza. Vedere la Guida dell'utente per informazioni sulle altre tipologie di
sistemi di sicurezza. Scegliere Next (avanti).
4 Annotare la chiave di sicurezza visualizzata nella schermata popup. I computer sulla rete
wireless avranno bisogno di questa chiave di sicurezza per accedere al NBG334W. Per la
52
ITALIANO
chiave di sicurezza viene fatta distinzione tra maiuscole e minuscole, quindi ad esempio
"BCD" è diverso da "bcd".
"
Annotare la chiave di sicurezza, Name (SSID), Security (sicurezza)?e
Channel Selection (selezione canale)?per poterli utilizzare in seguito
affinché NBG334W e gli altri dispositivi presenti nella rete wireless possano
utilizzare le stesse impostazion.
5 Fare clic su OK per continuare.
3.3 Collegamento WAN
1 Può essere necessario attendere qualche minuto mentre la procedura guidata tenta di
rilevare quale tipo di connessione WAN (Ethernet, PPPoE o PPTP)?si sta utilizzando.
• Se la procedura guidata rileva il tipo di connessione, attenersi alla procedura che segue
corrispondente al tipo di connessione.
• Se la procedura guidata non riesce a rilevare un tipo di connessione, è necessario selezionare questo dato dall'elenco a discesa nella schermata che segue. Se non si conosce il
tipo di connessione da utilizzare, controllare i dati con il proprio ISP.
"
Se sono state fornite le impostazioni di accesso Internet, immettere i campi
seguenti. In caso contrario, lasciare le impostazioni predefinite e fare clic su
Next (Avanti).
53
ITALIANO
Collegamento Ethernet
Scegliere Ethernet come tipo di connessione WAN e fare clic su Next (avanti)?per passare
alla sezione 3.4.
Collegamento PPPoE
1 Selezionare PPPoE come tipo di connessione WAN.
2 Immettere un Service Name (nome del servizio, se l'ISP ne ha fornito uno), User Name
(nome utente) e Password. Scegliere Next (avanti) per passare alla sezione 3.4.
Collegamento PPTP
1 Selezionare PPTP utilizzando il tipo di connessione WAN.
2 Immettere User Name (nome utente) e Password.
• Se l'ISP non ha assegnato un indirizzo IP?PPTP fisso, selezionare Get automatically
from ISP (ottieni automaticamente dall'ISP).
• Se l'ISP ha assegnato un indirizzo IP?PPTP statico, selezionare Use fixed IP address
(usa indirizzo IP?statico) per assegnare a NBG334W un indirizzo IP?PPTP statico univoco
e una maschera di subnet.
3 Immettere un Server IP Address (indirizzo IP?del server)?PPTP.
54
ITALIANO
4 Immettere Connection ID/Name (identificativo connessione/nome, se forniti dall'ISP).
Scegliere Next (avanti) per passare alla sezione 3.4.
3.4 Indirizzo IP?della WAN
• If yourSe l'ISP non ha assegnato un indirizzo IP?statico, selezionare Get automatically
from your ISP (ottieni automaticamente dall'ISP)?e scegliere Next (avanti) per passare
alla sezione 3.5.
• Se l'ISP ha fornito un indirizzo IP statico:
1 Selezionare Use fixed IP address provided by your ISP (utilizza indirizzo IP?statico
fornito dall'ISP). Fare clic su Next (avanti).
2 Nella schermata successiva immettere il WAN IP address (indirizzo IP?della WAN), la
WAN IP Subnet Mask (maschera di subnet relativa all'IP?della WAN) e l'indirizzo IP?del
gateway forniti dall'ISP.
Se sono stati fornite impostazioni relative al server DNS, inserirle nei campi relativi. In caso
contrario lasciare le impostazioni predefinite e scegliere Next.
55
ITALIANO
3.5 Indirizzo MAC WAN
Un indirizzo MAC è un numero che identifica in modo univoco un dispositivo su una rete
qualsiasi. Configurare l'indirizzo MAC?della porta WAN utilizzando l'indirizzo
MAC?predefinito assegnato in fabbrica al dispositivo oppure clonando l'indirizzo MAC?di
un computer della LAN. Per impostazione predefinita, NBG334W utilizza l'indirizzo MAC
assegnato dalla fabbrica per identificarsi sulla WAN.
• Selezionare Factory Default (predefinito di fabbrica) per utilizzare l'indirizzo MAC predefinito assegnato dalla fabbrica.
• Selezionare Clone the Computer’s MAC Address (clona indirizzo MAC del computer) per
clonare l'indirizzo MAC di un computer della LAN. Digitare l'indirizzo IP del computer di cui
si intende clonare l'indirizzo MAC. È consigliabile clonare l'indirizzo MAC di un computer
della LAN anche se l'ISP non richiede autenticazione dell'indirizzo MAC.
• Selezionare Set WAN MAC Address (imposta indirizzo MAC della WAN) e immettere
l'indirizzo MAC da utilizzare.
3.6 La gestione della banda dati
Selezionare Enable BM for all traffic automatically (abilita gestione automatica della
banda per tutto il traffico)?per lasciare che NBG334W gestisca le priorità del traffico a
seconda della tipologia di dati. Ad esempio, lo streaming video potrebbe avere una priorità
maggiore rispetto alla posta elettronica. Se non si è certi, lasciare l'opzione deselezionata.
Scegliere Next (avanti).
3.7 Configurazione completata
1 Scegliere Apply (applica) per salvare le modifiche nella schermata successiva che
appare nella procedura guidata.
56
ITALIANO
2 Scegliere Finish (fine) nella schermata sotto per completare la configurazione guidata.
3 Congratulazioni! Aprire il browser, quale ad esempio Internet Explorer, per visitare un
sito Web qualsiasi.
V
Se non è possibile accedere a Internet quando il computer è connesso a
una delle porte LAN del NBG334W, controllare i collegamenti. A questo
punto spegnere il NBG334W, attendere qualche secondo e poi
riaccenderlo. Se il problema persiste, eseguire nuovamente la
configurazione guidata verificando in immettere correttamente le
informazioni. Se si utilizza un nuovo account Internet, contattare il proprio
ISP per verificare che sia attivo. Per altri suggerimenti, vedere la sezione di
Risoluzione dei problemi della Guida dell'utente.
4 Configurazione della rete wireless
In questa sezione viene spiegato come aggiungere un computer alla rete wireless. Nel
computer deve essere installato un adattatore wireless. Per aggiungere un computer alla
rete è necessario configurare il computer con funzioni wireless utilizzando gli stessi SSID,
canale e configurazione di sicurezza utilizzati per il NBG334W. Vedere la nota della
sezione 3.
1 Aprire il programma di utilità dell'adattatore wireless (quale ad esempio quello
raffigurato di seguito). L'utilità wireless del computer può differire da quella raffigurata
nell'illustrazione di esempio.
57
ITALIANO
2 Individuare il nome della rete (SSID) e scegliere Connect (connetti)?per aggiungere il
computer alla rete wireless.
3 Seguire le istruzioni dell'utilità wireless. Terminata l'operazione, aprire un browser
Internet come Internet Explorer per navigare in Internet..
• Per ulteriori informazioni, vedere la Guida dell'utente per consultare un tutorial su come
aggiungere un computer alla rete wireless.
V
Se non si riesce ad accedere a Internet dalla rete wireless, verificare che il
NBG334W e i computer sulla rete wireless utilizzino le stesse impostazioni
wireless. Per ulteriori informazioni, vedere il capitolo relativo alla
LAN?Wireless nella Guida dell'utente. Se non si conosce la chiave di
sicurezza, premere RESET sul NBG334W per 10 secondi oppure finché la
spia ( ) non lampeggia. Le impostazioni del dispositivo saranno
reimpostate alla configurazione predefinita di fabbrica. Tutte le impostazioni
salvate nel dispositivo vengono perse.
Visualizzazione delle certificazioni del prodotto
1 Aprire http://www.zyxel.com.
2 Selezionare il prodotto dall'elenco di riepilogo a discesa nella Home Page di ZyXEL per
passare alla pagina del prodotto in questione.
3 Selezionare da questa pagina la certificazione che si desidera visualizzare.
58
ITALIANO
59
SVENSKA
Översikt
NBG334W är en IEEE 802.11b/g trådlös bredbandsrouter eller accesspunkt (AP). Som
router dirigerar NBG334W trafik mellan ditt trådlösa nätverk och ett annat nätverk som
t.ex. Internet enligt nedan, tillhandahåller tjänster som t.ex. innehållsfiltrering,
bandbreddshantering och en brandvägg.
I denna snabbstartguide beskrivs det hur du gör följande med NBG334W i router-läge:
1 Ansluta maskinvara
2 Åtkomst till webbkonfigurator
3 Ansluta till Internet med guiden
4 Konfigurera trådlösa inställningar
Se bruksanvisningen på CD-skivan i paketet angående hur du ställer in NBG334W som en
AP och för mer information om alla funktioner.
Du läser bruksanvisningen genom att sätta in den CD-skiva som medföljde i kartongen i
din CD-ROM-enhet. En startbild ska visas. Navigera till bruksanvisningen från denna bild.
Om ingen startbild visas, öppna Windows Explorer (utforskaren) (klicka på My Computer
(den här datorn)), klicka på CD-ROM-enheten (vanligtvis enhet D:) och navigera dit
därifrån.
60
SVENSKA
1 Maskinvaruanslutningar
Gör följande för att utföra maskinvaruanslutningar för inledande inställning.
1
WAN
Anslut ditt modem till WAN-porten med sladden som medföljde ditt modem.
2
LAN
Anslut datorn till en LAN-port med den gula Ethernetsladden från förpackningen.
3
Strömanslutning
Använd strömsladden från förpackningen för att ansluta POWER-uttaget till en
lämplig strömkälla. Detta är även din strömlinjeanslutning.
Indikatorlamporna
Titta på indikatorlamporna. När du ansluter strömmen, blinkar indikatorlampan (
förblir tänd när enheten väl är klar.
Indikatorlamporna LAN (
anslutningar är rätt utförda.
) och WAN (
61
) tänds om motsvarande
) och
SVENSKA
V
Kontrollera anslutningarna ifall ingen indikatorlampa tänds. Om detta inte
hjälper, koppla bort NBG334W från strömkällan, vänta några sekunder och
anslut sedan den igen.
2 Åtkomst till webbkonfigurator
Standardinloggningsinformation
IP-adress
http://192.168.1.1
Administratörslösenord
1234
1 Öppna en Internet-webbläsare som t.ex. Internet Explorer. Ange http://192.168.1.1
enligt nedan.
2 Fönstret Password (lösenord) visas. Ange lösenord (1234 är standard) och klicka på
Login (inloggning).
3 Om ingen inloggningsskärm visas, kontrollera att din dator är inställd för att ta emot en
IP-adress dynamiskt. Om detta inte hjälper, kontrollera webbläsarens
säkerhetsinställningar (se bilagan i bruksanvisningen för information om båda
förslagen).
4 Ändra lösenord på den följande bild och klicka på Apply (verkställ).
62
SVENSKA
5 Klicka på Go to Wizard setup (gå till guideinställning) för att ställa in din NBG334W för
första gången.
3 Inställningsguide för anslutning
1 Välj språk i rullgardinsrutan. Klicka på Next (nästa).
2 Klicka på Next (nästa) på den följande skärmen för att fortsätta med
anslutningsguiden.
"
Ange dina Internet-uppkopplingsuppgifter exakt som du fått dem av din
Internet-leverantör på varje guideskärmbild. Klicka på Next (nästa) för att
fortsätta eller klicka på Back (bakåt) för att gå tillbaka till föregående
skärmbild. Aktuell skärminformation går förlorad om du klickar på Back
(bakåt).
63
SVENSKA
3.1 Systeminformation
Denna skärm är valfri. Du kan helt enkelt klicka på Next (nästa).
3.2 Trådlöst LAN
Konfigurera din NBG334W för att stödja ett trådlöst nätverk genom att följa dessa steg.
1 Ange ett unikt Name (SSID) (namn) för att identifiera NBG334W i det trådlösa LAN.
2 Välj en trådlös kanal. NBG334W och andra trådlösa klienter måste använda samma kanal.
3 Välj Auto för att automatiskt använda WPA-PSK som ger en högre säkerhetsnivå. Se
bruksanvisningen för information om andra sorters säkerhet. Klicka på Next (nästa).
4 Skriv ner den säkerhetsnyckel som visas på skärmen. Datorer i det trådlösa nätverket
behöver denna säkerhetsnyckel för åtkomst till NBG334W. Säkerhetsnyckeln är
skiftlägeskänslig, dvs. “ABCD” är inte detsamma som “abcd”.
64
SVENSKA
"
Skriv ner säkerhetsnyckeln, Name (namn) (SSID), Security (säkerhet)
och Channel Selection (kanalval) för senare användning eftersom
NBG334W och andra enheter i ditt trådlösa nätverk måste använda samma
inställningar.
5 Klicka på OK för att fortsätta.
3.3 WAN-anslutning
1 Du måste kanske vänta flera minuter medan guiden försöker detektera vilken WANanslutningstyp (Ethernet, PPPoE eller PPTP) du använder.
• Om guiden detekterar din anslutningstyp, följ stegen för din anslutningstyp enligt nedan.
• Om guiden inte detekterar en anslutningstyp, måste du välja din anslutningstyp från
rullgardinsrutan på skärmen nedan. Om du inte vet vilken anslutningstyp du ska använda,
fråga din Internet-leverantör.
"
Om du har fått Internet-uppkopplingsuppgifter, ange dem i följande fält. I
annat fall, låt standardinställningarna stå och klicka på Next (nästa).
Ethernet-anslutning
Välj Ethernet som WAN-anslutningstyp och klicka på Next (nästa) för att gå till avsnitt 3.4.
65
SVENSKA
PPPoE-anslutning
1 Välj PPPoE som WAN-anslutningstyp.
2 Ange ett Service Name (tjänstenamn - om du fått ett av din Internet-leverantör), User
Name (användarnamn) och Password (lösenord). Klicka på Next (nästa) för att gå till
avsnitt 3.4.
PPTP-anslutning
1 Välj PPTP som WAN-anslutningstyp.
2 Ange User Name (användarnamn) och Password (lösenord).
• Välj Get automatically from ISP (hämta automatiskt från Internet-leverantör) om din
Internet-leverantör inte har tilldelat dig en fast PPTP IP-adress.
• Om din Internet-leverantör har tilldelat dig en fast PPTP IP-adress, välj Use fixed IP
address (använd fast IP-adress) för att ge NBG334W en fast, unik PPTP IP-adress och
subnetmask.
3 Ange PPTP server-IP-adress.
4 Ange Connection ID/Name (anslutnings-ID/namn - om du fått sådant av din Internetleverantör). Klicka på Next (nästa) för att gå till avsnitt 3.4.
66
SVENSKA
3.4 WAN IP-adress
• Om din Internet-leverantör inte har tilldelat dig en fast IP-adress, välj Get automatically
from your ISP (hämta automatiskt från din Internet-leverantör) och klicka på Next (nästa)
för att gå till avsnitt 3.5.
• Om din Internet-leverantör har gett dig en fast IP-adress:
1 Välj Use fixed IP address provided by your ISP (använd fast IP-adress som
tillhandahållits av Internet-leverantör). Klicka på Next (nästa).
2 På nästa skärm skriver du in WAN IP address, WAN IP Subnet Mask och den gatewayIP-adress du fått av din Internet-leverantör.
Om du fått DNS-serverinställningar, ange dem i fälten. I annat fall, låt
standardinställningarna stå och klicka på Next (nästa).
3.5 WAN MAC-adress
En MAC-adress är ett nummer som unikt identifierar en enhet i vilket nätverk som helst.
Ställ in WAN-portens MAC-adress genom att antingen använda enhetens fabrikstilldelade
MAC-adress eller genom att klona MAC-adressen för en dator i ditt LAN. Som standard
använder NBG334W den fabrikstilldelade MAC-adressen för att identifiera sig själv i WAN.
• Välj Factory Default (fabriksstandard) för att använda den fabrikstilldelade standard-MACadressen.
• Välj Clone the Computerfs MAC Address (klona datorns MAC-adress) för att klona MACadressen från en dator i ditt LAN. Skriv in datorns IP-adress med den MAC-adress du
klonar. Du rekommenderas att klona MAC-adressen från en dator i ditt LAN även om din
Internet-leverantör för närvarande inte kräver MAC-adressautenticering.
67
SVENSKA
• Välj Set WAN MAC Address (ställ in WAN MAX-adress) och ange den MAC-adress du vill
använda.
3.6 Bandbreddshantering
Välj Enable BM for all traffic automatically (aktivera BM automatiskt för all trafik) för att
låta NBG334W prioritera datatrafik beroende på dess användning. Till exempel kan
videoströmmar prioriteras högre än e-post. Markera ej om du är osäker. Klicka på Next
(nästa).
3.7 Installationen är klar.
1 Klicka på Apply (tillämpa) för att spara dina ändringar i den nästa skärm som visas i
guiden.
2 Klicka på Finish (slutför) i bilden nedan för att slutföra guideinstallationen.
3 Grattis! Öppna en webbläsare som t.ex. Internet Explorer, för att besöka din
favoritwebbplats.
68
SVENSKA
V
Om du inte kan ansluta till Internet när din dator är ansluten till en av
NBG334W:s LAN-portar, kontrollera dina anslutningar. Stäng därefter av
NBG334W, vänta några sekunder och sätt sedan på den igen. Om detta
inte fungerar ska du köra guiden igen och vara extra noga med att skriva in
informationen korrekt. Dessutom, om du använder ett nytt Internet-konto,
kontakta din ISP för att kontrollera att det är aktivt. Se Felsökning eller
bruksanvisningen för mer information.
4 Inställning av trådlöst nätverk
Följ detta avsnitt för att lägga till en dator i ditt trådlösa nätverk. Datorn måste ha en trådlös
adapter installerad. För att lägga till en dator i ditt nätverk måste du konfigurera din trådlöst
aktiverade dator med samma SSID, kanal och säkerhetsinställningar som NBG334W. Se
kommentaren från avsnitt 3.
1 Öppna trådlöst inställningsprogrammet för din trådlösa adapter som t.ex. det som visas
nedan. Det trådlösa inställningsprogrammet i din dator kan skilja sig från det som visas
nedan.
2 Leta reda på ditt nätverksnamn (SSID) och klicka på Connect (anslut) för att lägga till
din dator i det trådlösa nätverket.
3 Följ instruktionerna för ditt trådlösa inställningsprogram. När du är klar kan du öppna en
Internet-webbläsare som t.ex. Internet Explorer för att surfa på Internet.
• För mer information, se bruksanvisningen för en guide om hur du lägger till en dator i ditt
trådlösa nätverk.
69
SVENSKA
V
Om du inte kan få åtkomst till Internet från det trådlösa nätverket,
kontrollera att NBG334W och datorerna i ditt trådlösa nätverk använder
samma trådlösa inställningar. Se kapitlet om trådlöst LAN i
bruksanvisningen för mer information. Om du inte vet vilken
säkerhetsnyckel du har, tryck på RESET (återställ) på din NBG334W i 10
sekunder eller tills ( ) blinkar. Inställningarna i din enhet återgår till
fabriksstandard. Alla inställningar som du har sparat i enheten går
förlorade.
Visa din produkts certifikat
1 Gå till http://www.zyxel.com.
2 Välj din produkt från rullgardinslistrutan på ZyXEL:s hemsida för att gå till denna
produkts sida.
3 Välj det certifikat du vill titta på från denna sida.
4 För ytterligare information besök www.support.zyxel.se.
70
SVENSKA
71