1
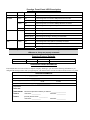
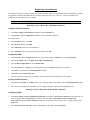
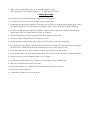
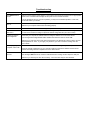
Prestige 660R-6xC Quick Start Guide
Prestige Rear Panel Connections
PORT
DSL
CONNECTION
Connect the DSL port on the Prestige to the wall jack using the included DSL cable (telephone wire).
Connect the micro filter(s) (optional – see the appendix in your User’s Guide for details) between the wall
jack and your telephone(s).
Be careful not to insert an RJ-11 connector into the RJ-45 port.
LAN 10/100M
Use an Ethernet cable to connect this port to a computer (with an Ethernet card) or a hub (if your network
has more than one computer). The port is auto-negotiating (can connect at 10 or 100Mbps) and autocrossover (automatically adjust to straight-through or crossover Ethernet cable).
RESET
You only need to use this button if you have forgotten the Prestige’s password or IP address. It returns the
Prestige to the factory defaults.
POWER
(9V AC)
Connect the end of the included power adaptor for your region to this power socket.
After you’ve made the connections, connect the power adaptor to a power supply and push in the power button to turn on the
Prestige. The power button is not available on all models.
Prestige Front Panel LED Description
LED
PWR/SYS
COLOR
Green
STATUS
DESCRIPTION
On
The Prestige is receiving power and functioning properly.
Blinking
The Prestige is rebooting.
Off
The Prestige is not ready or has malfunctioned.
Prestige Front Panel LED Description
LED
10/100M
COLOR
PPP
DESCRIPTION
Red
On
The power to the Prestige is too low.
Green
On
The Prestige has a successful 10Mbps Ethernet connection.
Blinking
The Prestige is receiving or sending data.
On
The Prestige has a successful 100Mbps Ethernet connection.
Blinking
The Prestige is receiving or sending data.
Off
The LAN is not connected.
On
The Prestige is linked successfully to a DSLAM.
Blinking (Slow)
The Prestige is initializing the DSL line.
Blinking (Fast)
The Prestige is sending or receiving non-PPP traffic.
Off
The DSL link is down.
On
The Prestige has a PPP (PPPoA or PPPoE) connection.
Blinking
The Prestige is sending or receiving PPPoA or PPPoE traffic.
Off
The Prestige does not have a PPP (PPPoA or PPPoE) connection.
Amber
DSL/ACT
STATUS
Green
Amber
Press the power switch in. The PWR/SYS LED blinks and turns steady on. The 10/100M and DSL
LEDs turn on, if they are properly connected.
Prestige Factory Defaults
LAN IP Address
192.168.1.1
Default Password
1234
Subnet Mask
255.255.255.0
DHCP IP Pool
192.168.1.33 – 192.168.1.64
Internet Account Information
Your ISP (Internet Service Provider) or telephone company should give you most of the following information or preconfigured the Prestige with it when you signed up for your Internet access account. You do not need to know every field.
REQUIRED INFORMATION
Virtual Path Identifier (VPI): ____________
Virtual Channel Identifier (VCI): ____________
Multiplexing (VC-based or LLC-based):
VC
LLC
Your device’s WAN IP Address (if given): __________________
Encapsulation:
RFC 1483
ENET ENCAP
Ethernet Encapsulation Gateway IP Address: ____________________
PPPoA
User Name: ____________
PPPoE
(PPPoE) Service Name: ____________
User Name: ____________
Password: ____________
Password: ____________
Preparing Your Network
All computers must have a 10M or 100M network card and TCP/IP installed. TCP/IP should already be installed on computers
using Windows NT/2000/XP, Macintosh OS 7 and later operating systems. See your User’s Guide for information on
configuring static IP address for your computer.
These procedures are for dynamic IP address assignment.
Set ting up Yo ur W ind ow s 95 /98 /Me C omp ute r
Installing TCP/IP Components
1.
Click Start, Settings, Control Panel and double-click the Network icon.
2.
The Network window Configuration tab displays a list of installed components.
To install TCP/IP:
a.
In the Network window, click Add.
b.
Select Protocol and then click Add.
c.
Select Microsoft from the list of manufacturers.
d.
Select TCP/IP from the list of network protocols and then click OK.
Configuring TCP/IP
1.
In the Network window Configuration tab, select your network adapter’s TCP/IP entry and click Properties.
2.
Click the IP Address tab. Click Obtain an IP address automatically.
3.
Click the DNS Configuration tab. Select Disable DNS.
4.
Click the Gateway tab. Highlight any installed gateways and click Remove until there is none listed.
5.
Click OK to save and close the TCP/IP Properties window.
6.
Click OK to close the Network window.
7.
Turn on your Prestige and restart your computer when prompted. Insert the Windows CD if prompted.
Verifying TCP/IP Properties
1.
Click Start and then Run. In the Run window, type "winipcfg" and then click OK to open the IP Configuration window.
2.
Select your network adapter. You should see your computer's IP address, subnet mask and default gateway.
Set ting up Yo ur W ind ow s NT /20 00 /XP Comp ute r
Configuring TCP/IP
1.
Click Start, Settings, Network and Dial-up Connections and right-click Local Area Connection or the connection you
want to configure and click Properties. For Windows XP, click start, Control Panel, Network and Internet
Connections and then Network Connections. Right-click the network connection you want to configure and then click
Properties.
2.
Select Internet Protocol (TCP/IP) (under the General tab in Win XP) and click Properties.
3.
The Internet Protocol TCP/IP Properties window opens. Click Obtain an IP
address automatically.
4.
Click Obtain DNS server automatically.
5.
Click Advanced, IP Settings tab and remove any installed gateways, then click OK.
6.
Click OK to save and close the Internet Protocol (TCP/IP) Properties window.
7.
Click OK to close the Local Area Connection Properties window.
8.
Turn on your Prestige and restart your computer (if prompted).
Verifying TCP/IP Properties
1.
Click Start, Programs, Accessories and then Command Prompt.
2.
In the Command Prompt window, type "ipconfig" and then press ENTER.
The window displays information about your IP address, subnet mask and
default gateway.
Set ting up Yo ur Mac in tos h Co mp ute r
Configuring TCP/IP Properties
1.
Click the Apple menu, Control Panel and double-click TCP/IP to open the TCP/IP Control Panel.
2.
Select Ethernet from the Connect via list.
3.
Select Using DHCP Server from the Configure list.
4.
Close the TCP/IP Control Panel.
5.
Click Save if prompted, to save changes to your configuration.
6.
Turn on your Prestige and restart your computer (if prompted).
Verifying TCP/IP Properties
Check your TCP/IP properties in the TCP/IP Control Panel.
Accessing the Prestige
Access the Prestige using the web configurator or the SMT via a telnet session.
Procedure For Web Configurator Configuration
1.
Launch your web browser and enter “192.168.1.1” as the URL.
2.
Type “admin” as the user name, "1234" (default) as the password and press ENTER.
3.
You should now see the SITE MAP screen. Click the help icon (located in the upper right portion all screens) for online
HTML help.
Procedure For SMT Configuration via Telnet
1.
Launch a Telnet program. In Windows, click Start and then Run.
2.
Type “Telnet” followed by a space and the IP address of the Prestige,
(192.168.1.1 is the default) and click OK to display the password screen.
3.
Enter “1234”, the default password, to access the SMT main menu. As you
type a password, the screen displays an asterisk “ * ” for each character you type.
Safety Warnings
For your safety, be sure to read and follow all warning notices and instructions.
To reduce the risk of fire, use only No. 26 AWG or larger telephone wire.
Do NOT open the device or unit. Opening or removing covers can expose you to dangerous high voltage points or other
risks. ONLY qualified service personnel can service the device. Please contact your vendor for further information.
Use ONLY the dedicated power supply for your device. Connect the power cord or power adaptor to the right supply
voltage, that is, 110V AC for North America or 230V AC for Europe.
Do NOT use the device if the power supply is damaged as it might cause electrocution.
If the power supply is damaged, remove it from the power outlet.
Do NOT attempt to repair the power supply. Contact your local vendor to order a new power supply.
Place connecting cables carefully so that that no one will step on them or stumble over them. Do NOT allow anything to
rest on the power cord and do NOT locate the product where anyone can walk on the power cord.
If you wall mount your device, make sure that no electrical, gas or water pipes will be damaged.
Do NOT install nor use your device during a thunderstorm. There may be a remote risk of electric shock from lightning.
Do NOT expose your device to dampness, dust or corrosive liquids.
Do NOT use this product near water, for example, in a wet basement or near a swimming pool.
Make sure to connect the cables to the correct ports.
Do NOT obstruct the device ventilation slots, as insufficient airflow may harm your device.
Do NOT store things on the device.
Connect ONLY suitable accessories to the device.
Troubleshooting
PROBLEM
The PWR/SYS LEDs
are off.
CORRECTIVE ACTION
Make sure the Prestige’s power adaptor is connected to the Prestige and plugged into an appropriate
power source. Check that the Prestige and the power source are both turned on.
Turn the Prestige off and on. If the error persists, you may have a hardware problem. In this case,
you should contact your vendor.
The LAN LED won’t
turn on.
Check the cable connection to the Prestige LAN port.
The DSL LED is off.
Check the connection between the Prestige DSL port and the wall jack.
I cannot access the
SMT menu.
The default SMT password is “1234”. If you have changed the password and have now forgotten it,
you will need to reset the Prestige or upload the default configuration file (see User’s Guide).
I cannot access the
web configurator.
Check that your computer IP address and the Prestige IP address are on the same subnet.
Make sure your computer network card is working properly.
If you changed the Prestige default LAN IP address then enter the new one as the URL.
Make sure you enter the correct user name and password. The default user name is “admin” and the
default password is “1234”. If you forgot your password, you have to reset the Prestige. See the
User’s Guide.
I cannot ping any
computer on the LAN.
If the 10/100M LAN LED is off, check the cables between the Prestige and your computer or hub.
I cannot access the
Internet.
Make sure the Prestige is turned on and connected to the network.
Check the TCP/IP configuration on your computer. Make sure that the IP address and the subnet
mask of the Prestige and the computers are on the same subnet.
If the Prestige’s DSL LED is off, check the cable between the Prestige and the telephone wall jack.
Make sure you entered your user name correctly. Your user name may be case-sensitive.