1
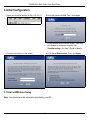
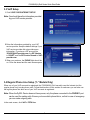
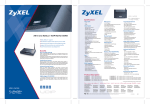
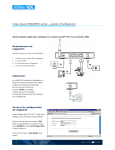
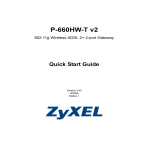
P-2602HW(L)-DxA Series
ADSL2+ 4-port Gateway VoIP IAD with IEEE 802.11g Wireless
Quick Start Guide
Version 3.40
Edition 1
5/2006
P-2602HW(L)-DxA Series Quick Start Guide
Overview
This Quick Start Guide is designed to help you set up the P-2602HW-DxA series and the the P-2602HWL-DxA
series devices (“P-2602HW(L)-DxA”). The P-2602HW-DxA series is an ADSL2+ router with a built in 4-port
switch and VoIP integrated access device (IAD). It also can expand your wired network by providing IEEE
802.11g wireless access.
The P-2602HWL-DxA series can also be set up to use regular phone services which do not use the Internet.
Note: The screens in this guide reflect the P-2602HWL-D1 model.
The following figure shows how your P-2602HW(L)-DxA (A) connects your network to the Internet and
provides firewall protection. It also shows how your device can make VoIP calls and calls to regular phones.
1 Requirements
Make sure you have the following things before you set up your P-2602HW(L)-DxA.
• Internet access - account information provided by your ISP, such as user name, password, and so on.
• VoIP account - You need the account information provided by your VoIP service provider (the company that lets
you make phone calls over the Internet). This information might include your URI, number, and so on.
• Internet Explorer 6.0 or later or Netscape Navigator 7.0 or later, with JavaScript enabled.
2
P-2602HW(L)-DxA Series Quick Start Guide
2 Hardware Connections
1 DSL: Use the gray ADSL cable to connect the DSL (or MODEM) jack on a splitter to this port. If a splitter is
not provided connect the telephone jack to this port.
2 LINE: Use the green PSTN line cable to connect the TEL (or PHONE) jack on a splitter to this port. If a splitter
is not provided connect the telephone jack to this port. The LINE port is only available in the P-2602HWLDxA models.
Note: When the ZyXEL Device does not have power, only the phone connected to the PHONE 1 port
can be used for making calls. Ensure you know which phone this is, so that in case of emergency
you can make outgoing calls.
3
P-2602HW(L)-DxA Series Quick Start Guide
3 ETHERNET 1~4: Use Ethernet cables to connect computers to this port for initial configuration and/or
Internet access.
4 PHONE 1-2: Use a telephone cable (and any telephone adaptors provided with your P-2602HW(L)-DxA) to
connect your telephones to these ports. If you only have one telephone, you should use port 1.
5 POWER: Use the power adaptor provided with your P-2602HW(L)-DxA to connect an appropriate power
source to this port.
Note: If you are using T-ISDN (UR-2), connect the green wire to a TAE connector before connecting it
to a telephone wall jack or the telephone splitter's TEL (or PHONE) jack.
6 Push in the POWER button. Look at the lights on either side of the P-2602HW(L)-DxA.
• The POWER light blinks during start-up and is green once the P-2602HW(L)-DxA is ready.
• Each ETHERNET light turns on if the corresponding ETHERNET port is properly connected.
The lights blink when the P-2602HW(L)-DxA is sending or receiving data through the corresponding ETHERNET port.
• The DSL light stays on if a physical connection with the ISP is established. The INTERNET
light stays on when Internet access is available.
• The PHONE lights stay on when your SIP account is registered and they blink if the receiver
is off the hook.
• The WLAN light turns on when the wireless LAN is ready. It blinks when the P-2602HW(L)DxA is sending/receiving data through the wireless LAN.
If the PHONE 1 or PHONE 2 light is on, go to Section 4 to see how to make calls through
the Internet.
If the INTERNET light comes on but the PHONE lights are off, go to Section 3.3 and use the
VOIP SETUP wizard.
If the INTERNET light is off but the DSL light is on, go to Section 3.1 and use the
INTERNET SETUP wizard to configure your Internet access settings.
If the lights are different than described, go to Troubleshooting.
4
P-2602HW(L)-DxA Series Quick Start Guide
3 Initial Configuration
1 Open your browser, and go to http://192.168.1.1.
2 Enter the password 1234. Then, click Login.
If your browser cannot find this screen, make sure
your browser is configured correctly. See
Troubleshooting in the User’s Guide for details.
3 Follow the directions in this screen.
4 Click Go to Wizard setup. Then, click Apply.
3.1 Internet/Wireless Setup
Note: You should have the information provided by your ISP.
5
P-2602HW(L)-DxA Series Quick Start Guide
1 Click INTERNET/WIRELESS SETUP.
2 Wait while the P-2602HW(L)-DxA tries to detect
your Internet connection. If the P-2602HW(L)DxA cannot detect your Internet connection,
follow the directions. Enter the information
provided by your ISP. Keep the default settings
if your ISP did not provide some information.
Make sure your wireless security settings are
compatible with your existing wireless devices.
See the User’s Guide for more information on
wireless networks. If you want to set up OTIST, go
to Section 3.2.
3 When your Internet connection is setup
correctly, the INTERNET light should be green.
When you are finished click Return to Wizard
Main Page.
3.2 Wireless Security and OTIST
ZyXEL's One-Touch Intelligent Security Technology (OTIST) feature allows you to automatically configure the
SSID and WPA-PSK on all OTIST-equipped wireless clients within range of the P-2602HW(L)-DxA.
Note: If you enable OTIST but select Disable wireless security using the wireless wizard, the P2602HW(L)-DxA will create a WPA-PSK automatically.
If you enable OTIST and select Manually assign a WEP key using the wireless wizard, the P2602HW(L)-DxA will replace the WEP key with a WPA-PSK.
Enable OTIST only if your wireless clients support WPA and OTIST.
You must enable OTIST on the P-2602HW(L)-DxA and all wireless clients within three minutes in any order.
To start OTIST on the P-2602HW(L)-DxA, hold in the RESET button for one to five seconds. Do not hold the
RESET button in for too long, as this will reset the P-2602HW(L)-DxA to the factory defaults. You can also
start OTIST in the wireless wizard screen.
To enable OTIST on wireless clients, click Start in the Adapter screen. The Setup Key is 01234567 by default.
If you have previously saved a setup key on the P-2602HW(L)-DxA, use it instead of the default.
For more information on wireless security and configuration, see Wireless LAN in the User's Guide.
6
P-2602HW(L)-DxA Series Quick Start Guide
3.3 VoIP Setup
1 Click VOICE OVER INTERNET SETUP.
Note: You should have the information provided
by your VoIP service provider.
2 Enter the information provided by your VoIP
service provider. Keep the default settings if your
VoIP service provider did not provide some
information. If you have a SIP account like
[email protected], the SIP Number
is 1234567, and the SIP Service Domain is VoIPprovider.com.
3 When you are done, the PHONE light should be
on. Close the wizard and the main screen opens.
3.4 Regular Phone Line Setup (“L” Models Only)
When one of your VoIP accounts is registered, the P-2602HW(L)-DxA normally uses the Internet (not the
regular phone line) to make phone calls. Follow the directions in this section to make sure you can also use
the regular phone line while one of your VoIP accounts is registered.
Note: When the ZyXEL Device does not have power, only the phone connected to the PHONE 1 port
can be used for making calls. Ensure you know which phone this is, so that in case of emergency
you can make outgoing calls.
In the main screen, click VoIP > PSTN Line.
7
P-2602HW(L)-DxA Series Quick Start Guide
PSTN Line Pre-fix Number: If you want to make a regular
phone call while one of your SIP accounts is registered.
Enter a prefix number (1 to 7 digits long) in the PSTN Line
Prefix Number field. These numbers tell the ZyXEL device
that you want to make a regular phone call.
Relay to PSTN Line: Enter phone numbers for regular
phone calls (that do not use the Internet) that you always
want to dial without the prefix number. For example, enter
emergency phone numbers here.
Click Apply.
4 Phone Calls
When a PHONE light turns on, your SIP account is registered successfully. Dial a numerical SIP number (like
“12345” for example) on your phone’s keypad. Use your voice service provider’s dialing plan to make calls
through the Internet to regular telephone numbers. See your User’s Guide for other calling options.
Troubleshooting
If you cannot access the Internet, follow these steps.
1 Check the device’s lights. If they are different than what is described in Section 2, turn off the device, make
sure the connections are correct, and inspect your cables for damage. Turn the device on again.
2 Follow the steps in Section 3 again. Make sure you enter the correct information. For example, if your
account has a user name and password, make sure you type it correctly. In addition, if you are not sure
which encapsulation your ISP uses, contact your ISP.
3 If you are using a new Internet account, contact your ISP to make sure it is active.
4 If you still have problems, see Troubleshooting in the User’s Guide.
If you can access the Internet, but you cannot make calls through the Internet, follow these steps.
1 Check the PHONE lights. If neither of them is on, make sure that your telephone is connected to the
corresponding PHONE port.
2 Make sure the VOICE OVER INTERNET SETUP wizard screens are properly configured (see Section 3.3).
3 You can also check the VoIP status in the Status screen. See the User’s Guide for more information about
this screen.
Viewing Your Product’s Certifications
1 Go to www.zyxel.com.
2 Select your product from the drop-down list box on the ZyXEL home page to go to that product's page.
3 Select the certification you wish to view from this page.
8