1
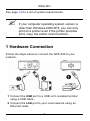
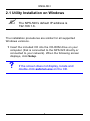
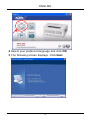
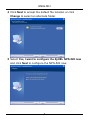
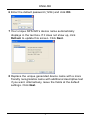
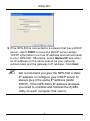
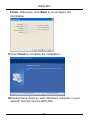
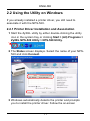
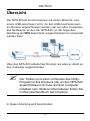
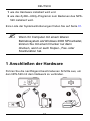
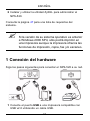
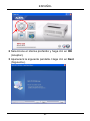
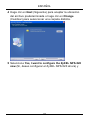
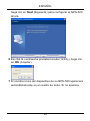
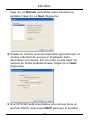
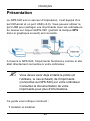
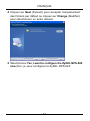
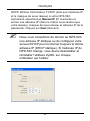
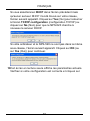
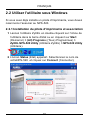
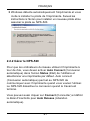
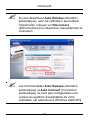
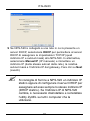
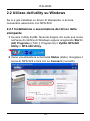
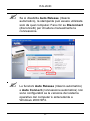
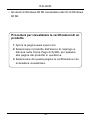
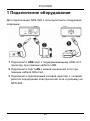
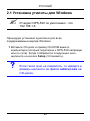
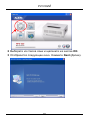
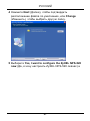
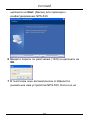
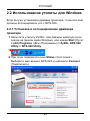
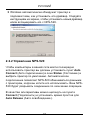
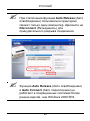
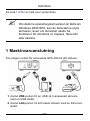
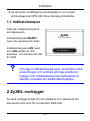
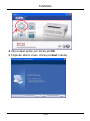
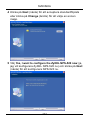
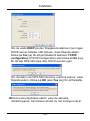
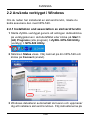
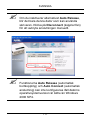
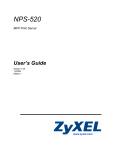
NPS-520
MFP Print Server
Quick Start Guide
Version 1.00
Edition 1
11/2006
Table of Contents
ENGLISH
1
DEUTSCH
17
ESPAÑOL
33
FRANÇAIS
49
ITALIANO
65
РУССКИЙ
81
SVENSKA
99
Copyright © 2006. All rights reserved.
ENGLISH
Overview
The NPS-520 is a print server and comes with one Ethernet
port and one USB (v2.0) port. You can use the USB port to
share a printer with the computers in the network to which the
NPS-520 (labeled NPS in the following graphic) is connected.
Through the NPS-520, the printer works as if it is connected
directly to your computer.
"
You should have already installed the driver
(and utility if there is one) for the printer
(connected to the NPS-520) on your computer.
Refer to your printer documentation for more
information.
This guide shows you how to:
1 Install the hardware.
2 Install and use the ZyXEL utility to manage the NPS-520.
1
ENGLISH
See page 14 for a list of system requirements.
"
If your computer operating system version is
older than Windows 2000 SP4, you can only
print on a printer even if the printer provides
print, copy, fax and/or scan functions.
1 Hardware Connection
Follow the steps below to connect the NPS-520 to your
network.
1 Connect the USB port to a USB v2.0 compliant printer
using a USB cable.
2 Connect the LAN port to your local network using an
Ethernet cable.
2
ENGLISH
3 Use the included power adaptor to connect the power
socket on the NPS-520 to an appropriate power source.
1.1 LEDs
Look at the LEDs (lights) on
the top panel.
The READY LED stays on
when the system is ready.
The LAN LED stays on if the
LAN port is properly
connected and blinks when
there is traffic.
V
If none of the LEDs are on, check your
connections, and inspect your cables for
damage. If the LEDs are still off, contact your
local vendor.
2 ZyXEL Utility
Use the utility to install and associate your printer driver as
well as manage the NPS-520.
3
ENGLISH
2.1 Utility Installation on Windows
"
The NPS-520’s default IP address is
192.168.1.6.
The installation procedures are similar for all supported
Windows versions.
1 Insert the included CD into the CD-ROM drive on your
computer (that is connected to the NPS-520 directly or
connected to your network). When the following screen
displays, click Setup.
V
If the screen does not display, locate and
double-click autorun.exe on the CD.
4
ENGLISH
2 Select your preferred language and click OK.
3 The following screen displays. Click Next.
5
ENGLISH
4 Click Next to accept the default file location or click
Change to select an alternate folder.
5 Select Yes, I want to configure the ZyXEL NPS-520 now
and click Next to configure the NPS-520 now.
6
ENGLISH
6 Enter the default password (1234) and click OK.
7 Your unique NPS-520’s device name automatically
displays in the text box. If it does not show up, click
Refresh to update this screen. Click Next.
8 Replace the unique generated device name with a more
friendly recognizable name with additional descriptive text
if you want. Alternatively, leave the fields at the default
settings. Click Next.
7
ENGLISH
9 If the NPS-520 is connected to a network that has a DHCP
server, select DHCP to have the DHCP server assign
TCP/IP information (such as IP address and subnet mask)
to your NPS-520. Otherwise, select Manual IP and enter
an IP address (in the same subnet as your network),
subnet mask and the gateway’s IP address. Click Next.
"
We recommend you give the NPS-520 a static
IP address or configure your DHCP server to
always give it the same IP address (static
DHCP). If the NPS-520’s IP address changes,
you need to uninstall and reinstall the ZyXEL
utility on each computer that uses it.
8
ENGLISH
If you selected DHCP in the previous screen but there was
no DHCP server found in your network, the following screen
displays. Click Yes to go back to the TCP/IP configuration
screen or click No to have the NPS-520 search for the DHCP
server again.
If your computer and the NPS-520 are not in the same
subnet, the following screen pops up. Click OK (or Yes) to
continue.
10This read-only screen shows the current settings. Check
whether what you have configured is correct and click
9
ENGLISH
Finish. Otherwise, click Back to re-configure the
information.
11Click Finish to complete the installation.
12Repeat these steps on each Windows computer in your
network that will use the NPS-520.
10
ENGLISH
2.2 Using the Utility on Windows
If you already installed a printer driver, you still need to
associate it with the NPS-520.
2.2.1 Printer Driver Installation and Association
1 Start the ZyXEL utility by either double-clicking the utility
icon in the system tray or clicking Start > (All) Programs >
ZyXEL NPS-520 Utility > NPS-520 Utility.
2 The Status screen displays. Select the name of your NPS520 and click Connect.
3 Windows automatically detects the printer and prompts
you to install the printer driver. Follow the on-screen
11
ENGLISH
instructions to install a new driver and/or have the driver
associate with the NPS-520.
2.2.2 Managing the NPS-520
To have computers in the network take turns to use the
printer, you need to enable Auto Connect in the utility Status
screen and select a default printer. Auto connect allows the
NPS-520 to communicate with the printer when you want to
use it. The NPS-520 drops the connection after the job is
finished.
Alternatively, click Connect and set the Auto Release idle
timeout.
12
ENGLISH
"
"
If you disable Auto Release, only that computer
can use the printer. Click Disconnect to
manually drop the connection.
The Auto Release and Auto Connect features
are not configurable if your computer operating
system version is older then Windows 2000
SP4.
13
ENGLISH
"
V
If the printer is not connected or not available
when you send out a request, the request will be
put in your computer’s print queue untill the
printer is available.
If you cannot use the printer, make sure you
enable Auto Release and/or Auto Connect on
all Windows computers.
3 System Requirements
Before installation, make sure you have a computer with the
following:
• Pentium II 300 MHz or above
• A minimum of 20 MB available hard disk space
• A minimum of 32 MB RAM
• A CD-ROM drive
• Windows 98 Second Edition (SE), Windows Me, Windows
2000, Windows 2003, Windows XP
• Windows 98 SE users may need the Windows 98 SE CD
14
ENGLISH
Procedure to View a Product’s Certification(s)
1 Go to www.zyxel.com.
2 Select your product from the drop-down list box on
the ZyXEL home page to go to that product's page.
3 Select the certification you wish to view from this
page.
15
ENGLISH
16
DEUTSCH
Übersicht
Der NPS-520 ist ein Druckserver mit einem Ethernet- und
einem USB-Anschluss (v2.0). An den USB-Anschluss kann
ein Drucker angeschlossen werden, der von allen Computern
des Netzwerks, an den der NPS-520 (in der folgenden
Abbildung als NPS bezeichnet) angeschlossen ist, verwendet
werden kann.
Über den NPS-520 arbeitet der Drucker, als wäre er direkt an
den Computer angeschlossen.
"
Der Treiber (und wenn vorhanden das UtilityProgramm) des Druckers (der an den NPS-520
angeschlossen ist) muss auf dem Computer
installiert sein. Weitere Informationen finden Sie
im Benutzerhandbuch des Druckers.
In dieser Anleitung wird beschrieben,
17
DEUTSCH
1 wie die Hardware installiert wird und
2 wie das ZyXEL-Utility-Programm zum Bedienen des NPS520 installiert wird.
Eine Liste der Systemanforderungen finden Sie auf Seite 31.
"
Wenn Ihr Computer mit einem älteren
Betriebssystem als Windows 2000 SP4 arbeitet,
können Sie mit einem Drucker nur dann
drucken, wenn er auch Kopier-, Fax- oder
Scanfunktion hat.
1 Anschließen der Hardware
Führen Sie die nachfolgend beschriebenen Schritte aus, um
den NPS-520 mit dem Netzwerk zu verbinden.
18
DEUTSCH
1 Schließen Sie einen USB-2.0-kompatiblen Drucker mit
einem USB-Kabel an den Anschluss USB an.
2 Schließen Sie das lokale Netzwerk mit einem
Ethernetkabel an den Anschluss LAN an.
3 Verbinden Sie den Netzanschluss des NPS-520 mit dem
mitgelieferten Netzadapter mit einer geeigneten
Stromquelle.
1.1 LEDs
Die LEDs (Anzeigeleuchten)
auf dem Gerät zeigen den
Betriebsstatus des Geräts
an.
Die READY-LED leuchtet,
wenn das System
betriebsbereit ist.
Die LAN-LED leuchtet, wenn
der LAN-Anschluss richtig verbunden ist, und sie blinkt, wenn
Daten empfangen oder gesendet werden.
V
Wenn keine der LEDs leuchtet, prüfen Sie, ob
alle Kabel unbeschädigt und richtig verbunden
sind. Wenn die LEDs weiterhin nicht leuchten,
wenden Sie sich an Ihren Fachhändler.
19
DEUTSCH
2 Das ZyXEL Utility-Programm
Mit dem Ultiliy-Programm wird sowohl der Druckertreiber
installiert und mit eventuell bereits installierten
Druckertreibern verknüpft als auch der NPS-520 bedient.
2.1 Installieren des Utility-Programms bei
Windows
"
Die standard IP-Adresse des NPS-520 ist
192.168.1.6.
Die Schritte für die Installation sind bei allen unterstützten
Versionen von Windows sehr ähnlich.
1 Legen Sie die mitgelieferte in das CD-ROM-Laufwerk des
Computers (der direkt mit dem NPS-520 oder mit dem
Netzwerk verbunden ist). Wenn das folgende Fenster
erscheint, klicken Sie auf Setup (Installieren).
V
Wenn dieses Fenster nicht erscheint, navigieren
Sie auf der CD zur Datei autorun.exe und
klicken Sie doppelt darauf.
20
DEUTSCH
2 Wählen Sie eine Sprache aus, und klicken Sie auf OK.
3 Das folgende Fenster wird angezeigt. Klicken Sie auf Next
(Weiter).
4 Klicken Sie auf Next (Weiter), um den vorgegebenen
Standardordner als Speicherort für die Datei zu
21
DEUTSCH
verwenden, oder klicken Sie auf Change (Ändern), um
einen anderen Ordner auszuwählen.
5 Wählen Sie Yes, I want to configure the ZyXEL NPS-520
now (Ja, ich möchte den ZyXEL NPS-520 jetzt
konfigurieren), und klicken Sie auf Next (Weiter), um den
NPS-520 zu konfigurieren.
22
DEUTSCH
6 Geben Sie das Standardkennwort (1234) ein, und klicken
Sie auf OK.
7 Im Textfeld wird automatisch der einmalige Gerätename
des NPS-520 angezeigt. Sollte er nicht angezeigt werden,
klicken Sie auf Refresh (Aktualisieren), um die Anzeige
dieses Fensters zu aktualisieren. Klicken Sie auf Next
(Weiter).
8 Ersetzen Sie den Gerätenamen durch einen Namen, den
Sie sich leichter merken können. Sie können aber auch
die Standardeinstellungen beibehalten. Klicken Sie auf
Next (Weiter).
23
DEUTSCH
9 Wenn der NPS-520 mit einem Netzwerk verbunden ist,
das über einen DHCP-Server verfügt, wählen Sie die
Option DHCP, damit der DHCP-Server Ihrem NPS-520 die
TCP/IP-Daten (wie IP-Adresse und Subnetz-Maske)
zuweist. Anderenfalls wählen Sie Manual IP (Manuelle
IP), und geben Sie eine IP-Adresse (im selben Subnetz
wie das Netzwerk), eine Subnetz-Maske und die IPAdresse des Gateways ein. Klicken Sie auf Next (Weiter).
"
Es wird empfohlen, dem NPS-520 eine statische
IP-Adresse zu geben oder den DHCP-Server so
zu konfigurieren, dass er dem NPS-520 immer
dieselbe IP-Adresse vergibt (statisches DHCP).
24
DEUTSCH
Wenn sich die IP-Adresse des NPS-520 ändert,
muss das ZyXEL Utility-Programm auf jedem
Computer, der mit dem Gerät arbeitet, neu
installiert werden.
Wenn Sie im vorhergehenden Fenster die Option DHCP
gewählt haben, aber im Netzwerk kein DHCP-Server
gefunden wurde, erscheint das folgende Fenster. Klicken Sie
auf Yes (Ja), um zum Fenster TCP/IP configuration (TCP/
IP-Konfiguration) zurückzukehren, oder auf No (Nein), damit
der NPS-520 noch einmal nach dem DHCP-Server sucht.
25
DEUTSCH
Wenn sich der Computer und der NPS-520 nicht im selben
Subnetz befinden, erscheint das folgende Fenster. Klicken
Sie zum Fortfahren auf OK (oder Yes (Ja)).
10In diesem schreibgeschützten Fenster werden die
aktuellen Einstellungen angezeigt. Prüfen Sie die
Einstellungen, und klicken Sie auf Finish (Fertig stellen).
Um die Einstellungen zu ändern, klicken Sie auf Back
(Zurück).
26
DEUTSCH
11Klicken Sie auf Finish (Fertig stellen), um die Installation
abzuschließen.
12Führen Sie diese Schritte auf allen Windows-Computern
aus, die den NPS-520 benutzen werden.
2.2 Benutzen des Utility-Programms bei
Windows
Wenn Sie bereits einen Druckertreiber installiert haben, muss
dieser mit dem NPS-520 verknüpft werden.
2.2.1 Installieren und Verknüpfen des Druckertreibers
1 Starten Sie das ZyXEL Utility-Programm, indem Sie
entweder doppelt auf das entsprechende Symbol in der
Taskleiste klicken oder indem Sie es über Start (start) >
27
DEUTSCH
(All) Programs ((Alle) Programme) > ZyXEL NPS-520
Utility > NPS-520 Utility aufrufen.
2 Das Fenster Status erscheint. Wählen Sie den Namen des
NPS-520, und klicken Sie auf Connect (Verbinden).
3 Windows erkennt automatisch den Drucker und fordert Sie
auf, den Druckertreiber zu installieren. Führen Sie die
Anweisungen auf dem Bildschirm aus, um einen neuen
28
DEUTSCH
Treiber zu installieren und/oder den Treiber mit dem NPS520 zu verknüpfen.
2.2.2 Bedienen des NPS-520
Damit alle Computer im Netzwerk Zugriff auf den Drucker
haben, müssen Sie im Fenster Status die Option Auto
Connect (Automatisch verbinden) wählen und dort einen
Standarddrucker einstellen. Mit der Funktion Auto connect
kann der NPS-520 mit dem Drucker kommunizieren, wenn
Sie ihn benutzen möchten. Nach abschließen der
Druckaufgabe beendet der NPS-520 die Verbindung.
Sie können auch auf Connect (Verbinden) klicken und bei
Auto Release (Automatisch freigeben) die Leerlaufzeit
einstellen.
29
DEUTSCH
"
"
Wenn Sie die Option Auto Release
(Automatisch freigeben) deaktivieren, kann nur
dieser Computer den Drucker benutzen. Klicken
Sie auf Disconnect (Trennen), um die
Verbindung manuell zu trennen.
Wenn Ihr Computer mit einem älteren
Betriebssystem als Windows 2000 SP4 arbeitet,
können die Optionen Auto Release
(Automatisch freigeben) und Auto Connect
(Automatisch verbinden) nicht konfiguriert
werden.
30
DEUTSCH
"
V
Wenn der Drucker beim Senden einer
Druckanfrage gerade nicht angeschlossen oder
verfügbar ist, wird diese Anfrage so lange in die
Druckwarteschlange gestellt, bis der Drucker
verfügbar ist.
Wenn der Drucker nicht druckt, stellen Sie
sicher, dass bei allen Windows-Computern die
Option Auto Release (Automatisch freigeben)
und/oder Auto Connect (Automatisch
verbinden) aktiviert ist.
3 Systemvoraussetzungen
Stellen Sie vor der Installation sicher, dass Ihr Computer die
folgenden Voraussetzungen erfüllt:
• Pentium II 300 MHz oder höher
• Mindestens 20 MB freier Festplattenspeicher
• Mindestens 32 MB RAM
• Ein CD-ROM-Laufwerk
31
DEUTSCH
• Windows 98 Second Edition (SE), Windows Me, Windows
2000, Windows 2003, Windows XP
• Wenn Sie mit Windows 98 SE arbeiten, benötigen Sie die
Programm-CD für Windows 98 SE
Schritte zum Ansehen der
Produktzertifizierung(en)
1 Rufen Sie die Website www.zyxel.com auf.
2 Wählen Sie auf der ZyXEL-Startseite aus der
Dropdown-Liste Ihr Produkt aus, um die Seite des
Produkts aufzurufen.
3 Wählen Sie auf dieser die Zertifizierung aus, die
angezeigt werden soll.
32
ESPAÑOL
Vista previa
El NPS-520 es un servidor de impresión y viene con un
puerto Ethernet y otro USB (v2.0). Puede utilizar el puerto
USB para compartir una impresora con los ordenadores de la
red a los que el NPS-520 (etiquetado como NPS en el
siguiente gráfico) esté conectado.
A través del NPS-520, la impresora funciona como si
estuviera directamente conectada a su ordenador.
"
Debería tener instalado el controlador (y la
utilidad si la hay) para la impresora (conectada
al NPS-520) en su ordenador. Consulte su
documentación de la impresora para más
información.
Esta guía le muestra cómo:
1 Instalar el Hardware.
33
ESPAÑOL
2 Instalar y utilizar la utilidad ZyXEL para administrar el
NPS-520.
Consulte la página 47 para una lista de requisitos del
sistema.
"
Si la versión de su sistema operativo es anterior
a Windows 2000 SP4, sólo podrá imprimir en
una impresora aunque la impresora ofrezca las
funciones de impresión, copia, fax y/o escaneo.
1 Conexión del hardware
Siga los pasos siguientes para conectar el NPS-520 a su red.
1 Conecte el puerto USB a una impresora compatible con
USB v2.0 utilizando un cable USB.
34
ESPAÑOL
2 Conecte el puerto LAN a su red local utilizando un cable
Ethernet.
3 Utilice el adaptador de alimentación incluido para
conectar el zócalo de alimentación del NPS-520 a una
fuente de alimentación apropiada.
1.1 LEDs
Mire los LEDs (luces) del
panel superior.
El LED READY (LISTO)
permanecerá encendido
cuando el sistema esté listo.
El LED LAN permanecerá
encendido si el puerto LAN
está correctamente
conectado y parpadea cuando hay tráfico.
V
Si ninguno de los LEDs está encendido,
verifique sus conexiones y compruebe si los
cables están dañados. Si los LEDs continúan
apagados, contacte con su vendedor local.
35
ESPAÑOL
2 Utilidad ZyXEL
Utilice la utilidad para instalar y asociar el controlador de su
impresora y para administrar el NPS-520.
2.1 Instalación de la utilidad en Windows
"
La dirección IP predeterminada del NPS-520 es
192.168.1.6.
Los procedimientos de instalación son similares para todas
las versiones de Windows soportadas.
1 Inserte el CD incluido en la unidad de CD-ROM de su
ordenador (conectada a su NPS-520 directamente o
conectada a la red). Cuando aparezca la siguiente
pantalla, haga clic en Setup (Configuración).
V
Si la pantalla no aparece, busque y haga doble
clic en autorun.exe en el CD.
36
ESPAÑOL
2 Seleccione el idioma preferido y haga clic en OK
(Aceptar).
3 Aparecerá la siguiente pantalla. Haga clic en Next
(Siguiente).
37
ESPAÑOL
4 Haga clic en Next (Siguiente) para aceptar la ubicación
del archivo predeterminada o haga clic en Change
(Cambiar) para seleccionar una carpeta distinta.
5 Seleccione Yes, I want to configure the ZyXEL NPS-520
now (Sí, deseo configurar el ZyXEL NPS-520 ahora) y
38
ESPAÑOL
haga clic en Next (Siguiente) para configurar el NPS-520
ahora.
6 Escriba la contraseña predeterminada (1234) y haga clic
en OK (Aceptar).
7 El nombre único del dispositivo de su NPS-520 aparecerá
automáticamente en el cuadro de texto. Si no aparece,
39
ESPAÑOL
haga clic en Refresh (Actualizar) para actualizar la
pantalla. Haga clic en Next (Siguiente).
8 Cambie el nombre único de dispositivo generado por un
nombre más fácil de reconocer añadiendo texto
descriptivo si lo desea. Por otro lado, puede dejar los
campos de forma predeterminada. Haga clic en Next
(Siguiente).
9 Si el NPS-520 está conectado a una red que tiene un
servidor DHCP, seleccione DHCP para que el servidor
40
ESPAÑOL
DHCP asigne la información TCP/IP (como la dirección IP
y máscara de subred) a su NPS-520. De lo contrario,
seleccione Manual IP (IP manual) y escriba una dirección
IP (en la misma subred de su red), máscara de subred y la
dirección IP de la puerta de enlace. Haga clic en Next
(Siguiente).
"
Le recomendamos asignar al NPS-520 una
dirección IP estática o configurar su servidor
DHCP para asignarle siempre la misma
dirección IP (DHCP estática). Si la dirección IP
del NPS-520 cambia, deberá desinstalar y
reinstalar la utilidad ZyXEL en cada ordenador
que la utilice.
41
ESPAÑOL
Si ha seleccionado DHCP en la pantalla anterior pero no se
ha encontrado un servidor DHCP en su red, aparecerá la
siguiente pantalla. Haga clic en Yes (Sí) para regresar a la
pantalla TCP/IP configuration (Configuración TCP/IP) o
haga clic en No para que el NPS-520 busque de nuevo el
servidor DHCP.
Si su ordenador y el NPS-520 no están en la misma subred,
aparecerá la siguiente pantalla. Haga clic en OK (Aceptar) (o
Yes (Sí)) para continuar.
10Esta pantalla de sólo lectura muestra la configuración
actual. Compruebe si lo que ha configurado es correcto y
42
ESPAÑOL
haga clic en Finish (Finalizar). De lo contrario, haga clic
en Back (Atrás) para volver a configurar la información.
11Haga clic en Finish (Finalizar) para completar la
instalación.
12Repita estos pasos en cada ordenador con Windows que
utilice el NPS-520 en su red.
43
ESPAÑOL
2.2 Usar la utilidad en Windows
Si ya ha instalado un controlador de impresora, deberá
asociarla con el NPS-520.
2.2.1 Instalación del controlador de la impresora y
asociación
1 Inicie la utilidad ZyXEL haciendo doble clic en el icono de
la utilidad en la bandeja del sistema o haciendo clic en
Start (Inicio) > (All) Programs ((Todos los) Programas) >
ZyXEL NPS-520 Utility > NPS-520 Utility.
2 Aparecerá la pantalla Status (Estado). Seleccione el
nombre de su NPS-520 y haga clic en Connect
(Conectar).
44
ESPAÑOL
3 Windows detectará automáticamente la impresora y le
pedirá que instale el controlador de la impresora. Siga las
instrucciones en pantalla para instalar un controlador nuevo
y/o asociar el controlador con el NPS-520.
2.2.2 Administrar el NPS-520
Para hacer que los ordenadores de la red se turnen para
utilizar la impresora, necesitará activar Auto Connect
(Conexión automática) en la pantalla Status (Estado) de la
utilidad y seleccione una impresora predeterminada. La
conexión automática permite al NPS-520 comunicarse con la
impresora cuando desee utilizarla. El NPS-520 detiene la
conexión tras finalizar el trabajo.
O bien, haga clic en Connect (Conectar) y ajuste el tiempo de
espera para Auto Release (Liberación automática).
45
ESPAÑOL
"
"
Si deshabilita Auto Release (Liberación
automática) la impresora podrá utilizarla sólo
ése ordenador. Haga clic en Disconnect
(Desconectar) para detener la conexión
manualmente.
Las características Auto Release (Liberación
automática) y Auto Connect (Conexión
automática) no son configurables si la versión
del sistema operativo de su ordenador es
anterior a Windows 2000 SP4.
46
ESPAÑOL
"
V
Si la impresora no está conectada o no está
disponible cuando envíe una petición, la
petición se pondrá en la cola de impresión de su
ordenador hasta que la impresora esté
disponible.
Si no puede utilizar la impresora, asegúrese de
haber habilitado Auto Release (Liberación
automática) y/o Auto Connect (Conexión
automática) en todos los ordenadores con
Windows.
3 Requisitos del sistema
Antes de la instalación, compruebe si su PC tiene lo
siguiente:
• Pentium II 300 MHz o superior
• Un mínimo de 20 MB de espacio libre en el disco duro
• Un mínimo de 32 MB de RAM
• Una unidad CD-ROM
47
ESPAÑOL
• Windows 98 Second Edition (SE), Windows Me, Windows
2000, Windows 2003, Windows XP
• Puede que los usuarios de Windows 98 SE necesiten el CD
de Windows 98 SE
Procedimiento para ver la(s) certificación(es)
del producto
1 Vaya a www.zyxel.com.
2 Seleccione su producto de la lista desplegable en
la página inicial de ZyXEL para ir a la página de
ese producto.
3 Seleccione el certificado que desee visualizar en
esta página.
48
FRANÇAIS
Présentation
Le NPS-520 est un serveur d'impression, il est équipé d'un
port Ethernet et un port USB (v2.0). Vous pouvez utiliser le
port USB pour partager une imprimante avec les ordinateurs
du réseau sur lequel leNPS-520 (portant la marque NPS
dans le graphique suivant) est connecté.
A travers le NPS-520, l'imprimante fonctionne comme si elle
était directement connectée à votre ordinateur.
"
Vous devez avoir déjà installé le pilote (et
l'utilitaire, le cas échéant) de l'imprimante
(connectée au NPS-520) sur votre ordinateur.
Consultez la documentation de votre
imprimante pour plus d'informations.
Ce guide vous indique comment :
1 Installer le matériel.
49
FRANÇAIS
2 Installer et utiliser l'utilitaire ZyXEL pour gérer le NPS-520.
Voir la page 63 pour une liste des configurations requises.
"
Si la version du système d'exploitation de votre
ordinateur est antérieure à Windows 2000 SP4,
vous pouvez seulement imprimer sur une
imprimante même si l'imprimante offre les
fonctions d'impression, copie, fax et/ou scanner.
1 Connexion matérielle
Suivez les étapes ci-dessous pour connecter le NPS-520 à
votre réseau.
1 Connectez le port USB à une imprimante conforme USB
v2.0 à l'aide d'un câble USB.
50
FRANÇAIS
2 Connectez le port LAN à votre réseau local à l'aide d'un
câble Ethernet.
3 Utilisez l'adaptateur d'alimentation inclus pour connecter
la prise d'alimentation du NPS-520 à une source
d'alimentation appropriée.
1.1 LED
Observez les LED (voyants)
sur le panneau supérieur.
La LED READY reste
allumée quand le système
est prêt.
La LED LAN reste allumée si
le port LAN est correctement
connecté et clignote quand il
y a du trafic.
V
Si aucune des LED n'est allumée, vérifiez vos
connexions, et vérifiez si vos câbles ne sont pas
endommagés. Si les LED sont toujours éteintes,
contactez votre revendeur.
51
FRANÇAIS
2 Utilitaire ZyXEL
Utilisez l'utilitaire pour installer et associer le pilote de votre
imprimante ainsi que pour gérer le NPS-520.
2.1 Installation de l'utilitaire sous Windows
"
L'adresse IP par défaut du NPS-520 est
192.168.1.6.
Les procédures d'installation sont semblables pour toutes les
versions Windows prises en charge.
1 Insérez le CD inclus dans le lecteur CD-ROM sur votre
ordinateur (connecté directement au NPS-520 ou
connecté à votre réseau). Quand l'écran suivant apparaît,
cliquez sur Setup (Installer).
V
Si l'écran n'apparaît pas, localisez et double
cliquez sur autorun.exe sur le CD.
52
FRANÇAIS
2 Sélectionnez votre langue préférée et cliquez sur OK.
3 L'écran suivant s'affiche. Cliquez sur Next (Suivant).
53
FRANÇAIS
4 Cliquez sur Next (Suivant) pour accepter l'emplacement
des fichiers par défaut ou cliquez sur Change (Modifier)
pour sélectionner un autre dossier.
5 Sélectionnez Yes, I want to configure the ZyXEL NPS-520
now (Oui, je veux configurer le ZyXEL NPS-520
54
FRANÇAIS
maintenant) et cliquez sur Next (Suivant) pour configurer
le NPS-520 maintenant.
6 Entrez le mot de passe par défaut (1234) et cliquez sur
OK.
7 Le nom de matériel unique de votreNPS-520 s'affiche
automatiquement dans la zone de texte. S'il n'apparaît
55
FRANÇAIS
pas, cliquez sur Refresh (Actualiser) pour mettre à jour
cet écran. Cliquez sur Next (Suivant).
8 Remplacez le nom de matériel unique généré, par un nom
plus facile à retenir avec, si vous le désirez, un texte
descriptif supplémentaire. Vous pouvez aussi laisser les
champs avec leurs paramètres par défaut. Cliquez sur
Next (Suivant).
9 Si le NPS-520 est connecté à un réseau comportant un
serveur DHCP, sélectionnez DHCP pour que le serveur
56
FRANÇAIS
DHCP attribue l'information TCP/IP (telle que l'adresse IP
et le masque de sous réseau) à votre NPS-520.
Autrement, sélectionnez Manual IP (IP manuelle) et
entrez une adresse IP (dans le même sous-réseau que
votre réseau), masque de sous-réseau et adresse IP de la
passerelle. Cliquez sur Next (Suivant).
"
Nous vous conseillons de donner au NPS-520
une adresse IP statique ou de configurer votre
serveur DHCP pour lui donner toujours la même
adresse IP (DHCP statique). Si l'adresse IP du
NPS-520 change, vous devez désinstaller et
réinstaller l'utilitaire ZyXEL sur chaque
ordinateur qui l'utilise.
57
FRANÇAIS
Si vous sélectionnez DHCP dans l'écran précédent mais
qu'aucun serveur DHCP n'a été trouvé sur votre réseau,
l'écran suivant apparaît. Cliquez sur Yes (Oui) pour retourner
à l'écran TCP/IP configuration (configuration TCP/IP) ou
cliquez sur No (Non) pour que le NPS-520 cherche à
nouveau le serveur DHCP.
Si votre ordinateur et le NPS-520 ne sont pas dans le même
sous-réseau, l'écran suivant apparaît. Cliquez sur OK (ou
sur Yes (Oui)) pour continuer.
10Cet écran en lecture seule affiche les paramètres actuels.
Vérifiez si votre configuration est correcte et cliquez sur
58
FRANÇAIS
Finish (Terminer). Autrement, cliquez sur Back (Retour)
pour reconfigurer les informations.
11Cliquez sur Finish (Terminer) pour terminer l'installation.
12Répétez ces étapes sur chaque ordinateur fonctionnant
sous Windows dans votre réseau qui utilisera le .NPS-520
59
FRANÇAIS
2.2 Utiliser l'utilitaire sous Windows
Si vous avez déjà installé un pilote d'imprimante, vous devez
néanmoins l'associer au NPS-520.
2.2.1 Installation du pilote d'imprimante et association
1 Lancez l'utilitaire ZyXEL en double-cliquant sur l'icône de
l'utilitaire dans la barre d'état ou en cliquant sur Start
(Démarrer) > (All) Programs ((Tous) Programmes) >
ZyXEL NPS-520 Utility (Utilitaire ZyXEL) > NPS-520 Utility
(Utilitaire).
2 L'écran Status (Etat) apparaît. Sélectionnez le nom de
votreNPS-520 et cliquez sur Connect (Connecter).
60
FRANÇAIS
3 Windows détecte automatiquement l'imprimante et vous
invite à installer le pilote de l'imprimante. Suivez les
instructions à l'écran pour installer un nouveau pilote et/ou
associer le pilote au NPS-520.
2.2.2 Gérer le NPS-520
Pour que les ordinateurs du réseau utilisent l'imprimante à
tour de rôle, vous devez activer Auto Connect (Connexion
automatique) dans l'écran Status (Etat) de l'utilitaire et
sélectionner une imprimante par défaut. Auto connect
(Connexion automatique) permet au NPS-520 de
communiquer avec l'imprimante quand vous voulez l'utiliser.
Le NPS-520 désactive la connexion quand le travail est
terminé.
Vous pouvez aussi cliquer sur Connect (Connecter) et définir
le délai d'inactivité pour Auto Release (Abandon
automatique).
61
FRANÇAIS
"
"
Si vous désactivez Auto Release (Abandon
automatique), seul cet ordinateur peut utiliser
l'imprimante. Cliquez sur Disconnect
(Déconnecter) pour désactiver manuellement la
connexion.
Les fonctionnalités Auto Release (Abandon
automatique) et Auto Connect (Connexion
automatique) ne sont pas configurables si la
version du système d'exploitation de votre
ordinateur est antérieure à Windows 2000 SP4.
62
FRANÇAIS
"
V
Si l'imprimante n'est pas connectée ou si elle
n'est pas disponible quand vous émettez une
requête, la requête sera placée dans la file
d'attente d'impression de votre ordinateur
jusqu'à ce que l'imprimante soit disponible.
Si vous ne pouvez pas utiliser l'imprimante,
vérifiez que vous avez activé Auto Release
(Abandon automatique) et/ou Auto Connect
(Connexion automatique) sur tous les
ordinateurs fonctionnant sous Windows.
3 Configuration requise
Avant l'installation, vérifiez que votre ordinateur comporte les
éléments suivants :
• Pentium II 300 MHz ou supérieur
• Un espace minimum de 20 Mo disponible sur le disque dur
• Une RAM de 32 Mo minimum
• Un lecteur CD-ROM
63
FRANÇAIS
• Windows 98 Seconde Edition (SE), Windows Me, Windows
2000, Windows 2003, Windows XP
• Les utilisateurs de Windows 98 SE auront peut-être besoin
du CD de Windows 98 SE
Procédure pour afficher la (les) certification(s)
d'un produit
1 Allez à www.zyxel.com.
2 Sélectionnez votre produit dans la liste déroulante
dans la page d'accueil du ZyXEL pour aller à la
page de ce produit.
3 Sélectionnez la certification que vous désirez
consulter dans cette page.
64
ITALIANO
Cenni generali
NPS-520 è un server di stampa dotato di una porta Ethernet
e di una porta USB (v2.0). È possibile utilizzare la porta USB
per condividere una stampante con i computer nella rete a cui
NPS-520 (didascalia NPS nella figura seguente) è collegato.
Tramite NPS-520 la stampante lavora come se fosse
collegata direttamente al computer.
"
Il driver (e il programma di utilità, se esistente)
della stampante (collegata a NPS-520)
dovrebbe essere già installato sul computer.
Vedere la documentazione della stampante per
ulteriori informazioni.
In questa guida viene spiegato come:
1 Installare l'hardware.
2 Installare e utilizzare l'utility ZyXEL per gestire NPS-520.
65
ITALIANO
Vedere a pagina 78 per l'elenco dei requisiti di sistema.
"
Se il sistema operativo del computer è una
versione antecedente a Windows 2000 SP4, su
una stampante è possibile solo stampare anche
se questa è dotata di funzioni di stampa, copia,
fax e/o scanner.
1 Collegamento hardware
Attenersi alla procedura seguente per collegare NPS-520 alla
rete.
1 Utilizzare un cavo USB per collegare la porta USB a una
stampante compatibile USB v2.0.
66
ITALIANO
2 Collegare la porta LAN alla rete locale utilizzando un cavo
Ethernet.
3 Utilizzare l'alimentatore fornito a corredo per collegare la
presa power (alimentazione) presente su NPS-520 a una
sorgente di alimentazione appropriata.
1.1 LED
Leggere lo stato dei LED
(spie luminose) presenti sul
pannello superiore.
Quando il sistema è pronto
si accende il LED READY
(pronto).
Il LED LAN resta acceso
quando la porta LAN è
collegata correttamente e lampeggia quando c'è traffico dati.
V
Se nessuno dei LED è acceso, controllare i
collegamenti e controllare la presenza di
eventuali danni ai cavi. Se i LED restano ancora
spenti, contattare il rivenditore locale.
67
ITALIANO
2 Utility ZyXEL
Utilizzare l'utility per installare e associare il driver della
stampante nonché gestire le funzioni di NPS-520.
2.1 Installazione dell'utility in Windows
"
L'indirizzo IP predefinito di NPS-520 è
192.168.1.6.
Le procedure di installazione sono simili per tutte le versioni
di Windows supportate.
1 Inserire il CD fornito a corredo nel lettore CD-ROM del
computer (collegato direttamente a NPS-520 o collegato
alla rete). Alla visualizzazione della schermata seguente,
fare clic su Setup (installazione).
V
Se la schermata non viene visualizzata,
individuare e fare doppio clic sul file
autorun.exe sul CD.
68
ITALIANO
2 Selezionare la lingua desiderata e fare clic su OK.
3 Viene visualizzata la seguente schermata. Fare clic su
Next (avanti).
69
ITALIANO
4 Fare clic su Next (avanti) per accettare la posizione
predefinita o fare clic su Change (cambia) per selezionare
una cartella alternativa.
5 Scegliere Yes, I want to configure the ZyXEL NPS-520
now (sì, desidero configurare ora lo ZyXEL NPS-520) e
fare clic su Next (avanti) per configurare NPS-520.
70
ITALIANO
6 Immettere la password predefinita (1234) e fare clic su
OK.
7 Nella casella di testo viene visualizzato automaticamente
il nome di dispositivo univoco di NPS-520. Se il nome non
viene visualizzato, fare clic su Refresh (aggiorna) per
aggiornare la schermata. Fare clic su Next (avanti).
8 Sostituire il nome di dispositivo generato univocamente
con un nome mnemonico riconoscibile più facilmente,
aggiungendo testo descrittivo a piacere. In alternativa,
lasciare le impostazioni predefinite in questi campi. Fare
clic su Next (avanti).
71
ITALIANO
9 Se NPS-520 è collegato a una rete in cui è presente un
server DHCP, selezionare DHCP per permettere al server
DHCP di assegnare le impostazioni TCP/IP (quali
indirizzo IP e subnet mask) allo NPS-520. In alternativa,
selezionare Manual IP (IP manuale) e immettere un
indirizzo IP (della stessa subnet della rete), la relativa
subnet mask e l'indirizzo IP del gateway. Fare clic su Next
(avanti).
"
Si consiglia di fornire a NPS-520 un indirizzo IP
statico oppure di configurare il server DHCP per
assegnare ad esso sempre lo stesso indirizzo IP
(DHCP statico). Se l'indirizzo IP di NPS-520
cambia, è necessario disinstallare e reinstallare
l'utility ZyXEL su tutti i computer che la
utilizzano.
72
ITALIANO
Se nella schermata precedente si è selezionato DHCP ma
non è stato trovato alcun server DHCP nella rete, viene
visualizzata la schermata seguente. Fare clic su Yes (sì) per
tornare alla schermata TCP/IP configuration
(configurazione TCP/IP) oppure fare clic su No per
consentire a NPS-520 di cercare nuovamente il server
DHCP.
Se il computer e NPS-520 non sono nella stessa subnet,
viene visualizzata la schermata seguente. Fare clic su OK
(oppure su Yes (sì)) per continuare.
73
ITALIANO
10Questa schermata a sola lettura mostra le impostazioni
correnti. Verificare che le impostazioni configurate siano
corrette e fare clic su Finish (fine). In caso contrario, fare
clic su Back (indietro) per riconfigurare le impostazioni.
11Fare clic su Finish (fine) per completare l'installazione.
12Ripetere questa procedura su tutti i computer Windows
della rete che dovranno utilizzare NPS-520.
74
ITALIANO
2.2 Utilizzo dell'utility su Windows
Se si è già installato un driver di stampante, è ancora
necessario associarlo con NPS-520.
2.2.1 Installazione e associazione del driver della
stampante
1 Avviare l'utility ZyXEL facendo doppio clic sulla sua icona
nell'area di notifica di Windows oppure scegliendo Start >
(All) Programs ((Tutti i) Programmi) > ZyXEL NPS-520
Utility > NPS-520 Utility.
2 Viene visualizzata la schermata Status (stato). Scegliere il
nome di NPS-520 e fare clic su Connect (connetti).
75
ITALIANO
3 Windows riconosce automaticamente la stampante e
richiede di installare il driver della stampante. Attenersi alle
istruzioni visualizzate per installare un nuovo driver e/o
associare il driver con NPS-520.
2.2.2 Gestione di NPS-520
Per consentire ai computer della rete di utilizzare a turno la
stampante, è necessario abilitare Auto Connect
(connessione automatica) nella schermata Status (stato)
dell'utility e selezionare una stampante predefinita. La
connessione automatica consente a NPS-520 di comunicare
con la stampante quando la si utilizza. Una volta terminato il
lavoro, NPS-520 chiude la connessione.
In alternativa, fare clic su Connect (connetti) e impostare il
timeout di inattività Auto Release (rilascio automatico).
76
ITALIANO
"
"
Se si disabilita Auto Release (rilascio
automatico), la stampante può essere utilizzata
solo da quel computer. Fare clic su Disconnect
(disconnetti) per chiudere manualmente la
connessione.
Le funzioni Auto Release (rilascio automatico)
e Auto Connect (connessione automatica) non
sono configurabili se la versione del sistema
operativo del computer è antecedente a
Windows 2000 SP4.
77
ITALIANO
"
V
Se la stampante non è collegata o non
disponibile quando si invia una richiesta,
quest'ultima sarà inserita nella coda di stampa
del computer finché la stampante è disponibile.
Se non è possibile utilizzare la stampante,
verificare di aver abilitato Auto Release (rilascio
automatico) e/o Auto Connect (connessione
automatica) su tutti i computer Windows.
3 Requisiti di sistema
Prima di eseguire l'installazione, verificare che il computer sia
dotato dei seguenti requisiti:
• Pentium II 300 MHz o superiore
• Almeno 20 MB di spazio libero su disco rigido
• Almeno 32 MB di RAM
• Una unità CD-ROM
• Windows 98 Second Edition (SE), Windows Me, Windows
2000, Windows 2003, Windows XP
78
ITALIANO
• Gli utenti di Windows 98 SE necessitano del CD di Windows
98 SE
Procedura per visualizzare le certificazioni di un
prodotto
1 Aprire la pagina www.zyxel.com.
2 Selezionare il prodotto dall'elenco di riepilogo a
discesa nella Home Page di ZyXEL per passare
alla pagina del prodotto in questione.
3 Selezionare da questa pagina la certificazione che
si desidera visualizzare.
79
ITALIANO
80
РУССКИЙ
Й
Обзор
Устройство NPS-520 является сервером печати, который
имеет по одному порту Ethernet и USB (v2.0). Вы можете
использовать порт USB для совместного использования
принтера с компьютерами, которые подключены к сети
имеющей NPS-520 (на иллюстрации внизу указан как
NPS).
При использовании NPS-520 принтер работает так, как
будто он напрямую подключен к компьютеру.
"
На вашем компьютере уже должен быть
установлен драйвер (и утилита, если она
устанавливается вместе с драйвером) для
принтера (подключенного к NPS-520).
Дополнительную информацию смотрите в
документации к принтеру.
В этом руководстве по будет показано, как:
81
РУССКИЙ
1 Установить оборудование.
2 Для управления NPS-520 необходимо установить
утилиту ZyXEL.
Перечень системных требований смотрите на странице
96.
"
Если на компьютере установлена
операционная система более старой версии,
чем Windows 2000 SP4, то вы сможете
использовать принтер только для печати
даже в том случае, если это устройство
позволяется выполнять печать, копирование,
отправку факсов и сканирование.
82
РУССКИЙ
1 Подключение оборудования
Для подключения NPS-520 к сети выполните следующие
операции.
1 Подключите USB порт к поддерживающему USB v2.0
принтеру при помощи кабеля USB.
2 Подключите порт LAN к вашей локальной сети при
помощи кабеля Ethernet.
3 Подключите прилагаемый сетевой адаптер к сетевой
розетке подходящей электрической сети и разъему на
NPS-520 .
83
РУССКИЙ
1.1 Светодиодные индикаторы
Посмотрите на
светодиодные индикаторы
на верхней панели.
Включенный индикатор
READY (Готов) означает,
что система готова к
работе.
Светодиодный индикатор
LAN загорается при правильном подключении порта LAN
и мигает при передаче данных.
V
Если ни один из индикаторов не загорается,
то проверьте надежность соединений и
отсутствие повреждений кабелей. Если
индикаторы все равно не включаются то
обратитесь к вашему местному поставщику.
2 Утилита ZyXEL
Утилита необходима для установки соответствующего
вашему принтеру драйвера и управления NPS-520.
84
РУССКИЙ
2.1 Установка утилиты для Windows
"
IP-адрес NPS-520 по умолчанию - это
192.168.1.6.
Процедура установки однотипна для всех
поддерживаемых версий Windows.
1 Вставьте CD-диск в привод CD-ROM вашего
компьютера (который подключен к NPS-520 напрямую
или по сети). Когда отобразится следующее окно,
щелкните на кнопке Setup (Установить).
V
Если такое окно не появилось, то найдите и
дважды щелкните на файле autorun.exe на
CD-диске.
85
РУССКИЙ
2 Выберите из списка язык и щелкните на кнопке OK.
3 Отобразится следующее окно. Нажмите Next (Далее).
86
РУССКИЙ
4 Нажмите Next (Далее), чтобы подтвердить
расположение файла по умолчанию, или Change
(Изменить), чтобы выбрать другую папку.
5 Выберите Yes, I want to configure the ZyXEL NPS-520
now (Да, я хочу настроить ZyXEL NPS-520 сейчас) и
87
РУССКИЙ
щелкните на Next (Далее) для перехода к
конфигурированию NPS-520.
6 Введите пароль по умолчанию (1234) и щелкните на
OK.
7 В текстовом окне автоматически отобразится
уникальное имя устройства NPS-520. Если оно не
88
РУССКИЙ
будет показано, то обновите это окно, щелкнув на
Refresh (Обновить). Нажмите Next (Далее).
8 Если вы хотите, то можно заменить уникальное
сгенерированное имя устройства более понятным
запоминающимся именем с дополнительным
поясняющим текстом. Если вы не желаете этого
делать, то оставьте установки по умолчанию. Нажмите
Next (Далее).
89
РУССКИЙ
9 Если NPS-520 подключается к сети, имеющей DHCP
сервер, то установите DHCP для получения
назначаемой сервером информации TCP/IP
(например, IP-адреса и маски подсети) вашим NPS520. Иначе, выберите Manual IP (Ручной IP) и введите
IP-адрес (в той же подсети, что и ваша сеть), маску
подсети и IP-адрес шлюза. Нажмите Next (Далее).
"
Мы рекомендуем вам присваивать NPS-520
статический IP-адрес или настроить DHCP
сервер так, чтобы он постоянно присваивал
постоянный IP-адрес (статический DHCP).
При изменении IP-адреса NPS-520 вы будете
вынуждены удалять и устанавливать заново
утилиту ZyXEL на каждом компьютере,
который ее использует.
90
РУССКИЙ
Если вы выберете DHCP в предыдущем окне, но он не
будет найден в сети, то появится следующее окно.
Щелкните Yes (Да) для возврата к окну TCP/IP
configuration (Конфигурация TCP/IP) или щелкните No
(Нет), чтобы заставить NPS-520 выполнить поиск DHCP
сервера еще раз.
Если компьютер и NPS-520 находятся в разных подсетях,
то появится следующее окно. Щелкните OK (или Yes
(Да)), чтобы продолжить установку.
10Это предназначенное только для чтения окно
отображает текущие настройки. Проверьте
правильность введенной вами конфигурации и
щелкните Finish (Завершить). При обнаружении
91
РУССКИЙ
неточностей щелкните Back (Назад) для изменения
информации.
11Нажмите Finish (Завершить), чтобы завершить
процесс установки.
12Повторите эти операции на всех компьютерах с ОС
Windows в вашей сети, которые будут использовать
NPS-520.
92
РУССКИЙ
2.2 Использование утилиты для Windows
Если вы уже установили драйвер принтера, то вы все еще
должны ассоциировать его с NPS-520.
2.2.1 Установка и ассоциирование драйвера
принтера
1 Запустите утилиту ZyXEL, или дважды щелкнув на ее
значке на панели задач Windows, или нажав Start (Пуск)
> (All) Programs ((Все) Программы) > ZyXEL NPS-520
Utility > NPS-520 Utility.
2 При этом появляется окно Status (Состояние).
Выберите имя вашего NPS-520 и щелкните Connect
(Подключить).
93
РУССКИЙ
3 Windows автоматически обнаружит принтер и
подскажет вам, как установить его драйвер. Следуйте
инструкциям на экране, чтобы установить новый драйвер
и/или ассоциировать его с NPS-520.
2.2.2 Управление NPS-520
Чтобы компьютеры в вашей сети могли поочередно
использовать принтер вы должны установить пункт Auto
Connect (Авто подключение) в окне Status (Состояние) и
выбрать принтер по умолчанию. Автоматическое
подключение позволяет NPS-520 обмениваться данными
с принтером, когда вы хотите его использовать. Ваш NPS520 будет разрывать соединение по окончании операции.
В качестве альтернативы можно щелкнуть на пункте
Connect (Подключить) и установить время простоя для
Auto Release (Авто освобождение).
94
РУССКИЙ
"
"
При отключении функции Auto Release (Авто
освобождение) пользоваться принтером
сможет только один компьютер. Щелкните на
Disconnect (Разъединить) для
принудительного разрыва соединения.
Функции Auto Release (Авто освобождение)
и Auto Connect (Авто подключение) не
работают в операционных системах более
ранних версий, чем Windows 2000 SP4.
95
РУССКИЙ
"
V
Если при отправке запроса принтер будет не
подключен или недоступен, то этот запрос
будет поставлен в очередь печати до
освобождения принтера.
Если вам не удается использовать принтер,
то проверьте включение функций Auto
Release (Авто освобождение) и/или Auto
Connect (Авто подключение) на всех
компьютерах с Windows.
3 Системные требования
Перед началом установки убедитесь, что ваш компьютер
удовлетворяет следующим требованиям:
• Pentium II 300 МГц и выше
• Минимум 20 Мб пространства на жестком диске
• Минимум 32 Мб оперативной памяти
• Привод CD-ROM
• Windows 98 Second Edition (SE), Windows Me, Windows
2000, Windows 2003, Windows XP
96
РУССКИЙ
• Пользователям Windows 98 SE может понадобиться CDдиск с дистрибутивом Windows 98 SE
Процедура просмотра сертификатов
продукта
1 Посетите сайт www.zyxel.com.
2 Выберите ваш продукт из выпадающего списка
на домашней странице ZyXEL и перейдите на
его страницу.
3 Выберите на этой странице сертификат, который
вы хотите просмотреть.
97
РУССКИЙ
98
SVENSKA
Översikt
NPS-520 är en printserver som levereras med en Ethernetport och en USB (v2.0) -port. Du kan använda USB-porten för
att dela en skrivare mellan datorerna i det nätverk som NPS520 (märkt NPS i följande grafik) är ansluten till.
Tack vare NPS-520 fungerar skrivaren som om den är direkt
ansluten till din dator.
"
Du ska redan ha installerat drivrutinen (och
eventuellt verktygsprogram) för skrivaren
(ansluten till NPS-520) i din dator. Se skrivarens
dokumentation för mer information.
Denna bruksanvisning beskriver hur du:
1 Installerar maskinvara.
2 Installerar och använder ZyXEL-verktyget för att hantera
NPS-520.
99
SVENSKA
Se sida 112 för en lista över systemkrav.
"
Om datorns operativsystemversion är äldre än
Windows 2000 SP4, kan du bara skriva ut på
skrivaren, även om skrivaren skulle ha
funktioner för att skriva ut, kopiera, faxa och/
eller skanna.
1 Maskinvaruanslutning
Följ stegen nedan för att ansluta NPS-520 till ditt nätverk.
1 Anslut USB-porten till en USB v2.0-anpassad skrivare
med en USB-sladd.
2 Anslut LAN-porten till ditt lokala nätverk med en Ethernetsladd.
100
SVENSKA
3 Använd den medföljande strömadaptern och anslut
strömuttaget på NPS-520 till en lämplig strömkälla.
1.1 Indikatorlampor
Titta på indikatorlamporna
på toppanelen.
Indikatorlampan READY
lyser när systemet är klart.
Indikatorlampan LAN lyser
om LAN-porten är rätt
ansluten, och blinkar när det
är trafik.
V
Om ingen indikatorlampa lyser, kontrollera dina
anslutningar och verifiera att inga sladdar är
trasiga. Om indikatorlamporna fortfarande är
släckta, kontakta din lokala återförsäljare.
2 ZyXEL-verktyget
Använd verktyget både för att installera och associera din
skrivardrivrutin som för att hantera NPS-520.
101
SVENSKA
2.1 Verktygsinstallation i Windows
"
NPS-520:s standard-IP-adress är 192.168.1.6.
Installationsprocedurerna är likartade för alla Windowsversioner som stöds.
1 Sätt in den medföljande CD-skivan i CD-ROM-enheten på
din dator (som är ansluten till NPS-520 direkt eller
ansluten till ditt nätverk). När följande skärm visas, klicka
på Setup (inställningar).
V
Om skärmen inte visas, leta reda på och
dubbelklicka på autorun.exe på CD-skivan.
102
SVENSKA
2 Välj önskat språk och klicka på OK.
3 Följande skärm visas. Klicka på Next (nästa).
103
SVENSKA
4 Klicka på Next (nästa) för att acceptera standardfilplats
eller klicka på Change (ändra) för att välja en annan
mapp.
5 Välj Yes, I want to configure the ZyXEL NPS-520 now (ja,
jag vill konfigurera ZyXEL NPS-520 nu) och klicka på Next
(nästa) för att konfigurera NPS-520 nu.
104
SVENSKA
6 Ange standardlösenordet (1234) och klicka på OK.
7 NPS-520;s unika enhetsnamn visas automatiskt i
textrutan. Om det inte visas, klicka på Refresh
(uppdatera) för att uppdatera skärmen. Klicka på Next
(nästa).
8 Om du vill kan du ersätta det unika genererade
enhetsnamnet med ett mer lättigenkännligt namn med
extra beskrivande text. Alternativt kan du låta fälten få ha
kvar sina standardinställningar. Klicka på Next (nästa).
105
SVENSKA
9 Om NPS-520 är ansluten till ett nätverk som har en
DHCP-server, välj DHCP och låt DHCP-servern tilldela
TCP/IP-information (som t. ex. IP-adress och
subnetmask) till NPS-520. I annat fall cäljer du Manual IP
(manuell IP) och anger en IP-adress (i samma subnet som
ditt nätverk), subnetmask och gateway-IP-adress. Klicka
på Next (nästa).
"
Vi rekommenderar att du ger NPS-520 en
statisk IP-adress eller konfigurerar din DHCPserver tatt alltid ge den samma IP-adress
(statisk DHCP). Om NPS-520:s IP-adress
ändras, måste du avinstallera och ominstallera
ZyXEL-verktyget på alla datorer som använder
det.
106
SVENSKA
Om du valde DHCP på den föregående skärmen men ingen
DHCP-server hittades i ditt nätverk, visas följande skärm.
Klicka på Yes (ja) för att gå tillbaka till skärmen TCP/IP
configuration (TCP/IP-konfiguration) eller klicka på No (nej)
för att låta NPS-520 söka efter DHCP-servern igen.
Om din dator och NPS-520 inte finns i samma subnet, visas
följande skärm. Klicka på OK (eller Yes (ja)) för att fortsätta.
10Denna skrivskyddade skärm visar de aktuella
inställningarna. Kontrollera att det du har konfigurerat är
107
SVENSKA
rätt och klicka på Finish (slutför). I annat fall klickar du på
Back (bakåt) för att omkonfigurera informationen.
11Klicka på Finish (slutför) för att slutföra installationen.
12Upprepa dessa steg för varje Windows-dator i ditt nätverk
som ska använda NPS-520.
108
SVENSKA
2.2 Använda verktyget i Windows
Om du redan har installerat en skrivardrivrutin, måste du
ändå associera den med NPS-520.
2.2.1 Installation and association av skrivardrivrutin
1 Starta ZyXEL-verktyget genom att antingen dubbelklicka
på verktygsikonen i aktivitetsfältet eller klicka på Start >
(All) Programs (alla program) > ZyXEL NPS-520 Utility
(verktyg) > NPS-520 Utility.
2 Skärmen Status visas. Välj namnet på din NPS-520 och
klicka på Connect (anslut).
3 Windows detekterar automatiskt skrivaren och uppmanar
dig att installera skrivardrivrutinen. Följ instruktionerna på
109
SVENSKA
skärmen för att installera en ny drivrutin och/eller associera
drivrutinen med NPS-520.
2.2.2 Hantera NPS-520
För att låta datorer i nätverket turas om att använda skrivaren,
måste du aktivera Auto Connect (automatisk anslutning) på
verktygsskärmen Status och välja en standardskrivare.
Autoanslutningen låter NPS-520 kommunicera med skrivarne
när du vill använda den. NPS-520 kopplar bort anslutningen
när jobbet är klart.
Alternativt kan du klicka på Connect (anslut) och ställa in
Auto Release (automatisk bortkoppling) efter en viss tids
inaktivitet.
110
SVENSKA
"
"
Om du inaktiverar alternativet Auto Release,
blir det bara denna dator som kan använda
skrivaren. Klicka på Disconnect (koppla från)
för att avbryta anslutningen manuellt.
Funktionerna Auto Release (automatisk
bortkoppling) och Auto Connect (automatisk
anslutning) kan inte konfigureras ifall datorns
operativsystemversion är äldre än Windows
2000 SP4.
111
SVENSKA
"
V
Om skrivaren inte är ansluten eller inte är
tillgänglig när du skickar ut en begäran, kommer
din begäran att hamna i din dators utskriftskö
tills skrivaren är tillgänglig.
Om du inte kan använda skrivaren, se till att
aktivera alternativet Auto Release (automatisk
bortkoppling) och/eller Auto Connect
(automatisk anslutning) på alla Windowsdatorer.
3 Systemkrav
Före installation, kontrollera att din dator har följande:
• Pentium II 300 MHz eller högre
• Minst 20 MB ledigt hårddiskutrymme
• Minst 32 MB RAM
• En CD-ROM-enhet
• Windows 98 Second Edition (SE), Windows Me, Windows
2000, Windows 2003, Windows XP
112
SVENSKA
• Windows 98 SE-användare behöver eventuellt CD-skivan
med Windows 98 SE.
Procedur för att visa en produkts certifikat
1 Gå till www.zyxel.com.
2 Välj din produkt från rullgardinslistrutan på ZyXEL:s
hemsida för att gå till denna produkts sida.
3 Välj det certifikat du vill titta på från denna sida.
113
SVENSKA
114