1
Vantage Access
Auto Configuration Server
Quick Start Guide
CONTENTS
ENGLISH
2
DEUTSCH
16
ESPAÑOL
44
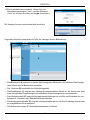
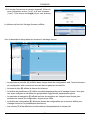
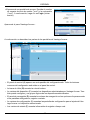
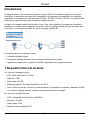
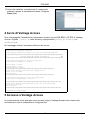
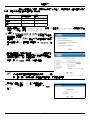
IP Address http://localhost
FRANÇAIS
30
User Name root
ITALIANO
58
РУССКИЙ
72
简体中文
86
繁體中文
100
Version 2.0
8/2007
Edition 1
DEFAULT LOGIN
Password
root
1
ENGLISH
ENGLISH
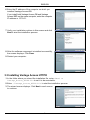
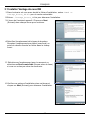
Introduction
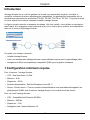
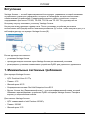
Vantage Access is a web-based management tool that allows you to remotely management,
control and monitor multiple compatible devices. A compatible device is any device that supports
the TR-069, TR-098, TR-104 or TR-106 protocols. This Quick Start Guide shows you how to
install Vantage Access.
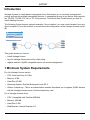
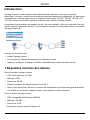
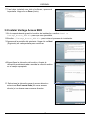
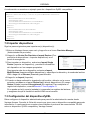
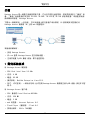
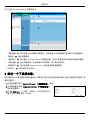
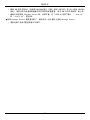
The following figure shows a network example. Once installed, you use a web browser from any
client computer (A) on the network to access the web configurator on the Vantage Access server
(B).
A
B
This guide shows you how to:
• install Vantage Access.
• log into Vantage Access as root for initial setup.
• register and set a ZyXEL compatible device for remote management.
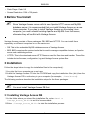
1 Minimum System Requirements
For the Vantage Access server:
• CPU: Dual Intel Xeon 3.0 GHz
• Memory: 4 GB
• Hard Disk: 80 GB
• Operating System: Red Hat Enterprise Linux ES 3
• Others: License key - This is an authentication number that allows you to register ZyXEL devices
with the Vantage Access server. See the license key card.
For a Vantage Access client:
• CPU: Compatible Intel Pentium 450 MHz
• Memory: 256 MB
• Hard Disk: 2 GB
• Web Browser: Internet Explorer 6.0
2
ENGLISH
• Flash Player: Flash 9.0
• Screen Resolution: 1024 x 768 pixels
2 Before You Install
"
Since Vantage Access comes with its own Apache HTTP server and MySQL
database server, it is recommended that you install Vantage Access on a new
Linux computer. If you plan to install Vantage Access on an existing Linux
computer, you must uninstall existing Apache and MySQL from that server;
otherwise they will conflict with Vantage Access.
Vantage Access consists of three packages: DB, BED and HTTPD. You can install them
separately on different computers or on the same one.
• DB: This is the embedded MySQL database server of Vantage Access.
• BED: BED comprises the protocol suite that is used to manage compatible devices, an Apache
server and a watchdog service.
• HTTPD: This is the download server HTTP Daemon used for files store and transfer. These files
include device firmware, configuration, log and Vantage Access system files.
3 Installation
Follow the steps below to copy the installation files to the computer(s).
1 Log into the Linux computer as a root user
2 Insert the Vantage Access CD into the CD-ROM and copy the installation files (.bin) from the
Vantage Access CD to a directory in your computer (for example, ./Home/Access).
The following sections describe the installation steps for the three packages.
"
You must install Vantage Access DB first.
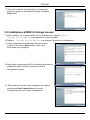
3.1 Installing Vantage Access DB
1 In the folder where you stored the installation file, enter chmod +x
Vantage_Access_DB.bin to set it to be executable.
2 Enter ./Vantage_Access_DB.bin to start the installation process.
3
ENGLISH
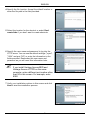
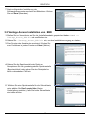
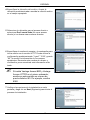
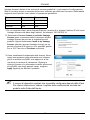
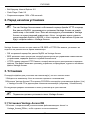
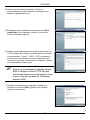
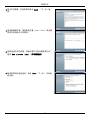
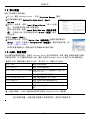
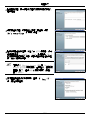
3 The wizard screen displays. Click Next in each screen
to continue.
4 Specify the location for the database. Accept the
default location (user/local) or enter the file path in the
field provided.
5 Select the location for the shortcut or select Don’t
create links if you don’t want to create shortcuts.
6 Verify your installation options in this screen and click
Next to start the installation process.
4
ENGLISH
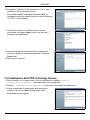
7 After the software component is installed successfully,
the screen displays. Click Done.
3.2 Installing Vantage Access BED
1 In the folder where you stored the installation file, enter chmod +x
Vantage_Access_BED.bin to set it to be executable.
2 Enter ./Vantage_Access_BED.bin to start the installation process.
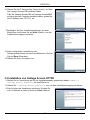
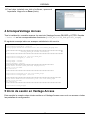
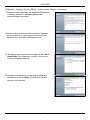
3 The wizard screen displays. Click Next in each screen
to continue.
4 Specify the file location. Accept the default location or
enter the file path in the field provided.
5 Select the location for the shortcut or select Don’t
create links if you don’t want to create shortcuts.
5
ENGLISH
6 Enter the IP address of the computer on which you
installed Vantage Access DB.
If you install both Vantage Access DB and Vantage
Access BED on the same computer, enter the computer
IP address or 127.0.0.1.
7 Verify your installation options in this screen and click
Next to start the installation process.
8 After the software component is installed successfully,
the screen displays. Click Done.
9 Restart your computer.
3.3 Installing Vantage Access HTTPD
1 In the folder where you stored the installation file, enter chmod +x
Vantage_Access_HTTPD.bin to set it to be executable.
2 Enter ./Vantage_Access_HTTPD.bin to start the installation process.
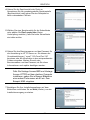
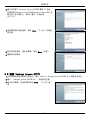
3 The wizard screen displays. Click Next in each screen
to continue.
6
ENGLISH
4 Specify the file location. Accept the default location or
enter the file path in the field provided.
5 Select the location for the shortcut or select Don’t
create links if you don’t want to create shortcuts.
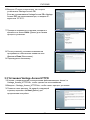
6 Specify the user name and password to log into the
HTTP server. You can use the default settings ("zyxel",
"1234" and port "80") or enter the information in the
fields provided. Remember this user name and
password as you will need this information later.
"
If you install Vantage Access BED and
Vantage Access HTTPD on the same
computer, enter a different port number other
than 80 in this screen. For example, enter
8080.
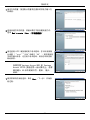
7 Verify your installation options in this screen and click
Next to start the installation process.
7
ENGLISH
8 After the software component is installed successfully,
the screen displays. Click Done.
4 Starting Vantage Access
After the installation, you need to start the Vantage Access DB, BED and HTTPD services. Enter
./start.sh in the corresponding directories (Tr069_db, Tr069_bed and Tr069_httpd).
The success message indicates a successful service startup.
[root@localhost local]# cd /usr/local/Tr069_db
[root@localhost Tr069_db]# ./start.sh
Starting mysqld daemon with databases from /usr/local/Tr069_db/mysql/data
################################################################################
###
Vantage_Access_DB started successfully!
###
################################################################################
[root@localhost Tr069_db]# cd /usr/local/Tr069_bed
[root@localhost Tr069_bed]# ./start.sh
Starting tr069...success
Starting httpd...success
Starting watchdog...success
###################################################################
Vantage Access started (tr069 pid 2364; httpd pid 2377)
Version: 2.0.47.83.00b31
Date: 2007-06-15
###################################################################
[root@localhost Tr069_bed]# cd /usr/local/Tr069_httpd
[root@localhost Tr069_httpd]# ./start.sh
#############################################################################
Vantage Access HTTPD started successfully from /usr/local/Tr069_httpd
Version: 2.0.47.83.00b3
Date: 2007-06-15
#############################################################################
[root@localhost Tr069_httpd]#
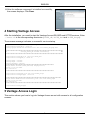
5 Vantage Access Login
This section shows you how to log into Vantage Access as root with access to all configuration
screens.
8
ENGLISH
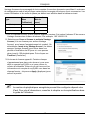
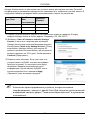
Vantage Access comes with three default login accounts. The web configurator screens and
privileges vary depending on which account you use to log in. The default user names and
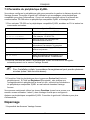
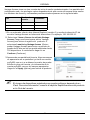
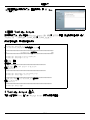
passwords are displayed in the following table.
Type
User Name
Password
Root
root
root
Administrator
admin
admin
Subscriber
guest
guest
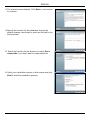
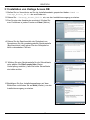
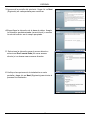
1 On a client computer, open Internet Explorer (version 6) and enter the IP address of the
Vantage Access server in the address bar. For example, 192.168.252.10.
2 Select I have a license to activate Vantage
Access to start the product registration. Or select I
want to try Vantage Access to enter a 90-day trial
period where you can manage up to 100 devices.
Then click Continue.
3 A License screen displays. Some fields do not
appear in your screen if you already have a
myZyXEL.com account or if you are getting the trial
version. Enter the license key and the myZyXEL.com
account information in the fields provided. click
Apply to activate the product.
"
The number of registered devices you can configure depends on your iCard. For
more information, see the product specifications chapter in the User’s Guide.
4 A login screen displays. Enter the root login user
name ("root") and password ("root"). Then click
Login.
9
ENGLISH
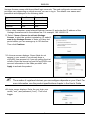
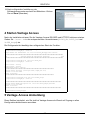
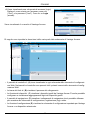
The Vantage Access dashboard displays.
The following describes the parts of the Vantage Access screens.
A
B
C
D
E
F
• The control panel (A) displays in every web configurator screen. All the common web configurator
buttons are in the control panel.
• The title bar (B) displays the link path.
• The device window (C) displays the devices that are managed by the Vantage Access. You can
also configure and view the logical groupings of the managed devices.
• The navigation panel (D) displays the navigation links that you click to access configuration, log or
status screens.
• The configuration window (E) displays the configuration screens that you set for Vantage Access
or a selected device.
• The status centers (F) displays real-time log information.
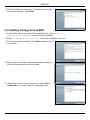
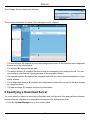
6 Specifying a Download Server
You must specify a server to store device firmware and configuration files and perform automatic
remote firmware upgrades or configuration restores on the managed devices.
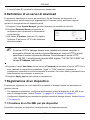
1 Click the System Manager icon in the control panel.
10
ENGLISH
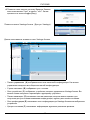
2 Click Download Server in the navigation panel to
display the configuration screen.
3 In the IP Address field, enter the IP address of the
HTTP server in dotted decimal notation.
"
If the HTTP server and Vantage Access are installed on the same computer, you
must use a different port number for the HTTP server and specify the port
number. For example, if the HTTP server (192.168.100.1) is using port 8080,
then enter “192.168.100.1:8080” in the IP Address field.
4 Set the User Name and Password fields to access the HTTP server. If you have changed the
default settings (“zyxel” and “1234”) during the installation process, enter the new account
information. The account user name and password are case sensitive.
5 Click Apply to save the settings.
7 Registering a Device
You must register one or multiple compatible devices to Vantage Access to allow remote
management.
• To register one device, configure the device information in the Edit an XML file and upload to Vantage Access. See Section 7.1 on page 11 and Section 7.2 on page 12.
• Configure the device to allow remote management from Vantage Access. See Section 7.3 on
page 12.
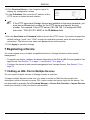
7.1 Editing an XML File for Multiple Devices
You can import multiple devices to Vantage Access at one time.
To import multiple devices at one time, you need to create an XML file that contains the
information (such as the device name, OUI, serial number and device type) for the device. You
can download an example file in Provision Manager > Device Pre-Provision > Import Devices
window and modify it with your device’s information.
11
ENGLISH
The following shows an example for two ZyXEL compatible devices.
<?xml version="1.0" encoding="UTF-8"?>
<Template xmlns:xsi="http://www.w3.org/2001/XMLSchema-instance">
<Device>
<deviceName>Device1</deviceName>
<OUI>001349</OUI>
<serialNumber>001349000000</serialNumber>
<deviceType>P-2602HW-D1A</deviceType>
</Device>
<Device>
<deviceName>Device2</deviceName>
<OUI>001349</OUI>
<serialNumber>00134900000a</serialNumber>
<deviceType>P-2802HWL-I1</deviceType>
</Device>
</Template>
7.2 Importing Devices
Follow the steps below to import your device(s).
1 Log into Vantage Access as root and click the Provision Manager icon.
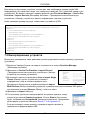
2 Click Device Pre-Provision > Import Devices in the
navigation panel.
3 To import one device, select Import Single Device and
enter the device information in the fields provided.
To import more than one device, select Import Multi-Devices
and specify the location and name of the XML file or click
Browse to locate it.
4 Click Import.
5 When the file import is successful, you should see the new entry(ies) in the
Device List panel.The Status field displays Unregistered. To complete the
device registration, see Section 7.3 on page 12.
If you cannot see the new entry(ies), check the system logs and make sure the
XML file format is correct.
7.3 ZyXEL Device Setting
You must configure the managed device to allow remote management from Vantage Access.
Refer to the user’s guide that comes with your compatible device for more information. The
following shows how to enable TR-069 communication protocol between a ZyXEL compatible
device and Vantage Access.
1 To activate TR-069 on the ZyXEL compatible device, access the CLI and enter the following
commands.
wan tr load
Enables TR-069 configuration.
12
ENGLISH
wan tr active 1
Activates TR-069 remote management.
wan tr acsUrl
172.25.21.174/TR069
Sets the IP address of the Vantage Access
server. For example, 172.25.21.174.
wan tr periodicEnable 1
Enables periodic information update to the
server.
wan tr informInterval 30
Sets the information update time. For example,
30 seconds.
wan tr debug on
Enables TR-069 debug mode to view logs.
wan tr save
Saves the settings.
wan tr reset
Sets the device to register to the Vantage
Access server right away.
2 Once connected to the network, the ZyXEL device automatically locates and registers to the
Vantage Access server.
"
For initial setup, the registration process may take several minutes (depending on
your network condition).
3 Check the device status in the Device List panel. If the status is
Registered, this indicates that device registration is successful and that
Vantage Access has stored the ZyXEL compatible device information to its
database.
You can now use the Provision screens (when you log in as "admin") in
Vantage Access to remotely configure this ZyXEL compatible device. Refer to
the User’s Guide for detailed information.
Troubleshooting
1 I cannot start Vantage Access.
• You must reboot your computer after installing Vantage Access.
• Make sure Vantage Access DB has started. See Section 4 on page 8.
• If the "Error: Remote DB is not alive!" message displays, this means that you
have specified the wrong Vantage Access DB server IP address during the Vantage
Access BED installation. Uninstall and install Vantage Access BED with the correct IP
address. Refer to the uninstalling chapter in the User’s Guide and page 5 in this guide.
• Make sure you can connect to Vantage Access DB. If the MySQL server is on a different
computer, then maybe the computer is off or the connection to the computer is down.
2 I cannot display the Vantage Access login screen.
• This may happen if you have already installed Apache with your Linux distribution. Uninstall Apache.
13
ENGLISH
• If you installed Vantage Access BED and Vantage Access HTTPD on the same computer,
uninstall and install Vantage Access HTTPD is using a different port number other than
80.
3 I cannot log into Vantage Access.
•
•
•
•
Make sure the Vantage Access server is turned on.
Make sure you have started Vantage Access on the server.
Make sure you enter the correct IP address of the Vantage Access server.
The default user name is "root" and the default password is "root". They are case-sensitive.
• If you enter the wrong password three times for a user name, you have to wait for 10 minutes before Vantage Access allows you to log in again with the same user name.
4 My web browser does not display the screen properly.
• Display the screens using only the supported web browsers. Refer to Section 1 on page 2.
• Make sure you have installed Macromedia Flash Player 9.0.
• It is recommended you use a monitor with a screen resolution set to 1024 by 768 pixels.
5 I cannot see my compatible device in Vantage Access.
• Make sure you have entered or imported an XML file containing the correct device information to Vantage Access. See Section 7 on page 11.
• Make sure you have properly set and activated management of compatible protocols on
the device. See Section 7.3 on page 12.
• The initial device discovery process may take up to three minutes depending on your network condition.
6 I see "[error] cannot add the device to Vantage Access, maybe database cannot be
connected or OUI-SN is duplicate" when I import device(s) using an XML file.
• Make sure your OUI (the part of device’s MAC address that uniquely identifies a company)
and SN (device’s LAN MAC address) information in the XML file are not duplicated with
any existing device listed in the device list panel. Correct the information in the XML file
and upload it again.
• Make sure you can connect to Vantage Access DB. If not, reset the DB by entering "./
stop.sh" and "./start.sh" under Tr069_db directory.
7 My Vantage Access server is broken and I want to install Vantage Access on another
computer.
• Please refer to the reinstalling existing license chapter in User’s Guide.
14
ENGLISH
15
DEUTSCH
DEUTSCH
Einleitung
Vantage Access ist ein webbasierendes Management-Tool, mit dem Sie mehrfach kompatible
Geräte entfernt verwalten, steuern und beobachten können. Kompatible Geräte sind Geräte,
welche die TR-069, TR-098, TR-104 oder TR-106 Protokolle unterstützen. Diese
Schnellanleitung führt Sie in die Installation des Vantage Accessein.
Folgende Abbildung zeigt ein Netzwerkbeispiel. Nach der Installation können Sie einen WebBrowser von jedem beliebigen Clientrechner (A) im Netzwerk benutzen, um den WebKonfigurator auf dem Vantage Access Server (B) zu erreichen.
A
B
Diese Anleitung enthält die Verfahren für die:
• Installation von Vantage Access.
• Anmeldung ins Vantage Access als Wurzel für die erste Einstellung.
• Registrierung und Einstellung eines ZyXEL kompatiblen Gerätes für die entfernte Verwaltung.
1 Mindestsystemanforderungen
Für den Vantage Access Server:
• CPU: Dual Intel Xeon 3.0 GHz
• Speicher: 4 GB
• Festplatte: 80 GB
• Betriebssystem: Red Hat Enterprise Linux ES 3
• Sonstiges: Lizenzschlüssel - Dieser ist eine Authentifizierungsnummer, die das Anmelden von
ZyXEL Geräten mit dem Vantage Access Server ermöglicht. Siehe Lizenzschlüsselkarte.
Für Vantage Access Klienten:
• CPU: Kompatibler Intel Pentium 450 MHz
• Speicher: 256 MB
• Festplatte: 2 GB
• Web-Browser: Internet Explorer 6.0
16
DEUTSCH
• Flash Player: Flash 9.0
• Bildauflösung: 1024 x 768 Pixel
2 Vor der Installation
Da Vantage Access mit seinem eigenen Apache HTTP Server und MySQL
Datenbankserver geliefert wird, sollten Sie Vantage Access auf einem neuen
Linux Computer installieren. Falls Sie Vantage Access doch auf einem bereits
existierenden Linux Computer installieren wollen, müssen Sie das aktuelle
Apache und MySQL von diesem Server entfernen; ansonsten kommt es zum
Konflikt mit Vantage Access.
Vantage Access besteht aus drei Paketen: DB, BED und HTTPD. Sie können die Installation
dieser getrennt auf verschiedenen Computern oder zusammen auf einem durchführen.
• DB: Dies ist der integrierte MySQL Datenbankserver von Vantage Access.
• BED: BED enthält die Protokollfolge zur Verwaltung von kompatiblen Geräten, einen Apache
Server und eine Überwachungsfunktion.
• HTTPD: Dies ist der Download-Server HTTP Daemon zur Lagerung und Übermittlung von
Dateien. Diese Dateien enthalten eine Gerätefirmware, die Konfiguration, sowie Anmledungsund Vantage Access Systemdateien.
3 Installation
Befolgen Sie die unteren Schritte, um die Installationsdateien auf den (die) Computer zu
kopieren.
1 Melden Sie sich im Linux Computer als Wurzelbenutzer an
2 Legen Sie die Vantage Access CD in Ihr CD-ROM Laufwerk und kopieren Sie die Dateien
(.bin) von der Vantage Access CD in ein Verzeichnis Ihres Computers (zum Beispiel ./Home/
Access).
Folgenden Sektionen beschreiben die Installationsschritte der drei Pakete.
Sie müssen erst Vantage Access DB installieren.
17
DEUTSCH
3.1 Installation von Vantage Access DB
1 Stellen Sie im Verzeichnis wo Sie die Installationsdatei gespeichert haben chmod +x
Vantage_Access_DB.bin als ausführbar ein.
2 Geben Sie ./Vantage_Access_DB.bin ein, um den Installationsvorgang zu starten.
3 Das Fenster des Assistenten erscheint. Klicken Sie
zum Fortfahren in jedem Fenster auf Next (Weiter).
4 Geben Sie die Speicherstelle der Datenbank an.
Akzeptieren Sie die grundeingestellte Speicherstelle
(Benutzer/lokal) oder geben Sie den Dateipfad im
dafür vorhandenen Feld ein.
5 Wählen Sie eine Speicherstelle für die Schnelltaste
oder wählen Sie Don't create links (Keine
Verknüpfung erstellen), falls Sie keine Schnelltaste
einrichten wollen.
6 Bestätigen Sie Ihre Installationsoptionen auf dem
Bildschirm und klicken Sie auf Next (Weiter), um den
Installationsvorgang zu starten.
18
DEUTSCH
7 Nach erfolgreicher Installierung der
Softwarekomponente erscheint ein Bildschirm. Klicken
Sie auf Done (Beenden).
3.2 Vantage Access Installation von BED
1 Stellen Sie im Verzeichnis wo Sie die Installationsdatei gespeichert haben chmod +x
Vantage_Access_BED.bin als ausführbar ein.
2 Geben Sie ./Vantage_Access_BED.bin ein, um den Installationsvorgang zu starten.
3 Das Fenster des Assistenten erscheint. Klicken Sie
zum Fortfahren in jedem Fenster auf Next (Weiter).
4 Geben Sie die Speicherstelle der Datei an.
Akzeptieren Sie die grundeingestellte Speicherstelle
(Benutzer/lokal) oder geben Sie den Dateipfad im
dafür vorhandenen Feld ein.
5 Wählen Sie eine Speicherstelle für die Schnelltaste
oder wählen Sie Don't create links (Keine
Verknüpfung erstellen), falls Sie keine Schnelltaste
einrichten wollen.
19
DEUTSCH
6 Geben Sie die IP Adresse des Computers ein, auf dem
Sie Vantage Access DB installiert haben.
Falls Sie Vantage Access DB und Vantage Access BED
auf dem gleichen Computer installiert haben, geben Sie
die IP Adresse oder 127.0.0.1 ein.
7 Bestätigen Sie Ihre Installationsoptionen auf dem
Bildschirm und klicken Sie auf Next (Weiter), um den
Installationsvorgang zu starten.
8 Nach erfolgreicher Installierung der
Softwarekomponente erscheint ein Bildschirm. Klicken
Sie auf Done (Beenden).
9 Starten Sie Ihren Computer neu.
3.3 Installation von Vantage Access HTTPD
1 Stellen Sie im Verzeichnis wo Sie die Installationsdatei gespeichert haben chmod +x
Vantage_Access_HTTPD.bin als ausführbar ein.
2 Geben Sie ./Vantage_Access_HTTPD.bin ein, um den Installationsvorgang zu starten.
3 Das Fenster des Assistenten erscheint. Klicken Sie
zum Fortfahren in jedem Fenster auf Next (Weiter).
20
DEUTSCH
4 Geben Sie die Speicherstelle der Datei an.
Akzeptieren Sie die grundeingestellte Speicherstelle
(Benutzer/lokal) oder geben Sie den Dateipfad im
dafür vorhandenen Feld ein.
5 Wählen Sie eine Speicherstelle für die Schnelltaste
oder wählen Sie Don't create links (Keine
Verknüpfung erstellen), falls Sie keine Schnelltaste
einrichten wollen.
6 Geben Sie den Benutzernamen und das Passwort für
die Anmeldung im HTTP Server an. Sie können die
Grundeinstellungen ( “zyxel” “1234”und Port “80”
benutzen oder die Information in den entsprechenden
Feldern eingeben. Merken Sie sich den
Benutzernamen und das Passwort, da Sie diese
Informationen auch später benötigen werden.
Falls Sie Vantage Access BED und Vantage
Access HTTPD auf dem gleichen Computer
installieren, geben Sie in diesem Bildschirm
eine andere Portnummer als 80 ein. Zum
Beispiel 8080 eingeben.
7 Bestätigen Sie Ihre Installationsoptionen auf dem
Bildschirm und klicken Sie auf Next (Weiter), um den
Installationsvorgang zu starten.
21
DEUTSCH
8 Nach erfolgreicher Installierung der
Softwarekomponente erscheint ein Bildschirm. Klicken
Sie auf Done (Beenden).
4 Starten Vantage Access
Nach der Installation müssen Sie die Vantage Access DB, BED und HTTPD Funktionen starten.
Geben Sie ./start.sh in den entsprechenden Verzeichnissen (Tr069_db, Tr069_bed und
Tr069_httpd) ein.
Die Erfolgsnachricht bestätigt den erfolgreichen Start der Funktion.
[root@localhost local]# cd /usr/local/Tr069_db
[root@localhost Tr069_db]# ./start.sh
Mysqld daemon mit Datenbanken aus /usr/local/Tr069_db/mysql/data starten
################################################################################
###
Vantage_Access_DB erfolgreich gestartet!
###
################################################################################
[root@localhost Tr069_db]# cd /usr/local/Tr069_bed
[root@localhost Tr069_db]# ./start.sh
tr069 startet...Erfolg
httpd startet...Erfolg
Überwachung startet...Erfolg
###################################################################
Vantage Access gestartet (tr069 pid 2364; httpd pid 2377)
Version: 2.0.47.83.00b31
Datum: 15.06.2007.
###################################################################
[root@localhost Tr069_bed]# cd /usr/local/Tr069_httpd
[root@localhost Tr069_db]# ./start.sh
#############################################################################
Vantage Access HTTPD erfolgreich von /usr/local/Tr069_httpd gestartet
Version: 2.0.47.83.00b31
Datum: 15.06.2007.
#############################################################################
[root@localhost Tr069_httpd]#
5 Vantage Access Anmeldung
Diese Sektion beinhaltet, wie Sie sich bei Vantage Access als Wurzel mit Zugang zu allen
Konfigurationsbildschirmen anmelden.
22
DEUTSCH
Vantage Access wird mit drei grundeingestellten Anmeldekonten geliefert. Die Fenster des WebKonfigurators und die Benutzerrechte hängen vom ausgewählten Konto ab. Die
grundeingestellten Benutzernamen und Passwörter sind in folgender Tabelle dargestellt.
Type (Typ)
User Name
(Benutzerna
me)
Password
(Passwort)
Root (Wurzel)
Root (Wurzel)
Root (Wurzel)
Administrator
admin
admin
Subscriber
(Teilnehmer)
guest (Gast)
guest (Gast)
1 Öffnen Sie den Internet Explorer (Version 6) auf einem Klientenrechner und geben Sie die IPAdresse des Vantage Access Servers in der Adressleiste an. Zum Beispiel 192.168.252.10.
2 Wählen Sie I have a license to activate Vantage
Access (Ich besitze eine Lizenz zur Aktivierung von
Vantage Access), um die Produktregistrierung zu
starten. Oder wählen Sie I want to try Vantage
Access (Ich möchte Vantage Access ausprobieren)
um eine 90-Tage lange Probezeit zu starten, in der
Sie bis zu 100 Geräte verwalten können. Klicken Sie
dann auf Continue (Weiter).
3 Es erscheint ein Lizenzfenster. Einige dieser Felder
erscheinen nicht, wenn Sie bereits ein myZyXEL.comKonto haben oder die Testversion anfordern. Geben
Sie den Lizenzschlüssel ein und die myZyXEL.com
Kontoinformation in den verfügbaren Feldern. Klicken
Sie auf Apply (Übernehmen), um das Produkt zu
aktivieren.
Die Zahl der zu konfigurierenden registrierten Geräte hängt von Ihrer iCard ab.
Mehr Informationen dazu finden Sie im Abschnitt Produktspezifikationen in der
Benutzeranleitung.
23
DEUTSCH
4 Ein Anmeldefenster erscheint. Geben Sie den
Wurzelbenutzernamen ("root" und das Passwort
("root" an. Klicken Sie dann auf Login (Anmelden).
Die Vantage Access Instrumententafel erscheint.
Folgender Abschnitt beschreibt die Teile der Vantage Access Bildschirme.
A
B
C
D
E
F
• Das Bedienfeld (A) erscheint in jedem Web-Konfigurator Bildschirm. Alle üblichen Web-Konfigurator Knöpfe sind im Bedienfeld vorhanden.
• Die Titelleiste (B) beschreibt den Verknüpfungspfad.
• Das Gerätfenster (C) zeigt die vom Vantage Accessverwalteten Geräte an. Sie können des Weiteren die logischen Gruppierungen der verwalteten Geräte konfigurieren und betrachten.
• Das Navigationsfeld (D) zeigt die Navigationsverknüpfungen an, die Sie zum Erreichen der konfigurations-, Anmelde- oder Statusbildschirme anklicken.
• Das Konfigurationsfenster (E) zeigt die konfigurationsfenster an, die Sie für Vantage Access oder
ein ausgewähltes Gerät einstellen.
• Die Statuscenter zeigen (F) Anmeldeinformationen in Echtzeit.
24
DEUTSCH
6 Download Server spezifizieren
Sie müssen einen Server angeben, um die Gerätefirmware und Konfigurationsdateien zu
speichern und um automatische entfernte Firmwareaktualisierungen oder
Konfigurationswiederherstellungen an den verwalteten Geräten durchführen zu können.
1 Klicken Sie auf das System Manager Symbol im Bedienfeld.
2 Klicken Sie auf Download Server im Navigationsfeld,
um den Konfigurationsbildschirm anzuzeigen.
3 Geben Sie im IP Address (IPAdresse) Feld die
IP?Adresse des HTTP Servers in gepunkteter
Dezimalzahl an.
Falls der HTTP Server und Vantage Access auf dem gleichen Computer
installiert sind, müssen Sie für den HTTP Server eine andere Portnummer
benutzen und diese spezifizieren. Zum Beispiel wenn der HTTP Server
(192.168.100.1) Port 8080 benutzt, geben Sie dann “192.168.100.1:8080”im IP
Address (IP Adresse) Feld ein.
4 Stellen Sie die User Name (Benutzername) und Password (Passwort) Felder für den Zugang
zum HTTP Server ein. Wenn Sie die Grundeinstellungen (zyxel und “1234” während der
Installation verändert haben, geben Sie die neue Kontoinformation ein. Achten Sie bei der
Eingabe des Benutzernamens und des Kennworts auf Groß- und Kleinschreibung.
5 Klicken Sie zum Speichern der Einstellungen auf Apply (Übernehmen).
7 Gerät registrieren
Sie müssen ein oder mehrere kompatible Geräte bei Vantage Access registrieren, um die
entfernte Verwaltung ermöglichen zu können.
• Um ein Gerät zu registrieren, konfigurieren Sie die Gerätinformation in der Edit und XML Datei
und laden Sie diese in das Vantage Access. Siehe Abschnitt 7.1 auf Seite 10 und Abschnitt 7.2
auf Seite 11.
• Konfigurieren Sie das Gerät, um eine entfernte Verwaltung über Vantage Access zu ermöglichen.
Siehe Abschnitt 7.3 auf Seite 12.
7.1 XML Datei für mehrere Geräte bearbeiten
Sie können mehrere Geräte ins Vantage Access auf einmal importieren.
25
DEUTSCH
Um mehrere Geräte auf einmal zu importieren, müssen Sie eine XML Datei erstellen, welche die
Geräteinformationen (wie Gerätname, OUI, Seriennummer und Gerättyp) enthält. Sie können
eine Beispieldatei im Provision Manager > Device Pre-Provision > Import Devices
(Einrichtungsmanager > Gerät Voreinrichtung > Geräte importieren) Fenster herunterladen und
diese mit Ihren Gerätinformationen modifizieren.
Im Folgenden finden Sie ein Beispiel für zwei ZyXEL kompatible Geräte.
<?xml version="1.0" encoding="UTF-8"?>
<Template xmlns:xsi="http://www.w3.org/2001/XMLSchema-instance">
<Device>
<deviceName>Device1</deviceName>
<OUI>001349</OUI>
<serialNumber>001349000000</serialNumber>
<deviceType>P-2602HW-D1A</deviceType>
<Device>
<Device>
<deviceName>Device2</deviceName>
<OUI>001349</OUI>
<serialNumber>00134900000a</serialNumber>
<deviceType>P-2802HWL-I1</deviceType>
<Device>
</Template>
7.2 Geräte importieren
Gehen Sie zum Importieren der Geräte wie folgt vor.
1 Melden Sie sich als Wurzel im Vantage Access an und klicken Sie auf das Provision
Manager (Einrichtungsmanager) Symbol.
2 Klicken Sie auf Device Pre-Provision > Import Devices
(Gerät Voreinrichtung > Geräte importieren) im
Navigationsfeld.
3 Zum Importieren eines einzelnen Gerätes wählen Sie
Import Single Device (Einzelnes Gerät importieren) und
geben Sie die Gerätinformation in den verfügbaren Feldern
an.
Um ehr als ein Gerät zu importieren, wählen Sie Import Multi-Devices (Mehrere Geräte
importieren) und spezifizieren Sie die Speicherstelle und den Namen der XML Datei oder klicken
Sie Browse (Suchen), um diese zu finden.
4 Klicken Sie auf Import.
5 Nach dem ersten erfolgreichen Import sollten die neuen Einträge im Device
List (Geräteliste) Feld erscheinen.Das Status Feld erscheint als
Unregistered (Nicht registriert). Zur Komplettierung der Gerätregistrierung
siehe Abschnitt 7.3 auf Seite 12.
Falls Sie die neuen Einträge nicht sehen, prüfen Sie die Systemeinträge und
vergewissern Sie sich, dass das XML Format korrekt ist.
26
DEUTSCH
7.3 ZyXEL Geräteinstellung
Sie müssen das verwaltete Gerät konfigurieren, damit Sie die entfernte Verwaltung über Vantage
Access ermöglichen können. Mehr Informationen finden Sie in der Benutzeranleitung Ihres
kompatiblen Gerätes. Im Folgenden wird die Aktivierung des TR-069 Kommunikationsprotokolls
zwischen dem ZyXEL kompatiblen Gerät und Vantage Access beschrieben.
1 Zur Aktivierung des TR-069 am ZyXEL kompatiblen Gerät verschaffen Sie sich Zugang zum
CLI und geben folgende Befehle ein.
wan tr load
Aktiviert die TR-069 Konfiguration.
wan tr active 1
Aktiviert die entfernte Verwaltung von TR-069.
wan tr acsUrl
172.25.21.174/TR069
Stellt die IP Adresse des Vantage Access
Servers ein. Zum Beispiel 172.25.21.174.
wan tr periodicEnable 1
Aktiviert die periodische
Informationsaktualisierung zum Server.
wan tr informInterval 30
Stellt die Aktualisierungszeit der Informationen
ein. Zum Beispiel 30 Sekunden.
wan tr debug on
Aktiviert den TR-069 Debug Modus zum
Betrachten von Logdateien.
wan tr save
Speichert die Einstellungen.
wan tr reset
Stellt das Gerät zur Registrierung im Vantage
Access Server ein.
2 Nach der Verbindung zum Server lokalisiert und registriert das ZyXEL Gerät automatisch im
Vantage Access Server.
Bei der ersten Einstellung kann der Registrierungsvorgang einige Minuten in
Anspruch nehmen (abhängig von Ihrem Netzwerkzustand).
3 Prüfen Sie den Gerätestatus im Device List (Geräteliste) Feld. Falls der
Status Registered (Registriert) ist, war die Geräteregistrierung erfolgreich
und Vantage Access hat die ZyXEL kompatible Gerätinformation in der
Datenbank gespeichert.
Sie können nun die Provision (Einrichtung) Bildschirme (wenn Sie sich als
Admin im Vantage Access anmelden) benutzen, um das ZyXEL kompatible
Gerät entfernt zu konfigurieren. Mehr Informationen finden Sie in der
Benutzeranleitung.
Problembewältigung
1 Ich kann Vantage Access nicht starten.
• Sie müssen Ihren Computer nach der Installation neu starten Vantage Access.
27
DEUTSCH
• Vergewissern Sie sich, dass Vantage Access DB gestartet ist. Siehe Abschnitt 4 auf Seite 7.
• Falls die Meldung Error: Remote DB is not alive! (Fehler: Entfernte DB ist nicht
aktiv) erscheint, haben Sie die falsche Vantage Access DB Server IP Adresse während
der Vantage Access BED Installation angegeben. Entfernen und installieren Sie Vantage
Access BED mit der korrekten IP Adresse. Siehe Abschnitt Entfernen in der Benutzeranleitung und Seite 4 in dieser Anleitung.
• Achten Sie darauf, dass Sie sich an Vantage Access DB anschließen. Falls sich der
MySQL Server auf einem anderen Computer befindet, ist der Computer womöglich ausgeschaltet oder es besteht keine Verbindung.
2 Ich kann den Vantage Access Anmeldebildschirm nicht hervorrufen.
• Dies kann passieren, wenn Sie Apache bereits mit Ihrer Linux Version installiert haben.
Apache entfernen.
• Falls Sie Vantage Access BED und Vantage Access HTTPD auf demselben Computer
installiert haben, entfernen und installieren Sie Vantage Access HTTPD mit einer anderen
Portnummer als 80.
3 Ich kann mich nicht in Vantage Access anmelden.
• Stellen Sie sicher, dass der Vantage Access Server eingeschaltet ist.
• Stellen Sie sicher, dass Sie Vantage Access auf dem Server gestartet haben.
• Stellen Sie sicher, dass Sie die richtige IP-Adresse des Vantage Access Servers eingestellt haben.
• Der grundeingestellte Benutzername ist root und das Passwort ist root Achten Sie auf die
Groß- und Kleinschrift.
• Wenn Sie unter einem Benutzernamen dreimal das falsche Passwort angeben, müssen
Sie 10 Minuten warten, bevor Vantage Access Ihnen die erneute Anmeldung mit demselben Benutzernamen ermöglicht.
4 Mein Web-Browser zeigt den Bildschirm nicht richtig an.
• Zeigen Sie die Bildschirme nur mit den unterstützten Web-Browsern an. Lesen Sie nach
unter Abschnitt 1 auf Seite 1.
• Stellen Sie sicher, dass Sie Macromedia Flash Player 9.0 installiert haben.
• Es wird ein Monitor mit einer Bildauflösung von 1024 x 768 Pixeln empfohlen.
5 Ich kann mein kompatibles Gerät im Vantage Access nicht sehen.
• Stellen Sie sicher, dass Sie eine XML-Datei mit der korrekten Geräteinformation in das
Vantage Access eingegeben oder importiert haben. Siehe Abschnitt 7 auf Seite 10.
• Stellen Sie sicher, dass Sie die Verwaltung der kompatiblen Protokolle am Gerät richtig
eingestellt und aktiviert haben. Siehe Abschnitt 7.3 auf Seite 12.
• Der erste Geräterkennungsvorgang kann abhängig von Ihrem Netzwerkzustand bis zu
drei Minuten dauern.
6 Ich sehe "[Fehler] kann das Gerät nicht Vantage Access hinzufügen, eventuell kann
Datenbank nicht verbunden werden oder OUI-SN ist doppelt vorhanden", wenn ich Geräte mit
einer XML Datei importiere.
28
DEUTSCH
• Stellen Sie sicher, dass Ihre OUI (der Teil der Gerät-MAC Adresse, der eine Firma eindeutig identifiziert) und SN (Gerät LAN MAC Adresse) Informationen in der XML Datei
nicht mit den Informationen eines bereits existierenden Gerätes im Gerätelistefeld übereinstimmen. Korrigieren Sie die Informationen in der XML Datei und laden Sie diese dann
erneut hoch.
• Achten Sie darauf, dass Sie sich an Vantage Access DB anschließen. Falls nicht, setzen
Sie DB durch eingeben von "./stop.sh" und "/start.sh"unter dem Verzeichnis Tr069_db
zurück.
7 Mein Vantage Access Server ist kaputt und ich möchte Vantage Access auf einem anderen
Computer installieren.
• Mehr dazu finden Sie im Abschnitt Neuinstallierung existierender Lizenzen in der
Benutzeranleitung.
29
FRANÇAIS
Introduction
Vantage Access est un outil de gestion via le web vous permettant de gérer, contrôler et
surveiller à distance plusieurs périphériques compatibles. Un périphérique compatible est un
périphérique supportant les protocoles TR-069, TR-098, TR-104 ou TR-106. Ce guide de mise
en route rapide vous indique comment installer Vantage Access.
La figure suivante montre un exemple de réseau. Une fois installé, vous utilisez un navigateur
web à partir d’un ordinateur client quelconque (A) sur le réseau pour accéder au configurateur
web sur le serveur (B)Vantage Access.
A
B
Ce guide vous indique comment :
• installer Vantage Access.
• ouvrir une session dans Vantage Access comme utilisateur racine pour le paramétrage initial.
• enregistrer et définir un périphérique compatible ZyXEL pour la gestion à distance.
1 Configuration minimum requise
Pour le serveur Vantage Access:
• CPU : Dual Intel Xeon 3.0 GHz
• Mémoire : 4 Go
• Disque dur : 80 Go
• Système d’exploitation : Red Hat Enterprise Linux ES 3
• Autres : Clé de licence – C'est un numéro d'authentification vous permettant d'enregistrer les
périphériques ZyXEL avec le serveur Vantage Access. Voir la carte de clé de licence.
Pour un client Vantage Access:
• CPU : Compatible Intel Pentium 450 MHz
• Mémoire : 256 Mo
• Disque dur : 2 Go
• Navigateur web : Internet Explorer 6.0
30
FRANÇAIS
• Lecteur Flash : Flash 9.0
• Résolution d'écran : 1024 x 768 pixels
2 Avant d’installer
"
Etant donné que le Vantage Access est accompagné de son propre serveur
Apache HTTP et serveur de bases de données MySQL, il est recommandé
d’installer Vantage Access sur un nouvel ordinateur Linux. Si vous projetez
d’installer Vantage Access sur un ordinateur Linux existant, vous devez
désinstaller Apache et MySQL existant de ce serveur; autrement ils entreront en
conflit avec Vantage Access.
Vantage Access est composé de trois packages : DB, BED et HTTPD. Vous pouvez les installer
séparément sur différents ordinateurs ou sur le même.
• DB : C’est un serveur de bases de données MySQL intégré de Vantage Access.
• BED : BED comprend la suite de protocoles utilisée pour gérer des périphériques compatibles, un
serveur Apache et un service de surveillance.
• HTTPD : C’est le démon HTTP du serveur de téléchargement utilisé pour le stockage et le transfert des fichiers. Ces fichiers incluent le microprogramme du périphérique, la configuration, les
fichiers journal et du système de Vantage Access.
3 Installation
Suivez les étapes ci-dessous pour copier les fichiers d’installation sur l’ordinateur (les
ordinateurs).
1 Ouvrez une session sur l’ordinateur Linux en tant qu’utilisateur racine
2 Insérez le CD du Vantage Access dans le lecteur de CD-ROM et copiez les fichiers
d’installation (.bin) depuis le CD du Vantage Access vers un répertoire dans votre ordinateur
(par exemple, ./Home/Access).
Les sections suivantes décrivent les étapes de l’installation pour les trois packages.
"
Vous devez d’abord installer Vantage Access DB.
31
FRANÇAIS
3.1 Installer Vantage Access DB
1 Dans le dossier où vous avez stocké le fichier d’installation, entrez chmod +x
Vantage_Access_DB.bin pour le rendre exécutable.
2 Entrez ./Vantage_Access_DB bin pour démarrer l’installation.
3 L’écran de l'assistant apparaît. Cliquez sur Next
(Suivant) dans chaque écran pour continuer.
4 Spécifiez l'emplacement de la base de données.
Acceptez l’emplacement par défaut (user/local) ou
entrez le chemin d’accès au fichier dans le champ
fourni.
5 Sélectionnez l’emplacement pour le raccourci ou
sélectionnez Don’t create links (Ne pas créer de liens)
si vous ne voulez pas créer de raccourcis.
6 Vérifiez vos options d’installation dans cet écran et
cliquez sur Next (Suivant) pour démarrer l’installation.
32
FRANÇAIS
7 Après avoir installé le composant logiciel, l’écran
s’affiche. Cliquez sur Done (Terminé).
3.2 Installer Vantage AccessBED
1 Dans le dossier où vous avez stocké le fichier d’installation, entrez chmod +x
Vantage_Access_BED.bin pour le rendre exécutable.
2 Entrez ./Vantage_Access_BED.bin pour démarrer l’installation.
3 L’écran de l'assistant apparaît. Cliquez sur Next
(Suivant) dans chaque écran pour continuer.
4 Spécifiez l'emplacement du fichier Acceptez
l’emplacement par défaut ou entrez le chemin d’accès
au fichier dans le champ fourni.
5 Sélectionnez l’emplacement pour le raccourci ou
sélectionnez Don’t create links (Ne pas créer de liens)
si vous ne voulez pas créer de raccourcis.
33
FRANÇAIS
6 Entrez l’adresse IP de l’ordinateur sur lequel vous
avez installé Vantage Access DB.
Si vous installez à la fois Vantage Access DB et Vantage
Access BED sur le même ordinateur, entrez l’adresse IP
de l’ordinateur ou 127.0.0.1.
7 Vérifiez vos options d’installation dans cet écran et
cliquez sur Next (Suivant) pour démarrer l’installation.
8 Après avoir installé le composant logiciel, l’écran
s’affiche. Cliquez sur Done (Terminé).
9 Redémarrez votre ordinateur.
3.3 Installer Vantage Access HTTPD
1 Dans le dossier où vous avez stocké le fichier d’installation, entrez chmod +x
Vantage_Access_HTTPD.bin pour le rendre exécutable.
2 Entrez ./Vantage_Access_HTTPD.bin pour démarrer l’installation.
3 L’écran de l'assistant apparaît. Cliquez sur Next
(Suivant) dans chaque écran pour continuer.
34
FRANÇAIS
4 Spécifiez l'emplacement du fichier Acceptez
l’emplacement par défaut ou entrez le chemin d’accès
au fichier dans le champ fourni.
5 Sélectionnez l’emplacement pour le raccourci ou
sélectionnez Don’t create links (Ne pas créer de liens)
si vous ne voulez pas créer de raccourcis.
6 Spécifiez le nom de l’utilisateur et le mot de passe
pour ouvrir une session sur le serveur HTTP. Vous
pouvez utiliser les paramètres par défaut (“zyxel”,
“1234” et port “80”) ou renseignez les informations
dans les champs fournis. Mémorisez ce nom
d’utilisateur et ce mot de passe car vous aurez besoin
de ces informations plus tard.
"
Si vous installez Vantage Access BED et
Vantage Access HTTPD sur le même
ordinateur, entrez un numéro de port
différent de 80 dans cet écran. Par exemple,
entrez 8080.
7 Vérifiez vos options d’installation dans cet écran et
cliquez sur Next (Suivant) pour démarrer l’installation.
35
FRANÇAIS
8 Après avoir installé le composant logiciel, l’écran
s’affiche. Cliquez sur Done (Terminé).
4 Démarrage Vantage Access
Après l’installation, vous devez démarrer les servicesVantage Access DB, BED et HTTPD.
Entrez ./start.sh dans les répertoires correspondants (Tr069_db, Tr069_bed et
Tr069_httpd).
Le message de succès indique un démarrage des services réussi.
[root@localhost local]# cd /usr/local/Tr069_db
[root@localhost Tr069_db]# ./start.sh
Démarrer le démon mysqld avec des bases de données à partir de /usr/local/Tr069_db/
mysql/data
################################################################################
###
Démarrage de Vantage_Access_DB réussi!
###
################################################################################
[root@localhost Tr069_db]# cd /usr/local/Tr069_bed
[root@localhost Tr069_bed]# ./start.sh
Démarrage de tr069...réussi
Démarrage de httpd...réussi
Démarrage de watchdog...réussi
###################################################################
Vantage Access démarré (tr069 pid 2364; httpd pid 2377)
Version : 2.0.47.83.00b31
Date : 2007-06-15
###################################################################
[root@localhost Tr069_bed]# cd /usr/local/Tr069_httpd
[root@localhost Tr069_httpd]# ./start.sh
#############################################################################
Démarrage de Vantage Access HTTPD réussi à partir de /usr/local/Tr069_httpd
Version : 2.0.47.83.00b3
Date : 2007-06-15
#############################################################################
[root@localhost Tr069_httpd]#
5 Vantage Access Ouvrir une session
Cette section vous indique comment ouvrir une session dans Vantage Access comme utilisateur
racine avec accès à tous les écrans de configuration.
36
FRANÇAIS
Vantage Access est accompagné de trois comptes d’ouverture de session par défaut. Les écrans
du configurateur web et les privilèges varient selon le compte utilisé pour ouvrir une session. Les
noms d’utilisateur et les mots de passe par défaut sont affichés dans le tableau suivant.
Type
User name
(Nom
d'utilisateur)
Password
(Mot de
passe)
Root (Racine)
root
root
Administrateur
admin
admin
Abonné
guest
guest
1 Sur un ordinateur client, ouvrez Internet Explorer (version 6) et entrez l’adresse IP du serveur
Vantage Access dans la barre d’adresse. Par exemple, 192.168.252.10.
2 Sélectionnez I have a license to activate Vantage
Access (J’ai une licence pour activer Vantage
Access) pour lancer l’enregistrement du produit. Ou
sélectionnez I want to try Vantage Access (Je désire
essayer Vantage Access) pour entrer dans une
période d’évaluation de 90 jours où vous pouvez
gérer jusqu’à 100 périphériques. Puis cliquez sur
Continue (Continuer).
3 Un écran de licence apparaît. Certains champs
n'apparaissent pas dans votre écran si vous avez
déjà un compte myZyXEL ou si vous utilisez la
version d'évaluation. Entrez la clé de licence et les
informations du compte de myZyXEL.com dans les
champs fournis. cliquez sur Apply (Appliquer) pour
activer le produit.
"
Le nombre de périphériques enregistrés pouvant être configurés dépend votre
iCard. Pour plus d’informations, consultez le chapitre sur les spécifications dans
le guide de l’utilisateur.
37
FRANÇAIS
4 Un écran d'ouverture de session apparaît. Entrez le
nom d’utilisateur racine (“root”) et le mot de passe
(“root”). Puis cliquez sur Login (Ouvrir une session).
Le tableau de bord de Vantage Access s’affiche.
Voici la description des parties des écrans du Vantage Access.
A
B
C
D
E
F
• Le panneau de contrôle (A) s’affiche dans chaque écran du configurateur web. Tous les boutons
du configurateur web courants se trouvent dans le panneau de contrôle.
• La barre de titre (B) affiche le chemin de la liaison.
• La fenêtre du périphérique (C) affiche les périphériques gérés par le Vantage Access. Vous pouvez aussi configurer et visualiser les groupements logiques des périphériques gérés.
• Le panneau de navigation (D) affiche les liens de navigation sur lesquels vous cliquez pour
accéder aux écrans de configuration, de journal ou d’état.
• La fenêtre de configuration (E) affiche les écrans de configuration que vous avez définis pour
Vantage Access ou un périphérique sélectionné.
• Les centres (F) d’état affichent les informations d’enregistrement en temps réel.
38
FRANÇAIS
6 Spécifier un serveur de téléchargement
Vous devez spécifier un serveur pour stocker les fichiers du microprogramme et de configuration
du périphérique et effectuer des mises à niveau du microprogramme distantes automatiques ou
rétablir la configuration sur les périphériques gérés.
1 Cliquez sur l’icône du System Manager (Gestionnaire système) dans le panneau de contrôle.
2 Cliquez sur Download Server (Serveur de
téléchargement) dans le panneau de navigation pour
afficher l’écran de configuration.
3 Dans le champ IP Address (Adresse IP), entrez
l’adresse IP du serveur HTTP en notation décimale
avec point.
"
Si le serveur HTTP et Vantage Access sont installés sur le même ordinateur,
vous devez utiliser un numéro de port différent pour le serveur HTTP et spécifier
le numéro de port. Par exemple, si le serveur HTTP (192.168.100.1) utilise le port
8080, alors entrez “192.168.100.1:8080” dans le champ IP Address (Adresse
IP).
4 Renseignez les champs User name (Nom d’utilisateur) et Password (Mot de passe) pour
accéder au serveur HTTP. Si vous avez changé les paramètres par défaut (“zyxel” et “1234”)
pendant l’installation, entrez les nouvelles informations du compte. Le nom de l'utilisateur et
le mot de passe du compte sont sensibles à la casse.
5 Cliquez sur Apply (Appliquer) pour enregistrer les paramètres.
7 Enregistrer un périphérique
Vous devez enregistrer un ou plusieurs périphériques compatibles sur Vantage Access pour
permettre la gestion à distance.
• Pour enregistrer un périphérique, configurez les informations du périphérique dans Edit an XML
file (Editer un fichier XML) et téléchargez-le sur Vantage Access. Voir Section 7.1 à la page 10 et
Section 7.2 à la page 11.
• Configurez le périphérique pour permettre la gestion à distance à partir de Vantage Access. VoirSection 7.3 à la page 12 .
7.1 Editer un fichier XML pour plusieurs périphériques
Vous pouvez importer plusieurs périphériques simultanément sur Vantage Access.
39
FRANÇAIS
Pour importer plusieurs périphériques simultanément, vous devez créer un fichier XML
contenant les informations (telles que le nom du périphérique, OUI, numéro de série et le type de
périphérique) pour le périphérique. Vous pouvez télécharger un fichier exemple dans la fenêtre
Provision Manager (Gestionnaire de provision) > Device Pre-Provision (Pré-provision du
périphérique) > Import Devices (Importer des périphériques) et les remplacer par les
informations de votre périphérique.
Voici un exemple pour deux périphériques compatibles ZyXEL.
<?xml version="1.0" encoding="UTF-8"?>
<Template xmlns:xsi="http://www.w3.org/2001/XMLSchema-instance">
<Device>
<deviceName>Périphérique1</deviceName>
<OUI>001349</OUI>
<serialNumber>001349000000</serialNumber>
<deviceType>P-2602HW-D1A</deviceType>
</Device>
<Device>
<deviceName>Périphérique2</deviceName>
<OUI>001349</OUI>
<serialNumber>00134900000a</serialNumber>
<deviceType>P-2802HWL-I1</deviceType>
</Device>
</Template>
7.2 Importer des périphériques
Suivez les étapes ci-dessous pour importer votre (vos) périphérique(s).
1 Ouvrez une session Vantage Access comme utilisateur racine et cliquez sur l’icône Provision
Manager (Gestionnaire de provision).
2 Cliquez sur Device Pre-Provision (Pré-provision du
périphérique) > Import Devices (Importer des
périphériques) dans le panneau de navigation.
3 Pour importer un périphérique, sélectionner Import Single
Device (Importer un seul périphérique) et entrez les
informations du périphérique dans les champs fournis.
Pour importer plus d’un périphérique, sélectionnez Import
Multi-Devices (Importer plusieurs périphériques) et spécifiez l’emplacement et le nom du fichier
XML ou cliquez sur Browse (Naviguer) pour le localiser.
4 Cliquez sur Import (Importer).
5 Quand l’importation du fichier a réussi, vous verrez apparaître les nouvelles
entrées dans le panneau Device List (Liste des périphériques). Le champ
Status (Etat) affiche Unregistered (Non enregistré). Pour terminer
l’enregistrement du périphérique, voir Section 7.3 à la page 12.
Si vous ne voyez pas les nouvelles entrées, consultez les journaux du système
et assurez-vous que le forma du fichier XML est correct.
40
FRANÇAIS
7.3 Paramètre du périphérique ZyXEL
Vous devez configurer le périphérique géré pour permettre la gestion à distance à partir de
Vantage Access. Consultez le guide de l’utilisateur qui accompagne votre périphérique
compatible pour plus d’informations. Ce qui suit montre comment activer le protocole de
communication TR-069 entre un périphérique compatible ZyXEL et Vantage Access.
1 Pour activater TR-069 sur le périphérique compatible ZyXEL, accédez au CLI et entrez les
commandes suivantes.
wan tr load
Active la configuration TR-069.
wan tr active 1
Active la gestion distante de TR-069.
wan tr acsUrl
172.25.21.174/TR069
Définit l'adresse IP Vantage Accessdu serveur
. Par exemple, 172.25.21.174.
wan tr periodicEnable 1
Active la mise à jour périodique des
informations sur le serveur.
wan tr informInterval 30
Définit l’heure de la mise à jour des
informations. Par exemple, 30 secondes.
wan tr debug on
Active le mode de débogage TR-069 pour
afficher les journaux.
wan tr save
Enregistre les paramètres.
wan tr reset
Définit le périphérique à enregistrer sur le
Vantage Access serveur immédiatement.
2 Une fois connecté au réseau, le périphérique ZyXEL se localise et s’enregistre
automatiquement sur le serveur Vantage Access.
"
Pour l’installation initiale, la procédure d’enregistrement peut prendre plusieurs
minutes (selon l’état de votre réseau).
3 Consultez l’état du périphérique dans le panneau Device List (Liste de
périphériques). Si l’état est Registered (Enregistré), cela indique que
l’enregistrement du périphérique a réussi et que a stocké les informations
du périphérique compatible ZyXEL sur sa base de données.Vantage
Access
Vous pouvez maintenant utiliser les écrans Provision (quand vous ouvrez une
session comme utilisateur “admin”) dans Vantage Access pour configurer à
distance ce périphérique compatible ZyXEL. Consultez le guide de l'utilisateur pour plus
d'informations.
Dépannage
1 Impossible de démarrer Vantage Access.
41
FRANÇAIS
• Vous devez redémarrer votre ordinateur après l’installation de Vantage Access.
• Assurez-vous que Vantage Access DB a démarré. Voir Section 4 à la page 7.
• Si le message "Error: Remote DB is not alive!" (Erreur: DB distante n’est
pas active!) s'affiche, cela signifie que vous avez spécifié une adresse IP erronnée du
serveur Vantage Access DB pendant l’installation de Vantage Access BED. Désinstallez
et installez Vantage Access BED avec l’adresse IP correcte. Consultez le chapitre de
désinstallation dans le guide de l’utilisateur et page 4 dans ce guide.
• Assurez-vous que vous pouvez vous connecter à Vantage Access DB. Si le serveur
MySQL se trouve sur un autre ordinateur, alors cet ordinateur est peut-être éteint ou la
connexion à l’ordinateur est interrompue.
2 Impossible d’afficher l’écranVantage Access d’ouverture de session.
• Cela peut se produire si vous avez déjà installé Apache avec votre distribution Linux.
Désinstaller Apache.
• Si vous avez installé Vantage Access BED et Vantage Access HTTPD sur le même ordinateur, désinstallez et installez Vantage Access HTTPD utilise un numéro de port différent
de 80.
3 Impossible d'ouvrir une session dans Vantage Access.
•
•
•
•
Assurez-vous que le serveur Vantage Access est allumé.
Vérifiez que vous avez démarréVantage Access sur le serveur.
Assurez-vous que vous entrez l’adresse IP correcte du serveur Vantage Access.
Le nom d’utilisateur par défaut est “root” et le mot de passe par défaut est “root”. Ils sont
sensibles à la casse.
• Si vous entrez un mot de passe erroné trois fois pour un nom d’utilisateur, vous devez
attendre 10 minutes avant que le Vantage Access vous autorise à ouvrir à nouveau une
session avec le même nom d’utilisateur.
4 Mon navigateur web n’affiche pas correctement l’écran.
• Affichez les écrans en utilisant uniquement les navigateurs web supportés. Consultez
Section 1 à la page 1.
• Assurez-vous que vous avez installé Macromedia Flash Player 9.0.
• Il est recommandé d’utiliser un moniteur avec une résolution d’écran réglée à 1024 par
768 pixels.
5 Je ne vois pas mon périphérique compatible dans Vantage Access.
• Assurez-vous que vous avez entré ou importé un fichier XML contenant les informations
de périphériques correctes sur Vantage Access. Voir Section 7 à la page 10.
• Vérifiez que vous avez correctement paramétré et activé la gestion des protocoles compatibles sur le périphérique. Voir Section 7.3 à la page 12.
• Le processus de découverte du périphérique initial peut prendre jusqu’à trois minutes
selon l'état de votre réseau.
6 Je vois "[error] cannot add the device to Vantage Access, maybe database cannot be
connected or OUI-SN is duplicate" ("[error] impossible d’ajouter le périphérique à Vantage
42
FRANÇAIS
Access, il est peut-être impossible de se connecter à la base de données ou OUI-SN est
dupliquée") quand j’importe un (des) périphérique(s) à l’aide d’un fichier XML.
• Assurez-vous que les informations de votre OUI (la partie de l’adresse MAC du périphérique qui identifie uniquement une entreprise) et SN (adresse MAC LAN du périphérique)
dans le fichier XML ne sont pas dupliquées avec un périphérique existant présent dans le
panneau de liste de périphériques. Corrigez les informations dans le fichier XML et téléchargez-le à nouveau.
• Assurez-vous que vous pouvez vous connecter à Vantage Access DB. Si non, réinitialisez
la BdD en entrant "./stop.sh" et "./start.sh" dans le répertoire Tr069_db.
7 Mon serveur Vantage Access est cassé et je veux installer Vantage Access sur un autre
ordinateur.
• Consultez le chapitre Reinstalling existing license (Réinstaller une licence existante) dans
le guide de l’utilisateur.
43
ESPAÑOL
ESPAÑOL
Introducción
Vantage Access es una herramienta de administración basada en web que le permite
administrar, controlar y monitorizar a distancia múltiples dispositivos compatibles. Un dispositivo
compatible es cualquier dispositivo que soporta los protocolos TR-069, TR-098, TR-104 o TR106. Esta Guía de instalación rápida le mostrará cómo instalar Vantage Access.
La siguiente figura muestra un ejemplo de red. Una vez instalado, utiliza un explorador de web
desde cualquier ordenador cliente (A) de la red para acceder al configurador web en el servidor
Vantage Access (B).
A
B
Esta guía le muestra cómo:
• instalar Vantage Access.
• iniciar sesión en Vantage Access para la configuración inicial.
• registrar y configurar un dispositivo ZyXEL compatible para la administración remota.
1 Requisitos mínimos del sistema
Para el servidor Vantage Access:
• CPU: Dual Intel Xeon 3.0 GHz
• Memoria: 4 GB
• Disco duro: 80 GB
• Sistema operativo: Red Hat Enterprise Linux ES 3
• Otros: Clave de licencia - Éste es un número de autenticación que le permite registrar dispositivos ZyXEL con el servidor Vantage Access. Ver la tarjeta de clave de licencia.
Para un cliente Vantage Access:
• CPU: Compatible Intel Pentium 450 MHz
• Memoria: 256 MB
• Disco duro: 2 GB
• Explorador de web: Internet Explorer 6.0
44
ESPAÑOL
• Reproductor Flash: Flash 9.0
• Resolución de pantalla: 1024 x 768 píxeles
2 Antes de instalar
"
Debido a que Vantage Access viene con su propio servidor Apache HTTP y
servidor de base de datos MySQL, se recomienda que instale Vantage Access
en un nuevo ordenador Linux. Si va a instalar Vantage Access en un ordenador
Linux existente, deberá desinstalar Apache y MySQL de ese servidor; de lo
contrario habrá conflictos con Vantage Access.
Vantage Access contiene tres paquetes: DB, BED y HTTPD. Puede instalarlos por separado en
ordenadores diferentes o en el mismo.
• DB: es el servidor de base de datos MySQL de Vantage Access.
• BED: BED consta de una suite de protocolos que se utiliza para administrar dispositivos compatibles, un servidor Apache y un servicio de seguridad.
• HTTPD: Éste es el servidor de descarga HTTP Daemon utilizado para el almacenamiento y
transferencia de archivos. Estos son archivos de firmware de dispositivos, configuración, registro
y archivos del sistema de Vantage Access.
3 Instalación
Siga los pasos siguientes para copiar los archivos de instalación en el/los ordenador(es).
1 Inicie sesión en el ordenador Linux como usuario root.
2 Inserte el CD Vantage Access en el CD-ROM y copie los archivos de instalación (.bin) del CD
Vantage Access a un directorio en su ordenador (por ejemplo, ./Home/Access).
Las siguientes secciones describen los pasos de instalación para los tres paquetes.
"
Primero debe instalar Vantage Access DB.
3.1 Instalar Vantage Access DB
1 En la carpeta donde guardó el archivo de instalación, escriba chmod +x
Vantage_Access_DB.bin para que sea ejecutable.
2 Escriba ./Vantage_Access_DB.bin para iniciar el proceso de instalación.
45
ESPAÑOL
3 Aparecerá la pantalla del asistente. Haga clic en Next
(Siguiente) en cada pantalla para continuar.
4 Especifique la ubicación de la base de datos. Acepte
la ubicación predeterminada (usuario/local) o escriba
la ruta del archivo en el campo apropiado.
5 Seleccione la ubicación para el acceso directo o
seleccione Don't create links (No crear acceso
directo) si no desea crear accesos directos.
6 Verifique las opciones de la instalación en esta
pantalla y haga clic en Next (Siguiente) para iniciar el
proceso de instalación.
46
ESPAÑOL
7 Tras haber instalado con éxito el software, aparecerá
la pantalla. Haga clic en Done (Listo).
3.2 Instalar Vantage Access BED
1 En la carpeta donde guardó el archivo de instalación, escriba chmod +x
Vantage_Access_BED.bin para que sea ejecutable.
2 Escriba ./Vantage_Access_BED.bin para iniciar el proceso de instalación.
3 Aparecerá la pantalla del asistente. Haga clic en Next
(Siguiente) en cada pantalla para continuar.
4 Especifique la ubicación del archivo. Acepte la
ubicación predeterminada o escriba la ruta del archivo
en el campo apropiado.
5 Seleccione la ubicación para el acceso directo o
seleccione Don't create links (No crear acceso
directo) si no desea crear accesos directos.
47
ESPAÑOL
6 Escriba la dirección IP del ordenador en el que ha
instalado Vantage Access DB.
Si instala Vantage Access DB y Vantage Access BED en
el mismo ordenador, escriba la dirección IP del
ordenador o 127.0.0.1.
7 Verifique las opciones de la instalación en esta
pantalla y haga clic en Next (Siguiente) para iniciar el
proceso de instalación.
8 Tras haber instalado con éxito el software, aparecerá
la pantalla. Haga clic en Done (Listo).
9 Reinicie su ordenador.
3.3 Instalar Vantage Access HTTPD
1 En la carpeta donde guardó el archivo de instalación, escriba chmod +x
Vantage_Access_HTTPD.bin para que sea ejecutable.
2 Escriba ./Vantage_Access_HTTPD.bin para iniciar el proceso de instalación.
3 Aparecerá la pantalla del asistente. Haga clic en Next
(Siguiente) en cada pantalla para continuar.
48
ESPAÑOL
4 Especifique la ubicación del archivo. Acepte la
ubicación predeterminada o escriba la ruta del archivo
en el campo apropiado.
5 Seleccione la ubicación para el acceso directo o
seleccione Don't create links (No crear acceso
directo) si no desea crear accesos directos.
6 Especifique el nombre de usuario y la contraseña para
iniciar sesión en el servidor HTTP. Puede utilizar la
configuración predeterminada ( "zyxel" "1234" y puerto
"80") o escribir la información en los campos
apropiados. Recuerde este nombre de usuario y
contraseña, pues necesitará esta información más
tarde.
"
Si instala Vantage Access BED y Vantage
Access HTTPD en el mismo ordenador,
escriba en esta pantalla un número de
puerto distinto a 80. Por ejemplo, escriba
8080.
7 Verifique las opciones de la instalación en esta
pantalla y haga clic en Next (Siguiente) para iniciar el
proceso de instalación.
49
ESPAÑOL
8 Tras haber instalado con éxito el software, aparecerá
la pantalla. Haga clic en Done (Listo).
4 ArranqueVantage Access
Tras la instalación, necesita arrancar los servicios Vantage Access DB, BED y HTTPD. Escriba
./start.sh en los correspondientes directorios (Tr069_db, Tr069_bed y Tr069_httpd).
El siguiente mensaje indica un arranque satisfactorio del servicio.
[root@localhost local]# cd /usr/local/Tr069_db
[root@localhost Tr069_db]# ./start.sh
Starting mysqld daemon with databases from /usr/local/Tr069_db/mysql/data
################################################################################
###
Vantage_Access_DB started successfully!
###
################################################################################
[root@localhost Tr069_db]# cd /usr/local/Tr069_bed
[root@localhost Tr069_bed]# ./start.sh
Starting tr069...success
Starting httpd...success
Starting watchdog...success
###################################################################
Vantage Access started (tr069 pid 2364; httpd pid 2377)
Version: 2.0.47.83.00b31
Date: 2007-06-15
###################################################################
[root@localhost Tr069_bed]# cd /usr/local/Tr069_httpd
[root@localhost Tr069_httpd]# ./start.sh
#############################################################################
Vantage Access HTTPD started successfully from /usr/local/Tr069_httpd
Version: 2.0.47.83.00b3
Date: 2007-06-15
#############################################################################
[root@localhost Tr069_httpd]#
5 Inicio de sesión en Vantage Access
Esta sección le muestra cómo iniciar sesión en el Vantage Access como root con acceso a todas
las pantallas de configuración.
50
ESPAÑOL
Vantage Access viene con tres cuentas de inicio de sesión predeterminadas. Las pantallas del
configurador web y los privilegios varían dependiendo de qué cuenta utiliza para iniciar sesión.
Los nombres de usuario y contraseñas predeterminados aparecen en la siguiente tabla.
Tipo
Nombre de
usuario
Contraseña
root
root
root
Administrator
admin
admin
Subscriber
guest
guest
1 En un ordenador cliente, abra Internet Explorer (versión 6) y escriba la dirección IP del
servidor Vantage Access en la barra de direcciones. Por ejemplo, 192.168.252.10.
2 Seleccione I have a license to activate Vantage
Access (Tengo una licencia para activar Vantage
Access) para iniciar el registro del producto. O
seleccione I want to try Vantage Access (Quiero
probar Vantage Access) para iniciar un período de
prueba de 90 días en los que podrá administrar hasta
100 dispositivos. A continuación haga clic en
Continue (Continuar).
3 Aparecerán una pantalla de licencia. Algunos campos
no aparecerán en su pantalla si ya tiene una cuenta
myZyXEL.com o si va a obtener la versión de prueba.
Escriba la clave de licencia y la información de la
cuenta myZyXEL.com en los campos apropiados.
Haga clic en Apply (Aplicar) para activar el producto.
"
El número de dispositivos registrados que puede configurar depende de su
iCard. Para más información, consulte el capítulo Especificaciones del producto
en la Guía del usuario.
51
ESPAÑOL
4 Aparecerá una pantalla de acceso. Escriba el nombre
de usuario de inicio de sesión ("root") y la contraseña
("root"). A continuación, haga clic en Login (Iniciar
sesión)
Aparecerá el panel Vantage Access .
A continuación se describen las partes de las pantallas de Vantage Access.
A
B
C
D
E
F
• El panel de control (A) aparece en cada pantalla del configurador web. Todos los botones
comunes del configurador web están en el panel de control.
• La barra de título (B) muestra la ruta del enlace.
• La ventana del dispositivo (C) muestra los dispositivos administrados por Vantage Access. También puede configurar y ver grupos lógicos de los dispositivos administrados.
• El panel de navegación (D) muestra los enlaces de navegación en los que hace clic para acceder
a las pantallas configuración, registro o estado.
• La ventana de configuración (E) muestras las pantallas de configuración para el ajuste del Vantage Access o el dispositivo seleccionado.
• Los centros de estado (F) muestra información de registro a tiempo real.
52
ESPAÑOL
6 Especificar un servidor de descarga
Debe especificar un servidor para almacenar los archivos del firmware y configuración del
dispositivo y realizar actualizaciones de firmware remotas automáticas o restauraciones de
configuración de los dispositivos administrados.
1 Haga clic en el icono System Manager (Administrador del sistema) en el panel de control.
2 Haga clic en Download Server (Servidor de
descarga) en el panel de navegación para mostrar la
pantalla de configuración.
3 En el campo IP Address (Dirección IP), escriba la
dirección IP del servidor HTTP con notación decimal.
"
Si el servidor HTTP y Vantage Access están instalados en el mismo ordenador,
debe utilizar un número de puerto diferente para el servidor HTTP y especificar el
número de puerto. Por ejemplo, si el servidor HTTP (192.168.100.1) utiliza el
puerto 8080, entonces escriba "192.168.100.1:8080" en el campo IP Address
(Dirección IP).
4 Ajuste los campos User Name (Nombre de usuario) y Password (Contraseña) para acceder
al servidor HTTP. Si ha cambiado la configuración predeterminada ("zyxel" y "1234" durante
el proceso de instalación, escriba la información de la nueva cuenta. Respetar los caracteres
en mayúscula en los campos nombre de usuario y contraseña.
5 Haga clic en OK (Aceptar) para guardar la configuración.
7 Registrar un dispositivo
Debe registrar uno o varios dispositivos compatibles en Vantage Access para permitir la
administración remota.
• Para registrar un dispositivo, configure la información del dispositivo en el archivo Edit an XML y
súbalo al Vantage Access. Consulte Sección 7.1 en la página 10 y Sección 7.2 en la página 11.
• Configure el dispositivo para permitir la administración remota desde Vantage Access. Ver Sección 7.3 en la página 11.
7.1 Editar un archivo XML para múltiples dispositivos
Puede importar múltiples dispositivos al Vantage Access a la vez.
Para importar múltiples dispositivos a la vez, necesitará crear un archivo XML que contenga la
información (como nombre del dispositivo, OUI, número de serie y tipo de dispositivo) del
dispositivo. Puede descargar un archivo de ejemplo en la ventana Provision Manager > Device
Pre-Provision > Import Devices y modificarlo con la información de su dispositivo.
53
ESPAÑOL
A continuación se muestra un ejemplo para dos dispositivos ZyXEL compatibles.
<?xml version="1.0" encoding="UTF-8"?>
<Template xmlns:xsi="http://www.w3.org/2001/XMLSchema-instance">
<Device>
<deviceName>Device1</deviceName>
<OUI>001349</OUI>
<serialNumber>001349000000</serialNumber>
<deviceType>P-2602HW-D1A</deviceType>
<Device>
<Device>
<deviceName>Device2</deviceName>
<OUI>001349</OUI>
<serialNumber>00134900000a</serialNumber>
<deviceType>P-2802HWL-I1</deviceType>
<Device>
</Template>
7.2 Importar dispositivos
Siga los pasos siguientes para importar su(s) dispositivo(s).
1 Entre en Vantage Access como raíz y haga clic en el icono Provision Manager
(Administrador de provisión).
2 Haga clic en Device Pre-Provision > Import Devices (Preprovisión de dispositivos > Importar dispositivos) en el
panel de navegación.
3 Para importar un dispositivo, seleccione Import Single
Device (Importar un dispositivo) y escriba la información
del dispositivo en los campos apropiados.
Para importar más de un dispositivo, seleccione Import
Multi-Devices (Importar múltiples dispositivos) y especifique la ubicación y el nombre del archivo
XML o haga clic en Browse (Examinar) para buscarlo.
4 Haga clic en Import (Importar).
5 Cuando se haya realizado la importación del archivo, debería ver la nueva
entrada o entradas en el panel Device List (Lista de dispositivos). El campo
Status (Estado) mostrará Unregistered (Sin registrar) Para completar el
registro del dispositivo, consulteSección 7.3 en la página 11.
Si no puede ver la(s) nueva(s) entrada(s), compruebe los registros del sistema
y asegúrese de que el formato de archivo XML sea el correcto.
7.3 Configuración del dispositivo ZyXEL
Debe configurar el dispositivo administrado para permitir la administración remota desde
Vantage Access. Consulte la Guía del usuario que viene con su dispositivo compatible para más
información. A continuación se muestra cómo habilitar el protocolo de comunicación TR-069
entre un dispositivo ZyXEL compatible y Vantage Access.
54
ESPAÑOL
1 Para activar TR-069 en el dispositivo ZyXEL compatible, acceda a CLI y escriba los
comandos siguientes.
wan tr load
Activa la configuración TR-069.
wan tr active 1
Activa la administración remota TR-069.
wan tr acsUrl
172.25.21.174/TR069
Ajusta la dirección IP del servidor Vantage
Access. Por ejemplo, 172.25.21.174.
wan tr periodicEnable 1
Activa la actualización periódica de
información en el servidor.
wan tr informInterval 30
Ajusta el tiempo de actualización de la
información. Por ejemplo, 30 segundos.
wan tr debug on
Activa el modo de depuración TR-069 para ver
los registros.
wan tr save
Guarda la configuración.
wan tr reset
Ajusta el dispositivo para registrarse en el
servidor Vantage Access en seguida.
2 Una vez conectado a la red, el dispositivo ZyXEL se registra automáticamente en el servidor
Vantage Access.
"
Para la configuración inicial, el proceso de registro puede tardar varios minutos
(dependiendo del estado de su red).
3 Compruebe el estado del dispositivo en el panel Device List (Lista de
dispositivos). Si el estado es Registered (Registrado), esto indica que el
registro del dispositivo ha tenido éxito y que Vantage Access ha
almacenado la información del dispositivo ZyXEL compatible en su base de
datos.
Ahora puede utilizar las pantallas de Provision (Provisión) (cuando inicia
sesión como "admin") en Vantage Access para configurar remotamente este
dispositivo ZyXEL compatible. Consulte la Guía del usuario para información detallada.
Solución de problemas
1 No puedo arrancar Vantage Access.
• Debe reiniciar el ordenador tras instalar Vantage Access.
• Asegúrese de que Vantage Access DB esté iniciado. Consulte Sección 4 en la página 7.
• Si aparece el mensaje "Error: Remote DB is not alive!", significa que ha especificado una dirección IP de servidor Vantage Access DB errónea durante la instalación de
Vantage Access BED. Desinstale e instale Vantage Access BED con la dirección IP correcta. Consulte el capítulo de desinstalación en la Guía del usuario y página 4 en esta
guía.
55
ESPAÑOL
• Asegúrese de que se conecta a Vantage Access DB. Si el servidor MySQL está en un
ordenador diferente, puede que el ordenador esté apagado o que la conexión al ordenador haya caído.
2 No se muestra la pantalla de Vantage Access inicio de sesión.
• Esto ocurre si ya ha instalado Apache con su distribución Linux. Desinstale Apache.
• Si ha instalado Vantage Access BED y Vantage Access HTTPD en el mismo ordenador,
desinstale e instale Vantage Access HTTPD utilizando un número de puerto distinto a 80.
3 No puedo iniciar sesión en Vantage Access.
•
•
•
•
Asegúrese de que el servidor Vantage Access esté encendido.
Asegúrese de haber iniciado Vantage Access en el servidor.
Asegúrese de que escribe la dirección IP correcta del servidor Vantage Access.
El nombre de usuario predeterminado es "root" y la contraseña predeterminada es "root"
Respetar los caracteres en mayúscula.
• Si escribe tres contraseñas incorrectas para un nombre de usuario, deberá esperar 10
minutos para que Vantage Access le permita iniciar sesión con el mismo nombre de
usuario.
4 El explorador web no muestra la pantalla correctamente.
• Las pantallas aparecen sólo con los exploradores web soportados. Consulte Sección 1 en
la página 1.
• Asegúrese de haber instalado Macromedia Flash Player 9.0.
• Se recomienda que utilice un monitor con la resolución de pantalla a 1024 por 768 píxeles.
5 No puedo ver mi dispositivo compatible en Vantage Access.
• Asegúrese de haber escrito o importado un archivo XML con la información de dispositivo
correcta en Vantage Access. Ver Sección 7 en la página 10.
• Asegúrese de haber ajustado y activado correctamente la administración de los protocolos compatibles en el dispositivo. Ver Sección 7.3 en la página 11.
• El proceso inicial de descubrimiento de dispositivos puede tardar hasta tres minutos
dependiendo del estado de su red.
6 Veo "[error] cannot add the device to Vantage Access, maybe database cannot be connected
or OUI-SN is duplicate" cuando importo uno o varios dispositivos con un archivo XML.
• Asegúrese de que la información de su OUI (la parte de la dirección MAC del dispositivo
que identifica de forma única a una compañía) y SN (dirección LAN MAC del dispositivo)
en el archivo XML no está duplicada con un dispositivo existente listado en el panel de
lista de dispositivos. Corrija la información en el archivo XML y vuelva a subirla.
• Asegúrese de que se conecta a Vantage Access DB. De lo contrario, reinicie la DB escribiendo "./stop.sh" y "/start.sh" bajo el directorio Tr069_db.
7 Mi servidor Vantage Access está roto y quiero instalar Vantage Access en otro ordenador.
• Consulte el capítulo sobre la reinstalación de la licencia existente en la Guía del usuario.
56
ESPAÑOL
57
ITALIANO
Introduzione
Vantage Access è uno strumento di gestione di tipo Web che consente di gestire da remoto,
controllare e monitorare più dispositivi compatibili. Un dispositivo compatibile è un qualsiasi
dispositivo che supporta uno dei protocolli TR-069, TR-098, TR-104 e TR-106. In questa Guida
introduttiva viene illustrato come installare Vantage Access.
La figura che segue mostra un esempio di rete. Una volta installato il programma è possibile
utilizzare un browser da un qualsiasi computer client (A) presente nella rete per accedere allo
strumento di configurazione Web sul server Vantage Access (B).
A
B
In questa guida viene spiegato come:
• installare Vantage Access.
• accedere a Vantage Access come root per la configurazione iniziale.
• registrare e configurare un dispositivo ZyXEL compatibile per la gestione remota.
1 Requisiti minimi di sistema
Per il server Vantage Access:
• CPU: Dual Intel Xeon a 3.0 GHz
• Memoria: 4 GB
• Disco rigido: 80 GB
• Sistema operativo: Red Hat Enterprise Linux ES 3
• Altro: Chiave di licenza - Numero di autenticazione che consente di registrare i dispositivi ZyXEL
con il server Vantage Access. Vedere la scheda con la chiave di licenza.
Per un client Vantage Access:
• CPU: Compatibile Intel Pentium a 450 MHz
• Memoria: 256 MB
• Disco rigido: 2 GB
• Browser: Internet Explorer 6.0
58
ITALIANO
• Flash Player: Flash 9.0
• Risoluzione dello schermo: 1024 x 768 pixel
2 Prima di eseguire l'installazione
"
Dato che Vantage Access è fornito con il proprio server HTTP Apache e con il
database server MySQL, è consigliabile installare Vantage Access su un
computer Linux nuovo. Se si intende installare Vantage Access su un computer
Linux esistente, è dapprima necessario disinstallare le versioni esistenti di
Apache e MySQL da tale server, altrimenti queste andranno in conflitto con
Vantage Access.
Vantage Access è costituito da tre pacchetti: DB, BED e HTTPD. È possibile installare questi
programmi separatamente su computer differenti o sullo stesso computer.
• DB: database server MySQL embedded di Vantage Access.
• BED: BED comprende la suite di protocolli utilizzati per gestire i dispositivi compatibili, un server
Apache e un servizio watchdog.
• HTTPD: demone HTTP server di download utilizzato per l'archiviazione e il trasferimento dei file.
Questi file includono i file di sistema Vantage Access, del firmware del dispositivo, di configurazione e i log.
3 Installazione
Attenersi alla procedure seguente per copiare i file di installazione sui computer.
1 Accedere al computer Linux come utente root
2 Inserire il CD di Vantage Access nel lettore CD-ROM e copiare i file di installazione (.bin) dal
CD di Vantage Access a una directory del computer (ad esempio ./Home/Access).
Le sezioni seguenti descrivono la procedura di installazione per i tre pacchetti.
"
È necessario installare prima il DC di Vantage Access.
3.1 Installazione del DB di Vantage Access
1 Nella cartella i cui è memorizzato il file di installazione, digitare chmod +x
Vantage_Access_DB.bin per impostarlo come eseguibile.
2 Digitare ./Vantage_Access_DB.bin per avviare il processo di installazione.
59
ITALIANO
3 Viene visualizzata la schermata della procedura
guidata. Fare clic su Next (avanti) nelle varie
schermate per proseguire.
4 Specificare la posizione del database. Accettare la
posizione predefinita (user/local) oppure inserire il
percorso del file nell'apposito campo.
5 Selezionare la posizione del collegamento oppure
selezionare Don't create links (non creare
collegamenti) per non creare collegamenti.
6 Verificare le opzioni di installazione in questa
schermata e scegliere Next (avanti) per avviare il
processo di installazione.
60
ITALIANO
7 Una volta installato correttamente il componente
software, appare la schermata illustrata. Scegliere
Done (fine).
3.2 Installazione di BED di Vantage Access
1 Nella cartella i cui è memorizzato il file di installazione, digitare chmod +x
Vantage_Access_BED.bin per impostarlo come eseguibile.
2 Digitare ./Vantage_Access_BED.bin per avviare il processo di installazione.
3 Viene visualizzata la schermata della procedura
guidata. Fare clic su Next (avanti) nelle varie
schermate per proseguire.
4 Specificare la posizione del file. Accettare la posizione
predefinita oppure inserire il percorso del file
nell'apposito campo.
5 Selezionare la posizione del collegamento oppure
selezionare Don't create links (non creare
collegamenti) per non creare collegamenti.
61
ITALIANO
6 Immettere l'indirizzo IP del computer su cui è stato
installato il DB di Vantage Access.
Se si installa sia DB di Vantage Access sia BED di
Vantage Access sullo stesso computer, inserire l'indirizzo
IP 127.0.0.1 del computer.
7 Verificare le opzioni di installazione in questa
schermata e scegliere Next (avanti) per avviare il
processo di installazione.
8 Una volta installato correttamente il componente
software, appare la schermata illustrata. Scegliere
Done (fine).
9 Riavviare il computer.
3.3 Installazione di HTTPD di Vantage Access
1 Nella cartella i cui è memorizzato il file di installazione, digitare chmod +x
Vantage_Access_HTTPD.bin per impostarlo come eseguibile.
2 Digitare ./Vantage_Access_HTTPD.bin per avviare il processo di installazione.
3 Viene visualizzata la schermata della procedura
guidata. Fare clic su Next (avanti) nelle varie
schermate per proseguire.
62
ITALIANO
4 Specificare la posizione del file. Accettare la posizione
predefinita oppure inserire il percorso del file
nell'apposito campo.
5 Selezionare la posizione del collegamento oppure
selezionare Don't create links (non creare
collegamenti) per non creare collegamenti.
6 Specificare nome utente e password per accedere al
server HTTP. È possibile utilizzare le impostazioni
predefinite ("zyxel", "1234" e porta "80") oppure
inserire le informazioni desiderate nei campi appositi.
Prendere nota di nome utente e password perché
queste informazioni saranno necessarie in seguito.
"
Se si installa BED di Vantage Access e
HTTPD di Vantage Access sullo stesso
computer, inserire un numero di porta
differente da 80 in questa schermata. Ad
esempio inserire 8080.
7 Verificare le opzioni di installazione in questa
schermata e scegliere Next (avanti) per avviare il
processo di installazione.
63
ITALIANO
8 Una volta installato correttamente il componente
software, appare la schermata illustrata. Scegliere
Done (fine).
4 Avvio di Vantage Access
Una volta eseguita l'installazione è necessario avviare i servizi DB, BED e HTTPD di Vantage
Access. Digitare ./start.sh nelle directory corrispondenti (Tr069_db, Tr069_bed e
Tr069_httpd).
Un messaggio indica il successo dell'avvio dei servizi.
[root@localhost local]# cd /usr/local/Tr069_db
[root@localhost Tr069_db]# ./start.sh
Starting mysqld daemon with databases from /usr/local/Tr069_db/mysql/data
################################################################################
###
Vantage_Access_DB started successfully!
###
################################################################################
[root@localhost Tr069_db]# cd /usr/local/Tr069_bed
[root@localhost Tr069_bed]# ./start.sh
Starting tr069...success
Starting httpd...success
Starting watchdog...success
###################################################################
Vantage Access started (tr069 pid 2364; httpd pid 2377)
Version: 2.0.47.83.00b31
Date: 2007-06-15
###################################################################
[root@localhost Tr069_bed]# cd /usr/local/Tr069_httpd
[root@localhost Tr069_httpd]# ./start.sh
#############################################################################
Vantage Access HTTPD started successfully from /usr/local/Tr069_httpd
Version: 2.0.47.83.00b3
Date: 2007-06-15
#############################################################################
[root@localhost Tr069_httpd]#
5 Accesso a Vantage Access
In questa sezione viene spiegato come accede (login) a Vantage Access come utente root,
accendendo a tutte le schermate di configurazione.
64
ITALIANO
Vantage Access è dotato di tre account di accesso predefiniti. Lo strumento di configurazione
Web e i privilegi variano a seconda dell'account utilizzato per effettuare l'accesso. Nella tabella
seguente sono riportati i nomi utente e le password predefinite.
Tipo
Nome utente
Password
Root
root
root
Administrator
admin
admin
Subscriber
guest
guest
1 Su un computer client, aprire Internet Explorer (versione 6) e digitare l'indirizzo IP del server
Vantage Access nella barra degli indirizzi. Ad esempio 192.168.252.10.
2 Selezionare I have a license to activate Vantage
Access (sono in possesso della licenza per attivare
Vantage Access) per avviare la registrazione del
prodotto. Oppure selezionare I want to try Vantage
Access (desidero provare Vantage Access) per un
periodo di prova di 90 giorni in cui è possibile gestire
fino a 100. Fare clic su Continue (continua).
3 Viene visualizzata la schermata della licenza. Alcuni
campi non appaiono nella schermata se si dispone
già di un account myZyXEL.com oppure se si sta
ricevendo la versione di valutazione. Digitare la
chiave di licenza e le informazioni relative all'account
di myZyXEL.com negli appositi campi. scegliere
Apply (applica) per attivare il prodotto.
"
Il numero di dispositivi registrati che è possibile configurare dipende dalla iCard.
Per ulteriori informazioni, vedere il capitolo delle caratteristiche tecniche del
prodotto nella Guida dell'utente.
65
ITALIANO
4 Viene visualizzata una schermata di accesso (login).
Digitare il nome utente per l'accesso come root
("root") e la password ("root"). Fare clic su Login
(accedi).
Viene visualizzato il cruscotto di Vantage Access.
Di seguito sono riportate le descrizioni della varie parti delle schermate di Vantage Access.
A
B
C
D
E
F
• Il pannello di controllo di (A) viene visualizzato in ogni schermata dello strumento di configurazione Web. Nel pannello di controllo sono presenti tutti i pulsanti comuni dello strumento di configurazione Web.
• La barra del titolo di (B) visualizza il percorso del collegamento.
• La finestra dei dispositivi (C) visualizza i dispositivi gestiti da Vantage Access. È anche possibile
configurare e visualizzare raggruppamenti logici dei dispositivi gestiti.
• Il pannello di navigazione (D) visualizza i collegamenti di navigazione che è possibile utilizzare
per accedere alle schermate di configurazione, registrazione (log) e stato.
• La finestra di configurazione (E) visualizza le schermate di configurazione impostate per Vantage
Access o un dispositivo selezionato.
66
ITALIANO
• Il centro di stato (F) visualizza le informazioni in tempo reale.
6 Definizione di un server di download
È necessario specificare un server per archiviare i file del firmware dei dispositivi e di
configurazione e quindi eseguire gli aggiornamenti di firmware remoti automatici oppure i
ripristini di configurazione sui dispositivi gestiti.
1 Scegliere l'icona System Manager (gestione sistema) nel pannello di controllo.
2 Scegliere Download Server nel pannello di
navigazione per visualizzare la schermata di
configurazione.
3 Nel campo IP Address (indirizzo IP), digitare
l'indirizzo IP del server HTTP nella notazione
decimale puntata.
"
Se server HTTP e Vantage Access sono installati sullo stesso computer, è
necessario utilizzare un numero di porta differente per il server HTTP e quindi
specificare il numero di porta da utilizzare. Se ad esempio il server HTTP
(192.168.100.1) sta utilizzando la porta 8080, digitare "192.168.100.1:8080" nel
campo IP Address (indirizzo IP).
4 Impostare i campi User Name (nome utente) e Password per accedere al server HTTP. Se si
sono cambiate le impostazioni predefinite ("zyxel" e "1234") durante il processo di
installazione, immettere le nuove informazioni di account. Per nome utente e password viene
fatta distinzione tra maiuscole e minuscole.
5 Scegliere Apply (applica) per salvare le impostazioni.
7 Registrazione di un dispositivo
È necessario registrare uno o più dispositivi compatibili a Vantage Access per permettere la
gestione remota.
• Per registrare un dispositivo, configurare le informazioni relative al dispositivo in file XML e caricarlo su Vantage Access. Vedere Sezione 7.1 a pagina 10 e Sezione 7.2 a pagina 11.
• Configurare il dispositivo per permettere la gestione remota da Vantage Access. Vedere Sezione
7.3 a pagina 12.
7.1 Creazione di un file XML per più dispositivi
È possibile importare più dispositivi Vantage Access contemporaneamente.
67
ITALIANO
Per importare più dispositivi contemporaneamente, è necessario creare un file XML contenente
le informazioni (quali nome del dispositivo, OUI, numero seriale e tipo di dispositivo) relative al
dispositivo. È possibile scaricare un file di esempio nella finestra Provision Manager > Device
Pre-Provision > Import Devices (importa dispositivi) e modificarlo inserendo le informazioni
personalizzate sui dispositivi.
Segue un esempio di te dispositivi ZyXEL compatibili.
<?xml version="1.0" encoding="UTF-8"?>
<Template xmlns:xsi="http://www.w3.org/2001/XMLSchema-instance">
<Device>
<deviceName>Device1</deviceName>
<OUI>001349</OUI>
<serialNumber>001349000000</serialNumber>
<deviceType>P-2602HW-D1A</deviceType>
<Device>
<Device>
<deviceName>Device2</deviceName>
<OUI>001349</OUI>
<serialNumber>00134900000a</serialNumber>
<deviceType>P-2802HWL-I1</deviceType>
<Device>
</Template>
7.2 Importazione dei dispositivi
Attenersi alla procedura seguente per importare i dispositivi.
1 Accedere a Vantage Access come root e scegliere l'icona Provision Manager.
2 Scegliere Device Pre-Provision > Import Devices (importa
dispositivi) nel pannello di navigazione.
3 Per importare un dispositivo, selezionare Import Single
Device (importa dispositivo singolo) e inserire le
informazioni relative al dispositivo negli appositi campi.
Per importare più di un dispositivo, scegliere Import MultiDevices (importa più dispositivi) e specificare percorso e
nome del file XML oppure scegliere Browse (sfoglia) per selezionarlo.
4 Scegliere Import (importa).
5 Quando l'importazione di un file avviene con successo, è possibile vedere
le nuove voci nel pannello Device List (elenco dispositivi). Il campo Status
(stato) visualizza il messaggio Unregistered (non registrato). Per
completare la registrazione del dispositivo, vedere Sezione 7.3 a pagina 12.
Se le nuove voci non sono visibili, controllare i log di sistema e verificare che il
formato del file XML sia corretto.
68
ITALIANO
7.3 Impostazione dei dispositivi ZyXEL
È necessario configurare il dispositivo gestito per consentire la gestione remota da Vantage
Access. Per ulteriori informazioni fare riferimento alla guida utente fornita a corredo con il
dispositivo compatibile. Di seguito viene illustrato come abilitare il protocollo di comunicazione
TR-069 tra un dispositivo ZyXEL compatibile e Vantage Access.
1 Per attivare TR-069 sul dispositivo ZyXEL compatibile, accedere a CLI e inserire i comandi
seguenti.
wan tr load
Abilita la configurazione TR-069.
wan tr active 1
Attiva la gestione remota TR-069.
wan tr acsUrl
172.25.21.174/TR069
Imposta l'indirizzo IP del server Vantage
Access. Ad esempio 172.25.21.174.
wan tr periodicEnable 1
Abilita l'aggiornamento periodico delle
informazioni sul server.
wan tr informInterval 30
Imposta il tempo di aggiornamento delle
informazioni. Ad esempio 30 secondi.
wan tr debug on
Abilita la modalità di debug TR-069 per
visualizzare i registri (log).
wan tr save
Salva le impostazioni.
wan tr reset
Imposta il dispositivo per la registrazione
immediata sul server Vantage Access.
2 Una volta connessi alla rete, il dispositivo ZyXEL individua automaticamente il dispositivo ed
effettua la registrazione sul server Vantage Access.
"
Per la configurazione iniziale, il processo di registrazione può impiegare alcuni
minuti (a seconda della condizione della rete).
3 Controllare lo stato del dispositivo nel pannello Device List (elenco
dispositivi). Se lo stato è Registered (registrato) significa che la
registrazione del dispositivo è avvenuta con successo e che Vantage
Access ha memorizzato le informazioni sul dispositivo ZyXEL compatibile
nel suo database.
È ora possibile utilizzare le schermate Provision (quando si accede come
"admin") in Vantage Access per configurare da remoto il dispositivo ZyXEL
compatibile. Vedere la guida utente per le informazioni dettagliate.
Risoluzione dei problemi
1 Non riesco ad avviare Vantage Access.
• Dopo l'installazione di Vantage Access è necessario riavviare il computer.
69
ITALIANO
• Verificare che il DB di Vantage Access sia avviato. Vedere Sezione 4 a pagina 7.
• Se viene visualizzato il messaggio Error: Remote DB is not alive! (errore: DB
remoto non attivo) significa che è stato specificato un indirizzo IP sbagliato per il server
DB di Vantage Access durante l'installazione di BED di Vantage Access. Disinstallare BED
di Vantage Access e reinstallarlo utilizzando l'indirizzo IP corretto. Vedere il capitolo sulla
disinstallazione nella guida dell'utente e pagina 4 in questa guida.
• Verificare che sia possibile connettersi al DB di Vantage Access. Se il server MySQL si
trova su un computer differente, è possibile che questo computer sia spento o che la connessione al computer non sia attiva.
2 Non riesco a visualizzare la schermata di accesso a Vantage Access.
• Questo inconveniente può verificarsi se con la distribuzione Linux è già installato Apache.
Disinstallare Apache.
• Se si sono installato BED Vantage Access e HTTPD Vantage Access sullo stesso computer, disinstallare e reinstallare HTTPD Vantage Access utilizzando un altro numero di
porta diverso da 80.
3 Non riesco ad accedere a Vantage Access.
•
•
•
•
Verificare che il server Vantage Access sia attivo.
Verificare di aver avviato Vantage Access sul server.
Verificare di aver immesso l'indirizzo IP corretto del server Vantage Access.
Il nome utente predefinito è "root" e la password predefinita è "root". Per questi dati viene
fatta differenza tra maiuscole e minuscole.
• Se è stata immessa una password errata tre volte relativamente a un nome utente, occorrerà attendere 10 minuti prima che Vantage Access consenta di accedere nuovamente utilizzando lo stesso nome utente.
4 Il browser non visualizza correttamente la schermata.
• Visualizzare le schermate utilizzando uno dei browser supportati. Vedere Sezione 1 a pagina 1.
• Verificare di aver installato Macromedia Flash Player 9.0.
• Si consiglia di utilizzare un monitor con una risoluzione pari a 1024 per 768 pixel.
5 Non riesco a vedere il dispositivo compatibile in Vantage Access.
• Verificare di aver immesso o importato un file XML contenente le corrette informazioni sul
dispositivo in Vantage Access. Vedere Sezione 7 a pagina 10.
• Verificare di aver impostato e attivato correttamente la gestione dei protocolli compatibili
sul dispositivo. Vedere Sezione 7.3 a pagina 12.
• Il processo iniziale di rilevamento dei dispositivi può impiegare fino a tre minuti, a seconda
della condizione della rete.
6 Quando importo dispositivi utilizzando un file XML viene visualizzato il messaggio "[error]
cannot add the device to Vantage Access, maybe database cannot be connected or OUI-SN
is duplicate" (errore: impossibile aggiungere il dispositivo a Vantage Access; è possibile che il
database non sia connesso o che OUI-SN sia duplicato".
70
ITALIANO
• Verificare che le informazioni OUI (la parte dell'indirizzo MAC del dispositivo che identifica
univocamente una società) ed SN (l'indirizzo MAC LAN del dispositivo) presenti nel file
XML non sia duplicate con alcun dispositivo esistente elencato nel pannello dell'elenco
dei dispositivi. Correggere le informazioni presenti nel file XML e caricarlo nuovamente.
• Verificare che sia possibile connettersi al DB di Vantage Access. In caso contrario,
eseguire il reset del DB digitando "./stop.sh" e "./start.sh" nella directori Tr069_db.
7 Il server Vantage Access è danneggiato e desidero installare Vantage Access su un altro
computer.
• Vedere il capitolo sulla reinstallazione della licenza esistente all'interno della guida
dell'utente.
71
РУССКИЙ
Вступление
Vantage Access — это веб-ориентированный инструмент управления, который позволяет
осуществлять удаленное управление, контроль и наблюдение за многочисленными совместимыми устройствами. Совместимым является любое устройство, которое
поддерживает протоколы TR-069, TR-098, TR-104 или TR-106. Это руководство по
быстрому запуску описывает установку Vantage Access.
На рисунке внизу приведен пример сети. После установки устройства вы можете
использовать веб-браузер любого компьютера-клиента (А) в сети, чтобы получить доступ к
веб-конфигуратору на сервере Vantage Access (B).
A
B
В этом руководстве описаны:
• установка Vantage Access
• процедура входа в качестве корня Vantage Access для начальной установки
• регистрация и установка совместимого устройства ZyXEL для удаленного управления.
1. Минимальные системные требования
Для сервера Vantage Access :
• ЦПУ: Dual Intel Xeon 3.0 ГГц
• Память: 4 Гб
• Жесткий диск: 80 Гб
• Операционная система: Red Hat Enterprise Linux ES 3
• Другое: License key (Лицензионный ключ) — это идентификационный номер, который
позволяет зарегистрировать устройства ZyXEL на сервере Vantage Access. Смотрите
карточку с лицензионным ключом.
Для клиента Vantage Access:
• ЦПУ: совместимый с Intel Pentium 450 МГц
• Память: 256 Мб
• Жесткий диск: 2 Гб
72
РУССКИЙ
• Веб-браузер: Internet Explorer 6.0
• Flash Player: Flash 9.0
• Разрешение экрана: 1024 x 768 пикселей
2. Перед началом установки
"
Так как Vantage Access имеет собственный сервер Apache HTTP и сервер
баз данных MySQL, рекомендуется установка Vantage Access на новый
компьютер с системой Linux. Если вы планируете устанавливать Vantage
Access на существующий компьютер с Linux, то вначале нужно удалить
существующие Apache и MySQL с этого сервера. В противном случае они
будут конфликтовать с Vantage Access.
Vantage Access состоит из трех пакетов: DB, BED и HTTPD. Вы можете установить их
отдельно на разных или на одном компьютере.
• DB: встроенный сервер баз данных MySQL на Vantage Access.
• BED: включает пакет протоколов, который используется для управления совместимыми
устройствами, сервером Apache и службой безопасности.
• HTTPD: сервер загрузок HTTP Daemon, который используется для хранения и передачи
файлов. Эти файлы включают прошивку устройства, конфигурацию, журнал и системные
файлы Vantage Access.
3. Установка
Скопируйте файлы для установки на компьютер(ы), как это описано ниже.
1 Войдите на компьютер Linux в качестве корневого пользователя.
2. Вставьте Vantage Access CD в привод CD-ROM и скопируйте установочные файлы (.bin)
с Vantage Access CD в директорию на вашем компьютере (например, ./Home/Access).
В следующем разделе описываются шаги установки для трех пакетов.
"
Первым вы должны установить пакет Vantage Access.
3.1 Установка Vantage Access DB
1 В папке с сохраненными установочными файлами введите chmod +x
Vantage_Access_DB.bin, чтобы сделать их исполняемыми.
73
РУССКИЙ
2. Введите ./Vantage_Access_DB.bin , чтобы начать процесс установки.
3. Появится окно мастера. На каждой следующей
странице щелкайте на Next (Далее) для
продолжения настройки.
4. Укажите расположение базы данных. Примите
расположение по умолчанию (user/local) или
введите путь файла в требуемом поле.
5. Выберите расположение для ярлыка или Don't
create links (Не создавать ссылок), если вы не
хотите создавать ярлыки.
6. Проверьте параметры установки на экране и
щелкните на кнопке Next (Далее) для начала
процесса установки.
74
РУССКИЙ
7. После успешной установки компонентов
программного обеспечения появится окно.
Щелкните Done (Выполнено).
3.2 Установка Vantage Access BED
1 В папке с сохраненными установочными файлами введите chmod +x
Vantage_Access_BED.bin, чтобы сделать их исполняемыми.
2. Введите ./Vantage_Access_BED.bin, чтобы начать процесс установки.
3. Появится окно мастера. На каждой следующей
странице щелкайте на Next (Далее) для
продолжения настройки.
4. Укажите расположение файла. Примите
расположение по умолчанию или введите путь
файла в требуемом поле.
5. Выберите расположение для ярлыка или Don't
create links (Не создавать ссылок), если вы не
хотите создавать ярлыки.
75
РУССКИЙ
6. Введите IP-адрес компьютера, на котором
установлена Vantage Access DB.
Если вы устанавливаете Vantage Access DB и Vantage
Access BED на одном компьютере, то введите IPадрес или 127.0.0.1.
7. Проверьте параметры установки на экране и
щелкните на кнопке Next (Далее) для начала
процесса установки.
8. После успешной установки компонентов
программного обеспечения появится окно.
Щелкните Done (Выполнено).
9. Перезагрузите компьютер.
3.3 Установка Vantage Access HTTPD
1 В папке с сохраненными установочными файлами введите chmod +x
Vantage_Access_HTTPD.bin, чтобы сделать их исполняемыми.
2. Введите ./Vantage_Access_HTTPD.bin, чтобы начать процесс установки.
3. Появится окно мастера. На каждой следующей
странице щелкайте на Next (Далее) для
продолжения настройки.
76
РУССКИЙ
4. Укажите расположение файла. Примите
расположение по умолчанию или введите путь
файла в требуемом поле.
5. Выберите расположение для ярлыка или Don't
create links (Не создавать ссылок), если вы не
хотите создавать ярлыки.
6. Укажите имя пользователя и пароль для входа на
HTTP-сервер. Вы можете использовать настройки
по умолчанию ( "zyxel", "1234" и "80") или ввести
собственные значения в соответствующие поля.
Запомните это имя пользователя и пароль, так как
они понадобятся вам позже.
"
Если вы устанавливаете Vantage Access
BED и Vantage Access HTTPD на один
компьютер, введите на этом экране номер
порта, который не равен 80. Например,
введите 8080.
7. Проверьте параметры установки на экране и
щелкните на кнопке Next (Далее) для начала
процесса установки.
77
РУССКИЙ
8. После успешной установки компонентов
программного обеспечения появится окно.
Щелкните Done (Выполнено).
4. Запуск Vantage Access
После установки вам необходимо запустить службы Vantage Access DB, BED и HTTPD.
Введите ./start.sh в соответствующих директориях (Tr069_db, Tr069_bed и Tr069_httpd).
При успешном запуске на экране появится информационное сообщение.
[root@localhost local]# cd /usr/local/Tr069_db
[root@localhost Tr069_db]# ./start.sh
Запуск mysqld daemon с базами данных из /usr/local/Tr069_db/mysql/data
################################################################################
###
Vantage_Access_DB запущен успешно!
###
################################################################################
[root@localhost Tr069_db]# cd /usr/local/Tr069_bed
[root@localhost Tr069_bed]# ./start.sh
Запуск tr069...успешно
Запуск httpd...успешно
Запуск watchdog...успешно
###################################################################
Vantage Access запущен (tr069 pid 2364; httpd pid 2377)
Версия: 2.0.47.83.00b31
Дата: 2007-06-15
###################################################################
[root@localhost Tr069_bed]# cd /usr/local/Tr069_httpd
[root@localhost Tr069_httpd]# ./start.sh
#############################################################################
Vantage Access HTTPD запущен успешно из /usr/local/Tr069_httpd
Версия: 2.0.47.83.00b3
Дата: 2007-06-15
#############################################################################
[root@localhost Tr069_httpd]#
5. Vantage Access Вход в систему
В этом разделе будет показано, как войти в Vantage Access с корневым доступом ко всем
экранам настройки конфигурации.
78
РУССКИЙ
Vantage Access имеет по умолчанию три учетных записи для входа в систему. Окна вебконфигуратора и привилегии варьируются в зависимости от выбранной учетной записи. В
следующей таблице приведены имена пользователей и пароли по умолчанию.
Type (Тип)
User Name
Password
(Имя
(Пароль)
пользователя)
Корневой
root
root
Администратор
admin
admin
Абонент
guest
guest
1 Откройте Internet Explorer (версия 6) на компьютере-клиенте и введите IP-адрес
сервера Vantage Access в строке адреса. Например, 192.168.252.10.
2. Выберите I have a license to activate Vantage
Access (У меня есть лицензия для активации
Vantage Access) для начала регистрации продукта.
Или выберите I want to try Vantage Access (Я хочу
испробовать Vantage Access) для запуска 90дневного пробного использования, при котором вы
можете управлять до 100 служб. Затем щелкните
Continue (Продолжить).
3. Появится окно лицензии. Если у вас уже есть
учетная запись myZyXEL.com или вы выбрали
пробную установку, то некоторые поля будут
неактивны. Введите лицензионный код и
информацию учетной записи myZyXEL.com в
соответствующие поля. щелкните Apply
(Применить) для активации продукта.
"
Количество зарегистрированных устройств, которые вы можете
сконфигурировать, зависит от вашей iCard. Для получения дополнительной
информации смотрите раздел "Технические характеристики" в руководстве
пользователя.
79
РУССКИЙ
4. Появится окно входа в систему. Введите базовое
имя пользователя "root" и пароль "root". Затем
щелкните на кнопке Login (Вход).
Появится панель Vantage Access (Доступ к Vantage) .
Далее описываются элементы окон Vantage Access.
A
B
C
D
E
F
• Панель управления (A) отображается во всех окнах веб-конфигуратора. На панели
управления находятся все общие кнопки веб-конфигуратора.
• Строка заголовка (B) отображает путь к ссылке.
• Окно устройства (C) отображает устройства, которые управляются Vantage Access. Вы
можете также настроить и просмотреть группировку устройств.
• Панель навигации (D) показывает ссылки навигации, которые можно щелкать для
получения доступа к окнам изменения конфигурации, журналу или окнам состояния.
• Окно конфигурации (E) показывает окно конфигурации для Vantage Access или выбранного
устройства.
• Центры состояния (F) показывают информацию журнала в реальном времени.
80
РУССКИЙ
6. Указание сервера загрузок
Вы обязаны указать сервер для хранения файлов прошивки и конфигурации, а также для
выполнения обновления прошивки или восстановления конфигурации на управляемых
устройствах.
1 Щелкните на значке System Manager (Менеджер системы) на панели управления.
2. Щелкните на Download Server (Сервер загрузки)
на панели навигации для вызова окна
конфигурации.
3. В поле IP Address (IP-адрес) введите IP-адрес
сервера HTTP в числовом виде с точками.
"
Если сервер HTTP и Vantage Access устанавливаются на одном
компьютере, вы обязаны использовать и указать другой номер порта для
сервера HTTP. Например, если HTTP-сервер (192.168.100.1) использует
порт 8080, введите "192.168.100.1:8080" в поле IP Address (IP-адрес).
4. Введите значения в поля User Name (Имя пользователя) и Password (Пароль) для
получения доступа к HTTP-серверу. Если вы изменили значения по умолчанию ("zyxel" и
"1234") в процессе установки, введите эту новую информацию учетной записи. Имя
пользователя и пароль учетной записи чувствительны к регистру.
5. Щелкните на кнопке Apply (Применить) для сохранения изменений.
7. Регистрация устройства
Для включения удаленного управления вы обязаны зарегистрировать одно или несколько совместимых устройств на Vantage Access.
• Для регистрации одного устройства введите информацию в файле в Edit (Редактирование)
XML-файла и загрузите его на Vantage Access. Смотрите Section 7.1 на странице 10 и Section 7.2 на странице 11.
• Настройте конфигурацию устройства для разрешения удаленного управления с Vantage
Access. Смотрите Section 7.3 на странице 12.
7.1 Редактирование файла XML для нескольких устройств
Вы можете импортировать несколько устройств на Vantage Access за один раз.
81
РУССКИЙ
Для импорта нескольких устройств за один раз, вам необходимо создать файл XML
информацию об устройстве (такую, как название устройства, OUI, серийный номер и тип
устройства). Вы можете загрузить пример файла в окне Provision Manager > Device PreProvision > Import Devices (Менеджер заготовок > Предварительная заготовка для
устройства > Импорт устройств) и ввести информацию о вашем устройстве.
Ниже приведен пример для двух совместимых устройств ZyXEL.
<?xml version="1.0" encoding="UTF-8"?>
<Template xmlns:xsi="http://www.w3.org/2001/XMLSchema-instance">
<Device>
<deviceName>Device1</deviceName>
<OUI>001349</OUI>
<serialNumber>001349000000</serialNumber>
<deviceType>P-2602HW-D1A</deviceType>
</Device>
<Device>
<deviceName>Device2</deviceName>
<OUI>001349</OUI>
<serialNumber>00134900000a</serialNumber>
<deviceType>P-2802HWL-I1</deviceType>
</Device>
</Template>
7.2 Импортирование устройств
Выполните приведенные ниже действия для импортирования вашего (ваших) устройства
(устройств).
1 Войдите в Vantage Access как корень и щелкните на значке Provision Manager
(Менеджер заготовок).
2. Щелкните на Device Pre-Provision > Import Devices
(Предварительная заготовка для устройства > Импорт
устройств) на панели управления.
3. Для импорта одного устройства выберите Import Single
Device (Импорт одного устройства) и введите
информацию о нем в соответствующие поля.
Для импорта более одного устройства выберите Import
Multi-Devices (Выбор нескольких устройств) и укажите имя и расположение XML файла
или щелкните на кнопке Browse (Обзор), чтобы его найти.
4. Щелкните на Import (Импорт).
5. По окончании успешного импорта файла вы должны увидеть новую
запись(и) на панели Список устройств . В поле Status (Состояние)
будет отображаться Unregistered (Незарегистрировано). Завершение
регистрации устройства смотрите Section 7.3 на странице 12.
Если вы не видите новую запись(и), проверьте журнал системы и
правильность формата файла XML.
82
РУССКИЙ
7.3 Настройка устройства ZyXEL
Вы должны настроить конфигурацию управляемого устройства для разрешения
управления им с Vantage Access. Обратитесь к руководству пользователя, которое
прилагается к вашему совместимому устройству, для получения дополнительной
информации. Ниже показано, как активировать протокол связи TR-069 между Vantage
Access совместимым устройством ZyXEL.
1 Для активации TR-069 на совместимом устройстве ZyXEL войдите в СLI и введите
следующие команды.
wan tr load
Активация конфигурации TR-069
wan tr active 1
Активация удаленного управления TR-069
wan tr acsUrl 172.25.21.174/TR069
Устанавливает IP-адрес сервера Vantage
Access. Например, 172.25.21.174
wan tr periodicEnable 1
Активация периодического обновления
информации на сервере
wan tr informInterval 30
Устанавливает время обновления
информации. Например, 30 секунд.
wan tr debug on
Активация режима отладки TR-069 и
просмотра журналов
wan tr save
Сохранение настроек
wan tr reset
Установка регистрации устройства на
сервере Vantage Access немедленно
2. При подключении к сети устройство ZyXEL автоматически обнаружит сервер Vantage
Access и зарегистрируется на нем.
"
Процесс начальной установки может занять несколько минут (в зависимости
от состояния сети).
3. Проверьте состояние устройства на панели Device List (Список
устройств). Если установлено состояние Registered
(Зарегистрировано), это говорит об успешной регистрации и
сохранении Vantage Access информации о совместимом устройстве
ZyXEL в базе данных.
Теперь вы можете использовать окно Заготовки (когда вы входите как
"аdmin" в Vantage Access) для удаленного конфигурирования этого
совместимого устройства. Смотрите подробную информацию в руководстве пользователя.
Устранение неисправностей
1 Я не могу запустить Vantage Access.
83
РУССКИЙ
• Перезагрузите компьютер после установки Vantage Access.
• Убедитесь, что запущен Vantage Access DB. См. Section 4 на странице 7.
• Если отображается сообщение Error: Remote DB is not alive! (Ошибка: Удаленная БД
не существует!), это означает, что вы указали неверный IP-адрес сервера Vantage
Access DB во время установки Vantage Access BED. Удалите и снова установите Vantage Access BED с правильным IP-адресом. Смотрите раздел по удалению ПО в
руководстве пользователя и страницу 4 в данном руководстве.
• Проверьте подключение к Vantage Access DB. Если сервер MySQL находится на
другом компьютере, то, может быть, этот компьютер отключен или с ним утеряно
соединение.
2. Я не могу вызвать окно Vantage Access login (Вход в систему).
• Это может произойти, если вы уже установили Apache с дистрибутива Linux. Удалите
Apache.
• Если вы установили Vantage Access BED и Vantage Access HTTPD на один
компьютер, то удалите и снова установите Vantage Access HTTPD с использованием
порта, отличного от 80.
3. Я не могу войти в Vantage Access.
•
•
•
•
Убедитесь, что сервер Vantage Access включен.
Убедитесь, что сервер Vantage Access запущен.
Убедитесь, что вы ввели правильный IP-адрес сервера Vantage Access.
Имя пользователя по умолчанию — "root", пароль по умолчанию — "root". Они
чувствительны к регистру.
• Если вы ввели неверный пароль для имени пользователя три раза, то вам придется
подождать 10 минут перед тем, как Vantage Access позволит вам снова войти в
систему под этим именем пользователя.
4. Мой web-браузер отображает окно неправильно.
• Вызывайте конфигуратор при помощи поддерживаемых web-браузеров. Смотрите
Section 1 на странице 1.
• Убедитесь, что вы установили Macromedia Flash Player 9.0.
• Рекомендуется использовать монитор с разрешением экрана 1024 на 768 пикселей.
5. Я не могу найти мое совместимое устройство в Vantage Access.
• Убедитесь, что вы ввели и импортировали XML-файл, содержащий правильную
информацию об устройстве на Vantage Access. Смотрите Section 7 на странице 10.
• Убедитесь, что вы правильно установили и активировали управление совместимых
протоколов на устройстве. Смотрите Section 7.3 на странице 12.
• В зависимости от состояния вашей сети начальный поиск устройства может
занимать до трех минут.
6. Я вижу "[error] cannot add the device to Vantage Access, maybe database cannot be
connected or OUI-SN is duplicate" ("[ошибка] не могу добавить устройство в Vantage
84
РУССКИЙ
Access, возможно, не подключена БД или продублирована OUI-SN)"), когда импортирую
устройство(а) с использованием XML-файла.
• Убедитесь, что ваш OUI (часть MAC-адреса устройства, которая идентифицирует
компанию) и SN (LAN MAC-адрес устройства) не совпадают в XML-файле с уже
существующими устройствами, перечисленными на панели списка устройств.
Исправьте информацию в XML-файле и снова его загрузите.
• Проверьте подключение к Vantage Access DB. Если оно отсутствует, перезагрузите
DB путем ввода "./stop.sh" и "/start.sh" в директории Tr069_db.
7. Мой сервер Vantage Access неисправен, и я хочу установить Vantage Access на другом
компьютере.
• Пожалуйста, обратитесь к разделу о переустановке существующей лицензии в
руководстве пользователя.
85
简体中文
简体中文
介绍
Vantage Access 是一种基于网络的管理工具 , 它允许您进行远程管理 , 控制并监视多个 " 兼容 " 设
备。 " 兼容 " 设备是指任何支持 TR-069、TR-098、TR-104 或 TR-106 协议的设备。本快速开始指
南讲解如何安装 Vantage Access。
下图为一网络实例。一旦安装 , 您可从网络上的任意客户端计算机 (A) 使用网页浏览器访问
Vantage Access 服务器 (B) 上的 web 配置程序。
A
B
本指南讲解如何 :
• 安装 Vantage Access。
• 以 root 登录 Vantage Access 进行初始设置 。
• 注册并设置 ZyXEL 兼容 设备,便于遥控管理。
1 最低系统要求
对 Vantage Access 服务器 :
• CPU: Dual Intel Xeon 3.0 GHz
• 内存 : 4 GB
• 硬盘 : 80 GB
• 操作系统 : Red Hat Enterprise Linux ES 3
• 其它 : 许可密钥 - 一种认证号码,允许您用 Vantage Access 服务器注册 ZyXEL 设备。参见许可密
钥卡。
对 Vantage Access 客户端 :
• CPU: 兼容的 Intel Pentium 450 MHz
• 内存 : 256 MB
• 硬盘 : 2 GB
• web 浏览器 : Internet Explorer 6.0
• Flash Player (播放器): Flash 9.0
• 屏幕分辨率 : 1024 x 768 像素
86
简体中文
2 安装前
因为 Vantage Access 有自己的 Apache HTTP服务器和 MySQL 数据库服务器,建议
您在一台新的 Linux 计算机上安装 Vantage Access 。如果您打算在一台现有的
Linux 计算机上安装 Vantage Access ,您必须从服务器上卸载现有的 Apache 和
MySQL ; 否则它们可能会与 Vantage Access 冲突。
Vantage Access 含有三个程序包 : DB、BED 和 HTTPD。您 可以在不同的计算机上分别安装 它们,
或安装在同一台计算机上。
• DB: 内置的 Vantage Access 的 MySQL 数据库服务器 。
• BED: BED 含有用于管理兼容设备的协议组、 Apache 服务器以及
watchdog 服务。
• HTTPD: 下载服务器 HTTP 后台程序,用于保存和传送文件。这些文件包括设备固件、配置、日志
和 Vantage Access 系统文件。
3 安装
按以下步骤将安装文件复制到计算机。
1 以 root 用户登陆 Linux 计算机。
2 将 Vantage Access CD 插入 CD-ROM ,从 Vantage Access CD 将安装文件 (.bin) 复制到您的
计算机的一个目录下 ( 如 , ./Home/Access)。
以下各节描述这三个程序包的安装步骤。
您必须首先安装 Vantage Access DB 。
3.1 安装 Vantage Access DB
1 在您保存此安装文件的文件夹内,输入 chmod +x Vantage_Access_DB.bin 设置为可执行。
2 输入 ./Vantage_Access_DB.bin ,开始安装过程。
87
简体中文
3 显示向导屏幕。在各屏幕内单击 Next (下一步)继
续。
4 指定数据库位置。接受默认位置 (user/local) 或在提
供的字段内输入文件路径。
5 选择快捷方式的位置,或者如果您不想创建快捷方式,
选择 Don't create links (不创建链接)。
6 核实屏幕内的安装选项,单击 Next (下一步) 开始安
装过程。
88
简体中文
7 软件成功安装后,显示此屏幕。单击 Done (完成)。
3.2 安装 Vantage Access BED
1 在您保存此安装文件的文件夹内,输入 chmod +x
Vantage_Access_BED.bin 设置为可执行。
2 输入 ./Vantage_Access_BED.bin ,开始安装过程。
3 显示向导屏幕。在各屏幕内单击 Next (下一步)继
续。
4 指定文件位置。接受默认位置或在提供的字段内输入文
件路径。
5 选择快捷方式的位置,或者如果您不想创建快捷方式,
选择 Don't create links (不创建链接)。
89
简体中文
6 输入您安装了 Vantage Access DB 的计算机 IP 地址。
如果您将 Vantage Access DB 和 Vantage Access BED 安
装在同一台计算机上, 输入计算机 IP 地址或
127.0.0.1.
7 核实屏幕内的安装选项,单击 Next (下一步) 开始安
装过程。
8 软件成功安装后,显示此屏幕。单击 Done (完成)。
9 重新启动计算机。
3.3 安装 Vantage Access HTTPD
1 在您保存此安装文件的文件夹内,输入 chmod +x Vantage_Access_HTTPD.bin 设置为可执行。
2 输入 ./Vantage_Access_HTTPD.bin ,开始安装过程。
3 显示向导屏幕。在各屏幕内单击 Next (下一步)继
续。
90
简体中文
4 指定文件位置。接受默认位置或在提供的字段内输入文
件路径。
5 选择快捷方式的位置,或者如果您不想创建快捷方式,
选择 Don't create links (不创建链接)。
6 指定登陆 HTTP 服务器的用户名和密码。您可以使用默
认设置 ( "zyxel" "1234" 和端口 “80” ) 或在提供的
字段内输入信息。记住用户名和密码,因为您以后会用
到此信息。
如果您将 Vantage Access BED 和 Vantage
Access HTTPD 安装在同一台计算机上,在屏
幕内输入 80 以外的端口号。例如 , 输入
8080。
7 核实屏幕内的安装选项,单击 Next (下一步) 开始安
装过程。
91
简体中文
8 软件成功安装后,显示此屏幕。单击 Done (完成)。
4 启动 Vantage Access
安装后,您需要启动 Vantage Access DB、BED 和 HTTPD 服务。在相应目录 (Tr069_db、
Tr069_bed 和 Tr069_httpd) 下输入 ./start.sh。
成功消息表明服务成功启动。
[root@localhost local]# cd /usr/local/Tr069_db
[root@localhost Tr069_db]# ./start.sh
Starting mysqld daemon with databases from /usr/local/Tr069_db/mysql/data
################################################################################
###
Vantage_Access_DB started successfully!
###
################################################################################
[root@localhost Tr069_db]# cd /usr/local/Tr069_bed
[root@localhost Tr069_db]# ./start.sh
Starting tr069...success
Starting httpd...success
Starting watchdog...success
###################################################################
Vantage Access started (tr069 pid 2364; httpd pid 2377)
Version: 2.0.47.83.00b31
Date: 2007-06-15
###################################################################
[root@localhost Tr069_bed]# cd /usr/local/Tr069_httpd
[root@localhost Tr069_httpd]# ./start.sh
#############################################################################
Vantage Access HTTPD started successfully from /usr/local/Tr069_httpd
Version: 2.0.47.83.00b3
Date: 2007-06-15
#############################################################################
[root@localhost Tr069_httpd]#
5 Vantage Access 登陆
本节讲解如何以 root 登陆 Vantage Access ,访问所有配置屏幕。
Vantage Access 有三个默认登陆帐户。Web 配置程序屏幕和权限会因登陆帐户不同而有区别。 下
表列出了默认用户名和密码。
类型
用户名
密码
Root
Root
Root
92
简体中文
类型
用户名
密码
管理员
admin
admin
用户
guest
guest
1 在一台客户端计算机上,打开 Internet Explorer ( 版本 6) ,在地址栏内输入 Vantage
Access 服务器的 IP 地址。例如: 192.168.252.10.
2 选择 I have a license to activate Vantage
Access (我有激活 Vantage Access 的许可)开始 产
品注册。或选择 I want to try Vantage Access (我想
试用 Vantage Access) ,进入 90 天的试用期,在此期
间,您最多可管理 100 台设备。然后单击 Continue
(继续)。
3 显示许可屏幕。如果您已经有一个 myZyXEL.com 帐户
或是进入试用版,有些字段不会显示出来。在提供的字
段内输入许可密钥 和 myZyXEL.com 帐户信息。单击
Apply (应用),激活产品。
您可以配置的注册设备数量取决于您的
iCard。若要了解更多信息,请参考用户指南中的规格章节。
4 出现一个登陆屏幕。输入 root 登陆用户名 ("root")
和密码 ("root") 然后单击 Login (登陆)。
Vantage Access 管理面板就显示出来。
93
简体中文
以下介绍 Vantage Access 屏幕各部分。
A
B
C
D
E
F
•
控制面板 (A) 显示在各 web 配置程序屏幕内。所有普通 web 配置程序按钮都位于控制面板内。
•
标题栏 (B) 显示链接路径。
•
设备窗口 (C) 显示通过 Vantage Access 管理的设备。您也可配置和浏览所管理设备的逻辑组。
•
导航面板 (D) 显示导航链接,单击链接可访问配置、日志或状态屏幕。
•
配置窗口 (E) 显示您设置 Vantage Access 或所选设备的配置屏幕。
• 状态中心 (F) 显示实时日志信息。
6 指定一个下载服务器。
您必须指定一个服务器来保存设备固件 和配置 文件以及在所管理的设备上进行远程固件升级或 配
置恢复操作 。
1 在控制面板内单击 System Manager (系统管理器) 图标。
2 在导航面板内单击 Download Server (下载服务器) ,
显示配置屏幕。
3 在 IP Address (IP 地址)字段内,以十进制点符号
输入 HTTP 服务器的 IP 地址。
94
简体中文
如果 HTTP 服务器和 Vantage Access 安装在同一台计算机上,您必须为 HTTP 服
务器使用不同的端口号,并指定该端口号。例如:如果 HTTP 服务器
(192.168.100.1) 使用端口 8080, 则在 the IP Address (IP 地址)字段内输入
“192.168.100.1:8080”。
4 输入 User Name (用户名) 和 Password (密码) 字段,访问 HTTP 服务器。如果您已经改变了
默认设置 ( “zyxel”和 “1234” (在安装过程中),则输入新帐户信息。帐户用户名和密码
区分大小写。
5 单击 Apply (应用) 保存设置。
7 注册设备
您必须注册一个或多个 兼容 设备到 Vantage Access ,以便远程管理。
• 要注册一台设备,在 Edit an XML file(编辑一个 XML 文件)内配置设备信息,并上传到 Vantage
Access。参考 第 10 页的 7.1 部分 和 第 11 页的 7.2 部分。
• 配置设备,允许从 Vantage Access 远程管理。 参考 第 11 页的 7.3 部分。
7.1 针对多台设备编辑 XML 文件。
您可一次导入 多台设备到 Vantage Access
。
要 一 次导入多台设备,您需要创建一个含有设备信息 ( 如设备名称、OUI、序列号和设备类型等)
的 XML 文件。您可以在 Provision Manager > Device Pre-Provision > Import Devices 窗口内下
载一个示例文件,根据您的设备信息修改它。
以下为 两台 ZyXEL 兼容 设备的示例。
<?xml version="1.0" encoding="UTF-8"?>
<Template xmlns:xsi="http://www.w3.org/2001/XMLSchema-instance">
<Device>
<deviceName>Device1</deviceName>
<OUI>001349</OUI>
<serialNumber>001349000000</serialNumber>
<deviceType>P-2602HW-D1A</deviceType>
<Device>
<Device>
<deviceName>Device2</deviceName>
<OUI>001349</OUI>
<serialNumber>00134900000a</serialNumber>
<deviceType>P-2802HWL-I1</deviceType>
<Device>
</Template>
95
简体中文
7.2 导入设备
按以下步骤导入您的设备。
1 以 root 登陆 Vantage Access ,单击 Provision Manager 图标。
2 在导航面板内单击 Device Pre-Provision > Import
Devices 。
3 要导入一台设备,选择 Import Single Device (导入一台设
备),并在提供的字段内输入设备信息。
要导入多台设备,选择 Import Multi-Devices (导入多台设
备) ,并指定 XML 文件的地址或单击 Browse (浏览) 来定
位此文件。
4 单击 Import (导入)。
5 文件成功导入后,您会在 Device List (设备列表)面板中看到新条目。
Status (状态)字段显示 Unregistered (未注册)。要完成设备注册,参
见 第 11 页的 7.3 部分。
如果不能看到新条目,检查系统日志并确保 XML 格式正确。
7.3 ZyXEL 设备设置
您必须配置所管理的设备,以便从 Vantage Access 进行远程管理。参考 兼容 设备所附用户指南,
了解更多信息。以下讲解如何启用 ZyXEL 兼容 设备与 Vantage Access 之间的 TR-069 通信协议。
1 要在 ZyXEL 兼容设备上激活 TR-069 , 请 访问 CLI 并输入以下命令。
wan tr load
启用 TR-069 配置。
wan tr active 1
激活 TR-069 遥控管理。
wan tr acsUrl 172.25.21.174/TR069 设置 Vantage Access 服务器的 IP 地址。如:
172.25.21.174。
wan tr periodicEnable 1
启用 定期更新信息到服务器。
wan tr informInterval 30
设置 信息更新时间。如: 30 秒。
wan tr debug on
启用 TR-069 debug 模式查看日志。
wan tr save
保存设置。
wan tr reset
设置 设备立刻注册到 Vantage Access 服务
器。
2 一旦接入网络, ZyXEL 设备自动定位并注册到 Vantage Access 服务器。
关于初始设置,注册过程可能需几分钟的时间 ( 取决于网络状况 )。
96
简体中文
3 在 Device List (设备列表)面板内 检查设备状态。如果状态为 Registered
(已注册), 表明设备注册成功, Vantage Access 已经保存了 ZyXEL 兼容设
备信息到数据库内。
您现在可使用 Provision 屏幕 ( 以“admin”登陆时) 在 Vantage Access 内远
程配置此 ZyXEL 兼容设备。参考用户指南了解详细信息。
故障解决
1 不能启动 Vantage Access。
• 安装 Vantage Access 后,必须重启计算机。
• 确保 Vantage Access DB 已经启动。参见 第 7 页的 4 部分。
• 如果显示 Error: Remote DB is not alive!(“错误:远程 DB 不活动”) 消息,则意味着在
Vantage Access BED 安装过程中指定了错误的 Vantage Access DB 服务器 IP 地址。卸载,
并以正确的 IP 地址安装 Vantage Access BED 。参考用户指南中的卸载章节,和本指南中的
第4页 。
• 确保可以连接到 Vantage Access DB。如果 MySQL 服务器位于不同的计算机上,则有可能计
算机关闭或与计算机的连接断开了。
2 不能显示 Vantage Access 登陆屏幕。
• 如果您的 Linux 系统已经安装了 Apache ,可能发生这种情况。卸载 Apache。
• 如果在同一台电脑上安装 Vantage Access BED 和 Vantage Access HTTPD ,卸载后,再用
80 以外的端口号安装 Vantage Access HTTPD 。
3 不能登陆 Vantage Access。
•
•
•
•
•
确保 Vantage Access 服务器已打开。
确保已在服务器上启动了 Vantage Access 。
确保输入了 Vantage Access 服务器的正确 IP 地址。
默认用户名为 “root”, 默认密码为 “root”。它们区分大小写。
如果针对同一用户名输入错误密码达三次,您您必须等候 10 分钟,直到 Vantage Access 允
许您以相同用户名再次登陆。
4 我的 web 浏览器不能正确显示屏幕。
• 只能用系统支持的 web 浏览器显示屏幕。参考 第 1 页的 1 部分。
• 确保已安装 Macromedia Flash Player 9.0.
• 建议使用屏幕分辨率设置为 1024x 768 像素的显示器。
5 不能在 Vantage Access 内看见 兼容设备 。
• 确保您已将含有正确设备信息的 XML 文件输入或导入 Vantage Access。参见第 10 页的 7 部
分 。
• 确保已正确设置并激活设备上的兼容协议 管理 。参见第 11 页的 7.3 部分 。
• 发现初使设备的过程可能最多需要 3 分钟,取决于网络状况。
6 使用 XML 文件导入设备时 ,看见: “[ 错误 ] 不能添加此设备到 Vantage Access, 可能无法
连接数据库或 OUI-SN 重复”。
97
简体中文
• 确保 XML 文件中的 OUI ( 设备的 MAC 地址部分 , 可唯一识别一家公司 ) 和 SN ( 设备 LAN MAC
地址 ) 信息没有与设备列表面板中的任何现有设备重复。 改正 XML 文件中的信息,再上传。
• 确保可以连接到 Vantage Access DB。如果不能,在 Tr069_db 目录下输入 “./stop.sh”
和 “/start.sh”,重设 DB。
7 我的 Vantage Access 服务器中断了,我想在另一台计算机上安装 Vantage Access 。
• 请参考用户手册中重装现有许可章节。
98
简体中文
99
繁體中文
簡介
Vantage Access 是一項網頁式管理工具,可允許您遠端管理、控制及監控多重相容的裝置。所謂的
相容裝置是指任何能夠支援 TR-069、TR-098、TR-104 或 TR-106 通訊協定的裝置。本 《快速入門
指引》說明如何安裝 Vantage Access 的方法。
下圖顯示網路範例。一旦安裝完成,您可從網路上任一台用戶端電腦 (A) 上的網頁瀏覽器存取
Vantage Access 伺服器 (B) 上的網頁設定介面。
A
B
本手冊內容將介紹以下項目:
• 如何安裝 Vantage Access。
• 如何以 root 登入至 Vantage Access 進行初步設定。
• 如何註冊並設定一台 ZyXEL 相容的裝置進行遠端管理。
1 最低系統需求
Vantage Access 伺服器:
• CPU:Dual Intel Xeon 3.0 GHz
• 記憶體:4 GB
• 硬碟:80 GB
• 作業系統:Red Hat 企業版 Linux ES 3
• 其它項目:授權密碼-這是認證號碼,您可以利用這組號碼於 Vantage Access 伺服器註冊 ZyXEL
裝置。詳見授權卡。
Vantage Access 用戶端:
• CPU:相容的 Intel Pentium 450 MHz
• 記憶體:256 MB
• 硬碟:2 GB
• 網頁瀏覽器:Internet Explorer 6.0
• Flash 播放軟體:Flash 9.0
• 螢幕解析度:1024 x 768 像素
100
繁體中文
2 安裝前注意事項
"
由於 Vantage Access 隨附本身的 Apache HTTP 伺服器及 MySQL 資料庫伺服器,
建議您將 Vantage Access 安裝在一台新的 Linux 電腦上。如果您計劃將
Vantage Access 安裝在一台現有的 Linux 電腦上,您必須先解除安裝伺服器上
的現有 Apache 及 MySQL;否則將會與 Vantage Access 相衝突。
Vantage Access 包含三項產品包裝:DB、BED 及 HTTPD。您 可將這三項產品分別安裝在不同的電
腦,或同一台電腦上。
• DB:這是 Vantage Access 內建的 MySQL 資料庫伺服器。
• BED:BED 包含用來管理相容裝置的協定組合、一台 Apache 伺服器及看門狗服務。
• HTTPD:這是用來檔案儲存及傳輸的下載伺服器 HTTP 精靈。這些檔案包括裝置韌體、設定、日誌
及 Vantage Access 系統檔案。
3 安裝
請遵循下列步驟將安裝檔案複製到電腦上。
1 登入至 Linux 電腦成為 root 使用者
2 將 Vantage Access CD 插入 CD-ROM,並將 Vantage Access CD 上的安裝檔案 (.bin) 複製到
電腦的一個目錄內 (例如,./Home/Access)。
以下章節將說明這三項產品的安裝步驟。
"
您必須先安裝 Vantage Access DB。
3.1 安裝 Vantage Access DB
1 在您儲存安裝檔案的檔案夾中,輸入 chmod +x Vantage_Access_DB.bin 將它設定成可執行。
2 輸入 ./Vantage_Access_DB.bin 開使安裝程序。
101
繁體中文
3 顯示精靈畫面。在各畫面按一下 Next ( 下一步 ) 以繼續
進行下個步驟。
4 指定資料庫的位置。接受預設的位置 (使用者 / 本機)
或在提供的欄位中輸入檔案路徑。
5 選取捷徑的位置,或是當您不想建立捷徑時,選取
Don't create links ( 不要建立連結)。
6 在本畫面中確認您的安裝選項,並按一下 Next ( 下一
步 ) 開始安裝程序。
102
繁體中文
7 在軟體零組件安裝成功之後,畫面即顯示。按一下 Done
( 完成 )。
3.2 安裝 Vantage Access BED
1 在您儲存安裝檔案的檔案夾中,輸入 chmod +x Vantage_Access_BED.bin 將它設定成可執行。
2 輸入 ./Vantage_Access_BED.bin 開使安裝程序。
3 顯示精靈畫面。在各畫面按一下 Next ( 下一步 ) 以繼
續進行下個步驟。
4 指定檔案位置。接受預設的位置或在提供的欄位中輸入
檔案路徑。
5 選取捷徑的位置,或是當您不想建立捷徑時,選取
Don't create links ( 不要建立連結)。
103
繁體中文
6 在您安裝 Vantage Access DB 的那台電腦上輸入該電腦
的 IP 位址。
如果您將 Vantage Access DB 及 Vantage Access BED 同
時安裝在同一台電腦上,則輸入電腦的 IP 位址或
127.0.0.1。
7 在本畫面中確認您的安裝選項,並按一下 Next ( 下一
步 ) 開始安裝程序。
8 在軟體零組件安裝成功之後,畫面即顯示。按一下 Done
( 完成 )。
9 重新啟動電腦。
3.3 安裝 Vantage Access HTTPD
1 在您儲存安裝檔案的檔案夾中,輸入 chmod +x Vantage_Access_HTTPD.bin 將它設定成可執行。
2 輸入 ./Vantage_Access_HTTPD.bin 開使安裝程序。
3 顯示精靈畫面。在各畫面按一下 Next ( 下一步 ) 以繼
續進行下個步驟。
104
繁體中文
4 指定檔案位置。接受預設的位置或在提供的欄位中輸入
檔案路徑。
5 選取捷徑的位置,或是當您不想建立捷徑時,選取
Don't create links ( 不要建立連結)。
6 指定使用者名稱及密碼,以登入至 HTTP 伺服器。您可
使用預設設定 (「zyxel」、 「1234」及連接埠 「80」)
或在提供的欄位中輸入資訊。牢記這個使用者名稱及密
碼,稍後將需要此資訊。
"
如果您將 Vantage Access BED 及 Vantage
Access HTTPD 安裝在同一台電腦上,請在本
畫面上輸入一個與 80 不同的埠號。例如,
輸入 8080。
7 在本畫面中確認您的安裝選項,並按一下 Next ( 下一
步 ) 開始安裝程序。
105
繁體中文
8 在軟體零組件安裝成功之後,畫面即顯示。按一下 Done
( 完成 )。
4 啟動 Vantage Access
在安裝完成之後,您必須啟動 Vantage Access DB、BED 及 HTTPD 裝置。在各對應的目錄中,輸入
./start.sh (Tr069_db、 Tr069_bed 及 Tr069_httpd)。
成功的訊息出現,顯示服務啟動成功。
[root@localhost local]# cd /usr/local/Tr069_db
[root@localhost Tr069_db]# ./start.sh
以 /usr/local/Tr069_db/mysql/data 的資料庫啟動 mysqld 精靈
################################################################################
###
Vantage_Access_DB 啟動成功!
###
################################################################################
[root@localhost Tr069_db]# cd /usr/local/Tr069_bed
[root@localhost Tr069_bed]# ./start.sh
啟動 tr069... 成功
啟動 httpd... 成功
啟動看門狗 ... 成功
###################################################################
Vantage Access 啟動 (tr069 pid 2364;httpd pid 2377)
版本:2.0.47.83.00b31
日期:2007-06-15
###################################################################
[root@localhost Tr069_bed]# cd /usr/local/Tr069_httpd
[root@localhost Tr069_httpd]# ./start.sh
#############################################################################
Vantage Access HTTPD 自 /usr/local/Tr069_httpd 啟動成功
版本:2.0.47.83.00b3
日期:2007-06-15
#############################################################################
[root@localhost Tr069_httpd]#
5 Vantage Access 登入
本節介紹如何以 root 登入至 Vantage Access 存取所有設定畫面。
106
繁體中文
Vantage Access 隨附三個預設登入帳號。根據您所使用之不同登入,其網頁設定介面及權限也隨之
改變。預設的使用者名稱及密碼如下表所示。
類型
使用者名稱
密碼
根
root
root
管理員
admin
admin
用戶
guest
guest
1 在用戶端電腦上,開啟 Internet Explorer (版本 6)並且在 Vantage Access 伺服器的位址
列輸入 IP 位址。例如:192.168.252.10。
2 選取 I have a license to activate Vantage
Access ( 我有啟動 Vantage Access 的授權 ) 以啟動
產品註冊。或選取 I want to try Vantage Access ( 我
要試用 Vantage Access) 開始 90 天的試用期,這期
間可管理多達 100 部裝置。接著按一下 Continue ( 繼
續 )。
3 顯示授權畫面。如果您已經有 myZyXEL.com 帳號或如
果您需要的是試用版,某些欄位就不會出現在畫面上。
在提供的欄位上,輸入授權密碼及 myZyXEL.com 帳號
資訊。按一下 Apply ( 套用 ) 以啟動產品。
"
您可設定的註冊裝置數量端視您的 iCard 而
定。請參閱 《使用手冊》中產品規格章節,取得詳細資訊。
4 顯示登入畫面。輸入 root 登入使用者名稱
(「root」) 及密碼 (「root」)。接著按一下 Login (
登入 )。
107
繁體中文
顯示 Vantage Access
儀表板。
以下分別說明 Vantage Access 畫面的每個部份。
A
B
C
D
E
F
•
•
•
控制台 (A) 顯示在每個網頁設定介面畫面上。所有常用的網頁設定介面按鈕都出現在控制台上。
標題列 (B) 顯示連結路徑。
裝置視窗 (C) 顯示由 Vantage Access 所管理的裝置。您也可以設定及檢視所管理裝置的邏輯群
組。
•
導覽面板 (D) 顯示您按一下以存取設定、日誌或狀態畫面的導覽連結。
•
設定視窗 (E) 顯示您設定 Vantage Access 或選取裝置的設定畫面。
•
狀態中心 (F) 顯示即時日誌資訊。
6 指定一部下載伺服器
您必須指定一部伺服器以儲存裝置韌體及設定檔,並執行韌體遠端自動升級,或是管理裝置的設定
回復。
1 按一下控制台中的 System Manager ( 系統管理員)圖示。
108
繁體中文
2 在導覽面板中按一下 Download Server ( 下載伺服器 )
顯示設定畫面。
3 在 IP Address (IP 位址 ) 欄位中,以點分十進位表示
法輸入 HTTP 伺服器的 IP 位址。
"
如果 HTTP 伺服器及 Vantage Access 安裝在同一部電腦中,HTTP 伺服器必須使
用不同的埠號,並指定該埠號。例如,若 HTTP 伺服器 (192.168.100.1) 使用連
接埠 8080,則在 IP Address (IP 位址 ) 欄位輸入 「192.168.100.1:8080」。
4 設定 User Name ( 使用者名稱 ) 及 Password ( 密碼 ) 欄位以存取 HTTP 伺服器。如果您在安
裝過程中,變更預設設定 (「zyxel」及 「1234」), 請輸入新的帳號資訊。帳號的使用者名稱
與密碼皆區分大小寫。
5 按一下 Apply ( 套用 ) 可儲存設定。
7 註冊一台裝置
您必須將一台或多台相容的裝置註冊到 Vantage Access 以允許遠端管理。
• 欲註冊一台裝置,請在 Edit an XML file ( 編輯 XML 檔 ) 中設定裝置資訊,並上載至 Vantage
Access。請參閱 Section 7.1 on page 10 及 Section 7.2 on page 11。
• 設定裝置以允許 Vantage Access 進行遠端管理。 請參閱 Section 7.3 on page 11。
7.1 多台裝置如何編輯 XML 檔
您可以同時匯入多台裝置到 Vantage Access。
欲同時匯入多台裝置,您必須建立一個 XML 檔,包含這些裝置的資訊 (例如裝置名稱、OUI、序號
及裝置類型)。您可以從 Provision Manager > Device Pre-Provision > Import Devices ( 提
供管理員 > 裝置事先提供 > 匯入裝置 ) 視窗中下載範例檔,並以您的裝置資訊加以修改。
109
繁體中文
以下範例介紹兩台 ZyXEL 相容的裝置。
<?xml version="1.0" encoding="UTF-8"?>
<Template xmlns:xsi="http://www.w3.org/2001/XMLSchema-instance">
<Device>
<deviceName>Device1</deviceName>
<OUI>001349</OUI>
<serialNumber>001349000000</serialNumber>
<deviceType>P-2602HW-D1A</deviceType>
</Device>
<Device>
<deviceName>Device2</deviceName>
<OUI>001349</OUI>
<serialNumber>00134900000a</serialNumber>
<deviceType>P-2802HWL-I1</deviceType>
</Device>
</Template>
7.2 匯入裝置
依照以下步驟匯入您的裝置。
1 以 root 登入至 Vantage Access,並按一下 Provision Manager ( 提供管理員 ) 圖示。
2 在導覽面板中按一下 Device Pre-Provision > Import
Devices ( 裝置事先提供 > 匯入裝置 )。
3 欲匯入一台裝置,選取 Import Single Device ( 匯入單台裝
置 ) 並在提供的欄位中輸入裝置資訊。
欲匯入一台以上的裝置,選取 Import Multi-Devices ( 匯入
多台裝置 ) 並指定 XML 檔的位置及名稱,或按一下 Browse (
瀏覽 ) 尋找。
4 按一下 Import ( 匯入 )。
5 當檔案匯入成功,您應參閱 Device List ( 裝置清單 ) 面板中新的項目。
Status ( 狀態 ) 欄位顯示 Unregistered ( 未註冊 )。欲完成裝置註冊,請參
閱 Section 7.3 on page 11。
如果無法看到新的項目,檢查系統日誌並確定 XML 的檔案格式正確。
7.3 ZyXEL 裝置設定
您必須設定管理的裝置以允許 Vantage Access 進行遠端管理。豈參閱您相容裝置隨附之 《使用手
冊》,取得更多資訊。以下說明如何啟用 ZyXEL 相容裝置及 Vantage Access 之間的 TR-069 通訊
協定。
1 欲啟動 ZyXEL 相容裝置上之 TR-069,請存取 CLI 並輸入以下命令。
wan tr load
啟用 TR-069 設定。
wan tr active 1
啟動 TR-069 遠端管理。
wan tr acsUrl 172.25.21.174/TR069 設定 Vantage Access 伺服器的 IP 位址。例
如:172.25.21.174。
110
繁體中文
wan tr periodicEnable 1
啟用週期性資訊更新至伺服器。
wan tr informInterval 30
設定資訊更新時間。例如:30 秒。
wan tr debug on
啟用 TR-069 偵錯模式檢視日誌。
wan tr save
儲存設定。
wan tr reset
設定裝置立即註冊至 Vantage Access 伺服器。
2 一旦連接至網路,ZyXEL 裝置將自動尋找並註冊至 Vantage Access 伺服器。
"
在初步設定時,註冊程序可能需要數分鐘 (根據您的網路情況)。
3 檢查 Device List ( 裝置清單 ) 面板中的裝置狀態。如果狀態為 Registered
( 已註冊 ),這表示該裝置註冊成功,且 Vantage Access 已將 ZyXEL 相容裝
置資訊儲存至資料庫中。
現在您可以使用 Provision ( 提供 ) 畫面 (以 「Admin」登入), 在 Vantage
Access 中遠端設定這台 ZyXEL 相容裝置。請參閱 《使用手冊》,取得更詳細的
資訊。
疑難排解
1 無法啟動 Vantage Access。
• 在安裝完 Vantage Access 之後,您必須重新啟動電腦。
• 確認 Vantage Access DB 已啟動。請參閱 Section 4 on page 7。
• 如果顯示 Error: Remote DB is not alive! ( 錯誤:遠端 DB 並未作用! ) 訊息,意即您在
安裝 Vantage Access BED 時,指定了錯誤的 Vantage Access DB 伺服器 IP 位址。解除安
裝,再以正確的 IP 位址安裝 Vantage Access BED。請參閱 《使用手冊》中的解除安裝章
節,以及本手冊中的 page 4。
• 確認能連接至 Vantage Access DB。如果 MySQL 伺服器在另一台電腦上,那麼或許這台電
腦是關閉的,或是與這台電腦間的連線已關閉。
2 無法顯示 Vantage Access 登入畫面。
• 發生的原因可能是您的 Linux 分布已經安裝 Apache。解除安裝 Apache。
• 如果您已經將 Vantage Access BED 及 Vantage Access HTTPD 安裝在同一台電腦上,解除
安裝並在安裝 Vantage Access HTTPD 時使用不是 80 的埠號。
3 無法登入至 Vantage Access。
•
•
•
•
•
確認 Vantage Access 伺服器電源已經開啟。
確認伺服器上的 Vantage Access 已經啟動。
確認輸入正確的 Vantage Access 伺服器 IP 位址。
預設的使用者名稱為 「root」,預設的密碼為 「root」, 大小寫有別。
如果同一個使用者名稱輸入錯誤的密碼三次,在 Vantage Access 允許您以相同的使用者名
稱再次登入前,您必須稍待 10 分鐘。
111
繁體中文
4 網頁瀏覽器無法正常顯示畫面。
• 僅使用支援的網頁瀏覽器顯示畫面。請參閱 Section 1 on page 1。
• 確認您已經安裝 Macromedia Flash Player 9.0。
• 建議您所使用的監視器螢幕解析度設定為 1024 乘 768 像素。
5 無法在 Vantage Access 上看到我的相容裝置。
• 確認您已經輸入或匯入包含正確 Vantage Access 裝置資訊的 XML 檔案。請參閱 Section 7
on page 10。
• 確認您已經正確設定並啟動裝置上相容協定的管理。請參閱 Section 7.3 on page 11。
• 依據您的網路情況,初步的裝置探索程序最多耗時三分鐘。
6 當我使用 XML 檔案匯入裝置時,看到「[error] cannot add the device to Vantage Access,
maybe database cannot be connected or OUI-SN is duplicate」([ 錯誤 ] 無法新增裝置至
Vantage Access,或許無法連接資料庫或 OUI-SN 重複 )。
• 確認您在 XML 檔案中的 OUI (裝置的 MAC 位址中,唯一能辨識公司的部份)及 SN (裝置
的 LAN MAC 位址)資訊與裝置清單面板上所列的現有裝置並無重複。更正 XML 檔案中的資
訊,再次上載。
• 確認能連接至 Vantage Access DB。若不行,藉由在 Tr069_db 目錄下,輸入 「./
stop.sh」及 「./start.sh」重設 DB。
7 Vantage Access 伺服器已中斷,我想要將 Vantage Access 安裝到另一台電腦上。
• 請參閱 《使用手冊》中解除安裝現有授權的章節。
112
繁體中文
113