Transcript
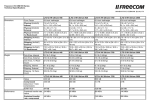
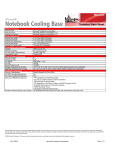
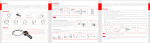
USER’S MANUAL
Precaution
• CPU and motherboard are subject to damage if the product is
incorrectly installed. Familiarize yourself with this “USER’S
MANUAL” before installing the product.
• Excessive force may result in malfunction or damage to the fan,
the product or the computer. Avoid inserting any objects into
the fan while operating.
• The product is not compatible with a slim body type case.
Please check the compatibility at www.zerotherm.co.kr (or
www.apack.net)
• APACK Inc is not responsible for any damage to the product,
and/or the computer including CPU resulted from:
1). Incorrect installation
2). CPU overclocking.
[English] Please read this USER’S MANUAL carefully before installation
Applicable Models
• ZEROtherm BTF80(100% Aluminum Fin)
• ZEROtherm BTF90(100% Copper Fin)
Specifications
Models
BTF80
Dimension
(L x W x H)
Fin
BTF90
108 x 81 x 128 mm
(5.04 x 3.19 x 4.25 inch)
Aluminum
Copper
Components
Copper
Base
Material
Heat Pipe
Copper(Sintered type)
Heat dissipation area
4,404cm 2 (682.6inch2)
Cooling capacity
Installation(Intel–Socket 775)
Over 140W
①
②
③
④
⑤
⑥
⑦
⑧
Over 150W
Fan size
92 x 25mm (3.62 x 0.98 inch)
Fan speed
750 ~ 2,500rpm±10%
Acoustical noise
Under 27.0dB±10%
Connector
4-pin(PWM)
Operating voltage
12 VDC
Consuming power
Max. 1.54W
Airflow
Max. 42.8CFM
CPU Cooler (front view)
CPU Cooler (Separated Fan)
Intel Clip
Back Plate (for Intel)
Clip Screws (4 pcs, for Intel)
AMD Clip
Thermal Grease
User’s Manual
Heat Pipe
Fan Rail
Installation(AMD–Socket 754/939/940/AM2)
• Install Back Plate
1) Remove the thin paper film from the back plate to expose the
insulating tape. [Picture 4]
2) Attach the back plate to the back side of the main board with
the socket RM (Retention Mechanism) holes lined up.
• Spread Thermal Grease
1) Clean off particles or dust from the top of the CPU.
2) Spread thermal grease thinly and evenly on top of the CPU
• Install Intel Clip
1) Install Intel clip using a screw driver on the bottom of the cooler
[Caution] Excessive force may damage the heat pipes. It is
easy to install the clip after laying the product down
sideways like [Picture 8].
• Separate Fan Component
1) In order to install the product on Intel CPU, the fan should be
separated from the unit.
2) Gently grasp the fan rail (Red Bar) and pull it up and out of the
unit.
3) If you use a bar or a driver like [Picture 9], you can easily pull
the fan up and out of the unit.
[Caution] Be careful not to damage the fins when you pull
the fan up with a bar or a driver.
• Install Cooler
1) Fasten the screws with a driver and install the cooler on the
CPU.
[Caution] Make sure that there are no interfering
components before installing the cooler.
• Install Fan Component
1) Push the fan down on the bracket rail like [Picture 10 and 11]
• Spread Thermal Grease
1) Clean off particles or dust from the top of the CPU.
2) Spread thermal grease thinly and evenly on top of the CPU
• Install AMD Clip
1) Install AMD clip using a driver on the bottom of the cooler
2) The AMD clip can be installed horizontally or vertically in
accordance with your motherboard’s RM (Retention
Mechanism).
[Caution] Excessive force may damage the heat pipes. It is
easy to install the clip after laying the product down
sideways like [Picturer 12~ 15]
• Install Cooler
1) Fasten the screws with a driver and install the cooler on the
CPU.
[Caution] Make sure that there are no interfering
components before installing the cooler
BIOS SETUP
Since ZEROtherm CPU coolers feature extreme low fan
speed (RPM) while achieving optimal results, it is possible
that you may experience an initial booting error prompting “CPU
Fan Error!” This seldom happens since only a few number of
mother board brands (including ASUS) report this problem.
This “CPU Fan Error!” message has nothing to do with a real
system error and can be easily fixed.
When “CPU Fan Error!” prompts, set up the BIOS as
followings:
① Booting Error – CPU Fan
Error!
A few number of mother
board brands (including
ASUS) may prompt “CPU
Fan Error!”
12
Horizontal type
13
Vertical type
15
③ Boot Settings Configuration
② BIOS Setup – Boot tap
Press the “DEL” button on the
keyboard to set up the BIOS.
Select “Boot” tap and “Boot
Settings Configuration”
④ “Wait For ‘F1’ If Error” Options
Fin
Weight
(W/O Optional Components)
Bracket
458g
678g
Features
Bracket Rail
Silence Innovations
• Ultra maglev forms oil protection bearing technology adapted
• PWM fan speed control (750~2,500rpm)
• Optimized airflow design
Killer Performance
• Efficient 8-line heat pipe effects
• Polished copper base for better thermal conductivity
• High performance thermal grease adapted(TC-5022)
14
Select “Wait For ‘F1’ If Error”
Fan
1
Block
Creative & Cool Design
• Unique butterfly motif fins
• Super bright LEDs
Compatibility
• Intel socket 775 up to CoreTM2 Duo
• AMD socket 754, 939, 940 and AM2
Install Intel Clip
04
2
08
Waranty & Disclaimer
CPU Cooler
4
3
Remove the thin paper film, and then
attach the back side of the main board
5
Intel Clip
09
10
Fan Rail
11
Bracket Rail
Clip Screw (4pcs)
Press the “Enter” button on
the keyboard. Change its
options into “Disabled”.
• Warranty : 2 Years from the purchase date
• APACK INC. is not responsible for any damage due to
external causes, including but not limited to, improper use,
problems with electrical power, accident, neglect, alteration,
repair, improper installation, or improper testing.
- www.zerotherm.co.kr // www.apack.net
- [email protected]
⑤ Wait For ‘F1’ If Error – Disabled ⑥ Save configuration changes and
exit
Back Plate(For Intel)
Patents
• Republic of Korea patent application No. : 40-0564565-0000
• Republic of Korea design application No. : 30-2006-21470
• Patent applications pending around the world including USA, EU,
and Japan
Now Wait For ‘F1’ If Error
options are Disabled.
7
6
AMD Clip
Thermal Grease
Separate the fan from the cooler,
and then install cooler from the main board
Install the fan
Press “F10” button in your
keyboard. Select “OK”,
when the prompt ask if you
want to save configuration
changes and exit now.