1
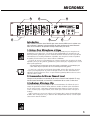
4 CHANNEL POWERED MIXER
UNBAL
CD/TAPE
LINE IN
UNBAL
CD/TAPE
LINE IN
MODEL TYPE: MM-4
OWNER'S MANUAL
MANUEL DE L'UTILISATEUR
Manual-Owners-mm4-00-3v0.pdf
IMPORTANT SAFETY INSTRUCTIONS
The exclamation point within an equilatereal
triangle is intended to alert the user to the
presence of important operating and
maintenance (servicing) instructions in the
literature accompanying the appliance.
This lightning flash with arrowhead symbol,
within an equilateral triangle, is intended to alert
the user to the presence of uninsulated
“dangerous voltage” within the product’s enclosure
that may be of sufficient magnitude to constitute a risk of
electric shock to persons.
Le point d’exclamation à l’intérieur d’un triangle équilatéral
est prévu pour alerter l’utilisateur de la présence
d’instructions importantes dans la littérature accompagnant l’appareil en ce qui concerne l’opération et la
maintenance de cet appareil.
Ce symbole d’éclair avec tête de flèche dans un triangle
équilatéral est prévu pour alerter l’utilisateur de la présence
d’un « voltage dangereux » non-isolé à proximité de l’enceinte
du produit qui pourrait être d’ampleur suffisante pour présenter
un risque de choque électrique.
S2125A
FOLLOW ALL INSTRUCTIONS
Instructions pertaining to a risk of fire,
electric shock, or injury to a person
SUIVEZ TOUTES LES INSTRUCTIONS
Instructions relatives au risque de feu,
choc électrique, ou blessures aux personnes
CAUTION: TO REDUCE THE RISK OF ELECTRIC
AVIS: AFIN DE REDUIRE LES RISQUE DE CHOC
ELECTRIQUE, N’ENLEVEZ PAS LE COUVERT (OU LE
PANNEAU ARRIERE) NE CONTIENT AUCUNE PIECE
SHOCK, DO NOT REMOVE COVER (OR BACK).
NO USER SERVICEABLE PARTS INSIDE.
REPARABLE PAR L’UTILISATEUR.
REFER SERVICING TO QUALIFIED
SERVICE PERSONNEL.
CONSULTEZ UN TECHNICIEN QUALIFIE
POUR L’ENTRETIENT
Read Instructions: The Owner’s Manual should be read and
understood before operation of your unit. Please, save these instructions for future reference and heed all warnings.
Clean only with dry cloth.
Packaging: Keep the box and packaging materials, in case the unit
needs to be returned for service.
Warning: To reduce the risk or fire or electric shock, do not expose
this apparatus to rain or moisture. Do not use this apparatus near water!
Warning: When using electric products, basic precautions should
always be followed, including the following:
Your unit should be connected to a power source only of the voltage specified in the
owners manual or as marked on the unit. This unit has a polarized plug. Do not use
with an extension cord or receptacle unless the plug can be fully inserted. Precautions should be taken so that the grounding scheme on the unit is not defeated.
Hazards
Do not place this product on an unstable cart, stand, tripod, bracket or table. The
product may fall, causing serious personal injury and serious damage to the product.
Use only with cart, stand, tripod, bracket, or table recommended by the manufacturer
or sold with the product. Follow the manufacturer’s instructions when installing the
product and use mounting accessories recommended by the manufacturer.
The apparatus should not be exposed to dripping or splashing water; no objects
filled with liquids should be placed on the apparatus.
Terminals marked with the “lightning bolt” are hazardous live; the external wiring
connected to these terminals require installation by an instructed person or the use of
ready made leads or cords.
Ensure that proper ventilation is provided around the appliance. Do not install near
any heat sources such as radiators, heat registers, stoves, or other apparatus
(including amplifiers) that produce heat.
No naked flame sources, such as lighted candles, should be placed on the apparatus.
Power Cord
Do not defeat the safety purpose of the polarized or grounding-type plug. A polarized plug
has two blades with one wider than the other. A grounding type plug has two blades and a
third grounding prong. The wide blade or the third prong are provided for your safety. If the
provided plug does not fit into your outlet, consult an electrician for replacement of the
obsolete outlet. The AC supply cord should be routed so that it is unlikely that it will be
damaged. If the AC supply cord is damaged DO NOT OPERATE THE UNIT.
Unplug this apparatus during lightning storms or when unused for long periods of time.
The unit should be serviced only by qualified service personnel.
êtres comprises avant l’opération de votre appareil. Conservez.
Gardez S.V.P. ces instructions pour consultations ultérieures et
observez tous les avertissements.
Nettoyez seulement avec le tissu sec.
Emballage: Conservez la boite au cas ou l’appareil devait être
retourner pour réparation.
Avertissement: Pour réduire le risque de feu ou la décharge
électrique, n'exposez pas cet appareil à la pluie ou à l'humidité.
N’utilisez pas cet appareil près de l’eau!
Attention: Lors de l’utilisation de produits électrique, assurez-vous
Power Sources
Service
Veuillez Lire le Manuel: Il contient des informations qui devraient
d’adhérer à des précautions de bases incluant celle qui suivent:
Alimentation
L’appareil ne doit être branché qu’à une source d’alimentation correspondant au
voltage spécifié dans le manuel ou tel qu’indiqué sur l’appareil. Cet appareil est
équipé d’une prise d’alimentation polarisée. Ne pas utiliser cet appareil avec un
cordon de raccordement à moins qu’il soit possible d’insérer complètement les trois
lames. Des précautions doivent êtres prises afin d’eviter que le système de mise à la
terre de l’appareil ne soit désengagé.
Risque
Ne pas placer cet appareil sur un chariot, un support, un trépied ou une table instables.
L’appareil pourrait tomber et blesser quelqu’un ou subir des dommages importants.
Utiliser seulement un chariot, un support, un trépied ou une table recommandés par le
fabricant ou vendus avec le produit. Suivre les instructions du fabricant pour installer
l’appareil et utiliser les accessoires recommandés par le fabricant.
Il convient de ne pas placer sur l’appareil de sources de flammes nues, telles que
des bougies allumées.
L’appeil ne doit pas être exposé à des égouttements d’eau ou des éclaboussures
et qu’aucun objet rempli de liquide tel que des vases ne doit être placé sur l’appareil.
Assurez que lappareil est fourni de la propre ventilation. Ne procédez pas à
l’installation près de source de chaleur tels que radiateurs, registre de chaleur, fours
ou autres appareils (incluant les amplificateurs) qui produisent de la chaleur.
Les dispositifs marqués d’une symbole “d’éclair” sont des parties dangereuses
au toucher et que les câblages extérieurs connectés à ces dispositifs de
connection extérieure doivent être effectivés par un opérateur formé ou en utilisant
des cordons déjà préparés.
Cordon d’Alimentation
Ne pas enlever le dispositif de sécurité sur la prise polarisée ou la prise avec tige de
mise à la masse du cordon d’alimentation. Une prise polarisée dispose de deux
lames dont une plus large que l’autre. Une prise avec tige de mise à la masse
dispose de deux lames en plus d’une troisième tige qui connecte à la masse. La
lame plus large ou la tige de mise à la masse est prévu pour votre sécurité. La prise
murale est désuète si elle n’est pas conçue pour accepter ce type de prise avec
dispositif de sécurité. Dans ce cas, contactez un électricien pour faire remplacer la
prise murale. Évitez d’endommager le cordon d’alimentation. N’UTILISEZ PAS
L’APPAREIL si le cordon d’alimentation est endommagé.
Débranchez cet appareil durant les orages ou si inutilisé pendant de longues périodes.
Service
Consultez un technicien qualifié pour l’entretien de votre appareil.
safety-4v5.eps • April 3/2007
MICROMIX
2
3
UNBAL
CD/TAPE
LINE IN
1
4
UNBAL
CD/TAPE
LINE IN
5
6
Introduction
We at Yorkville Sound are confident that you will find your new MM4 to be an efficient
and versatile solution to your sound reinforcement needs. This manual contains information to help you get the maximum performance from your Micromix. We hope you will
take the time to read it over.
1. Microphone and Line Inputs
The MM4 features both balanced microphone and unbalanced line inputs on channels 1 and
2. The standard XLR type microphone inputs are electronically balanced for maximum noise
suppression. The input characteristics match those of professional low impedance dynamic
microphones such as the Shure® SM-58 and the Apex750.
The line inputs are standard 1/4-inch jacks which accept single-ended signals from
guitars, synthesizers, electric pianos, tape recorders, unbalance high-impedance microphones, and the like.
Do not connect signals to both types of inputs on any one channel. Use either the
unbalanced or the balanced input on any one channel, but not both. Connecting to both
inputs on one channel will cause improper operation of the input circuit.
Channel 3 and 4 are special channels, in which the line inputs (1/4-inch jack) have
been replaced by two RCA jacks. The XLR balanced input functions identically to the other
XLR inputs, but the RCA inputs are specifically intended to receive stereo signals from
compact disk players or tape players. Within the MM4, these stereo signals are electronically summed to a mono signal.
2. Channel Level Controls
Each channel has a separate level control. Advancing this control increases the contribution
of the associated channel’s signal to the overall mix.
3. Clip LED
The Clip LED is located next to the master control. It will light when any signal anywhere
within the mixer section gets to within 3 dB of clipping. Under normal use, it is expected
that this LED will flash for brief instants during the loudest musical peaks. If the clip LED is
off, you can be sure that the mixer section of the MM4 is not clipping.
The LED circuitry is intended to indicate clipping only in the mixer section of the MM4.
It is not implemented as an indicator of clipping in the power-amp section. Remember also
that the clip LED can’t indicate clipping in any external amplifier connected to the MM4.
MICROMIX
4. Master Control
The signals from the four channels are internally routed to the Master section, where they
are combined into a mono signal. This signal is then routed to the EQ and then to the power
amplifier within the MM4. The Master control varies the level of this combined signal. The
signal level sent to the Effects Loop Send jack is also governed by the Master Control.
5. EQ Section
The tone controls provided by the MM4 consist of a three-band active shelving equalizer. The
signal arriving from the Master Control passes through this on its way to the power amplifier.
Within the EQ section, the signal is temporarily split into three components. The lowest frequency (bass) components may be adjusted with to Lo control, the middle (midrange) frequencies are varied by the Mid Control, and the Hi control adjusts the high (treble) frequencies.
The numbers around the Lo, Mid, and Hi dials indicate the amount of boost or cut
applied to the signal, in the decibels. The center or “0” positions correspond to a “flat”
response where the signal level remains unchanged as it passes through the EQ.
Rotating the Lo control clockwise from this position will increase the Bass frequency
components, while a counterclockwise rotation will decrease the Bass sounds.
When adjusting the EQ controls, it is best to begin by setting all three controls to their
center “0” positions. From there you can experiment until you get the sound you like.
6. Effects Loop
An external effect such as a digital delay, echo, phaser, flanger, or parametric equalizer can
be easily interfaced to the MM4. Any effect device designed to operate at 0dB line levels
will properly interface to your MM4. As a rule, any device which is not foot operated will
work just fine; “foot-pedal” devices which are designed to accept a guitar directly can often
be overloaded by standard line level signals.
Connect the input of the effect device to the Send jack of the MM4 Effects Loop. Connect
the output of the effect device to the Rtn jack of the MM4 Effects Loop. Now the MM4’s
signal is routed through the effect device on its way to the MM4’s power amplifier.
The Effects Loop Send jack may also be used as a line output jack. You can augment the
MM4’s internal amplifier by connecting an external power amplifier’s input to this jack.
Plugging into the Effects Loop Rtn (Return) jack will disconnect the MM4’s direct
internal signal path from the MM4’s power amplifier and substitute the signal present at
the Rtn jack. This means that you can use the Effects Loop to send the signal from the
MM4’s mixer to an external power amplifier while using the MM4’s built-in power amplifier for some other purpose.
7. Power Amplifier
The MM4 power amplifier delivers approximately 150 watts into a 4-ohm load. There are two
speaker output jacks on the rear panel of the MM4. You can connect either an 8-ohm speaker to each jack, or one 4-ohm speaker.
The MM4’s power amplifier is fully protected from all abnormal load conditions. Shorting
the outputs of the MM4 will not harm the unit. The power amplifier will shut down if it
senses an improper load condition. Such a condition can result from connecting too many
speakers, (too low a load-impedance), to the MM4. In this case, the sound will be intermittent as the power amplifier repeatedly tests the load to determine if it can resume operation. The solution is, of course, to reduce the number of speakers you have connected.
MICROMIX
2
3
UNBAL
CD/TAPE
LINE IN
1
4
UNBAL
CD/TAPE
LINE IN
5
6
Introduction
Nous sommes confiants chez Yorkville que votre nouveau MM4 sera la solution souple et efficace à aideront à mieux bénificier du plein rendement de votre Micromix.
Nous vous conseillons de prendre le temps nécessaire pour le lire.
1. Entrees Pour Microphone et Ligne
Le mixeur MM4 est doté sur les canaux 1 et 2 d’entrées symétriques pour microphones et
asymétriques pour entrée ligne. Les entrées de type standard XLR pour microphones sont
électroniquement symétriques pour une réduction maximale du bruit de fond et possède des
caractéristiques les rendant parfaitement compatibles aux microphones à basse impédance
de qualité professionelle tel que le Shure® SM-58 ou APEX750.
Les prises de ¼ pouce sont asymétriques et servent à brancher des microphones de haute
impédance, ainsi que des guitares, synthétiseurs, pianos électriques, magnétophones ou tout
autre signal asymétrique.
Il est important de ne brancher qu’une des entrées symétriques ou asymétriques par
canal. Faute de quoi l’opération du circuit d’entrée pourait être gênée.
Le canal 3 et 4 offre des prises d’entrées de type RCA, au lieu d’une prise den ¼ pouce,
conçues pour magnétophones et joueurs de disques au laser. Les deux entrées RCA sont
mélangées électroniquement en mono. La prise d’entrée symétrique XLR fonctionne comme
celles des autres canaux.
2. Commandes de Niveau Channel Level
Chaque canal possède une commande de niveau Channel Level séparée. En augmentant cette commande, on intensifie la contribution de ce canal au mixe final.
3. Indicateur d’Ecretage Clip
L’indicateur d’écrêtage clip est placé près de la commande Master. Il s’allume dès que le
niveau du signal dans la section mixeur atteint en dedans de 3dB du point de distortion
réel. En usage normal , cette lampe s’allumera brièvement durant les pointes de niveau
sonore. Si la lamp clip n’est pas allumé, il est certain que la section mixeur n’est pas en
écrêtage.
Cette circuitrie est conçue pour indiquer que l’écretage dans le stage de préamplification
du MM-4. Elle n’indique pas si il y a distorsion dans l’amplificateur interne, ou tout amplificateur externe branché au MM-4.
MICROMIX
4. Commande Generale Master
Cette commande règle le niveau général combiné des quatres canaux, qui passe ensuite par
l’égaliseur, et optionellement par le circuit-effets.
5. Egalisation
Il est possible d’ajuster la tonalité finale du mixe par les trois bandes égalisation, soit Lo
pour les graves, Mid pour les moyennes, et Hi pour le aigues.
6. Circuit-Effets
Ces priseservent à brancher tout appareil à effets externe au MM4. Branche l’entrée de
l’appareil à la prise Send, et la sortie à la prise Rtn. N’utilisez pas de pédales à effets,
celles-ci ne sont pas conçues pour la sonorisation.
La prise Send peut servir en outre de sortie pour une amplificateur supplémentaire, et la
prise Rtn, que débranche le mixeur de l’amplificateur interne dès qu’une fiche y est inséré,
peut servir d’entrée auxiliaire à niveau ligne.
7. Amplificateur
L’amplificateur du MM4 fournit environ 150-watts sur 4-ohms. Deux prise en parallèle à
l’arriére servent à brancher deux haut-parleurs de 8-ohms ou un de 4-ohms.
L’amplificateur du MM4 est protégé contre les court-circuits accidentels par un circuit qui
interrompe l’amplification jusqu’à ce que le défaut est enlevé. Trop d’enceintes acoustiques branchèes aux sorties du MM4 (impédance infériere à 4-ohms) causeront une
amplification intermittente. Aucun dommage en résuit, mais c’est un indice important
que l’impédance trop basse.
MICROMIX
SPECIFICATIONS
Power Output
Harmonic Distortion
Input sensitivity
Output Load
Power Requirements
(In Europe)
140 Watts RMS @ 4-ohms
90 Watts RMS @ 8-ohms
< 1.0% at Full Power
1.0 Volt RMS
4-ohm minimum
117 VAC 60 Hz 360 VA
220 VAC 50 Hz 360 VA
SPECIFICATIONS
Puissance De Sortie
Distorsion Harmonique
Sensibilite a L’entrée (efx rtn)
Charge a La Sortie
Alimentation Secteur
(Modele Export)
140 Watts RMS sur 4-ohms
90 Watts RMS sur 8-ohms
< 1.0% a pleine puissance
1.0 Volt RMS
4-Ohms minimum
117 VAC 60 Hz 360 VA
220 VAC 50 Hz 360 VA
MICROMIX
Two & Ten Year Warranty
Two
&Ten
Unlimited Warranty
Yorkville's two and ten-year unlimited warranty on this product is transferable
and does not require registration with Yorkville Sound or your dealer. If this
product should fail for any reason within two years of the original purchase
date (ten years for the wooden enclosure), simply return it to your Yorkville
dealer with original proof of purchase and it will be repaired free of charge.
This includes all Yorkville products, except for the YSM Series studio
monitors, Coliseum Mini Series and TX Series Loudspeakers.
Freight charges, consequential damages, weather damage, damage as a result
of improper installation, damages due to exposure to extreme humidity, accident
or natural disaster are excluded under the terms of this warranty. Warranty does
not cover consumables such as vacuum tubes or par bulbs. See your Yorkville
dealer for more details. Warranty valid only in Canada and the United States.
Garantie Illimitée
La garantie illimitée de deux et dix ans de ce produit est transférable. Il n`est pas
nécessaire de faire enregistrer votre nom auprès de Yorkville Sound ou de votre
détaillant. Si, pour une raison quelconque, ce produit devient défectueux durant
les deux années qui suivent la date d`achat initial (dix ans pour l`ébénisterie),
retournez-le simplement à votre détaillant Yorkville avec la preuve d`achat original
et il sera réparé gratuitement. Ceci inclus tous les produits Yorkville à l`exception
de la série de moniteurs de studio YSM, la mini série Coliseum et de la série TX.
Les frais de port et de manutention ainsi que les dommages indirects ou
dommages causés par désastres naturels, extrême humidité ou mauvaise
installation ne sont pas couverts par cette garantie. Cette garantie ne couvre
pas les produits consommables tels que lampe d`amplificateur ou ampoules
"PAR". Voir votre détaillant Yorkville pour plus de détails. Cette garantie n’est
valide qu’au Canada et aux États Unis d’Amérique.
Canada U.S.A.
Voice: (905) 837-8481 Voice: (716) 297-2920
Fax: (905) 837-8746 Fax: (716) 297-3689
w w w . y o r k v i l l e . c o m
Yorkville Sound
550 Granite Court
Pickering, Ontario
L1W-3Y8 CANADA
Yorkville Sound Inc.
4625 Witmer Industrial Estate
Niagara Falls, New York
14305 USA
Printed in Canada
REAL Gear.
REAL People.
WORLD HEADQUARTERS
CANADA
U.S.A.
Yorkville Sound
Yorkville Sound Inc.
550 Granite Court
Pickering, Ontario
L1W-3Y8 CANADA
4625 Witmer Industrial Estate
Niagara Falls, New York
14305 USA
Voice: (905) 837-8481
Fax: (905) 837-8746
Voice: (716) 297-2920
Fax: (716) 297-3689