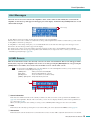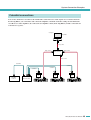
1
Reference Manual
EN
Contents
Introduction............................................. 3
About the documentation.......................................... 3
Setup ........................................................................... 3
Terms........................................................................... 4
Controls and Connectors ...................... 5
Front Panel.................................................................. 5
Rear Panel................................................................... 8
Optional I/O cards ...................................................... 9
Supported I/O cards ............................................... 9
Removing and installing a card............................. 10
Cleaning the air filters.............................................. 11
Panel Operations .................................. 12
Basic Operations...................................................... 12
About the Display.................................................. 12
Switching Screens ................................................ 12
Editing the Parameters ......................................... 12
Adjusting the Attenuation...................................... 12
Screen Structure ...................................................... 13
SCENE Screen .......................................................... 40
Recalling a scene ................................................. 40
Storing a scene..................................................... 41
Editing a scene ..................................................... 42
Erasing a scene (Clear) ........................................ 42
Initializing the internal memory............................... 43
System Connection Examples ............ 44
Daisy-chain connection via analog or
digital audio ........................................................... 44
Thru-output for digital connections........................ 45
Regarding digital connections............................... 45
Operations that can be Performed from
the Panel ................................................................ 14
Redundant connections (Backup) .......................... 46
Alert Messages ......................................................... 15
HOME Screen............................................................ 15
Bridge connections from
EtherSound to AES/EBU ...................................... 48
METER Screen.......................................................... 16
CobraNet connections ............................................. 49
SETTING Screen....................................................... 17
Bridge connections from
CobraNet to AES/EBU........................................... 50
UTILITY Screen......................................................... 19
Device Setup ........................................................ 19
Word Clock Setup ................................................. 20
Information............................................................ 21
Network Setup ...................................................... 21
LCD Setup ............................................................ 22
Front Panel Operation........................................... 22
Scene Setup ......................................................... 23
Misc Setup ............................................................ 24
MENU Screen............................................................ 24
General ................................................................. 25
Signal Path ........................................................... 26
Signal Chain ......................................................... 27
Calibration............................................................. 28
Limiter ................................................................... 29
SIGNAL PATH Screen .............................................. 30
SIGNAL PATH Block Diagrams............................. 30
Recalling library settings
(Speaker Processor only).................................. 32
Slot Input Router................................................... 33
Input On/Off .......................................................... 33
4x4 Matrix Mixer ................................................... 33
8Band Input EQ .................................................... 34
Input Delay............................................................ 34
Oscillator Mix ........................................................ 35
2
X-Over Input Level (Speaker Processor) .............. 35
X-Over Polarity (Speaker Processor).................... 35
X-Over (Speaker Processor)................................. 36
Output Delay (Speaker Processor) ....................... 37
6Band Output EQ (Speaker Processor)................ 37
Output Level (Speaker Processor)........................ 38
Mute On/Off (Speaker Processor) ........................ 38
Limiter (Speaker Processor) ................................. 39
Output Router ....................................................... 39
TX6n/5n/4n Reference Manual
EtherSound connections ......................................... 47
Connecting External
Controllers and Analog Devices ......... 51
Remote control from AMX or Crestron
([NETWORK] connector) ...................................... 51
Controlling an analog device
([FAULT OUTPUT] connector) ............................. 51
Euroblock plug connection ..................................... 52
Adjusting the Input/Output Levels ...... 53
Simplified block diagram and level diagram.......... 53
Gain / Input Sensitivity conversion table ............... 53
Adjusting the input/output levels............................ 54
Basic level adjustment .......................................... 54
Level adjustments between
TX6n/TX5n/TX4n units ...................................... 54
Level adjustments between analog and digital ..... 54
Appendix ............................................... 55
Message List ............................................................. 55
Alert Message List (Excerpt) ................................... 56
Troubleshooting ....................................................... 57
Index .......................................................................... 58
Introduction
About the documentation
This manual mainly explains operation and specifications for the TX6n, TX5n, and TX4n (subsequently referred
to as TXn) power amplifiers. When using the TXn, you will also need to consult various manuals other than this
document.
● Manuals other than this document
TX6n/5n/4n Owner’s Manual (printed)
Explains mainly the initial setup.
Amp Editor Installation Guide (PDF)
Explains the installation procedure for Amp Editor and the uninstallation
procedure.
Amp Editor Owner’s Manual (PDF)
Explains how to use Amp Editor.
PDF manuals and Amp Editor can be downloaded from the following URL.
http://www.yamahaproaudio.com/
NOTE
• In order to view the downloaded manuals, Adobe Reader must be installed in your computer. If you don’t have
Adobe Reader, please access the Adobe Corporation’s website at the following URL, and download Adobe Reader
(free of charge).
http://www.adobe.com/
Setup
For details on setting up the TXn and Amp Editor, refer to the “TX6n/5n/4n Owner’s Manual” and “Amp Editor
Owner’s Manual.”
TX6n/5n/4n Reference Manual
3
Introduction
Terms
This section explains terminology specific to the TXn.
■ Amp Editor
This is computer application software. This software allows you to monitor and control the TXn amplifiers from your computer.
■ Scene
Settings such as power-on/standby or mute for each amplifier are called a “scene.” By recalling a scene, the saved settings
can be immediately applied to the amplifiers. Each TXn unit has 50 scenes.
■ Signal Path
This is the audio signal processing functionality provided by the internal DSP. Components organized into modules according to their functionality are placed in the signal path.
■ Component
These are modules in the signal path that organize audio signal processing according to their functionality.
■ Library
The settings of all Speaker Processor components can be saved together in a library. A library can be saved only from Amp
Editor, but can be recalled from the unit’s front panel as well.
■ Device ID
This is an ID for uniquely identifying a TXn unit within a network. In order to allow monitoring and control from Amp Editor, you must specify non-conflicting IDs within a workspace.
4
TX6n/5n/4n Reference Manual
Controls and Connectors
Front Panel
!9
@0
!9
@0
i
i
!4
o
!0
e
!2
r
q
t
y
u
q
w
o
!1
!1
!0
!2
!5
!3
!6
!7
!8
!3
q [POWER] switch and indicator
This switch turns the amplifier’s power on or off. When you turn this switch on, the [POWER] indicator will light white. In
Standby mode, it will light white as well.
w [STANDBY] indicator
This indicator will light orange when the amplifier’s power is in Standby mode. To switch between Standby/On modes, hold
down the TXn’s panel [HOME] button for three seconds or longer, or switch the mode from the MENU screen ➝ General
➝ Sensitivity/Amp Gain or Amp Editor’s Detail View window.
NOTE
• Standby is a state in which the speaker output’s power amp section is off (operation other than speaker output will continue).
e [IDENTIFY] indicator
When you click the [Identify] button in the Tree View window of Amp Editor, the [IDENTIFY] indicator of the corresponding amplifier will blink blue.
r [NETWORK] indicator
This will blink green when the amplifier is connected to a computer via the [NETWORK] connector, and data is being sent
or received.
TX6n/5n/4n Reference Manual
5
Controls and Connectors
t [PROTECTION] indicator
When the protection system is active, this indicator will light red. The protection circuit will operate in the following situations.
• If the amplifier overheats and the output limiter operates
The speaker output will be attenuated if the heat sink of the amplifier section exceeds 80°C (80%), and will be muted if
the heat sink exceeds 90°C (90%). The [PROTECTION] indicator will light at 80°C (80%) or higher.
• If the power supply overheats and shuts-down
The fan will rotate at high speed if the power supply section exceeds 90°C, and the analog circuits will shut down if it
exceeds 100°C. The [PROTECTION] indicator will light only if shut-down occurs.
NOTE
• The thermal meter in the METER screen and in Amp Editor indicates the heat sink temperature of the amp section.
The temperature of the power supply section is not shown.
• If the load falls below 0.5 ohms
If a short occurs and the load falls below 0.5 ohms, the speaker output will be muted, and muting will be cleared approximately 1 second later.
• If DC output is detected
The speaker output will be muted, and the power supply section will shut down.
• If the power supply malfunctions
The speaker output will be muted.
• If ultra-high frequencies, overcurrent, excessive total current, or maximum current is detected
The speaker output will be compressed.
y [BRIDGE] indicator
This will light green if the amplifier mode is set to Bridge.
u [PARALLEL] indicator
This will light orange if the amplifier mode is set to Parallel.
i [MUTE] indicator
This indicator will light red if muting is turned on by the [MUTE] button or from Amp Editor. When the power is turned on,
the output signal will also be muted and the indicator will blink red until audio begins being output.
NOTE
• Even if mute is off, this indicator will blink if Solo was turned on from Amp Editor, or when the output has been muted by
the protection circuit.
o [MUTE] button
By holding down the [MUTE] button for one second or longer, you can turn muting on/off for that channel. When muting
turns on, the [MUTE] indicator will light. By holding down the [MUTE] button when the Solo function is turned on from
Amp Editor, Solo will be defeated.
!0 [ALERT] indicator
This will light to indicate an alert related to the amplifier’s audio signal. If an alert for a specific channel has occurred, the
indicator of the corresponding channel will light; for other alerts, the indicators of both channels will light. At this time, the
alert message will appear in the upper part of the display.
!1 [CLIP] indicator
When the signal of the speaker output’s power amp section exceeds the clipping level, this indicator will light and the output
signal will be compressed.
!2 [SIGNAL] indicator
This will light green when the level of the signal being output from the [SPEAKERS] jack exceeds 1 Vrms (equivalent to
0.2 W into an 8 ohms load, 0.4 W into a 4 ohms load or 0.8 W into a 2 ohms load).
6
TX6n/5n/4n Reference Manual
Controls and Connectors
!3 Encoders A, B
When the display shows the attenuation meter, these encoders adjust the attenuation of channels A and B. If any other
screen is displayed, encoder A moves the cursor and encoder B modifies the parameter value.
NOTE
• Only encoder A can be operated if you’re adjusting the attenuation when the amplifier mode is Bridge.
!4 Display
This shows the amplifier’s settings or a level meter. Refer to “Screen Structure” (page 13) for details.
NOTE
• If the power supply is in Standby mode or if the LCD Setup’s Backlight setting is Auto OFF, the backlight will go dark if no
panel operation has been performed for ten seconds. It will light again when a panel operation is performed.
!5 Function buttons
These buttons move to the screen indicated above each button in the display. If a channel name (e.g., CH A, CH B) is
shown, this means that a parameter for that channel is displayed; press the corresponding function button to switch the
channel that is shown. These buttons may also operate in different ways depending on the screen shown in the display.
!6 [HOME] button
This accesses the HOME screen (page 15) in the display.
By holding down this button for three seconds or longer, you can switch the power between Standby and On modes. When
the confirmation message appears, press the [ENTER] button to switch the setting.
!7 [EXIT] button
By pressing this button when the display shows a screen other than the HOME screen, you can move to the screen of the
next highest level.
NOTE
• To temporarily disable panel lock, simultaneously hold down the [HOME] button and [EXIT] button for three seconds or
longer.
• If you hold down this button for three seconds or longer in the HOME screen, the FAULT OUTPUT connector output will
be reset (NC and C will be connected).
!8 [ENTER] button
Use this to select a parameter or to finalize an edited parameter value. Depending on the screen shown in the display, this
button may also be used in other ways. If the parameter value is blinking, you must finalize the value by pressing this button.
NOTE
• If you hold down this button for one second or longer in the HOME screen, the UTILITY screen Device Setup page (page
19) will appear.
!9 Air intakes
The amplifier uses forced-air cooling. The variable speed cooling fan draws air in from the front and exhausts it through the
rear. The cooling fan speed varies depending on the heat sink temperature: It operates at low speed when it is below 40 °C
(40%), increases in speed according to increases in temperature, and operates at high speed when temperature exceeds 60
°C (60%). If the power supply exceeds 90°C, the variable speed fan will operate at high speed regardless of the heat sink
temperature.
Please be sure that you do not block the air intakes or exhaust vents. Also, clean the filter elements regularly. If the air
intakes are clogged with dust or debris, the amplifier will overheat, which may result in the amplifier shutting down.
@0 Screw holes for handles
These four screw holes (four locations) are for the included handles. Fix the handles to the amplifier, using the included flathead screws.
TX6n/5n/4n Reference Manual
7
Controls and Connectors
Rear Panel
@1
@2
@7
@4
@6
@5
@3
@1 [SPEAKERS] jacks
These are speaker output jacks.
• Speakon connectors : Speakon type cable plugs (Neutrik NL4) can be connected here.
• Five-way binding post connectors : Bare wires or Y plugs can be connected here.
NOTE
• The five-way binding post connectors and Speakon connectors are internally connected in parallel. If you’re using both
simultaneously, make sure that the speaker impedance of each connector is 4–16 ohms (8–32 ohms in Bridge mode).
@2 Digital input/output connectors (I/O card slot)
An AES-IO card is installed as standard, allowing AES/EBU digital audio signals to be input and output.
• [IN] connector
: This is an XLR-3-31 type balanced input connector for inputting two-channel digital audio signals.
• [OUT] connector
: This is an XLR-3-32 type balanced output connector for outputting two-channel audio signals
processed by the internal DSP.
• [THRU] connector : This is an XLR-3-32 type balanced output connector that outputs the unprocessed signal received
at the [IN] connector. Even if the power is turned off, this connector will output the input signal
without any change (page 44). However, internal settings will be switched when the power is
switched on/off, causing the output signal to be muted for an instant.
NOTE
• If desired, you can remove the AES-IO card and install a separately sold MY card. For details on the types of MY card
that can be used and how to install them, refer to “Optional I/O cards” (page 9).
• The removed AES-IO card cannot be installed and used in other devices.
• You must use a 110 ohm digital cable to make AES/EBU connections.
@3 Analog input/output connectors
These connectors input and output analog audio signals.
• [IN] connector : These are XLR-3-31 type input connectors for inputting analog audio signals. The pin polarity is shown at right (IEC
60268).
NOTE
• In Parallel mode and Bridge mode, only the signal of
channel A is output from the speaker output connector
by default. The channel B signal is not sent from the
speaker output, but the audio signal processed by the
internal DSP can be output from the digital output connector.
• [THRU] connector : This is an XLR-3-32 type balanced output connector
that outputs the unprocessed analog signal received from
the [IN] connector.
8
TX6n/5n/4n Reference Manual
Hot
Ground
Cold
Controls and Connectors
@4 [NETWORK] connector
This is a 100BASE-TX/10BASE-T Ethernet connector. You can connect this to a computer so that the amplifier can be monitored and controlled from Amp Editor. This also allows an external controller such as AMX or Crestron to be connected.
NOTE
• To prevent electromagnetic interference, use an STP (Shielded Twisted Pair) cable for the [NETWORK] connector.
@5 [FAULT OUTPUT] connectors
This is a 3P Euroblock connector for controlling an external analog device when an abnormality occurs in the CPU or triggered by the occurrence of a Fault event specified in Amp Editor. NC and C will be connected when the amplifier is operating normally; NO and C will be connected when a problem occurs (page 51). You can also reset this output from Amp
Editor.
A message will appear in the screen if a problem occurs. To reset the output, hold down the [EXIT] button for three seconds
or longer in the HOME screen.
@6 Power cable
Connect the plug of the power cable to an AC outlet of the correct voltage.
@7 Grounding screw
The AC power cord is a 3-wire type. If the AC outlet used is earthed (grounded), this device will be properly earthed as well.
Also, grounding the screw sometimes reduces hum and interference noise.
Optional I/O cards
■ Supported I/O cards
You can remove the AES-IO card from the TXn’s rear panel, and install a separately sold MY (mini-YGDAI) card. As of September 2009, the following MY cards are supported. For the latest information, refer to the Yamaha pro audio website.
http://www.yamahaproaudio.com/
Card name
AES-IO (attached)
Input/output format
AES/EBU
Number of channels
Inputs
Outputs
Auto Scan Mode/
Redundant Backup
2
2
✓
Input/output connector
XLR-3-31, XLR-3-32
MY4-AD
Analog input
4
—
—
XLR-3-31
MY8-AD24
Analog input
8
—
—
TRS phone
MY8-AD96
Analog input
8
—
—
D-sub 25-pin
MY4-DA
Analog output
—
4
—
XLR-3-32
MY8-DA96
Analog output
—
8
—
D-sub 25-pin
MY8-ADDA96
Analog input/output
8
8
—
Euroblock
MY8-AE
AES/EBU
8
8
✓
D-sub 25-pin
MY8-AE96
AES/EBU
8
8
✓
D-sub 25-pin
MY8-AE96S
AES/EBU
8
8
✓
D-sub 25-pin
MY8-AEB
AES/EBU
8
8
✓
BNC
MY16-AE
AES/EBU
16
16
✓
D-sub 25-pin
MY16-CII
CobraNet
16
16
—
RJ-45
MY16-ES64
EtherSound
16
16
—*
RJ-45
MY16-MD64
MADI
16
16
—*
BNC, SC fiber
MY16-EX
Expansion card
16
16
—*
RJ-45
AVY16-ES
EtherSound made by
AuviTran Corp.
16
16
—
RJ-45
* When the card which supports Emulation mode is operating with the mode ON, the compatibility is the same as the emulated card.
TX6n/5n/4n Reference Manual
9
Controls and Connectors
■ Removing and installing a card
To remove and install a card, proceed as follows.
1. Make sure that the power of the TXn is turned off.
2. Loosen the screws that fasten the slot, and remove the installed card.
Keep the removed card in a safe place.
3. Align the two edges of the card to be installed with the guide rails inside the slot, and insert the card into the
slot.
Push the card all the way into the slot so that the contacts of the card are correctly mated with the connector inside the slot.
Guide rail
4. Fasten the card using the screws attached to the card.
Be aware that malfunctions or faulty operation may occur if the card is not fastened.
• You must turn off the amplifier’s power switch before removing and installing a card. Otherwise, malfunctions or electric
shock may occur.
CAUTION
10
TX6n/5n/4n Reference Manual
Controls and Connectors
Cleaning the air filters
To ensure adequate cooling air intake, the filter elements must be cleaned when they have become clogged. Follow
the description below to clean each of the filter elements.
1. Make sure that the power to the amplifier is turned off.
2. Disconnect the power cable from the AC outlet.
3. Remove the two screws that fasten the front filter grill, and remove the grill.
4. Remove the filter element, and wash it in plain water. If the filter element is exceptionally dirty, mild detergent may be used.
5. Dry the filter element completely.
• Never replace the filter element while it is still wet.
CAUTION
6. Replace the filter element on the air intake, hook the front filter grill on the amplifier, and secure it using the
screws. (The replacement part number of the filter element is WN311200.)
Front filter grill
Filter element
TX6n/5n/4n Reference Manual
11
Panel Operations
Basic Operations
■ About the Display
Shows an alert message if an alert event occurs
such as an abnormality in the amplifier.
Shows the contents of the selected screen.
Shows the names of the screens assigned to
the function buttons.
■ Switching Screens
By pressing a function button you can move to the screen indicated above that button. By pressing the [HOME] button you can
move to the HOME screen. By pressing the [EXIT] button you can move to the screen one level above.
■ Editing the Parameters
Use encoders A and B to move to the parameter that you want to edit, and use encoder B to edit the value.
NOTE
• If you edit a parameter in the UTILITY screen, press the [ENTER] button when you finish editing. If you move to a different screen without pressing the [ENTER] button, your change will not be applied.
■ Adjusting the Attenuation
When the display shows the attenuator (i.e., in the HOME screen or the METER screen), you can use encoders A and B to
adjust each channel’s attenuation.
NOTE
• If the display shows a screen other than the HOME screen or METER screen, encoders A and B are used to set parameters.
Attenuator
12
TX6n/5n/4n Reference Manual
Panel Operations
Screen Structure
HOME Screen
METER
METER Screen
SETTING Screen
SETTING
• ANA INPUT VOLTAGE
• SLOT INPUT VOLTAGE
• SP OUTPUT VOLTAGE
• SP OUTPUT POWER
• SP OUTPUT IMPEDANCE
• SLOT OUTPUT METER
• THERMAL
UTILITY
• ANA INPUT VOLTAGE
• SLOT INPUT VOLTAGE
• SP OUTPUT VOLTAGE
• SP OUTPUT POWER
• SP OUTPUT IMPEDANCE
• SLOT OUTPUT METER
• THERMAL
UTILITY Screen
General
• Device Setup
• Word Clock Setup
• Information
• Network Setup
• LCD Setup
• Front Panel Operation
• Scene Setup
• Misc Setup
MENU
• Sensitivity/Amp Gain
• Stereo/Bridge/Parallel
• Attenuation Link
• Input Redundancy
Signal Path
MENU Screen
• General
Encoder
• Signal Path
• Signal Chain
Encoder
SCENE
• Input Router
• Input On/Off
• 4x4 Matrix Mixer
• 8Band Input EQ
• Input Delay
• Oscillator Mix
• Speaker Processor
• Output Router
• Calibration
Signal Chain
• Limiter
• Analog Input Signal Chain
• Slot Input Signal Chain
• Output Signal Chain
SCENE Screen
Calibration
• Calibrate by Pilot Tone
• Calibrate by Prog Source
• RECALL
• STORE
• EDIT
• CLEAR
Limiter
• Voltage Limiter
• Power Limiter
• Limiter Gain Reduction
Speaker Processor
LIB.
Library
• X-Over Input Level
• X-Over Polarity
• X-Over
• Output Delay
• 6Band Output EQ
• Output Level
• Mute On/Off
• Limiter
• RECALL
Encoder
TX6n/5n/4n Reference Manual
13
Panel Operations
Operations that can be Performed from the Panel
Category
METER
(page 16)
UTILITY
(page 19)
Subcategory
ANA INPUT VOLTAGE
Shows the input level from the analog input connectors.
SLOT INPUT VOLTAGE
Shows the input level from the slot.
SP OUTPUT VOLTAGE
Shows the output level from the [SPEAKERS] connectors.
SP OUTPUT POWER
Shows the output power from the [SPEAKERS] connectors.
SP OUTPUT IMPEDANCE
Shows the output impedance from the [SPEAKERS] connectors.
SLOT OUTPUT METER
Shows the output level to the slot.
THERMAL
Shows the heat sink temperature.
Device Setup
Makes settings to distinguish the amplifier on a network.
Word Clock Setup
Sets the word clock.
Information
Shows information about the amplifier.
Network Setup
Specifies the IP address and other settings for using the amplifier in a
network.
LCD Setup
Specifies the display settings.
Front Panel Operation
Turns panel operation lock on/off.
Scene Setup
Makes scene* settings.
Misc Setup
MENU
(page 24)
Explanation
General
Sets the amplifier’s internal clock, etc.
Sensitivity/Amp Gain
Sets the input sensitivity/gain.
Stereo/Bridge/Parallel
Specifies the amplifier’s mode (Stereo/Bridge/Parallel).
Attenuation Link
Specifies whether attenuator operation will be linked between channels
A and B.
Input Redundancy
Specifies the redundant connection mode, etc.
Signal Path
Signal Chain
Calibration
Limiter
Makes settings for the equalizer, delay, crossover, and others that process the audio signal. Speaker Processor libraries can also be recalled.
Analog Input Signal Chain
Makes settings for checking whether the audio signal is being correctly
input from the analog connectors.
Slot Input Signal Chain
Makes settings for checking whether the audio signal is being correctly
input from the slot.
Output Signal Chain
Makes settings for checking the status of output from the [SPEAKERS]
connectors.
Calibrate by Pilot Tone
Uses a pilot tone to measure the impedance of the connected speakers.
Calibrate by Prog Source
Uses an audio signal to measure the impedance of the connected
speakers.
Voltage Limiter
Makes settings for the limiter.
Power Limiter
Limiter Gain Reduction
SCENE
(page 40)
Specifies whether the limiter will be linked between channels A and B.
Recall
Recalls a scene*.
Store
Stores a scene*.
Edit
Edits a scene*.
Clear
Clears a scene*.
*Scene..........The settings listed above, such as Standby/Power-On or mute (with the exception of UTILITY), are called a “scene”. By recalling a scene, the
saved settings can be immediately applied to the amplifiers.
14
TX6n/5n/4n Reference Manual
Panel Operations
Alert Messages
When an alert event occurs related to the amplifier’s audio, such as when an abnormality has occurred in the
amplifier, an alert message will appear in the upper part of the display. At this time the [ALERT] indicator of each
channel will also light.
Alert message
If Amp Editor is being used online, the alert message will also appear in Amp Editor.
When an alert event occurs, it will be recorded in the event log of the amplifier itself, and the recorded event log can be viewed
in Amp Editor’s “Event Log” dialog box.
In Amp Editor’s “Alert Setup” dialog box you can enable/disable alert events and select their types. If an alert type is set to
Information, the alert message will not appear in the display.
For details on the content of each alert and the appropriate measures to take, refer to the Amp Editor Owner’s Manual.
For details about the alert messages appearing when certain malfunctions are suspected to have occurred, you can also refer to
“Alert Message List (Excerpt)” (page 56).
HOME Screen
This shows information such as the currently selected scene name and attenuation. This screen will appear immediately after you power-on the amplifier. You can also access it by pressing the [HOME] button, or by pressing the
[EXIT] button several times. You can also move from this screen to various other screens.
NOTE
• As a shortcut from the HOME screen, you can hold down one of the following buttons for three (or one) seconds or longer
to execute the corresponding function (page 7).
[HOME] button
: Switch power between Standby/On
[EXIT] button
: Reset the FAULT OUTPUT connector
[ENTER] button
: Access the UTILITY screen Device Setup
[HOME] + [EXIT] button : Temporarily defeats panel lock
q
w
e
w
q Scene information
This shows the number and name of the currently recalled scene. The scene name can be specified in the SCENE screen
(page 42) or in Amp Editor. Instead of the scene name, you can choose to display the library name for the Speaker Processor component (page 24).
When you edit a parameter after recalling or storing a scene, an EDIT symbol will appear above the scene number.
w Gain
This indicates the currently specified gain for each channel. The gain can be adjusted in the MENU screen (page 24).
e Attenuation
This indicates the current attenuation for each channel. You can use encoders A/B to adjust the attenuation for each channel.
TX6n/5n/4n Reference Manual
15
Panel Operations
METER Screen
This shows the input/output levels of the audio signal, and the status of the power supply. As when you’re in the
HOME screen, you can use encoders A/B to adjust the attenuation of each channel.
To access the METER screen, access the HOME screen and press the left-most function button (METER). You can
change the meter type by using the left-most function button (PREV) and right-most function button (NEXT).
w
w
e
q
e
q Level meter
This shows the name of the currently selected meter type and the meter for each channel. The “<” “>” beside the meter are
threshold values.
NOTE
• When the input level from an analog input jack or slot exceeds the maximum value of digital signal, the top segment of
the meter will light.
w Gain
This indicates the currently specified gain for each channel. The gain can be adjusted in the MENU screen (page 24).
e Attenuation
This indicates the current attenuation for each channel. You can use encoders A/B to adjust the attenuation for each channel.
● Meter types that can be shown
The display units can be specified in the SETTING screen (page 17).
Meter type
Display unit
ANA INPUT VOLTAGE
dBFS, dBu, V
SLOT INPUT VOLTAGE
dBFS
Input level from the slot
SP OUTPUT VOLTAGE
dBu, V
Speaker output level
SP OUTPUT POWER
W
Speaker output power
SP OUTPUT IMPEDANCE
Ω
Speaker output impedance
SLOT OUTPUT METER
THERMAL
16
Explanation
Input level from the analog jack
TX6n/5n/4n Reference Manual
dBFS
%
Slot output level
Heat sink temperature of amplifier section
Panel Operations
SETTING Screen
For each meter type, this screen lets you specify various parameters for alert detection, peak hold, and display
units.
● Setting procedure
1. In the HOME screen, press the left-most function button (METER) to access the METER screen.
2. Use the function buttons (PREV/NEXT) to access the screen for the meter whose settings you want to change.
3. Press the second-from-right function button (SETTING) to access the SETTING screen for that meter.
4. Press the second-from-left function button (CH A/B or CH 1/2) to access the settings for the channel that you
want to edit.
Channel whose settings you will edit
5. Use encoder A to move the cursor to the parameter that you want to edit, and encoder B to edit the parameter
value.
The edited parameter value will be reflected by the amplifier in real time.
TX6n/5n/4n Reference Manual
17
Panel Operations
● Parameters that can be edited
The parameters that can be edited will depend on the meter type.
Parameter
Detect Enable
Range
Explanation
ON/OFF
Specifies whether alert detection will be enabled or disabled. An alert
message will be displayed if a point exceeding the specified value (Alert
Min/Max TH) is detected for the specified number of times (Detect
Count) within the specified duration (Detect Time). Detection is in 2 ms
intervals.
Alert Min TH
*
Specifies the lower threshold value for the alert.
Alert Max TH
*
Detect Time
1–10s
Specifies the time during which points exceeding the threshold value will
be counted.
Detect Count
1–100
Specifies the number of times that a point exceeding the threshold value
must be counted in order to trigger an alert.
Peak Hold
Specifies the upper threshold value for the alert.
ON/OFF
Unit
*
Turns peak hold on/off.
Specifies the display unit for the meter.
* The setting range will differ depending on the meter type.
Alert detection parameters
Value
= Detect Count
Max TH
Detect Time
Min TH
Time
now
18
TX6n/5n/4n Reference Manual
Panel Operations
UTILITY Screen
Here you can make settings for the amplifier itself and for the network.
● Setting procedure
1. In the HOME screen, press the second-from-left function button (UTILITY) to access the UTILITY screen.
2. Use the function buttons (PREV/NEXT) to access the screen for the sub-category whose settings you want to
change.
3. Use encoder A to move the cursor to the parameter that you want to edit, and encoder B to edit the parameter
value.
4. If the parameter value is blinking, press the [ENTER] button to confirm the value.
Non-blinking parameter values are reflected by the amplifier in real time.
■ Device Setup
Here you can specify identifiers for distinguishing the amplifier on a network.
NOTE
• You can also access this screen from the HOME screen by holding down the [ENTER] button for three seconds or longer.
Parameter name
Device ID
Identify
Label
Range
0–255
ON/OFF
—
Explanation
This is an ID for uniquely identifying the device within a network.
Lights the [Identify] button of the corresponding amplifier in Amp Editor’s
Tree View window.
Displays the label (name) of this amplifier as assigned by Amp Editor.
TX6n/5n/4n Reference Manual
19
Panel Operations
■ Word Clock Setup
Here you can select the master word clock that will synchronize digital audio signal processing.
q
w
r
e
q Fs
Indicates the current word clock frequency.
w Int
The status of the internal word clock. There are four possibilities: 44.1 kHz / 48 kHz / 88.2 kHz / 96 kHz. The default setting
is 96 kHz.
e Slot
The word clock status of the card inserted in the slot. Normally, the reference word clock signal is transmitted from a single
device, and the other devices will receive and synchronize to this word clock signal.
NOTE
• If a card with a built-in SRC (sampling rate converter) is installed, select the master word clock from other than the channels with the SRC enabled.
r Auto Scan Mode
This specifies whether the master clock will be switched automatically when a valid word clock is no longer being input to
the port that’s assigned as the master clock, or when a port of the slot is found to have a valid word clock being input while
the internal word clock is selected.
If this setting is ON, the master clock will automatically be switched according to the following order of priority.
1. The selected port of the slot
2. The internal word clock
NOTE
• For some types of installed I/O card (e.g., for an AD card), Auto Scan Mode will not operate even if this setting is ON.
Refer to “Supported I/O cards” (page 9) to check if your I/O card supports Auto Scan Mode.
• If two TXn amplifiers are bi-directionally connected via a digital I/O card (e.g., separately sold AES/EBU cards connected
via the D-sub 25 pin connectors), and if Auto Scan Mode is ON for both units, the word clock will loop, and will no longer
lock. In this case, turn Auto Scan Mode OFF for one of the TXn amplifiers.
● Setting procedure
1. Use encoder A to move the cursor to the port (Int or Slot) that you want to assign as the master clock.
2. Press the [ENTER] button to switch the master clock.
A word clock is being input, and can be selected as the master clock.
A valid word clock is not being input (and cannot be selected as the master clock).
A word clock is being input, but is not synchronized with the master clock.
Selected as the master clock.
Selected as the master clock, but a valid clock is not being input.
An invalid channel of the slot, an analog I/O card is installed, or no card is installed.
20
TX6n/5n/4n Reference Manual
Panel Operations
■ Information
This screen shows information about the amplifier. This is only for display, and contains no editable parameters.
Parameter name
Battery
Explanation
Indicates the state of the internal backup battery in four levels: “OK,” “Low Battery,” “Critical Battery,”
or “No Battery.” If “Critical Battery” or “No Battery” is shown, immediately save the data to a computer
or other external device, and then ask a Yamaha dealer to replace the backup battery.
Version
Indicates the firmware version.
Serial No.
Indicates the serial number of the amplifier.
Slot
Indicates the name of the card installed in the slot. By default, an AES-IO card is installed.
■ Network Setup
Here you can specify the IP address and other settings for using the amplifier in a network.
Parameter name
IP Address Mode
IP Address
MAC Address
IP Control Port No.
Range
DHCP/Manual
001.000.000.001–
223.255.255.254
—
49152–49407
Explanation
Specifies whether the IP address will be set automatically from Amp
Editor or the DHCP server (DHCP), or set manually (Manual).
Indicates the IP address for Auto mode.
Specifies the IP address for Manual mode. If you attempt to specify an
invalid address, the setting will be cancelled even if you press the
[ENTER] button.
Indicates the MAC address.
Specifies the Ethernet port number that will be used for remote control
from an external remote controller via the dedicated communication protocol. All devices in the network can communicate over the same port
number. Change the port number if the same port number is used for
other devices (other than TXn).
TX6n/5n/4n Reference Manual
21
Panel Operations
■ LCD Setup
Here you can adjust the display’s contrast and backlight.
Parameter name
Range
Contrast
0–100%
Backlight
ON/Auto OFF
Explanation
Specifies the display contrast.
Specifies the lit status of the display’s backlight. With the Auto OFF setting, the backlight will light when a panel operation is performed, and will
go dark ten seconds after the panel operation has ended. Similarly, the
backlight will go dark ten seconds after panel operations have ended
when the power supply is in Standby mode as well.
■ Front Panel Operation
Here you can turns panel operation lock on/off. By locking panel operations you can prevent unintended operation.
w
NOTE
q
e
• This setting restricts only panel operation of the amplifier itself; it does not affect control from an external device such as
Amp Editor.
q Panel
This specifies the panel lock setting (locks all panel operations including the [MUTE] button and attenuation adjustments).
• Normal
: Panel lock (locking of all panel operations) will be turned off.
• View Only : Parameters cannot be changed from the front panel. Only display-related operations can be performed.
• Full Lock : The front panel will be inoperable.
w MUTE Key
This locks mute operations by the [MUTE] button. This can be set only if the Panel setting is Normal.
e Att. Dial
This locks attenuation adjustments by the A/B encoders. This can be set only if the Panel setting is Normal.
22
TX6n/5n/4n Reference Manual
Panel Operations
● Setting the Lock
1. Use encoder A to move the cursor to the lock that you want to set, and use encoder B to change the setting.
The parameter you switched will blink.
2. Press the [ENTER] button. The lock will be applied.
● Temporarily defeating panel lock
Here’s how you can temporarily defeat the panel lock. Even if the lock is temporarily defeated, it will again be set the next time
the power is turned on.
NOTE
• If you want to clear panel lock, defeat the lock as explained below, and then set Panel to Normal.
1. Simultaneously hold down the [HOME] button and [EXIT] button for at least three seconds.
A message of “Unlock panel” will appear.
2. Press the [ENTER] button.
Panel lock will be temporarily (until the power is turned on again) defeated.
■ Scene Setup
Here you can make settings related to scene recall.
Parameter name
Scene Recall
EMG Scene Setup
Last Memory Resume
Range
Explanation
Enable/Disable
Specifies whether scene recall via front panel operations will be
allowed. This will not affect control from an external device such as Amp
Editor.
OFF, 00–49
Specifies the scene number that will be recalled when the EMG (Emergency) signal is received from an external controller. If this is OFF, a
scene will not be recalled even if an EMG signal is received.
ON/OFF
Specifies what will happen when the power is turned on. If this is ON,
the unit will start up with the settings that were in effect when the power
was last turned off. If this is OFF, the unit will start up by recalling the
scene of the scene number that was being used when the power was
last turned off.
TX6n/5n/4n Reference Manual
23
Panel Operations
■ Misc Setup
Here you can set the amplifier’s internal clock, etc.
Parameter name
Range
Explanation
Clock
Day-Month-Year
Hour:Minute
Sets the amplifier’s internal clock. This is used when recording the event
log. If daylight saving time has been enabled from Amp Editor, “DST”
will appear before the day. This can be set at a specific time everyday
from Amp Editor.
HOME screen Mode
SCENE/LIBRARY
Specifies whether the name shown in the HOME screen will be the
scene name or the Speaker Processor’s library name.
MENU Screen
Here you can make general settings for the amplifier in each category such as checking for broken connections,
measuring the speaker impedance, and settings for protection conditions.
● Setting procedure
1. In the HOME screen, press the second-from-right function button (MENU) to access the MENU screen.
2. Use encoder A or B to select the sub-category that you want to edit, and press the [ENTER] button to access
the screen for that sub-category.
24
TX6n/5n/4n Reference Manual
Panel Operations
3. Use encoder A to move the cursor to the parameter that you want to edit, and encoder B to edit the parameter
value.
4. If the parameter value is blinking, press the [ENTER] button to confirm the value.
Non-blinking parameter values are reflected by the amplifier in real time.
■ General
Here you can make general settings for the amplifier, such as gain/input sensitivity and amp mode.
● Sensitivity/Amp Gain
Parameter name
Range
Explanation
Amp Gain
19.8–43.8 dB
Specifies the gain of each channel. The gain and input sensitivity are
linked; you may edit either one.
Sensitivity
TX6n: 24.0–0.0 dBu
TX5n: 22.6– -1.4 dBu
TX4n: 21.4– -2.6 dBu
Gain Mode
Link ON/OFF
Standby/On
Standby/On
Switches the power between Standby and On modes. Standby is a
state in which the speaker output’s power amp section is off (operation
other than speaker output will continue).
Range
Explanation
Specifies the input sensitivity of each channel. Since the maximum output is different for each model, the settable range will differ for each
model. The gain and input sensitivity are linked; you may edit either
one.
Specifies whether the gain and input sensitivity settings will be linked
between channels.
● Stereo/Bridge/Parallel
Parameter name
Amp Mode
Stereo
The amplifier will operate in stereo, with channels A and B independent.
Bridge
The amplifier will operate as a monaural high-power amplifier that
bridge-connects the speaker output’s power amp sections, with the output signal from the channel A speaker processor as the source.
Parallel
The amplifier will operate as a two-channel monaural amplifier, with the
output signal from the channel A speaker processor as the source.
Range
Explanation
ON/OFF
Specifies whether the attenuator settings will be linked between channels.
● Attenuation Link
Parameter name
Att Link
TX6n/5n/4n Reference Manual
25
Panel Operations
● Input Redundancy
Here you can make settings for a redundant connection (duplicate audio connections) that uses both the analog input signal and
the digital (slot) input signal. If the digital input audio is interrupted by a broken connection or other problem, the amplifier can
automatically switch to the analog input (Backup), or the amplifier can automatically switch to the analog input simply when an
analog audio input signal is detected (Override).
Parameter name
Range
Mode
Explanation
OFF, Backup,
Override
Specifies the redundant connection mode.
Backup :
The input signal from the card installed in the slot will be the main signal; if the
input from the card becomes unlocked, the amplifier will automatically switch
to the input from the analog jack. Refer to “Supported I/O cards” (page 9) to
check if your I/O card supports the Backup mode.
Override : The input signal from the card installed in the slot will be the main signal; if
input from the analog jack is detected, the amplifier will automatically switch to
the input from the analog jack.
Auto Return
ON/OFF
When using Backup mode, this specifies whether the slot input will be re-enabled when the
interrupted slot input has recovered.
When using Override mode, this specifies whether the slot input will be re-enabled when the
analog input is interrupted.
Ovrrid Ch Link
ON/OFF
When using Override mode, this specifies whether both channels will switch together (ON) or
separately (OFF) when analog input is detected as being present or absent.
-30.0–0.0 dBFS
When using Override mode, this specifies the input level threshold value used to determine
the presence or absence of analog input.
0–60 s
When using Override mode with Auto Return ON, this specifies the time from when an interruption in the analog input is detected until the amplifier switches to the digital input.
Ovrrid Thrsld
Auto Rtn Delay
●
●
●
●
Input Redundant OFF
[Analog
Input A]
[Analog
Input B]
[Analog
Input A]
Redundancy
ADC
Backup mode (normal state)
Override mode (normal state)
ADC
[Analog
Input B]
ADC
[Analog
Input A]
Redundancy
Pol.
Gain/
Sens.
[Analog
Input B]
ADC
Pol.
Both of the analog and digital signals are
input into the 4x4 Matrix Mixer.
Pol.
Matrix
Mixer
Pol.
Slot
Input
Router
Only the digital signal is input into the 4x4
Matrix Mixer.
Refer to the “SIGNAL PATH Screen” (page 30).
TX6n/5n/4n Reference Manual
Gain
Pol.
■ Signal Path
26
ADC
Pol.
Slot
Input
Router
Pol.
Matrix
Mixer
Pol.
Gain
ADC
Gain/
Sens.
Pol.
Matrix
Mixer
Slot
Input
Redundancy
Pol.
Gain/
Sens.
Pol.
When digital input signal becomes
unlocked in Backup mode
● When analog input signal is
detected in Override mode
Gain
Router
Pol.
Only the analog signal is input into the 4x4
Matrix Mixer.
Panel Operations
■ Signal Chain
Here you can make settings for checking whether the input or output has been interrupted by a broken connection, etc.
● Analog Input Signal Chain/Slot Input Signal Chain
Here you can make settings to specify how a pilot tone supplied from the external device will be detected to determine whether
the input has been interrupted by a broken connection, etc. The settings for the Analog Input and the Slot Input are separate, but
the items to be set are identical.
Parameter name
Enable
Detect TH
Range
Explanation
ON/OFF
Enables/disables monitoring of input interruptions. If a pilot tone greater than the level specified by Detection TH could not be detected within the time specified by Detection Time, it will
be determined that the input has been interrupted.
-80.0–0.0 dBFS
Detect Time
0–100 s
Specifies the threshold value for the pilot tone input level.
Specifies the detection time for the pilot tone. If the pilot tone was not detected within the
specified time interval, it will be determined that the input has been interrupted.
Frequency
5 Hz–40.000 kHz
Specifies the center frequency of the pilot tone. If the sampling frequency is 44.1/48 kHz, a
pilot tone above 20 kHz cannot be detected appropriately.
Notch On
ON/OFF
Enables/disables the notch filter that eliminates the frequency component of the pilot tone so
that the pilot tone will not be output by the amplifier.
Notch Q
0.10–63.0
Detected Lvl
—
Specifies the width of the notch filter’s frequency band.
Indicates the level of the detected pilot tone.
● Output Signal Chain
Here you can specify how the speaker output impedance will be detected to determine whether the output has been interrupted
by a broken connection or a failed speaker. By outputting a pilot tone, the impedance can be detected reliably without relying
on the audio signal output.
NOTE
• The impedance and output level cannot be detected when the output level is lowered by the attenuator.
Parameter name
Range
Explanation
Frequency Type
5 Hz & 20 kHz,
10 Hz & 20 kHz
Specifies the center frequency (5 Hz or 10 Hz) for the low-frequency component of the pilot
tone that is output to the speaker. The high-frequency component is fixed at 20 kHz.
With the exception of Detect Time, the parameters listed below are displayed and edited
separately for the high-frequency component (High) and low-frequency component (Low).
Tone Level
-17.8–22.22 dBu
Specifies the output level of the pilot tone.
Enable
ON/OFF
Enables/disables monitoring of output interruptions.
Detect ImpMax
0.0–250.0 Ω
Specifies the upper threshold value of the impedance that is detected. If the specified value
is exceeded, it will be determined that the output has been interrupted.
Detect ImpMin
0.0–250.0 Ω
Specifies the lower threshold value of the impedance that is detected. If the measurement
falls below the specified value, it will be determined that the output has been interrupted.
Detect TH
-17.8–22.22 dBu
Specifies the lower threshold value of the level that is detected. If the measurement falls
below the specified value, it will be determined that the output has been interrupted.
Detect Time
0–100 s
Specify the interval (in seconds) at which checking for interrupted output will occur. If the
value is shorter than the time required for one measurement (approx. 0.5–8.0 seconds), the
measurement time will take effect instead.
Detected Lvl
—
Indicates the current output level value.
Detected Imp
—
Indicates the current impedance value.
TX6n/5n/4n Reference Manual
27
Panel Operations
■ Calibration
Here you can detect the impedance value of the speaker connected to each channel, and apply the result to the alert settings
(Signal Chain threshold values).
NOTE
• The impedance and output level cannot be detected when the output level is lowered by the attenuator.
● Calibrate by Pilot Tone
This performs the measurements using a pilot tone generated by the amp.
Parameter name
Frequency Type
Enable
Range
Explanation
5 Hz & 20 kHz,
10 Hz & 20 kHz
Specifies the center frequency (5 Hz or 10 Hz) for the low-frequency
component of the pilot tone that is output to the speaker. The high-frequency component is fixed at 20 kHz.
With the exception of Start and Apply, the parameters listed below are
displayed and edited separately for the high-frequency component
(High) and low-frequency component (Low).
ON/OFF
Calibration Start
Start
Detected Lvl
Detected Imp
Apply
Turns pilot tone output on/off.
Starts detection of level and impedance.
—
Indicates the detected level.
—
Indicates the detected impedance value.
Apply
Based on the detected level and impedance value, settings will be
made for the Output Signal Chain screen (page 27) parameters Frequency Type, Tone Level, Detect ImpMax (double the detected impedance value), Detect ImpMin (half the detected impedance value), and
Detect TH (the detected level divided by √2).
● Calibrate by Prog Source
This performs the measurements by outputting an audio source (program source) other than the pilot tone.
Parameter name
Calibration Start
Detected Lvl
Apply
28
TX6n/5n/4n Reference Manual
Range
Start
—
Apply
Explanation
Starts detection of impedance.
Indicates the detected impedance value.
Based on the detected impedance value, settings will be made for the
alert’s upper threshold value (double the detected impedance) and
lower threshold value (half the detected impedance).
Panel Operations
■ Limiter
Here you can specify the limiter conditions for the amplifier.
● Voltage Limiter
These settings specify how the limiter will be controlled by the output voltage.
Parameter name
Range
On
ON/OFF
Threshold
0.0–45.0 dBu
Attack
Release
Explanation
Turns the voltage limiter on/off.
Specifies the upper threshold value for the output voltage.
1–100 ms
Specifies the time over which 20 dB of attenuation will be applied after
the threshold value is exceeded.
0.01–10.00 s
Specifies the time over which the voltage that had been attenuated will
be returned to the original level after falling back to below the threshold
value.
● Power Limiter
These settings specify how the limiter will be controlled by the output power.
Parameter name
Range
On
ON/OFF
Threshold
TX6n: 10–4800 W
TX5n: 10–4200 W
TX4n: 10–3600 W
Explanation
Turns the power limiter on/off.
Specifies the upper threshold value for the output power.
● Limiter Gain Reduction
Parameter name
A/B Link
Range
Explanation
ON/OFF
Specifies whether the limiter will be linked between channels. If this is
ON, the limiter of the other channel will also operate when the limiter of
one channel operates.
TX6n/5n/4n Reference Manual
29
Panel Operations
SIGNAL PATH Screen
Here you can edit the components (equalizer, delay, crossover, etc.) that use the internal DSP to perform audio signal processing. This is displayed from the sub-category in the MENU screen.
NOTE
• To check details on the SIGNAL PATH screen, we recommend that you use Amp Editor’s Signal Path window. The Amp
Editor’s Signal Path window allows you to view and edit the signal route and functions in a more graphical manner.
■ SIGNAL PATH Block Diagrams
Redundancy
[Analog
Input A]
ADC
ADC
[Speaker Processor]
Pol.
PEQ
Level
Delay
Pol.
XOver
Delay
PEQ Level MUTE Limiter
MUTE
Protection
DAC
Att.
Amp [Speaker
Output A]
3
5
Gain/
Sens.
[Analog
Input B]
ADC
[Speaker Processor]
ADC
PEQ
Pol.
Delay
Level
Pol.
XOver
Delay
PEQ Level MUTE Limiter
MUTE
Protection
DAC
Att.
Amp [Speaker
Output B]
4
6
Matrix
Mixer
1
Pol.
1
OSC
7
2
3
Slot
Input
Gain
4
Router
5
6
2
Pol.
OSC
7
8
30
TX6n/5n/4n Reference Manual
8
Router
Slot
Output
Panel Operations
● Setting procedure
1. In the HOME screen, press the second-from-right function button (MENU) to access the MENU screen.
2. Use encoder A or B to select “Signal Path,” and press the [ENTER] button to access the SIGNAL PATH
screen.
3. Use encoder A or B to select the component that you want to edit, and press the [ENTER] button to access the
screen for that component.
If you selected “SP Proc” (Speaker Processor), use encoder A or B to select the component you want to edit, and press the
[ENTER] button to access the screen for that component.
4. Press the second- or third-from-left function button to access the settings for the parameter (such as CH A/B
or SL CH 1/2) that you want to edit.
5. Use encoder A to move the cursor to the parameter that you want to edit, and encoder B to edit the parameter
value.
6. If the parameter value is blinking, press the [ENTER] button to confirm the value.
Non-blinking parameter values are reflected by the amplifier in real time.
TX6n/5n/4n Reference Manual
31
Panel Operations
■ Recalling library settings (Speaker Processor only)
You can save Speaker Processor component settings from Amp Editor as library data, and recall the settings from the amplifier’s front panel. The library saves all parameters of the Speaker Processor components.
NOTE
• By default, the library provides presets for Yamaha’s Installation series speakers.
• You can convert the library files created for the DME series or SP2060 by Amp Editor and use them.
1. In the SIGNAL PATH screen, use encoder A or B to select “SP Proc” (Speaker Processor), and press the
[ENTER] button to access the Speaker Processor screen.
2. Press the right-most function button (LIB.) to access the library screen.
3. Use encoder A or B to select the settings that you want to recall.
4. Press the second-from-left function button (CH A/B) to switch the recall-destination channel.
5. Press the left-most function button (RECALL).
The recall confirmation screen will appear.
6. Press the [ENTER] button to execute the recall.
If you decide to cancel the operation, press the [EXIT] button.
32
TX6n/5n/4n Reference Manual
Panel Operations
■ Slot Input Router
Here you can specify the routing and gain from the slot input to each input channel.
NOTE
• To specify the routing to the input channel, press the second-from-right function button (SELECT 1/SELECT 2) to select
the input channel.
Parameter name
Range
Explanation
Input Assign
Slot Ch1 – Slot Ch16
Specifies the routing from the slot input to each input channel.
Input Gain
-24.0 dB – +24.0 dB
Specifies the gain from the slot input to each input channel.
■ Input On/Off
Here you can turn the input to the 4x4 Matrix Mixer on/off for each input channel.
■ 4x4 Matrix Mixer
This is a 4-input 4-output mixer with the input channels and output channels arranged in a matrix.
Parameter name
In Polarity
In Level
Cross Point
Range
NORMAL, INVERTED
-∞ –+10.00 dB
ON/OFF
Explanation
Specifies phase reversal for the signal of each input channel.
Adjusts the level of each input channel.
Turns on/off the send from each input channel to each output channel.
TX6n/5n/4n Reference Manual
33
Panel Operations
■ 8Band Input EQ
This is an eight-band parametric equalizer that boosts or cuts the signal at the specified frequencies. For each channel, you can
make settings for each frequency band (BAND A–H).
Parameter name
Type
Q
Range
Explanation
PEQ, L.SHELF 6,
L.SHELF 12,
H SHELF 6,
H SHELF 12, HPF, LPF
Selects the filter type. You cannot select the type for frequency bands
other than the first and last (B–G). (They are fixed at PEQ.) For details
on the filter types, refer to page 38.
63.0–0.10
Frequency
Gain
20.0 Hz–20.0 kHz
-18.0–+18.0 dB
Specifies the width of each frequency band.
Specifies the center frequency of each frequency band.
Specifies the gain for each frequency band.
Bypass
ON/OFF
Turns bypass on/off for each frequency band.
EQ All Bands
ON/OFF
Turns the entire eight-band equalizer on/off.
■ Input Delay
Here you can specify a delay for the signal.
Parameter name
On
Delay Time
34
TX6n/5n/4n Reference Manual
Range
ON/OFF
0.00–1,300.00 ms
Explanation
Turns the delay on/off.
Specifies the delay time.
Panel Operations
■ Oscillator Mix
This is a mono-channel oscillator. It generates a sine wave, pink noise, or burst noise. This can also mix the audio input signal
and oscillator signal.
Parameter name
Range
Explanation
PGM To SP
ON/OFF
Switches on/off the input from the Input Delay to the mix point before
the Speaker Processor.
Osc To SP
ON/OFF
Switches on/off the input from the oscillator to the mix point before the
Speaker Processor.
ON/OFF
Turns the oscillator on/off.
Osc On
Osc Level
-∞ –0.00 dB
Specifies the output signal level.
Wave Form
SINE100 Hz,
SINE1 kHz,
SINE10 kHz,
PINK, BURST, Vari
Selects the waveform that will be generated. If you select SINE (sine
wave), you can also select a frequency. If you want to freely specify the
frequency of a sine wave, select Vari.
Vari Freq
20.0 Hz–20.0 kHz
If you selected Vari as the Wave Form, this specifies the frequency of
the sine wave that will be generated.
■ X-Over Input Level (Speaker Processor)
This adjusts the input level to the crossover in a range of -∞ – +10 dB.
■ X-Over Polarity (Speaker Processor)
This specifies the phase reversal of the input signal to the crossover.
TX6n/5n/4n Reference Manual
35
Panel Operations
■ X-Over (Speaker Processor)
Here you can apply a high-pass filter and low-pass filter to the signal, so that only a specific frequency region is allowed to pass.
Parameter name
Range
LPF Freq
LPF Type
20.0 Hz–20 kHz
Thru, 6 dB/Oct, 12 dB AdjGc,
12 dB But, 12 dB Bessl,
12 dB L-R, 18 dB AdjGc,
18 dB But, 18 dB Bessl,
24 dB AdjGc, 24 dB But,
24 dB Bessl, 24 dB L-R,
36 dB AdjGc, 36 dB But,
36 dB Bessl, 48 dB AdjGc,
48 dB But, 48 dB Bessl,
48 dB L-R
LPF Gc
-6–+6 dB
HPF Freq
HPF Type
20.0 Hz–20.0 kHz
Thru, 6 dB/Oct, 12 dB AdjGc,
12 dB But, 12 dB Bessl,
12 dB L-R, 18 dB AdjGc,
18 dB But, 18 dB Bessl,
24 dB AdjGc, 24 dB But,
24 dB Bessl, 24 dB L-R,
36 dB AdjGc, 36 dB But,
36 dB Bessl, 48 dB AdjGc,
48 dB But, 48 dB Bessl,
48 dB L-R
HPF Gc
36
TX6n/5n/4n Reference Manual
-6–+6 dB
Explanation
Specifies the cutoff frequency of the low-pass filter.
Selects the attenuation per octave and the filter type for the low-pass
filter. If you select [Thru], the filter will not be applied.
AdjGc :
But :
Bessl :
L-R :
Adjustable Gain Control
Butterworth
Bessel
Linkwitz Riley
Specifies the gain at the cutoff frequency when Type is set to AdjGc.
Specifies the cutoff frequency of the high-pass filter.
Selects the attenuation per octave and the filter type for the high-pass
filter. If you select [Thru], the filter will not be applied.
Specifies the gain at the cutoff frequency when Type is set to AdjGc.
Panel Operations
■ Output Delay (Speaker Processor)
Here you can specify a delay for the signal.
Parameter name
On
Range
ON/OFF
Delay Time
0.00–500.00 ms
Explanation
Turns the delay on/off.
Specifies the delay time.
■ 6Band Output EQ (Speaker Processor)
This is a six-band parametric equalizer that boosts or cuts the signal at the specified frequencies. For each channel, you can
make settings for each frequency band (BAND A–F).
Parameter name
Type
Q
Frequency
Gain
Range
PEQ, L.SHELF 6,
L.SHELF 12,
H SHELF 6,
H SHELF 12,
HPF, LPF, APF 1st,
APF 2nd, Horn EQ
63.0–0.10
20.0 Hz–20.0 kHz
-18.0–+18.0 dB
Explanation
Selects the filter type.
Specifies the width of each frequency band.
Specifies the center frequency of each frequency band.
Specifies the gain for each frequency band.
Bypass
ON/OFF
Turns bypass on/off for each frequency band.
EQ All Bands
ON/OFF
Turns the entire six-band equalizer on/off.
TX6n/5n/4n Reference Manual
37
Panel Operations
● Filter types
• PEQ
This is a conventional parametric equalizer.
• L.SHELF (Low Shelving)
Without attenuating the low frequencies, this filter applies a fixed amount of attenuation to the region above the cutoff
frequency. 6 and 12 (dB/Oct) specify the amount of attenuation per octave.
• H.SHELF (High Shelving)
Without attenuating the high frequencies, this filter applies a fixed amount of attenuation to the region below the cutoff
frequency. 6 and 12 (dB/Oct) specify the amount of attenuation per octave.
• HPF (High Pass Filter)
A gently (12 dB/Oct) diminishing curve will be applied to the lower frequencies.
• LPF (Low Pass Filter)
A gently (12 dB/Oct) diminishing curve will be applied to the higher frequencies.
• APF (All Pass Filter)
This filter modifies only the phase, passing the signal at all frequencies. This is used to correct the phase at the crossover
band. APF 1st will invert the phase 0°–180° and APF 2nd will invert the phase 0°–360°. For APF 2nd, you can adjust the
Q setting.
• Horn EQ
CD (Constant Directivity) horn speakers have the characteristic of rolling-off the level of the high-frequency range.
Horn EQ is an equalizer that compensates for this characteristic. For this reason, the Gain is limited to 0 dB or higher,
and the Frequency is limited to 500 Hz or higher.
■ Output Level (Speaker Processor)
This adjusts the output level in a range of -∞ – +10 dB.
■ Mute On/Off (Speaker Processor)
Turns output muting on/off.
38
TX6n/5n/4n Reference Manual
Panel Operations
■ Limiter (Speaker Processor)
This compresses signals exceeding the threshold at ∞:1, preventing signals higher than the threshold level from being output.
Parameter name
On
Range
ON/OFF
Threshold
-54–0 dB
Attack Mode
Fast, Mid, Slow, Manual
Explanation
Turns the limiter on/off.
Specifies the threshold value for the limiter.
Selects the attack speed of the limiter. If the Manual setting is selected,
use the Attack setting below to specify the attack time. If Fast/Mid/Slow
is selected, the attack time is specified roughly according to the HPF
cutoff frequency of Speaker Processor’s Crossover.
Fast : 1/4 wavelength of cutoff frequency
Mid : 1/2 wavelength of cutoff frequency
Slow : 1 wavelength of cutoff frequency
Attack
0.0–120.0 ms
Release Mode
Fast, Mid, Slow, Manual
Specifies the attack time when Manual mode is selected.
Selects the release speed of the limiter. If the Manual setting is
selected, use the Release setting below to specify the release time. If
Fast/Mid/Slow is selected, the release time is specified roughly according to the HPF cutoff frequency of Speaker Processor’s Crossover.
Fast : 4 wavelength of cutoff frequency
Mid : 8 wavelength of cutoff frequency
Slow : 16 wavelength of cutoff frequency
Release
3 ms–21.1 s
Specifies the release time when Manual mode is selected.
■ Output Router
Here you can specify the routing for the slot output. For each slot output channel, you can select from the following four types
of output points. For details on output points, refer to “SIGNAL PATH Block Diagrams” (page 30).
MTXOut3/4
OscMixIn1/2
SpProcOutA/B
OSC1/2
Outputs 3/4 of the 4x4 Matrix Mixer
From outputs 1/2 of the 4x4 Matrix Mixer to immediately before mixing with the oscillator output
Outputs A/B of the Speaker Processor.
Oscillator outputs 1/2
TX6n/5n/4n Reference Manual
39
Panel Operations
SCENE Screen
Here you can save parameter settings as a scene, and recall them from the front panel or from Amp Editor.
A scene contains various amplifier settings such as the Standby/Power-On status, the parameter values of the components, and the threshold values of the alerts. 00 is the default setting scene (read-only).
To access the SCENE screen, access the HOME screen and press the right-most function button (SCENE).
NOTE
• Scene names can be shown on the amplifier’s display only in the following languages: English, German, French, Spanish, and Japanese. However, only English alphanumeric characters can be input from the amplifier’s panel. If you want to
display a German, French, Spanish, or Japanese scene name, enter the name in Amp Editor’s “Scene Manager” dialog
box.
• You can also specify a scene for EMG (Emergency), which will be recalled when an EMG signal is received from an
external controller (page 23).
• For the current scene, the scene number will be highlighted.
■ Recalling a scene
Here’s how to recall the desired scene 00–49 from the scene list.
1. In the HOME screen, press the right-most function button (SCENE) to access the SCENE screen.
2. Use encoder A to select the scene number that you want to recall.
3. Press the left-most function button (RECALL).
The recall confirmation screen will appear.
NOTE
• If Scene Recall is set to Disable in the UTILITY screen Scene Setup, it won’t be possible to perform recall operations
from the front panel, so “RECALL” will not appear above the function button.
4. Press the [ENTER] button to execute the recall.
If you decide to cancel the operation, press the [EXIT] button.
The number of the recalled scene is highlighted (the current scene) in the SCENE screen.
• While settings are being applied to the amplifier, the message “Do not turn off!” will be shown in the display. Never
power-off the amplifier while this message is displayed.
CAUTION
40
TX6n/5n/4n Reference Manual
Panel Operations
■ Storing a scene
Here’s how to store the amplifier’s settings in a scene 01–49.
1. In the HOME screen, press the right-most function button (SCENE) to access the SCENE screen.
2. Use encoder A to select the scene number that you want to store.
3. Press the second function button from the left (STORE).
The store confirmation screen will appear.
NOTE
• If the scene is protected, it is not possible to store the scene. Press the second function button from the right (EDIT) to
turn protect Off before you store.
4. Use encoder A to move the cursor to the scene name, and turn encoder B to access the screen where you can
specify the scene name.
5. Specify the scene name by using encoder A to move the cursor location and using encoder B to select the
desired characters.
You can also use the function buttons to insert a character at the cursor location (INS), or to delete a character (DEL).
6. When you’ve finished specifying the scene name, press the second function button from the left (OK) to
return to the confirmation screen.
7. As necessary, use encoder A to select Protect and encoder B to turn the protect setting on/off.
8. Press the [ENTER] button to execute the Store operation.
The number of the stored scene is highlighted (the current scene) in the SCENE screen.
TX6n/5n/4n Reference Manual
41
Panel Operations
■ Editing a scene
Here’s how to edit the scene name or turn the protect setting on/off for each scene 01–49.
1. In the HOME screen, press the right-most function button (SCENE) to access the SCENE screen.
2. Use encoder A to select the scene number that you want to edit.
3. Press the second function button from the right (EDIT).
The same confirmation screen as for Scene Store will appear.
Then edit the scene name or protect setting in the same way as when storing a scene, and when you are finished press the
[ENTER] button to execute your edits (page 41).
■ Erasing a scene (Clear)
Here’s how to clear a scene 01–49. However, you cannot clear the current scene.
1. In the HOME screen, press the right-most function button (SCENE) to access the SCENE screen.
2. Use encoder A to select the scene number that you want to clear.
3. Press the right-most function button (CLEAR).
The Scene Clear confirmation screen will appear.
NOTE
• If the current scene is selected, [CLEAR] will not appear because the current scene cannot be erased.
4. Press the [ENTER] button to execute the Clear operation.
• While settings are being applied to the amplifier, the message “Do not turn off!” will be shown in the display.
Never power-off the amplifier while this message is displayed.
CAUTION
42
TX6n/5n/4n Reference Manual
Panel Operations
Initializing the internal memory
Here’s how to initialize the amplifier’s internal memory. As desired, you can initialize two types of data.
• User Data : All user data except for the event log and the Speaker Processor library will be initialized.
• Library
: Only the Speaker Processor library will be initialized.
• When you initialize the internal memory, the settings that had been saved in internal memory up to that point will be lost.
Use caution when performing the following steps.
CAUTION
1. Power-off the TXn.
2. While holding down the [HOME] button, turn on the power; the Initialize screen will appear.
3. Use encoder A to select the data that you want to initialize, and press the [ENTER] button to execute the Initialize operation.
When initialization is completed, the amplifier will automatically restart.
• During initialization, the message “Do not turn off!” will be shown in the display.
Never power-off the amplifier while this message is displayed.
CAUTION
TX6n/5n/4n Reference Manual
43
System Connection Examples
Daisy-chain connection via analog or digital audio
Here is an example of multiple amplifiers connected in a daisy-chain via analog audio signals or digital audio signals (e.g., AES/EBU).
In the case of analog connection, daisy-chain the [THRU] jack and [IN] jack.
In the case of digital connection (the standard AES-IO card), daisy-chain the [THRU] jack and [IN] jack, or the
[OUT] jack and [IN] jack. The [THRU] jack will output the input signal without change, and the [OUT] jack will
output the signal with processing applied.
Computer
Amp Editor
Amp control
Amp control
Amp control
Network switch
Amp control
Analog audio
or
Digital audio
Analog audio
or
Digital audio
THRU/
OUT
IN
TXn
Analog audio
or
Digital audio
THRU/
OUT
IN
TXn
IN
TXn
Mixer
In order to monitor and control the amplifiers from Amp Editor, use Ethernet cables to connect the computer to each amplifier.
This allows you to monitor and control all of the amps in the workspace from a single computer.
In the case of digital connections, you’ll need to make word clock settings (page 20). Specify whether you want the slot’s
CH 1/2 to be the master clock, or turn Auto Scan Mode on.
44
TX6n/5n/4n Reference Manual
System Connection Examples
■ Thru-output for digital connections
For digital connections (the standard AES-IO card), the “thru” output from the [IN] jack to the [THRU] jack will be a signal
that has passed through the buffer if the power is on, or a signal that bypasses the buffer if the power is off.
DIGITAL (AES/EBU)
IN
THRU
Relay
Relay
Buffer
If the power is on, the signal is regenerated in the buffer, theoretically allowing daisy-chain connection of any number of units.
At this time, a slight latency occurs (40 nsec when operating at 96 kHz), but even if ten units are connected this will be only 400
nsec (a mere 0.14 mm when calculated as a difference in distance).
If the power is off (or if the power will not turn on because the amplifier has malfunctioned), a relay circuit will bypass the
buffer and directly “thru-output” the input signal so that the signal to the daisy-chained amplifiers connected downstream is not
interrupted. At this time, there will be a slight interruption in the sound due to the switching of the relay circuit. (Power-on ➝
off will take approximately 200 ms, and power off ➝ on will take approximately 10 ms.)
■ Regarding digital connections
When using a digital connection (the standard AES-IO card), please note the following points regarding connection cables.
• You must use a 110Ω digital cable to make digital connections. Do not use an analog mic cable. Although the same XLR connector as for analog connections is used, take care not to inadvertently connect a digital signal and analog signal.
• A high-quality 110Ω digital cable can be extended to approximately 100 meters when operating at 96 kHz (theoretically to
approximately 200 meters when operating at 48 kHz). However, this length cannot be guaranteed in some cases, due to differences in cable quality and the number of connector contacts. Please use cables that are impedance-matched and have minimal attenuation through the high-frequency range (12 MHz).
• If you need to extend a digital cable longer than 100 meters, we recommend that you use an impedance conversion connector
to change from the 110Ω XLR connector to a 75Ω coaxial (BNC) connector, and use a 75Ω coaxial video cable to convey the
signal. Even in this case, the signal will be dependent on the quality of the cable, but can usually be extended up to 300
meters.
• As far as possible, connect the digital cable directly to the TXn amplifier itself without routing it through a patch panel on
your amp rack, etc. Routing the signal via a patch panel will make impedance matching more difficult.
• If you want to distribute a digital signal to multiple amplifiers, we recommend that you use the TXn’s “thru” output to make
daisy-chain connections, or distribute it using an external device (such as a digital mixer in which an AES/EBU card is
installed, or a DME series unit). Using a parallel cable to distribute the signal cannot be recommended from the viewpoint of
impedance matching.
TX6n/5n/4n Reference Manual
45
System Connection Examples
Redundant connections (Backup)
By connecting both the analog audio signal and the digital audio signal, you can make a redundant connection
(duplicate audio connections). If the digital audio signal is interrupted by a problem such as a broken connection,
the system will switch to the analog audio signal.
In order to enable a redundant connection, you’ll need to access the MENU screen ➝ General ➝ Input Redundancy, and choose “Backup” so that the digital audio signal has priority (page 26).
Computer
Amp Editor
Amp control
Amp control
Amp control
Network switch
Amp control
Analog audio
Analog audio
Analog audio
Digital audio
Digital audio
Digital audio
THRU/
OUT
IN
TXn
Mixer
46
TX6n/5n/4n Reference Manual
THRU/
OUT
IN
TXn
IN
TXn
System Connection Examples
EtherSound connections
You can use an interface card such as the MY16-ES64 to send and receive audio signals via an EtherSound network.
From a single computer, you can use Amp Editor to monitor and control the amplifiers and use AVS-ESMonitor to
make EtherSound settings. However on the amplifiers, the amplifier control connections and EtherSound network
connections are separate.
NOTE
• You can connect up to three MY16-EX I/O expansion cards to a single MY16-ES64 card.
Computer
Amp Editor
AVS-ESMonitor
Amp control
EtherSound
Amp control
Network switch
Amp control
Amp control
EtherSound
NEXT
MY16-EX
IN
MY16ES64
MASTER
SIDE
NEXT
MY16-EX
MY16EX
MASTER
SIDE
MY16EX
EtherSound
network
TXn
TXn
TXn
TX6n/5n/4n Reference Manual
47
System Connection Examples
Bridge connections from EtherSound to AES/EBU
You can use an EtherSound interface unit such as the NAI48-ES to make a bridge connection from an EtherSound
network to an AES/EBU signal.
Computer
Amp Editor
AVS-ESMonitor
Amp control
EtherSound
Amp control
Network switch
Amp control
Amp control
EtherSound
AES/EBU
AES/EBU
AES/EBU
IN
EtherSound
network
48
TX6n/5n/4n Reference Manual
IN
IN
NAI48-ES
TXn
TXn
TXn
System Connection Examples
CobraNet connections
You can use an interface card such as the MY16-CII to send and receive audio signals via a CobraNet network.
From Amp Editor, you can monitor and control the amplifiers, and make CobraNet settings for the MY16-CII
card. However on the amplifiers, the connections for amplifier control (from Amp Editor) and the connections for
CobraNet are separate.
Computer
Amp Editor
Amp control
Amp control
Amp control
Network switch
Amp control
CobraNet
CobraNet
CobraNet
CobraNet
IN
IN
MY16CII
CobraNet
network
IN
MY16CII
MY16CII
Network switch
TXn
TXn
TXn
TX6n/5n/4n Reference Manual
49
System Connection Examples
Bridge connections from CobraNet to AES/EBU
You can use a CobraNet interface unit such as the NHB32-C to make a bridge connection from a CobraNet network to an AES/EBU signal.
Computer
Amp Editor
Amp control
Amp control
Amp control
Network switch
Amp control
CobraNet
AES/EBU
AES/EBU
AES/EBU
IN
CobraNet
network
50
TX6n/5n/4n Reference Manual
IN
IN
NHB32-C
TXn
TXn
TXn
Connecting External Controllers and
Analog Devices
Remote control from AMX or Crestron ([NETWORK] connector)
You can connect an Ethernet-compatible controller such as AMX or Crestron to the amplifier’s [NETWORK]
connector, and remotely control the amplifier.
When connecting a remote controller, you must specify the amplifier’s Port No. The Port No. setting can be made
from the panel of the TXn amplifier or via Amp Editor. For details, refer to page 21 or to the Amp Editor owner’s
manual.
• For details of the remote control communication protocol, please refer to the “TXn Remote Control Protocol Specification”
provided on the website.
NOTE
http://www.yamahaproaudio.com/
Controlling an analog device ([FAULT OUTPUT] connector)
You can connect a lamp etc. to the rear panel [FAULT OUTPUT] connector to
indicate that an abnormality has occurred.
The [FAULT OUTPUT] connector consists of NO (Normally Open), C (Common), and
NC (Normally Closed). The [FAULT OUTPUT] connector is a relay circuit, and operates as follows.
Normal state
Abnormal state
Powered-off
NO
Open
Closed
Closed
NC
Closed
Open
Open
The relay contacts used in the [FAULT OUTPUT] connector are rated for a load of 1A, DC 30V. Do not apply a load that
exceeds this rating.
Use Amp Editor to make settings for the [FAULT OUTPUT] connector.
Euroblock plugs are used for the [FAULT OUTPUT] connector. Euroblock connection methods are described in “Euroblock
plug connection” (page 52) in this manual.
• In Amp Editor’s [Device Setup] menu ➝ [Alert Setup], you can set Type to Fault so that a fault can be indicated by a connected lamp, etc. For details on making settings, refer to the “Amp Editor owner’s manual.”
NOTE
● Example : Using an LED to indicate normal/fault status of the TXn
Normal state
Powered-off / Abnormal state
TXn
TXn
NC
Lit
C
NC
Unlit
C
NO
NO
Unlit
Lit
• The relay contacts are rated for a resistive load of 1A, DC 30V. Do not apply a load that exceeds this rating.
CAUTION
TX6n/5n/4n Reference Manual
51
Connecting External Controllers and Analog Devices
Euroblock plug connection
Use the included Euroblock plug (3P) to make connections to the [FAULT OUTPUT] connector.
● Cable preparation
• To prepare the cable for attachment to a Euroblock connector, strip the wire as
shown in the illustration, and use stranded wire to make connections. With a
Euroblock connection, the stranded wire may be prone to breakage because of
metal fatigue due to the weight of the cable or due to vibration. When rack-mounting your equipment, use a lacing bar when possible to bundle and fasten the cables.
• If cables will be frequently connected and disconnected, as in the case of a portable
installation, we recommend that you use ferrules with insulation sleeves. Use a ferrule whose conductor portion has an external diameter of 1.3 mm or less, and a
length of approximately 5 mm (such as the AI0,5-6WH made by the Phoenix Contact corporation).
• If you use stranded wire, do not tin (plate with solder) the exposed end.
CAUTION
1. Loosen the terminal screws.
NOTE
• Use a slotted screwdriver with a blade approximately 2 mm wide.
Slotted screwdriver
2 mm
Loosen
Euroblock plug
Terminal screw
2. Insert the cables.
3. Securely tighten the terminal screws.
Pull the cables (not too strongly) to confirm that they are securely connected.
4. Connect the Euroblock plug to the TXn’s [FAULT OUTPUT] connector.
52
TX6n/5n/4n Reference Manual
approx.
5 mm
1.3 mm
or less
approx.
5 mm
Adjusting the Input/Output Levels
Simplified block diagram and level diagram
On the TXn amplifiers, the gain / input sensitivity is adjusted by the input level before A/D conversion. The adjustable gain range is the same for the TX6n/TX5n/TX4n models. Since the maximum output is different for each
model, the settable range for input sensitivity will differ for each model. The gain and input sensitivity are linked;
you may edit either one.
DIGITAL
INPUT
ANALOG
INPUT
ATTENUATOR
DSP
INPUT
AMP
AD
POWER
AMP
DA
GAIN
ATTENUATOR (all models): 0.0 to -80.0, -∞dB (0.5dB step)
GAIN (all models): 19.8 to 43.8dB (0.1dB step)
32.0dB (default)
GAIN
TX6n Clips (43.8dBu) TX5n Clips
TX4n Clips
+11.8dBu (TX6n)
0dBu (TX6n)
GAIN: 19.8dB (min.)
0dBFS (digital max.)
ATT: 0.0dB
Maximum Output Power
43.8dBu (1800W/8Ω)
42.4dBu (1300W/8Ω)
41.2dBu (1000W/8Ω)
GAIN: 32.0dB (default)
GAIN: 43.8dB (max.)
Model
Input Sensitivity
TX6n
+24.0 to 0dBu (8Ω)
default: +11.8dBu
TX5n
+22.6 to -1.4dBu (8Ω)
default: +10.4dBu
TX4n
+21.4 to -2.6dBu (8Ω)
default: +9.2dBu
ATTENUATOR
+24.0dBu
Model
TX6n
TX5n
TX4n
GAIN
19.8 to 43.8dB
default: 32.0dB
ATT: -∞dB
Gain / Input Sensitivity conversion table
GAIN
Sensitivity (dBu)
(dB) TX6n TX5n Tx4n
19.8 24.0 22.6 21.4
19.9 23.9 22.5 21.3
20.0 23.8 22.4 21.2
20.1 23.7 22.3 21.1
20.2 23.6 22.2 21.0
20.3 23.5 22.1 20.9
20.4 23.4 22.0 20.8
20.5 23.3 21.9 20.7
20.6 23.2 21.8 20.6
20.7 23.1 21.7 20.5
20.8 23.0 21.6 20.4
20.9 22.9 21.5 20.3
21.0 22.8 21.4 20.2
21.1 22.7 21.3 20.1
21.2 22.6 21.2 20.0
21.3 22.5 21.1 19.9
21.4 22.4 21.0 19.8
21.5 22.3 20.9 19.7
21.6 22.2 20.8 19.6
21.7 22.1 20.7 19.5
21.8 22.0 20.6 19.4
21.9 21.9 20.5 19.3
22.0 21.8 20.4 19.2
22.1 21.7 20.3 19.1
22.2 21.6 20.2 19.0
22.3 21.5 20.1 18.9
22.4 21.4 20.0 18.8
22.5 21.3 19.9 18.7
22.6 21.2 19.8 18.6
22.7 21.1 19.7 18.5
22.8 21.0 19.6 18.4
22.9 20.9 19.5 18.3
23.0 20.8 19.4 18.2
23.1 20.7 19.3 18.1
23.2 20.6 19.2 18.0
23.3 20.5 19.1 17.9
23.4 20.4 19.0 17.8
23.5 20.3 18.9 17.7
23.6 20.2 18.8 17.6
23.7 20.1 18.7 17.5
23.8 20.0 18.6 17.4
GAIN
Sensitivity (dBu)
(dB) TX6n TX5n Tx4n
23.9 19.9 18.5 17.3
24.0 19.8 18.4 17.2
24.1 19.7 18.3 17.1
24.2 19.6 18.2 17.0
24.3 19.5 18.1 16.9
24.4 19.4 18.0 16.8
24.5 19.3 17.9 16.7
24.6 19.2 17.8 16.6
24.7 19.1 17.7 16.5
24.8 19.0 17.6 16.4
24.9 18.9 17.5 16.3
25.0 18.8 17.4 16.2
25.1 18.7 17.3 16.1
25.2 18.6 17.2 16.0
25.3 18.5 17.1 15.9
25.4 18.4 17.0 15.8
25.5 18.3 16.9 15.7
25.6 18.2 16.8 15.6
25.7 18.1 16.7 15.5
25.8 18.0 16.6 15.4
25.9 17.9 16.5 15.3
26.0 17.8 16.4 15.2
26.1 17.7 16.3 15.1
26.2 17.6 16.2 15.0
26.3 17.5 16.1 14.9
26.4 17.4 16.0 14.8
26.5 17.3 15.9 14.7
26.6 17.2 15.8 14.6
26.7 17.1 15.7 14.5
26.8 17.0 15.6 14.4
26.9 16.9 15.5 14.3
27.0 16.8 15.4 14.2
27.1 16.7 15.3 14.1
27.2 16.6 15.2 14.0
27.3 16.5 15.1 13.9
27.4 16.4 15.0 13.8
27.5 16.3 14.9 13.7
27.6 16.2 14.8 13.6
27.7 16.1 14.7 13.5
27.8 16.0 14.6 13.4
27.9 15.9 14.5 13.3
GAIN
Sensitivity (dBu)
(dB) TX6n TX5n Tx4n
28.0 15.8 14.4 13.2
28.1 15.7 14.3 13.1
28.2 15.6 14.2 13.0
28.3 15.5 14.1 12.9
28.4 15.4 14.0 12.8
28.5 15.3 13.9 12.7
28.6 15.2 13.8 12.6
28.7 15.1 13.7 12.5
28.8 15.0 13.6 12.4
28.9 14.9 13.5 12.3
29.0 14.8 13.4 12.2
29.1 14.7 13.3 12.1
29.2 14.6 13.2 12.0
29.3 14.5 13.1 11.9
29.4 14.4 13.0 11.8
29.5 14.3 12.9 11.7
29.6 14.2 12.8 11.6
29.7 14.1 12.7 11.5
29.8 14.0 12.6 11.4
29.9 13.9 12.5 11.3
30.0 13.8 12.4 11.2
30.1 13.7 12.3 11.1
30.2 13.6 12.2 11.0
30.3 13.5 12.1 10.9
30.4 13.4 12.0 10.8
30.5 13.3 11.9 10.7
30.6 13.2 11.8 10.6
30.7 13.1 11.7 10.5
30.8 13.0 11.6 10.4
30.9 12.9 11.5 10.3
31.0 12.8 11.4 10.2
31.1 12.7 11.3 10.1
31.2 12.6 11.2 10.0
31.3 12.5 11.1 9.9
31.4 12.4 11.0 9.8
31.5 12.3 10.9 9.7
31.6 12.2 10.8 9.6
31.7 12.1 10.7 9.5
31.8 12.0 10.6 9.4
31.9 11.9 10.5 9.3
32.0 11.8 10.4 9.2
GAIN
Sensitivity (dBu)
(dB) TX6n TX5n Tx4n
32.1 11.7 10.3 9.1
32.2 11.6 10.2 9.0
32.3 11.5 10.1 8.9
32.4 11.4 10.0 8.8
32.5 11.3 9.9
8.7
32.6 11.2 9.8
8.6
32.7 11.1 9.7
8.5
32.8 11.0 9.6
8.4
32.9 10.9 9.5
8.3
33.0 10.8 9.4
8.2
33.1 10.7 9.3
8.1
33.2 10.6 9.2
8.0
33.3 10.5 9.1
7.9
33.4 10.4 9.0
7.8
33.5 10.3 8.9
7.7
33.6 10.2 8.8
7.6
33.7 10.1 8.7
7.5
33.8 10.0 8.6
7.4
33.9
9.9
8.5
7.3
34.0
9.8
8.4
7.2
34.1
9.7
8.3
7.1
34.2
9.6
8.2
7.0
34.3
9.5
8.1
6.9
34.4
9.4
8.0
6.8
34.5
9.3
7.9
6.7
34.6
9.2
7.8
6.6
34.7
9.1
7.7
6.5
34.8
9.0
7.6
6.4
34.9
8.9
7.5
6.3
35.0
8.8
7.4
6.2
35.1
8.7
7.3
6.1
35.2
8.6
7.2
6.0
35.3
8.5
7.1
5.9
35.4
8.4
7.0
5.8
35.5
8.3
6.9
5.7
35.6
8.2
6.8
5.6
35.7
8.1
6.7
5.5
35.8
8.0
6.6
5.4
35.9
7.9
6.5
5.3
36.0
7.8
6.4
5.2
36.1
7.7
6.3
5.1
GAIN
Sensitivity (dBu)
(dB) TX6n TX5n Tx4n
36.2
7.6
6.2
5.0
36.3
7.5
6.1
4.9
36.4
7.4
6.0
4.8
36.5
7.3
5.9
4.7
36.6
7.2
5.8
4.6
36.7
7.1
5.7
4.5
36.8
7.0
5.6
4.4
36.9
6.9
5.5
4.3
37.0
6.8
5.4
4.2
37.1
6.7
5.3
4.1
37.2
6.6
5.2
4.0
37.3
6.5
5.1
3.9
37.4
6.4
5.0
3.8
37.5
6.3
4.9
3.7
37.6
6.2
4.8
3.6
37.7
6.1
4.7
3.5
37.8
6.0
4.6
3.4
37.9
5.9
4.5
3.3
38.0
5.8
4.4
3.2
38.1
5.7
4.3
3.1
38.2
5.6
4.2
3.0
38.3
5.5
4.1
2.9
38.4
5.4
4.0
2.8
38.5
5.3
3.9
2.7
38.6
5.2
3.8
2.6
38.7
5.1
3.7
2.5
38.8
5.0
3.6
2.4
38.9
4.9
3.5
2.3
39.0
4.8
3.4
2.2
39.1
4.7
3.3
2.1
39.2
4.6
3.2
2.0
39.3
4.5
3.1
1.9
39.4
4.4
3.0
1.8
39.5
4.3
2.9
1.7
39.6
4.2
2.8
1.6
39.7
4.1
2.7
1.5
39.8
4.0
2.6
1.4
39.9
3.9
2.5
1.3
40.0
3.8
2.4
1.2
40.1
3.7
2.3
1.1
40.2
3.6
2.2
1.0
GAIN
Sensitivity (dBu)
(dB) TX6n TX5n Tx4n
40.3
3.5
2.1
0.9
40.4
3.4
2.0
0.8
40.5
3.3
1.9
0.7
40.6
3.2
1.8
0.6
40.7
3.1
1.7
0.5
40.8
3.0
1.6
0.4
40.9
2.9
1.5
0.3
41.0
2.8
1.4
0.2
41.1
2.7
1.3
0.1
41.2
2.6
1.2
0.0
41.3
2.5
1.1
-0.1
41.4
2.4
1.0
-0.2
41.5
2.3
0.9
-0.3
41.6
2.2
0.8
-0.4
41.7
2.1
0.7
-0.5
41.8
2.0
0.6
-0.6
41.9
1.9
0.5
-0.7
42.0
1.8
0.4
-0.8
42.1
1.7
0.3
-0.9
42.2
1.6
0.2
-1.0
42.3
1.5
0.1
-1.1
42.4
1.4
0.0
-1.2
42.5
1.3
-0.1 -1.3
42.6
1.2
-0.2 -1.4
42.7
1.1
-0.3 -1.5
42.8
1.0
-0.4 -1.6
42.9
0.9
-0.5 -1.7
43.0
0.8
-0.6 -1.8
43.1
0.7
-0.7 -1.9
43.2
0.6
-0.8 -2.0
43.3
0.5
-0.9 -2.1
43.4
0.4
-1.0 -2.2
43.5
0.3
-1.1 -2.3
43.6
0.2
-1.2 -2.4
43.7
0.1
-1.3 -2.5
43.8
0.0
-1.4 -2.6
Initial setting
TX6n/5n/4n Reference Manual
53
Adjusting the Input/Output Levels
Adjusting the input/output levels
■ Basic level adjustment
If we think of the TXn amplifier in a similar way as a conventional analog amplifier, there are two parameters that determine the
gain/level.
• Gain / Input sensitivity:
The input level before A/D conversion is adjusted from the front panel MENU screen ➝ [General] ➝ [Sensitivity/Amp
Gain].
If the level is not modified within the internal DSP (SIGNAL PATH), the gain / input sensitivity can be thought of as
being exactly the same as on a conventional analog amplifier. The gain can be adjusted in a range of 19.8 to 43.8 dB in 0.1
dB increments. However, the input sensitivity range differs between models.
• Attenuator:
The output level at the final stage after D/A conversion can be adjusted by turning encoders A/B in the HOME screen.
The range is 0.0 to -80.0 and -∞dB, adjustable in 0.5 dB increments.
Unlike a conventional analog amplifier, the level can also be adjusted using the 4x4 Matrix Mixer or Speaker Processor of the
internal DSP (SIGNAL PATH screen). These can be used as appropriate for different purposes. For example, the Speaker Processor can be used to adjust the level for each speaker unit.
■ Level adjustments between TX6n/TX5n/TX4n units
In a system where different TX6n/TX5n/TX4n models coexist, set the same gain on each unit if you want to obtain the same
output level (V, dBu) for a given input level. These settings are convenient when you need to manage the gain in a multi-way
speaker system. In this case, the maximum output will differ depending on the model, meaning that as you raise the input level,
the power amp section of the TX5n and TX4n will clip earlier than the TX6n.
Conversely, if you want to obtain the maximum output power (W) from the amplifiers for a given maximum input level, set the
input sensitivity to match the maximum input level. In this case, the output level for a given input level will differ depending on
the model, but each amplifier’s maximum output will be obtained for the same input level (the power amp section will begin
clipping when the maximum input occurs).
■ Level adjustments between analog and digital
To match the digital signal level to the analog signal level
without changing the analog signal level, adjust the gain of the
slot input.
If you want the level to be consistent between analog and digital signals from an audio source (such as a digital mixer)
equipped with both analog and digital outputs, refer to “Gain /
Input Sensitivity conversion table” (page 53). Set the gain so
that even when using the TX5n or TX4n, the input sensitivity
of the TX6n and the maximum analog output level of the
audio source are equivalent.For example, the Yamaha PM5D
features a maximum output level of +24 dBu, so in this case
you would set the amplifier’s gain to 19.8 dB.The DM2000 or
the MY8-DA96 card have a maximum output level of +18
dBu, so in this case you would set amplifier’s gain to 25.8
dB.With these settings, the digital full-bit will be equivalent to
the audio sources’ analog maximum output level.
54
TX6n/5n/4n Reference Manual
Redundancy
[Analog
Input A]
ADC
Pol.
ADC
Pol.
Gain/
Sens.
[Analog
Input B]
Matrix
Mixer
Pol.
Slot
Input
Gain
Router
Pol.
Appendix
Message List
Messages that may appear in the TXn’s display and the appropriate responses are listed below.
Message
Explanation
Panel
Full locked!
To prevent unintended operation, panel operations have been locked by the panel lock setting.
To temporarily defeat panel lock, hold down both the [HOME] button and [EXIT] button for at least
three seconds. To turn panel lock off, first defeat it temporarily, and then turn the UTILITY screen ➝
Front Panel Operation ➝ Panel setting OFF.
Panel
View only!
To prevent unintended operation, parameter editing has been locked by the panel lock setting.
To temporarily defeat panel lock, hold down both the [HOME] button and [EXIT] button for at least
three seconds. To turn panel lock off, first defeat it temporarily, and then turn the UTILITY screen ➝
Front Panel Operation ➝ Panel setting OFF.
Parameter
Protected!
This message will appear if you attempt to perform panel operations to edit parameters of a Speaker
Processor component to which a library whose security setting was “View” or “Hide” was recalled.
If you want to defeat security, recall a library item whose security is set to “Edit.”
MUTE key
Locked!
To prevent unintended operation, the [MUTE] buttons have been locked.
To unlock the [MUTE] buttons, set the UTILITY screen ➝ Front Panel Operation ➝ MUTE Key setting
to Normal.
ATT. Dial
Locked!
To prevent unintended operation, changes to the attenuation have been locked.
To unlock the attenuation, set the UTILITY screen ➝ Front Panel Operation ➝ Att. Dial setting to Normal.
Scene recalling
Do not turn off!
A scene is being recalled. Never turn off the power while this message is shown.
Cannot edit
while online!
Settings cannot be edited, because the unit is online with Amp Editor.
File writing
Do not turn off!
A file is being written to internal memory. Never turn off the power while this message is shown.
Calibrating
[EXIT] to cancel
Calibration is being executed.
If you decide to cancel calibration, press the [EXIT] button.
Initializing
Do not turn off!
Internal memory is being initialized. Never turn off the power while this message is shown.
Updating f/ware
Do not turn off!
The firmware is being updated. Never turn off the power while this message is shown.
Synchronizing
Do not turn off!
Now synchronizing with Amp Editor. Never turn off the power while this message is shown.
Turning power on:
Are you sure?
No[EXIT] Yes[ENTER]
This message will appear when the power is being switched from Standby to On.
To switch the setting, press the [ENTER] button.
Going Standby:
Are you sure?
No[EXIT] Yes[ENTER]
This message will appear when the power is being switched from On to Standby.
To switch the setting, press the [ENTER] button.
Changing Freq. Type:
Are you sure?
No[EXIT] Yes[ENTER]
This message will appear when you change the Frequency Type in the Signal Chain screen or the
Calibration screen.
To change the setting, press the [ENTER] button. When this is changed, the Output Signal Chain
parameters or Calibration parameters will return to their default values.
Press and hold [EXIT] key
to reset Fault Output
This will appear if the FAULT OUTPUT connector’s output is set to on. Hold down the [EXIT] button
for three seconds or longer to reset the output (NC and C will be connected).
Reset Fault Output
Are you sure?
No[EXIT] Yes[ENTER]
This will appear if the FAULT OUTPUT connector’s output is set to on and you hold the [EXIT] button
for three seconds or longer to reset the output. Press the [ENTER] button to reset the output.
TX6n/5n/4n Reference Manual
55
Appendix
Alert Message List (Excerpt)
The alert message display indicates the operational status of the unit or other alert information that you specified
to display via Amp Editor.
The following messages appear when certain malfunctions are suspected to have occurred. For details about alert
messages, including the following messages, refer to the Amp Editor Owner’s Manual.
Message
56
Content
Response
No battery
The internal backup battery has been completely
exhausted or is not installed.
Critical battery
The internal backup battery has run extremely low,
and it is possible that memory has disappeared.
Low battery
The internal backup battery has only a small amount
of power remaining.
If you continue operation, settings may be lost and
return to the default values. Contact your Yamaha
dealer as soon as possible.
Current scn lost
The settings saved in internal memory have been lost.
The backup battery may have run down. Contact your
Yamaha dealer.
Fan failed[Ch*]
The channel * cooling fan has stopped.
Check whether dirt or a foreign object could have
clogged the fan, and clean the fan appropriately. If this
does not solve the problem, it is likely that the device
has malfunctioned. Immediately stop using the unit,
and contact your Yamaha dealer.
DC detected[*]
Since a direct current component was detected in the
speaker output, the power amp’s power supply has
been shut down.
It is likely that the device has malfunctioned; immediately stop using the unit, and contact your Yamaha
dealer.
Flash ROM error
Failed while writing to internal flash ROM.
Network HW error
A problem has occurred in the internal network device.
It is likely that the device has malfunctioned; please
contact your Yamaha dealer.
DSP error
A problem has occurred in the internal DSP.
Illegal MAC adr
An invalid MAC address was specified.
Scene recall err
The scene could not be recalled.
System error
A system error has occurred.
Saving failed
The scene could not be saved in internal memory.
Initialize the memory. If this does not solve the problem, contact your Yamaha dealer.
Resume data lost
The current scene settings saved in internal memory
have been lost.
Recall the scene. If this does not solve the problem,
contact your Yamaha dealer.
TX6n/5n/4n Reference Manual
When you turn off the power, the current settings will
be lost, and will return to the default values. Immediately stop using the unit, and contact your Yamaha
dealer.
Appendix
Troubleshooting
Symptom
Power will not turn on, display
will not light
Possible causes
Response
The power cable is not connected properly.
Connect the power cable properly.
The POWER switch is not turned
on.
Turn the POWER switch on.
The cable is not connected properly.
Make the correct connections to the audio input jack and the
speaker output jack.
The gain or attenuator setting
has lowered the level.
Gain is adjusted by the MENU screen ➝ General ➝ Sensitivity/
Amp Gain. Attenuator is adjusted by turning the encoder in the
HOME screen.
The [MUTE] button is on.
If the front panel [MUTE] indicator is on, hold down the [MUTE]
button for one second or longer to cancel muting.
The protection circuit has operated, muting the output.
If the amplifier has overheated, clean the filter elements and
improve the ventilation around the amplifier. If the power supply
has malfunctioned, contact your Yamaha dealer.
In the SIGNAL PATH screen, the
input channels of the slot are
unassigned, their level is lowered, or they are muted.
Check the parameters for each component in the SIGNAL PATH
screen, such as Slot Input Router, Input On/Off, 4x4 Matrix
Mixer, and Mute On/Off.
The word clock from the slot
input is not synchronized with the
master clock.
Select the word clock from the slot as the master clock, or turn
Auto Scan Mode on.
Analog input level is exceeding
the input sensitivity setting.
Adjust MENU screen ➝ General ➝ Sensitivity/Amp Gain setting
according to the input level.
Sound that appears to be processed by an effect (phaser) is
output from the speaker
Phase cancellation is occurring
because an analog input signal
and digital input signal from the
same sound source but differing
latencies are being mixed via the
4x4 Matrix Mixer.
If you’re using redundant connections, set the MENU screen ➝
General ➝ Input Redundancy ➝ Mode setting to Backup. Alternatively, change the settings of the 4x4 Matrix Mixer etc. to turn
off one of the signals.
An alert message is displayed
An amplifier malfunction or other
alert event related to the amplifier audio has occurred.
For details on the meaning of each alert message and the
appropriate measures to take, refer to the Amp Editor Owner’s
Manual.
Panel operations are not
accepted
The unit is locked.
Refer to the Front Panel Operation setting (page 23).
A scene can be saved but not
recalled
Scene Recall is set to Disable.
Set the UTILITY screen ➝ Scene Setup ➝ Scene Recall setting
to Enable.
Library data can be recalled,
but not saved
You cannot save library data from
the TXn front panel.
Save the library data from Amp Editor.
All scene data saved in the
TXn has disappeared
The power was turned off while
the TXn’s data was being saved.
If you saved the project in Amp Editor, synchronize from Amp
Editor to the TXn.
The internal battery has run
down.
Contact your Yamaha dealer to have the battery replaced.
A cable is disconnected or broken.
Make sure that the Ethernet cable is correctly connected, and
that it is not broken.
The unit is offline.
In the main panel window, click the [OFFLINE] button to switch it
to [ONLINE].
The Device ID or IP address is
not set correctly.
Re-do the setup as described in the Amp Editor Owner’s Manual.
“LCD Backlight” is set to “Auto
OFF.”
Press any button on the panel to turn the backlight on.The LCD
backlight will turn off if you do not operate the unit for more than
10 seconds.
To keep the LCD backlit all the time, access the Utility screen,
select [LCD Setup], then set [Backlight] to “ON.”
No sound from the speaker
Noise from the speaker
Can’t use Amp Editor to monitor or control the TXn
The LCD is not backlit.
TX6n/5n/4n Reference Manual
57
Appendix
Index
Numerics
D
4x4 Matrix Mixer ........................................................... 33
6Band Output EQ ......................................................... 37
8Band Input EQ ............................................................ 34
Daisy-chain connection................................................. 44
Delay....................................................................... 34, 37
Device ID .................................................................. 4, 19
Device Setup ................................................................ 19
Digital input/output connectors (I/O card slot)................. 8
Display ............................................................................ 7
A
About the documentation................................................ 3
Air filters........................................................................ 11
Air intakes ....................................................................... 7
[ALERT] indicator............................................................ 6
Alert Message List (Excerpt)......................................... 56
Alert messages ............................................................. 15
Amp Editor ...................................................................... 4
Amp Gain..........................................................25, 53, 54
Amp Mode .................................................................... 25
AMX .............................................................................. 51
ANA INPUT VOLTAGE................................................. 16
Analog devices ............................................................. 51
Analog Input Signal Chain ............................................ 27
Analog input/output connectors ...................................... 8
APF............................................................................... 38
Att. Dial ......................................................................... 22
Attenuation..............................................................12, 54
Attenuation Link ............................................................ 25
Auto Return................................................................... 26
Auto Scan Mode ........................................................... 20
B
Backup....................................................................26, 46
Basic Operations .......................................................... 12
Battery .......................................................................... 21
Block diagram ............................................................... 53
Bridge ........................................................................... 25
[BRIDGE] indicator ......................................................... 6
C
Calibrate by Pilot Tone ................................................. 28
Calibrate by Prog Source.............................................. 28
Calibration..................................................................... 28
Card ................................................................................ 9
[CLIP] indicator ............................................................... 6
Clock............................................................................. 24
CobraNet connections .................................................. 49
Component ..................................................................... 4
Crestron ........................................................................ 51
Crossover ..................................................................... 36
58
TX6n/5n/4n Reference Manual
E
EMG Scene Setup ........................................................ 23
Encoders A, B................................................................. 7
[ENTER] button............................................................... 7
Equalizer................................................................. 34, 37
EtherSound connections............................................... 47
Euroblock plug .............................................................. 52
[EXIT] button................................................................... 7
External controllers ....................................................... 51
F
[FAULT OUTPUT] connectors .................................. 9, 51
Filter types .................................................................... 38
Front Panel Operation .................................................. 22
Function buttons ............................................................. 7
G
Gain ........................................................................ 53, 54
Gain Mode .................................................................... 25
General ......................................................................... 25
H
H.SHELF....................................................................... 38
[HOME] button ................................................................ 7
Home screen ................................................................ 15
Horn EQ........................................................................ 38
HPF............................................................................... 38
I
I/O cards ......................................................................... 9
Identify .......................................................................... 19
[IDENTIFY] indicator....................................................... 5
Information.................................................................... 21
Initializing the internal memory ..................................... 43
Input Delay.................................................................... 34
Input On/Off .................................................................. 33
Input Redundancy......................................................... 26
Input sensitivity ................................................. 25, 53, 54
IP Address .................................................................... 21
IP Control Port No......................................................... 21
Appendix
L
S
L.SHELF ....................................................................... 38
Label ............................................................................. 19
Last Memory Resume................................................... 23
LCD Setup .................................................................... 22
Level adjustment........................................................... 53
Level diagram ............................................................... 53
Level meter ................................................................... 16
Library....................................................................... 4, 32
Limiter .....................................................................29, 39
Limiter Gain Reduction ................................................. 29
LPF ............................................................................... 38
Scene........................................................................ 4, 40
Scene Recall................................................................. 23
Scene screen................................................................ 40
Scene Setup ................................................................. 23
Screen categories......................................................... 14
Screen structures.......................................................... 13
Screw holes for handles ................................................. 7
Sensitivity.......................................................... 25, 53, 54
Sensitivity/Amp Gain..................................................... 25
Serial No. ...................................................................... 21
SETTING screen .......................................................... 17
Setup .............................................................................. 3
Signal Chain ................................................................. 27
[SIGNAL] indicator .......................................................... 6
SIGNAL PATH screen .............................................. 4, 30
Slot Input Router........................................................... 33
Slot Input Signal Chain ................................................. 27
SLOT INPUT VOLTAGE............................................... 16
SLOT OUTPUT METER ............................................... 16
SP OUTPUT IMPEDANCE........................................... 16
SP OUTPUT POWER................................................... 16
SP OUTPUT VOLTAGE ............................................... 16
Speaker Processor ................................................. 32, 35
[SPEAKERS] jacks ......................................................... 8
Standby......................................................................... 25
[STANDBY] indicator ...................................................... 5
Standby/On................................................................... 25
Stereo ........................................................................... 25
Stereo/Bridge/Parallel................................................... 25
System Connection Examples...................................... 44
M
MAC Address................................................................ 21
MENU screen ............................................................... 24
Message list.................................................................. 55
METER screen ............................................................. 16
Misc Setup .................................................................... 24
[MUTE] button................................................................. 6
[MUTE] indicator ............................................................. 6
MUTE Key .................................................................... 22
Mute On/Off .................................................................. 38
MY cards......................................................................... 9
N
[NETWORK] connector............................................. 9, 51
[NETWORK] indicator..................................................... 5
Network Setup .............................................................. 21
O
Optional cards................................................................. 9
Oscillator Mix ................................................................ 35
Output Delay................................................................. 37
Output Level ................................................................. 38
Output Router ............................................................... 39
Output Signal Chain...................................................... 27
Override ........................................................................ 26
P
Panel............................................................................. 22
Panel Operations .......................................................... 12
Parallel.......................................................................... 25
[PARALLEL] indicator ..................................................... 6
Peak Hold ..................................................................... 18
PEQ .............................................................................. 38
Power cable .................................................................... 9
Power Limiter................................................................ 29
[POWER] switch and indicator........................................ 5
[PROTECTION] indicator................................................ 6
R
T
Terms.............................................................................. 4
THERMAL..................................................................... 16
Troubleshooting ............................................................ 57
U
Unit ............................................................................... 18
UTILITY screen............................................................. 19
V
Version.......................................................................... 21
Voltage Limiter.............................................................. 29
W
Word Clock Setup......................................................... 20
X
X-Over .......................................................................... 36
X-Over Input Level........................................................ 35
X-Over Polarity ............................................................. 35
Redundant connections ................................................ 46
Remote control ............................................................. 51
TX6n/5n/4n Reference Manual
59
U.R.G., Pro Audio & Digital Musical Instrument Division, Yamaha Corporation
© 2009 Yamaha Corporation
909-PO-D0