1
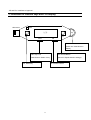
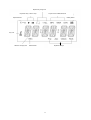
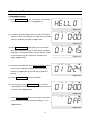
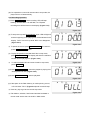
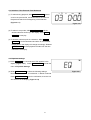
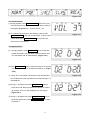
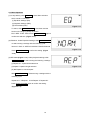
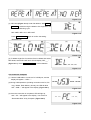
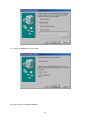
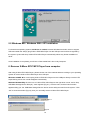
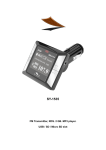
X-Micro EPIC MP3 Player
MP3 Music Player+Digital Voice Recorder+USB Flash Drive
User Manual
V1.2
Table of Contents
1.
Introduction
1.1
About X-Micro EPIC MP3 Player ----------------------------------------------------------------------- 2
1.2
Features ------------------------------------------------------------------------------------------------------ 2
2.
Illustration of function keys and LCD display---------------------------------------------------------------- 3-4
3.
Quick start ----------------------------------------------------------------------------------------------------------- 5
4.
Function and operation
5.
4.1
MP3 / WMA playback -------------------------------------------------------------------------------------- 6
4.2
Recording operation --------------------------------------------------------------------------------------- 7
4.3
Selection / Fast forward / fast backward --------------------------------------------------------------8
4.4
Equalizer settings------------------------------------------------------------------------------------------ 9
4.5
Volume control --------------------------------------------------------------------------------------------- 9
4.6
Repeat section --------------------------------------------------------------------------------------------- 10
4.7
Menu operation--------------------------------------------------------------------------------------------- 10
4.8
Connect to computer-------------------------------------------------------------------------------------- 11
4.9
Key lock ------------------------------------------------------------------------------------------------------ 12
How to Install / Modify / Repair / Remove driver
5.1
Windows 98 / 98SE Installation ------------------------------------------------------------------------13
5.2
Windows 2000 / ME / XP Installation ------------------------------------------------------------------15
6.
Remove X-Micro EPIC MP3 Player from computer ------------------------------------------------------ 15-16
7.
Linux 2.4.0 + / Mac 8.6 + Installation------------------------------------------------------------------------- 16
8.
MobileMail Function and Installation ------------------------------------------------------------------------- 16-17
IMPORTANT NOTICES ------------------------------------------------------------------------------------------------ 17
Disclaimer --------------------------------------------------------------------------------------------------------------- 18
1
1. Introduction
1.1 About X-Micro EPIC MP3 Player
X-Micro EPIC MP3 Player is the brand new multi-function MP3/WMA player from our EPIC series. Compared
with the single-function MP3 Player, X-MICRO EPIC MP3 PLAYER owns not only the stylish outlook with an
EQ built in LCD, but also a high quality digital voice recording function. We successfully combined
well-known USB flash drive, popular MP3/WMA player and delicately designed digital voice recorder in one
stick. With two AAA batteries, you can take advantage of 15 hours non-stop playing time. X-MICRO EPIC
MP3 PLAYER is suitable for each occasion — meeting, data storage and of course, music enjoyment. It is
absolutely your best choice from various consumer products.
1.2 Features
- Current available: 128MB / 256MB / 512MB
- Supports USB specification revision 1.1
- Transferring rate up to 12Mbit per second at “Full Speed”.
- Supports power saving mode to reduce power consumption while not playing X-Micro EPIC MP3 Player.
- Supports Windows 2000, ME, XP, Mac OS 8.6 or above and Linux 2.4.0 or above without device driver.
- Supports Windows 98/98SE with device driver.
- LED indicator when X-Micro EPIC MP3 Player is working.
- Key lock / write protect switch.
- Hot Plug & Play.
- Durable solid-state storage – data retention for at least 10 years.
- Erase Cycles: 100,000 times
- No external power is required - DC 4.5V ~ 5.5V from USB port.
- Low Power consumption:Write 39.1mA ~ 39.4mA / Read 35.0mA ~ 36.1mA.
- Support music format: MP3 / WMA
- Earphone jack: 3.5 mm
- Audio output: 5mW + 5mW
- Output frequency range: 20HZ – 20KHZ
- Power supply: by two of AAA battery.
- Continuous playing time: more than 15hours.
- EQ choices: Normal / Rock / Classic / POP / Jazz
- LCD display: 13mm (H) x 30mm (L)
- Digital voice record in ADPCM 32kbps (WAV) format through internal microphone.
- Repeat read function (A - B).
- Unit weight: approximate 30g (not including battery)
2
-CE and FCC certificate of approval.
2. Illustration of function keys and LCD display
LED
USB JACK
LCD
S1
S4
S3
SW1
S2
S1: Switch Controller
(Power On / Multi-function
Switch)
S1鍵: 開機/多功能按鍵
S2鍵: 音量控制桿SW1: Key Lock
S3: Record Button
(Write Protect / Button Lock)
(Record / Repeat Section settings)
S3鍵:錄音操作鍵/
S4鍵: 選單控制鍵
S4: Mode Key
S2: Volume Control
SW1鍵: 按鍵鎖
3
Repeat Play: Single / All
Play Mode: Play / Pause / Stop
Player function: WMA,MP3,DVR
Repeat Section
Battery Status
Key Lock
Selection and play time
Record Mode
Equalizer Settings
4
3. Quick Start
MP3/WMA Playback
Steps:
1. Press 3 seconds on Switch Controller to turn on the player.
2. LED will blink when you press Switch Controller. After blinking, LCD will show 「HELLO」.
3. If there are already MP3 or WMA files in the Flash Memory, the LCD will show「01 0:00」, and the
LED will light up. To begin the playback of MP3 or WMA file, press again Switch Controller .
Record Operation
Steps:
1. Press 3 seconds on Switch Controller to turn on the player.
2. Press Record Button to enter record mode. LED will blink, and the ”REC” icon in the display will
blink, too. The time in the display will increase from 「0:00」.
3. Press again Record Button to stop record and then enter the record playback mode. The ”REC”
icon will disappear and the ”DVR” icon will show up in the display. LED will light off.
4. To play the previous recorded WAV files, press Switch Controller in record playback mode.
Connecting to PC
Steps:
1. Use USB cable to connect to PC’s USB port, the player will be turned on automatically.
2. The USB indication will show up in the display. While connecting to PC, the display will
show ”--USB----”, and LED will blink.
4. Once the connection is completed, LED will light up, and”-- --PC-- --” will appear in the display. You
will see a “Removable Disk” in My Computer.
5
4. Function & Operation
4.1. MP3/WMA Playback
(1) Press Switch Controller to turn on the player. LED will blink.
The display will show 「HELLO」as Figure 4.1.1.
Figure 4.1.1
(2) The player will automatically read the content of the Flash
Memory. If there are already MP3 or WMA files in the Flash
Memory, the display will show as Figure 4.1.2.
Figure 4.1.2
(3) Press Switch Controller to start playing the first selection.
The music format such as MP3 or WMA will be indicated in
the display. LED will keep blinking and the selection number
as well as the playing time will also be indicated in the
Figure 4.1.3
display. (Figure 4.1.3)
(4) To pause during playback, press Switch Controller, and the
pause symbol will appear. Elapsed playing time will be
paused, too. (Figure 4.1.4). LED will light up instead of
flashing.
Figure 4.1.4
(5) Press Switch Controller to resume playback.
(6) To stop playing, press Switch Controller for 2 seconds,
LED will light up instead of blinking, and the playing time will
be reset to zero. (Figure 4.1.5)
Figure 4.1.5
(7) Press Switch Controller again for 2 seconds in stop mode,
the player will turn off and the display will appear 「OFF」.
(Figure 4.1.6)
Figure 4.1.6
6
(8) If no operations occurred for 60 seconds in stop mode, the
player will turn off automatically.
4.2. Recording Operation
(1) Press Record Button to start recording. LED will keep
blinking, and the ”REC” icon will flash, too. Elapsed
recording time will be shown in the display. (Figure 4.2.1)
Figure 4.2.1
(2) To stop record, press Record Button again. LED will light off,
and the beginning of the playing time will be indicated in the
display. ”DVR” icon turns up while ”REC” icon disappears.
(Figure 4.2.2)
Figure 4.2.2
※ To pause the record, press Switch Controller. To resume it,
press Switch Controller again.
(3) To play the previous recorded WAV files in stop mode,
press Switch Controller. The display will show the selection
number and the playing time. (Figure 4.2.3)
※
To switch between MP3 and record mode in stop mode,
Figure 4.2.3
press Mode Key.
(4) Press Switch Controller to pause the playback, playing time
will be paused as well. (Figure 4.2.4)
(5) Press Switch Controller to resume playback.
Figure 4.2.4
(6) If the space in the Flash Memory is used up during record,
LCD will show ”FULL” (Figure 4.2.5) and record will stop.
※ Press any key to go back to record stop mode.
※ File deletion, selection, fast forward and fast backward in
record mode are the same as in MP3 / WMA mode.
7
Figure 4.2.5
4.3. Selection / Fast Forward / Fast Backward
(1) To select during playback, slide Switch Controller upward
once for the previous file, and downward for the next one.
Playback will start from the beginning of the selection.
(Figure 4.3.1)
Figure 4.3.1
(2) To select in stop mode, slide Switch Controller until the
desired selection shows up in the display. Press Switch
controller to start play.
(3) To locate a particular point in a selection, Slide Switch
Controller up for fast backward and down for fast forward.
Playing time in the display will change accordingly. Release
Switch Controller and the playback will start from the time
indicated in the display.
4.4. Equalizer Settings
(1) Press Mode Key for 2 seconds until ”EQ” appears in the
display. (Figure 4.4.1) Press Switch Controller to enter the
menu of Equalizer Settings.
(2) Slide Switch Controller to select the following settings:
Normal Æ POP Æ JAZZ Æ CLASSICAL Æ ROCKÆ Normal.
Press Switch Controller again for confirmation, then the icon
will come out in the display. (Figure 4.4.2)
8
Figure 4.4.1
Figure 4.4.2
4.5. Volume Control
(1) During playback, slide Volume Controller to the left to turn
down and right to turn up the volume which will be shown in
the display. (Figure 4.5.1) -- Sound Level: 0 ~ 63
(2) To continuously increase or decrease the volume, slide
Volume Controller to the right / left and hold. To stop volume
Figure 4.5.1
control, stop sliding Volume Controller and the LCD will
resume the normal display.
4.6. Repeat Section
(1) During playback, press Record Button once to enter the
repeat read mode. The start point A will be marked. ”A-B”
icon will appear and “B” starts flashing. (Figure 4.6.1)
Figure 4.6.1
(2) Press Record Button again to mark the end point “B” whose
icon will stop flashing. A→B repeat read will go on. (Figure
4.6.2)
※ If point “B” is not marked until the end of the selected MP3
Figure 4.6.2
file, the playback of the next selection will start and point ” A”
will disappear.
(3) During A→B repeat read, press Record Button again to
leave this mode. Normal playback will resume from point
“B”, and the ”A-B” icon will disappear from the display.
(Figure 4.6.3)
Figure 4.6.3
※ During A→B repeat read, press Switch Controller once to
pause the repeat read, press Switch controller once again
to resume it.
9
4.7. Menu Operation
(1) In stop status, press Mode Key to enter Menu selection
which contains 3 functions:
(i) Equalizer Settings (EQ)
(ii) Playback Settings (REP)
(iii) File Deletion (DEL)
Figure 4.7.1
To select, slide Switch Controller up and down and the
function will change cyclically as follows:
EQ Æ REP Æ DEL ÆEQ. Press Switch Controller again to
confirm the selection. (Figure 4.7.1)
(2) EQ Menu: Under Equalizer Settings, slide Switch Controller
to select among 5 settings with the following cycle:
Normal Æ POP Æ JAZZÆCLASSICALÆROCKÆNormal
Press Switch Controller to confirm the setting. (Figure
Figure 4.7.2
4.7.2)
(3) REP Menu(Figure 4.7.3): Under playback settings, slide
Switch Controller to select among the following 3 settings:
(i) Repeat ALL: repeat all the selections
(ii) Repeat 1:repeat a single selection
Figure 4.7.3
(iii) NO Repeat: to cancel repeat
Slide Switch Controller to select among 3 settings with the
following cycle:
Repeat ALL Æ Repeat 1 Æ NO Repeat Æ Repeat ALL
Press Switch Controller again to confirm the setting.
(Figure 4.7.4)
10
Figure 4.7.4
(4) DEL Menu(Figure 4.7.5): Under file deletion, slide Switch
Controller to select among the deletion of a single file or all
files with the following cycle:
DEL ONEÆ DEL ALLÆ DEL ONE
Figure 4.7.5
Press Switch Controller again to confirm the setting.
(Figure 4.7.6)
Figure 4.7.6
(5) To delete single file: Choose the file to be delete then select
DEL Mode, select DEL ONE and LCD will display “DEL___”
(Figure 4.7.7). Press Switch Controller to confirm deletion.
Figure 4.7.7
4.8. Connect to Computer
(1) Use the USB cable to connect to PC’s USB port, and the
display will appear “--USB----”.
(3) During USB operations (including connection with PC, file
copy / delete, Flash Memory format), the LED will blink
and ”--USB----” will appear in the display. (Figure 4.8.1)
Figure 4.8.1
(4) Once the connection is completed, LED will light up,
and”---PC--” will appear in the display. You will see a
“Removable Disk” in My Computer. (Figure 4.8.2)
Figure 4.8.2
11
(5) Remove the unit from the USB port of PC to return the
player back to stop mode, and the removable disk will
disappear from My Computer. Playing time of the 1st file will
be displayed in the display. (Figure 4.8.3)
※ When file copy / delete through PC is finished, make sure
Figure 4.8.3
the USB operation has come to a complete stop and the
display appears “--PC--“ before unplugging the player from
PC’s USB port. Otherwise it may result in damages to the
files in the Flash Memory.
4.9. Key Lock
(1) Player status: click switch toward to Switch Controller, all
buttons and switch controller will be locked and stop working.
The display will appear symbol “
“. (Figure 4.9.1)
Figure 4.9.1
(2) Removable disk status: click switch toward to Switch
Controller, writing will be protected. (Figure 4.9.2)
Figure 4.9.2
(3) If you try to press any button or switch, the display will
appear “LOCK” to remind users. (Figure 4.9.3)
Figure 4.9.3
12
5. How to install driver
5.1 Windows 98/98SE Installation:
(1) Plug X-Micro EPIC MP3 Player into USB port. System will detect one new hardware and search for
proper driver to install.
(2) Choose the first recommend to install.
(3) Choose setting up from CD ROM.
13
(4) To execute installation by press “Next”.
(5) Press “Finish” to complete installation.
14
5.2 Windows ME / Windows 2000 / XP Installation
For these three operating systems, NO Driver is needed, because Windows has built-in driver to support
USB removable disk. Simply plug X-Micro EPIC MP3 Player into the USB port and it will be recognized by
the system. System will setup X-Micro EPIC MP3 Player automatically without any further installation of
driver.
Once installation is completed, you will see a “Removable Disk” drive in My Computer.
6. Remove X-Micro EPIC MP3 Player from computer
After using X-Micro EPIC MP3 Player, please choose one of the methods below according to your Operating
System to remove X-Micro EPIC MP3 Player from USB port:
Windows 98/98SE:You could unplug X-Micro EPIC MP3 Player from the USB port directly once the LED
stops blinking and its icon would disappear automatically.
Windows Me/2000/XP:Click the icon of X-Micro EPIC MP3 Player at the right down corner, and a “Stop
USB Mass Storage Device-Drive(H:)” menu appears (Fig.6.1). Click the menu, and the below window
appears telling you “the ‘USB Mass Storage Device’ device can be safely removed from the system”. Click
“OK” to close the window (Fig.6.2), then you can safely remove X-Micro EPIC MP3 Player.
Fig.6.1
Fig.6.2
15
7. Linux 2.4.0 + / Mac 8.6 + Installation
Again, No Driver is required for these two operating systems. Simply plug the X-Micro EPIC MP3 Player
into the USB port and the system will automatically find X-Micro EPIC MP3 Player. After using X-Micro EPIC
MP3 Player, you could unplug X-Micro EPIC MP3 Player from the USB port directly once the LED stops
blinking, then its icon would disappear automatically. For Linux user, please refer to Important Notices.
Important Notices:
(i) In OS Windows 98/98SE, if you don’t set up installation firstly, system will ask you to put driver disk
for running installation. Be sure to unplug X-Micro EPIC MP3 Player before running setup programs.
If you install the driver with X-Micro EPIC MP3 Player plugged, it may cause setup error or failure.
(ii) If you plug X-Micro EPIC MP3 Player into the USB port. System can find X-Micro EPIC MP3 Player,
but you are unable to access it. Please FORMAT X-Micro EPIC MP3 Player.
(iii) Before unplugging X-Micro EPIC MP3 Player from the USB port in Windows ME/2000/XP, make
sure you go to the right hand bottom of the screen to stop the USB device. Otherwise, it may result
in losing data that you have saved on X-Micro EPIC MP3 Player. (Please refer to 6.2.)
(iv) Linux uses a so-called "USB Manager", which does automatically load kernel modules (drivers) for
USB devices. It loads only drivers for devices that are present on the USB bus to reduce memory
usage. Per default, the USB Manager does not come with the USB Drive pre-configured. However,
you can easily configure the USB Manager to automatically recognize the USB Drive yourself. Just
add the following to the configuration file,
usbmgr.conf (usually in /etc/usbmgr): vendor 0x11E9 product 0x1004 module scsi_mod,
usb-storage
This line identifies the USB Drive and tells the USB Manager to load the SCSI as well as the USB
storage module. The SCSI module is needed in order to talk to both SCSI and USB storage
devices, while the usb-storage module is needed to talk to USB storage devices.
Do not forget to either reload the USB Manager's configuration or to restart the USB Manager (for instance,
do as root: /etc/init.d/usbmgr reload).
Disclaimer
All the information in this document is subject to change without prior notice. The manufacturer does not
make any representations or any warranties (implied or otherwise) regarding the accuracy and completeness
of this document and shall in no event be liable for any loss of profit or any other commercial damage,
including but not limited to special, incidental, consequential, or other damages.
16
No part of this document may be reproduced or transmitted in any form by any means without the express
written permission of the manufacturer.
All brand names and product names used in this document are trademarks or registered trademarks of their
respective holders.
17
www.x-micro.com
18