Transcript
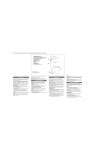
C163CMBS.Pub498698-00
1/8/02
4:23 PM
Page 2
OPERATING INSTRUCTIONS
PRODUCT MAY VARY SLIGHTLY FROM ILLUSTRATIONS
1.
2.
3.
4.
5.
6.
7.
8.
9.
10.
�
Inner Pipe
Outer Pipe
Height Adjustment Collar
Base Cap
4 Screws
Flange
Holes
Base End Cap
Bar A
Bar B
�
�
�
�
�
�
Front Grille
Tabs
�
�
Screw
�
Blade Cap
Fan Blade
Plastic Collar
�
�
Rear Grille
�
Motor Shaft
�
Shaft Pin
Oscillating Knob
Speed Control Switch
Motor Housing; keep
vents free of lint and dust.
�
�
FIG. 1
1.
2.
3.
4.
5.
6.
7.
8.
9.
10.
11.
12.
�
�
씈
씊
씋
씍
13.
14.
15.
쐅
쐈 16.
쐉
씉
씌
씎
17.
18.
19.
20.
21.
Fan Housing Neck
Connector Screw
Fan Housing Connector
Pipe Stopper (Inside of
Fan Housing
Connector)
Set Knob (holds Pipe
Stopper in place))
Inner Pipe
Height Adjustment
Collar
Base (Bars)
Base End Cap
쏹
21
쐅
FIG. 2
씏
HOW TO USE
This appliance is for household use and may be plugged into any 230V AC
electrical outlet (ordinary household current). Do not use any other
electrical outlet.
ASSEMBLY INSTRUCTIONS
1. Push the base end caps onto both ends of bar A and bar B.
2. Loosen and remove the four screws from bar A and bar B. Cross the
2 bars as shown in Fig. 1 and align the four holes with those on the
flange. Secure the flange to the bars with the four screws. Slide the base
cap down over the assembly.
CAUTION: Never remove the set knob, which holds the pipe stopper in
place (See Fig. 2).
3. If necessary, slightly loosen the set knob by turning it counterclockwise.
Slide the fan housing connector down over the inner pipe and tighten the
set knob. Make sure the set knob is tightly secured.
4. Loosen and remove connector screw from the fan housing neck. Align
notch on the fan housing neck with groove on the fan housing connector
and push down to connect the two parts. Secure by inserting the
connector screw through the holes and tightening.
5. Mount the rear grille to the motor housing by matching the 3 holes on the
rear grille to the 3 round pins on the front of the motor housing. Push in
firmly until the 3 pins protrude through the 3 holes.
6. Secure the rear grille to the motor housing by locating the plastic collar
on the thread hub around the motor shaft and turning clockwise to
tighten.
7. Insert the blade onto the motor shaft, matching the slot on the back of the
blade with the shaft pin (Fig. 2). Secure blade with blade cap, turning
counterclockwise to tighten.
8. Test blade operation by rotating it with your hand. There should be no
friction with the plastic collar. If blade does not rotate freely, repeat
steps 5 through 7.
9. Mount front grille to rear grille. Insert screw with a Phillips screwdriver
through holes in the 2 tabs at the bottom of the grille frame. Secure end
of screw with nut supplied.
TO USE AS A DESK FAN:
Loosen and remove the Connector Screw from the fan housing neck. Align
notch on the fan housing neck with the groove on the base and push down.
Secure by inserting the connector screw through the holes and tightening.
For complete assembly, follow steps 5 through 9 listed above under
Assembly Instructions.
FIG. 3
IMPORTANT SAFEGUARDS
If the supply cord is damaged, it must be replaced by the
manufacturer or its service agent or a similarly qualified person in
order to avoid a hazard.
When using electrical appliances, basic safety precautions should
always be followed, including the following:
■ READ AND SAVE THESE INSTRUCTIONS.
■ Use fan only for intended use, as described in instruction manual.
■ To protect against electrical shock, do not immerse unit, plug, or
cord in water or spray with liquids.
■ Close supervision is necessary when any appliance is used by or
near children.
■ Unplug from outlet when not in use, when moving fan from one
location to another, before putting on or taking off parts and
before cleaning.
■ Never insert fingers, pencils or any other objects through the
grille when fan is running.
■ Disconnect fan before cleaning.
■ Make sure fan is on a stable surface when operating to avoid
chance of overturning.
■ Do not use fan in a window. Rain may cause an electrical hazard.
■ Do not operate in the presence of explosive and/or flammable
fumes.
■ Do not place fan or any parts near an open flame, cooking or
other heating appliances.
■ Do not operate any appliance with a damaged cord or plug, after
the appliance malfunctions or has been dropped or damaged in
any manner.
OPERATING INSTRUCTIONS
1. Place the fan on a safe, flat surface where it cannot fall or be pulled by
the cord.
2. Control the direction of the airflow by firmly holding the fan housing neck
in one hand and by pushing the fan grille back to tilt up or by pushing it
forward to tilt down.
3. To make the fan oscillate, push down on the oscillating knob located on
the top of the motor housing. To stop the fan from oscillating, pull up on
the oscillating knob.
4. Plug into an electrical outlet.
5. Turn the control switch to the desired speed.
■ To disconnect, grip plug and pull from wall outlet. Never yank
on cord.
■ Always use on a dry surface.
■ This product is intended for household use only and not for
commercial or industrial use.
■ Do not use fan near curtains, plants, window treatments, etc.
WARNING: To reduce the risk of fire or electrical shock, do not
use this fan with any solid-state speed control device.
SAVE THESE INSTRUCTIONS
LINE CORD SAFETY TIPS
1. Never pull or yank on the cord or the appliance.
2. To insert plug, grasp it firmly and guide it into outlet.
3. To disconnect appliance, grasp plug and remove it from outlet.
4. Before each use, inspect the line cord for cuts and/or abrasion marks.
If any are found, this indicates that the appliance should be serviced
and the line cord replaced.
5. Never wrap the cord tightly around the appliance, as this could place
undue stress on the cord where it enters the appliance and cause it to
fray and break.
DO NOT OPERATE APPLIANCE IF THE LINE CORD SHOWS ANY DAMAGE,
OR IF APPLIANCE WORKS INTERMITTENTLY OR STOPS WORKING
ENTIRELY.
IMPORTANT:
During the first few minutes of initial use, you may notice a slight odor.
This is normal and will quickly disappear.
SAVE THIS USE AND CARE BOOK
12" OSCILLATING STAND/DESK FAN
CARE AND CLEANING
This appliance requires little maintenance and contains no user serviceable
parts. Do not try to fix it yourself. Refer it to qualified service personnel if
servicing is needed.
This fan is permanently lubricated and will not require additional
lubrication for the life of the fan.
TO CLEAN: Before cleaning, turn fan off and unplug from electrical outlet.
Wipe off excess dust with a lint-free cloth. To ensure adequate air
circulation to the motor, keep vents located at the rear of the motor housing
free from dust accumulation. A vacuum cleaner hose can be used to clean
these vents. Do not submerge your fan in water or any other liquid.
Disassemble grilles and blade (Fig. 2). Grilles and blade may be cleaned with
mild soap and water. Use a soft, slightly damp cloth to wipe the remaining
fan parts. Do not allow water or any other liquid to get into the motor
housing or base. Reassemble fan after grilles and blade have dried
completely. Do not plug fan into electrical outlet until it has been fully
reassembled.
TO STORE: Make sure to disassemble and clean the fan before storing.
Retain the original packaging for the purpose of storing your fan. Always
store fan in a dry place. Never store it while it is still plugged in. Never wrap
the cord tightly around the fan, and do not put any stress on the cord where
it enters the fan housing, as it could cause the cord to fray and break.
220 - 230V
50Hz, 36W
Copyright © 2001 Applica Consumer Products, Inc.
Printed in People’s Republic of China
PUB No.498698-00-RV00
PLEASE READ ALL INSTRUCTIONS BEFORE USING THIS PRODUCT
2000/12-12-68E
C163CM
MODEL C163CM