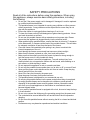
1
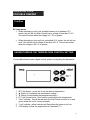
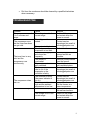
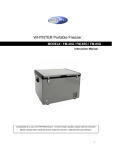
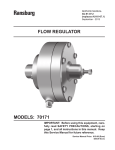
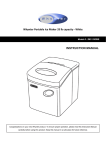
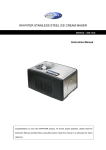
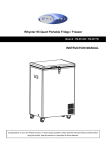
WHYNTER Portable Freezer MODEL# : FM-45G / FM-65G / FM-85G Congratulations on the purchase of a Whynter portable refrigerator/freezer. We trust that you will enjoy many years of trouble free use. Please read the instructions carefully before using your Whynter product. This book will provide you with information on how to operate and care for your Whynter product. 1 SAFETY PRECAUTIONS Read all of the instructions before using this appliance. When using this appliance, always exercise basic safety precautions, including the following: Do not use if the power supply cord is damaged. If damaged, it must be replaced by qualified technician/electrician. This portable freezer is not intended for use by young children or infirm persons without supervision. Young children must be supervised to ensure they do not play with the appliance. Ensure the freezer is unplugged before cleaning or if not in use. To clean the freezer use only mild detergents or glass cleaning products. Never use harsh chemicals or solvents. Do not use this portable freezer with an extension cord or power strip. Please ensure that the appliance is plugged directly into the electrical outlet. When positioning the portable freezer, ensure that there is at least a 2” clearance at the sides and a 4” clearance at the back of the portable freezer. This will allow for adequate ventilation of heat from the back of the freezer. Close the freezer lid immediately after putting in any items to maintain the internal temperature of the unit. Avoid placing the freezer near external heat sources or direct sunlight. Make sure the freezer is placed on a flat, level, and solid surface. Make sure that the surface on which the freezer is placed is strong enough to hold the freezer once it is fully loaded with items. The portable freezer is an electrical appliance. To avoid serious injury from electrical shock, do not operate the freezer with wet hands, while standing on a wet surface, or while standing in water. Do not expose this appliance to rain or excessive moisture. Do not turn the portable freezer upside down, on its side, or 45° or more off level. Never pull the power cord to disconnect the unit from an outlet. Grasp the plug directly and pull it from the outlet. Never lift or carry the freezer by the power cord. Keep the power cord away from heated surfaces. This portable freezer is designed for non-commercial use only. Do not plug this portable freezer into the power socket before setup is completed. An empty portable freezer can be dangerous for children or small animals. If disposing of the portable freezer remove gaskets, latches, lids and the entire door from your unused appliance so that children or small animals cannot become trapped inside. If your model of portable freezer is equipped with a lock, be sure to keep the keys in a safe location. Do not cut or remove the third prong (the grounding prong) from the power cord. The cord should be secured behind the unit and should not be left exposed or dangling. Do not move this portable freezer without securing the lid in a closed and latched position. Performance may vary based on operational and ambient conditions. 2 TABLE OF CONTENT UNPACKING PARTS AND FEATURES………………………………………….. 4-5 PROPERLOCATION……………………………………………………………………5 MOVEMENT AND INSTALLATION INSTRUCTIONS………………………………5 OPERATING YOUR PORTABLE FREEZER..…………………………………… 6-8 TEST-RUN……………………………………………………………………………….6 UNDERSTANDING THE TEMPERATURE CONTROL SETTING………………..6 TEMPERATURE ADJUSTMNET……………………………………….……………..7 QUICK FREEZING……………………………………………………………………...7 FOOD STORAGE……………………………………………………………………….7 DEFROSTING AND DE-ODERIZING………………………………………………...8 NORMAL OPERATING SOUNDS AND FUNCTIONS..…………………………….8 CLEANING AND MAINTAINING YOUR PORTABLE FREEZER……………… 8-9 TROUBLESHOOTING……………………….………………………………….....9-10 3 PARTS AND FEATURES Your portable freezer is supplied with all the accessories you need to enjoy refrigeration almost anywhere. Below is an image of the freezer features and standard accessories. 2 1 4 3 7 6 1. 2. 3. 4. 5. 6. 7. 5 Latch Insulated lid Wire baskets Side handle DC power cord AC power cord Drain plug 4 Proper Location Because this Position your portable freezer in a location where there is unit is proper air circulation and electrical connections. compressor Keep the portable freezer away from heat and direct based, ample sunlight if possible. space is This portable freezer is suitable for vehicle use and required camping however, the appliance should never be around the unit exposed to rain. to allow it to This portable freezer should not be placed in a built-in or exhaust recessed area. It is designed to be freestanding. properly. The normal operation of the freezer depends on heat radiation from the condenser. For the initial use, remove all packaging and allow at least 6” of clearance around the perimeter of the freezer. Movement and Installation Instructions 1. Remove all interior and exterior packaging. 2. Position the freezer in a dry and well-ventilated place. Keep the freezer away from direct sunlight, heaters and corrosive gases/chemicals. 3. Clean the interior surface with lukewarm water and a soft cloth. 4. When inserting the AC power-cord into the power socket, make sure the power socket is a grounded 115V~AC / 60Hz socket. Also, make sure that the unit’s grounding prong has not being tampered with. Note: When inserting the DC power-cord, make sure the input is a 12V~DC / 24V power source. 5. When moving the freezer, always use both handles to the carry the unit as level as possible. This is in order to protect the compressor and the sealed system. 5 OPERATING YOUR PORTABLE FREEZER Test-Run DC input power When attempting to plug your portable freezer into a standard 12 V socket, the unit will not work if socket has a voltage of less than 10.4 V. The unit will restart when the voltage is 11.8V or greater. When attempting to plug unit into a standard 24 V socket, the unit will not work if the socket has a voltage of less than 22.5 V. The unit will restart when the voltage is 24.2 V or greater. UNDERSTANDING THE TEMPERATURE CONTROL SETTING Your portable freezer uses a digital control system for adjusting the thermostat. SET: Set button – press this to set the desired temperature ▲: Button for increasing the temperature setting + ▼: Button for decreasing the temperature setting – FF: Fast Freeze button – this function quickly drops the temperature “Run” indicator: this will be red when the Fast Freeze function is on and green when the unit is running normally 2. “Low” indicator: yellow indicator will flash when the power is too low 3. LED display: shows the temperature in Fahrenheit (°F) 1. 2. 3. 4. 1. 6 Temperature Adjustment 1. When the freezer is plugged in to a power outlet, press the “Set” button. The LED will display the factory pre-set temperature of 0°F 2. To adjust the temperature: a. Press the “Set” button again b. While the LED is flashing, press the “▲” or “▼” buttons to reach the desired temperature c. Once the desired temperature is set, the LED stops flashing. The current internal temperature will then be displayed. After the LED has stopped flashing, you can check the set temperature by pressing the set button again d. To change the preset temperature again repeat steps a., b. and c. Note: Do not use the refrigerator-freezer as a refrigerator when the ambient temperature is lower than 41°F Fast Freeze Mode Press the “FF” button to run the freezer on the “Fast Freeze” mode. The Fast Freeze mode rapidly cools the unit to -8°F. The freezer will then maintain this temperature. Note: Do not run the unit on “FF” (fast freeze) for more than four hours, as this might adversely affect the refrigeration system. Food Storing Fresh foods should not be stored together with frozen foods. When the temperature is set below 32°F, do not keep glass-bottled drinks such as beer and lemonade, as the glass might shatter. 7 Defrosting and Deodorizing When the ice layer on the inner cabinet sides is over 0.2”, the defrosting operation should be performed to improve the refrigerating Never efficiency. To do this, follow these steps below: remove ice with a sharp 1. Turn off the power, and remove all items inside the object or freezer. screwdriver. 2. Allow the ice to completely melt. 3. Remove the drain plug and drain all water. Once the unit is defrosted and all the water has drained out, clean the interior with a soft rag before using the unit. Tip: To remove unpleasant odors place a piece of charcoal in the chest Normal Operating Sounds and Functions It is normal to hear gurgling sounds caused by the flow of refrigerant when each cooling cycle ends. The surface temperature of the compressor can reach 158-194°F when running. The noise emitted by the cooling fan on the condenser is a normal function. It is normal for the fan in the power supply to run all the time. CLEANING YOUR PORTABLE FREEZER Always disconnect the power supply before cleaning. Clean the inside of the cabinet whenever necessary using a solution of warm water and baking soda (1 tablespoon to every 2 liters of water). Dry with a soft cloth. Do not use steel brushes or harsh detergents to clean the inner liner. 8 Dirt from the condenser should be cleaned by a qualified technician when necessary. TROUBLESHOOTING Problem Cause The compressor runs for The voltage is not in the 1 to 5 minutes and correct range. stops. The refrigerant has The compressor runs leaked. but the inner liner does not get cold. The system is blocked. The ice layer on the evaporator is too thick. The door is being opened and closed too The inner liner is very frequently. cold and the The freezer is compressor runs overloaded. continuously. The condenser is not well-ventilated. The temperature sensortube is out of the evaporator or the controller is faulty. The controller is faulty (the power indicator is The compressor does not on). not run. The thermostat is set too high and the ambient temperature is too low. The freezer is noisy. The freezer is not level. The voltage is not in the correct range.. Solution Switch off the power and restart when the power is normal. Contact service department via email at [email protected] Defrost the freezer The door should be opened as little as possible. Remove some products from the freezer. Place the freezer in a well-ventilated place. Contact service department via email at [email protected] Contact service department via email at [email protected] Set the freezer to a lower temperature. Place the freezer on a flat and hard surface. Switch off the power and restart when the power is normal. 9 ONE YEAR LIMITED WARRANTY This WHYNTER portable freezer is warranted, to the original owner within the 48 continental states, for one year from the date of purchase against defects in material and workmanship under normal use and service. Should your WHYNTER portable freezer prove defective within one year from the date of purchase, return the defective part or unit, freight prepaid (within two months of purchase; after two months to one year, customer will be responsible for freight cost to Whynter’s service department), along with an explanation of the claim to Whynter Company. Please package the portable freezer carefully in its original packaging material to avoid damage in transit. Please retain original box and packaging material. Under this warranty, Whynter will repair or replace any parts found defective. This warranty is not transferable. After the expiration of the warranty, the cost of labor and parts will be the responsibility of the original owner of the unit. THIS WARRANTY DOES NOT COVER: - Acts of God, such as fire, flood, hurricanes, earthquakes and tornadoes. - Damage, accidental or other wise, to the Ice Maker while in the possession of a consumer not caused by a defect in material or workmanship; - Damage caused by consumer misuse, tampering, or failure to follow the care and special handling provisions in the instructions. - Damage to the finish of the case, or other appearance parts caused by wear. 1) Damage caused by repairs or alterations of the ice maker by anyone other than authorized by the manufacturer. 2) Freight and Insurance cost for the warranty service. To obtain service or information, contact Whynter Innovations Group via Email at [email protected] or call 866-WHYNTER. 10