1
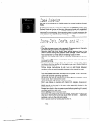
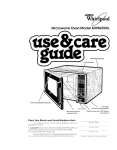
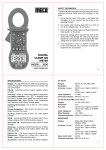
MODEL
RJM 7100
OVEN CAVITY
-7
,NEL
MODE MIXER COVER
I
DOOR HANDLE
’
MODEL AND SERIAL NUMBER
PLATE
-
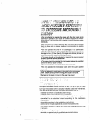
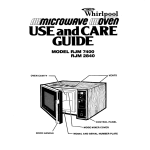
l Do not attempt
to operate this oven with the door open since
open-door operation can result in harmful exposure to microwave energy. It is important not to defeat or tamper with the safety
interlocks.
l Do not place any object
between the oven front face and the
door or allow soil or cleaner residue to accumulate on sealing
surfaces.
l Do not
operate the oven if it is damaged. It is particularly
important that the oven door close properly and that there is no
damage to the: (1) Door (bent), (2) hinges and latches (broken or
loosened), (3) door seals and sealing surfaces.
l The oven should
not be adjusted or repaired by anyone except
properly qualified service personnel.
l The oven should
be checked for microwave leakage by qualified
personnel after a repair is made.
l Do not operate
the oven if the door glass is broken.
l Do not operate
the microwave
oven with the outer cabinet
removed.
l Do not attempt
to cook eggs in the shell in the microwave
oven. Steam build-up within the egg will cause it to burst.
Damage to the oven or injury to the user may result.
a
*‘., I p9 ‘7“I ! : * -3
1 ‘: ‘: ;4
I ‘: Y ,-*a>”
f..J
i
/ .,,’;, .’ j
i i -. 7 1 i*7 j I> -,,J’ S.&f.: J
7 7,>
,: ‘>;:q jj ,,.“: ‘1 : j
;
; -: .‘*
.
il ‘&d : >j ~,,,i i .&I &i
Whirlpool Microwave Ovens are built to last. It is up to you to make
sure your microwave oven is properly installed, used and maintained.
You have to be sure that your Whirlpool Microwave Oven is.. .
installed according to installation instructions.
installed where it is protected from the weather.
installed on a counter, cart or shelf strong enough for its weight.
connected
to an electrical
circuit according
to the installation
instructions.
grounded according to the installation instructions.
used only for the job expected of a home microwave oven.
not used by children or others who might not understand how to use
it properly.
kept clean and in good repair.
serviced or repaired only by qualified service technicians.
:
Introduction
.............................
......................
Safety
Precautions
Before
You Use Your Microwave
Installation
..................
Instructions
How a Microwave
Oven ....
...........
Oven Works
How to Use Your Microwave
........
Oven
.....................
3
.....................
2
.....................
2 ;
.....................
4 *
.... .........
.....4 :
_....................
5 :
To start the microwave
oven ............
..................... 6 ;
’ To set the MEALTIMER’
.................
....... .. .... .. .... ..7 ;
II
.....................8 ;
To set the Cook Selector
Tips on Microwave
Oven Use
Do’s, Don’ts and Hints
’ Replacing
................
..................
the Oven Light Bulb
Care and Cleaning
..................
..........
.....................
8-9
1
....................
10
:
. . .._...............
10
_............__.....
11 :
Service
Before You Call for Service
If You Need Service
.............
. . . . . . . . . . . . . . . . . . . . 11 i
....................
. please read this guide all the way through. Save it for future
when you may wish to look up some helpful fact or suggestion.
use
is a good time to fill in the spaces below. You will need this
information
if you call for service or to ask questions about your
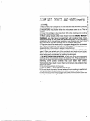
microwave oven. Model and serial numbers are located behind the
door of the microwave oven, as illustrated. Be sure to record all letters
and numbers.
MODEL AND SERIAL NUMBER PLATE
MODEL NO.
SERIAL NO.
--~
PURCHASE DATE-------~--------~
SERVICE COMPANY TELEPHONE
NO.-
- -
3
First: Take everything out of the oven. Wipe out the inside with a damp
cloth.
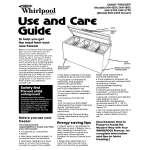
Second: Put the microwave oven on a counter, cart, table or shelf
which has enough strength to hold it. For ventilation, leave two inches
between the back of the oven and the wall. Do not block the vents on
top. They are needed for air flow and even cooking.
This oven can be built into a wall or cabinet. Kits RCK703 and RCK707 are
available from your dealer for recessed installation. It can also be installed, with those kits, above Whirlpool RDE, REE, RGE, RB and SB
series single ovens, or Imperial 7200 single gas ovens. Follow the manufacturer’s installation instructions. The RCK710, RCK711, and RCK713
kits can be used for surface mounting on a wall. The MICRO SHELF*
Hood, Model RJH3330, is available for mounting the microwave oven
above a range or cooktop.
Third: For your safety, this oven must be grounded. Its cord has the
3-prong grounding
plug. DO NOT CUT THE ROUND GROUNDING
PRONG FROM THE PLUG. If the wall receptacle doesn’t have the right
plug-in, or if the plug-in isn’t grounded
according
to the National
Electrical Code and local codes or ordinances,
you must have a
qualified electrician put in the right outlet.
Fourth: The outlet must supply 120 volts, 60 Hz., A.C. The microwave
oven will use about 1450 watts when it is operating, so no other major
household appliance should share the circuit.
Fifth: Fill a glass container with about one cup (250 mL) of cold water
and put it in the oven. Set Cook Selector to COOK and turn the oven
on for 1% minutes (see page 8). When the time is up, the water should
be heated.
Sixth: If the microwave oven has been stored in a cool room, the fan
may run slower than usual until the oven warms up to room
temperature.
‘Tmk.
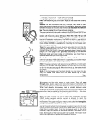
Microwaves
are like radio waves or radar waves. They will pass
through glass, plastic, paper and most other types of containers that
are not metal. Microwaves bounce off metal and are absorbed by food.
When food absorbs microwaves,
heat is created because water
molecules
in
the
food
are
disturbed
and
bounce around colliding with
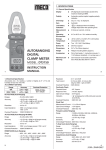
WAVEGUIDE
MAeNsraoNeach other. Heat is created by this bouncing and colliding . like when
you warm your hands by rubbing them together.
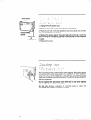
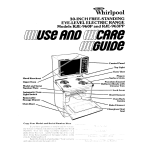
When all safety systems are secure (door shut completely
and the
START button pushed), electric current is allowed to reach the
magnetron
tube. The magnetron
tube uses electricity
to create
microwaves. They pass through a metal tunnel called the waveguide,
past the wave tuner, into the oven cavity.
MICROWAVE
4
BASICS
Just at the point where the microwaves are about to go into the oven
cavity, Whirlpool Microwave Ovens use a mode mixer (a slow-moving
metal fan) to scatter them. If all the microwaves went in the same
direction, they’d all bounce in the same direction, like water from a hose. Some parts of the food wouldn’t be touched. The mode mixer
works like a sprinkler to spread microwaves all around.
MODE
will
-s5
-*
3
The food container rests on a sealed-in shelf above the metal bottom of
the oven cavity. Because the food is above the metal bottom,
microwaves can get under it, through the shelf, to bounce up from the
bottom into the food.
<
‘-5
?
‘3
The walls, top and bottom of the oven cavity are metal. Microwaves
bounce around inside the oven until they are absorbed by food.
MIXER
The screen in the door is designed
allow you to see inside.
MICROWAVES
BOUNCE
THE BOTTOM
UP FROM
to keep microwaves
in the oven, yet z
2
There are three safety interlock switches designed to make sure that :
the microwave oven will not operate unless the door is closed and the ;
microwaves
are sealed inside. Do not tamper with any of these i
44
interlock switches.
<
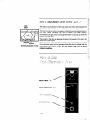
1
MEALTIMER’
COOK SELECTOR
“ON”
INDICATOR
START BUTTON
‘Tmk.
-
I
1. Push in button on door handle and open the door.
2. Place the food in the oven and close the door. Door will automatically latch.
3. Set the MEALTIMER’
to the desired cooking
time.
4. Turn the COOK SELECTOR to either Cook or Defrost setting.
recipe may use the word “HIGH” instead of “COOK.”
5. Push the START button. The “ON” indicator
the oven will come on.
Your
will glow and the light in
6. At the end of the cooking time a bell will ring and the microwave
oven will automatically
turn off.
‘Tmk.
6
I
1. Turn the timer to “0.”
2. Push in button on door handle and open door.
1. Close the oven door.
2. Set MEALTIMER’
to desired cooking
time.
3. Push the START button.
-$;qq- ,I, +‘“ld‘~,yv~
: jy;~/isLa d ,{ #yg$-y
St
-’
Turn the knob on the MEALTIMER’ until desired cooking
with the marker in the timer window.
1 I
time lines up
‘Tmk.
7
-
-1
Set dial of Cook Selector to COOK setting for normal cooking
foods.
of most
To defrost most foods, set the Cook Selector to DEFROST setting. The
Defrost Guide at the top of the door lists some foods with suggested
defrosting times. Refer to the MICRO MENUS Cookbook for more
information on defrosting. Some standing time is usually necessary for
complete thawing of foods before cooking.
‘Tmk.
a Plug the microwave oven into a separate 15 ampere circuit. Use only
an electrically grounded 3-pronged wall outlet.
’ Remove metal ties from plastic bags before placing them in the
oven to avoid arcing and possible oven damage. Check carryout
food containers for metal before reheating foods in them.
-’ Use your microwave oven only for cooking, reheating and defrosting.
,aSlice whole eggs before reheating to avoid a steam buildup and
possible bursting.
-j For cooking times longer than four minutes, avoid using paper
containers
and be careful of the plastics you use. (Some plastics
may get hot and melt.)
Follow recipe instructions
to stir, turn or add foods between
cooking cycles to avoid possible damage to the utensil or oven.
Your microwave oven uses 1450 watts at full power. It can’t share an
outlet with another operating appliance.
/ Be careful that food or utensils do not push against the plastic mode
mixer cover. Don’t remove the cover.
Harsh abrasives may scratch the oven finish.
Don’t use dishes or utensils with metal trim, staples, closures or
liners.
Metals should not be used in the oven unless
MICRO MENUS* Cookbook.
especially
directed
in the
Always have food in the microwave oven before operating it to avoid
possible damage to the oven.
Store nothing in the microwave oven.
Scorched or burned foods are overcooked. Continued cooking can
only burn them further and may cause them to flame..
especially
potatoes, corn-on-the-cob
and snacks.
Don’t operate oven by holding start button in.
‘Tmk
8
:;-$iY&j
-j-s :
1. Most of the oven’s weight is on one side (the side with the controls)
and it may be awkward to move.
2. INDICATORS may flicker when the microwave oven is on. This is
normal.
3. If your line voltage is low (less than 120 volts), heating and cooking
times may have to be lonqer.
4. When using recipes other than those from the MICRO MENUS*
Cookbook, you may have to experiment
with cooking times. Cook
foods according
to the times and quantities given in the Whirlpool
cookbook. As in conventional
cooking, over-cooking
can burn food
and may flame. Shorten cooking time for smaller quantities.
5. Popcorn should be made only in a popper designed for microwave
use. Follow instructions
received with the popper. The results are the
responsibility
of the popcorn popper manufacturer.
6. Liquids heated in certain containers
may overheat and flash into
vapor. Water can splash out of the container and make a loud noise.
This is not dangerous and will not harm the oven. You may wish to
avoid using such containers for heating liquids again.
7. DO NOT OVERCOOK POTATOES. At the end of the recommended
cooking time, the potatoes should be slightly firm. Wrap potatoes in
foil and set aside for five minutes. Potatoes will finish cooking while
standing.
Some potato varieties
may cook faster than others.
Overcooking
may result in poor flavor and texture and potatoes may
scorch or flame.
6. Do not store utensils in the oven.
9. Use hot pads.. . some utensils can be hot.
lO.Do not block the vents. Normal exhaust from cooking is vented out
the top and back. Depending on the food, exhaust may be hot.
11 .The inner door liner may appear wavy after the microwave oven has
been operated for a long time. This is normal.
‘Tmk.
&
2
;
j
3
;5
;;
3
‘I
=
1;
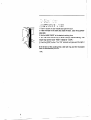
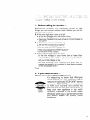
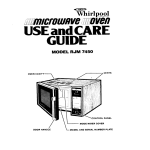
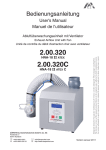
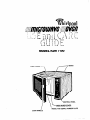
1. Unplug the oven power cord.
2. Remove screw and access panel shown in illustration.
ACCESS PAN
LOCATION
OF
LIGHT BULB
3. Replace bulb with a 40 watt appliance
with the access panel removed.)
bulb only. (Bulb can be seen
4. Replace the access panel. The panel has tabs at the top. Insert the
tabs in the top of the opening (behind the enclosure) to hold the panel
in place.
5. Replace the screw.
Your microwave oven is designed for easy cleaning. Most soils require
only wiping with warm sudsy water. For cooked-on or other stubborn
soils, boil a cup of water (250 mL) in the oven for 2 or 3 minutes. The
steam will condense and soften the soils. They should be less stubborn
after this treatment.
Do not operate the microwave
oven with soil or any other objects
between the door and the oven frame.
Do not use abrasive
microwave oven interior
10
cleansers
or scouring
or inside of the door.
pads
to
clean
the
1. Before calling for service..
.
Performance
problems
are sometimes
caused by little
things you can correct without tools. Before you call for
service, check this list.
A. If the oven light won’t turn on at all:
3 Is the unit plugged into the outlet firmly?
3 Have you checked to be sure a fuse or circuit breaker is
not open?
B. If microwave power won’t come on:
a Are all the controls set properly?
2 Do not hold the START button in.
3 Have you pressed the START button?
3 Is the door firmly closed?
C. If the cooking times seem too long:
j Is the line voltage to your home low or lower than
normal? The public utility in your area may be able to
tell you if the voltage is low.
, Are you allowing more cooking time when you increase the quantity (or number) of food being cooked
in the microwave oven?
l Trek.
2. If you need service..
Whirlpool
-
SYMBOL
OF OUALITV
SERVICE
.
Franchised TECH-CARE@ Service
It’s reassuring
to know that Whirlpool
stands behind your new appliance with its
network of franchised TECH-CARE8 service
companies. TECH-CARE service is designed
to fulfill your warranty
and provide the
after-warranty
service and maintenance
to
keep your new appliance
in top notch
condition,
anywhere in the United States.
Whirlpool wants you to get the service that
you would
expect
on quality
home
appliances.
u
11
If you move.. .
To make sure that your appliance is correctly installed and
to insure its continued
satisfactory
operation,
please
telephone your nearest TECH-CARE@ service company for
installation
or to get the name of a qualified
installer.
(Installation
cost will, of course, be paid by you.)
Or, If you need service..
.
1. Call the dealer
from whom you purchased
the
appliance or a Whirlpool franchised
TECH-CARE service
company. He is in the Yellow Pages of your telephone
directory
listed under Refrigerators
and Freezers Repairing or Servicing. (Also under Washers, Dryers Repairing or Servicing.)
2. Should you not find a listing, dial free, the Whirlpool
COOL-LINE@ service assistance
telephone
number (800)
253-1301. When calling from:
Michigan . . . . . . , . . . . . . . . . . . . . . . . . Dial (800) 632-2243
Alaska & Hawaii . . . . . . . . . . . . . . . . . Dial (800) 253-l 121
3. If you have a problem..
.
Call Whirlpool Corporation
in Benton Harbor at the COOLLINE service assistance telephone number (see step 2) or
write:
Mr. Guy Turner,
Vice President
Whirlpool Corporation
Administrative Center
2000 U.S. 33, North
Benton Harbor, Michigan 49022
YKrlpool
FSP IS a registered trademark
of Whirlpool corporation
for
quallty parts Look for this
FSP
symbol of quality whenever
you peed a replacement
parf
I
for your WhIrlpool appliance
FSP replacement
parts
~111fit right and work right.. because they are
made to the same exacting speclficatlons
used to build every new Whlrlpoo appliance
0
REMEMBER..
. If you must call or write. please provide:
your name, address,
telephone
number.
type
of appliance.
brand.
model.
senal
number,
date of purchase,
the dealer’s
name,
and a complete
description
of the problem.
This lnformallan
is needed
in order to better respond
to your request
for
assislance.
C0aG-J
12
Part
No. 310035
Rev. D