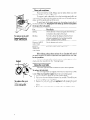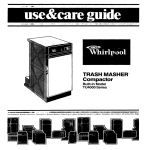
1
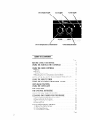
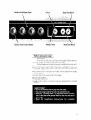
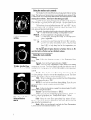
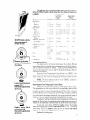
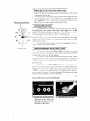
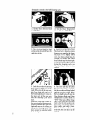
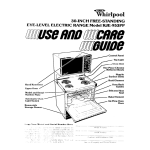
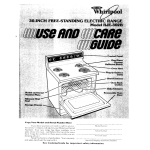
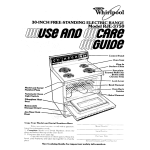
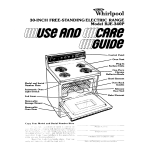
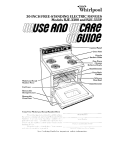
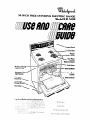
TF&3001
30-INCHFREE-STANDINGUECTRICRANGE
ModelRIE360B
Control
Panel
Chrome
Model and Serial
Number Plate
Automatic Oven
Light Switch
Storage Drawer
Oven Signal Light
Oven Temperature
Table
Control
Lock Light
Knob
Clean Light
Oven Selector
of Contents
BEFORE USING YOUR RANGE
USING THE SURFACE UNIT CONTROLS
USING THE OVEN CONTROLS
l Baking
l Broiling
,,,.
l Vanable Broil Fracture
l Resetting the OLcanTemperature Control Knob
SETTING THE CLOCK TO THE CORRECT TIME OF DAY.
USING THE MINUTE TIMER
USING THE AUTOMATIC MEALTIMER.
CLOCK
OVEN RACK POSITIONS
USING THE OVEN LIGHT
THE OVEN VENT
THE OPTIONAL ROTISSERIE
USING THE SELF-CLEANING
OVEN.
CLEANING AND CARING FOR YOUR RANGE,.
l Removing and Replacing Control Knobs
l Cleaning Under the Cooktop
l Removing the Storage Drawer
l Cleaning Chart
IF YOU NEED SERVICE OR HELP
1. BeforeYouCallforService
.:I::::::,‘.::::
2. If You Need Service
3. If You Have a Problem
: : 1: : : : : : : 1 : 1 : 1: 111 :
Knob
Surface Unit Signal Light
Surface Unit Control
Clock
Minute
Knobs
Before
using
Stop Time Knob
Timer
Start Time Knob
your range
IMPORTANT
This is the only fine pnnt you’ll find in this booklet. Please read it to
be sure you use your range as it was meant to be used.
We build appliances to last. but we can’t control how they are used.
Before using it. you are personally responsible for making sure that it..
l is properly installed and leveled on a floor that will hold the weight. and
in a well-ventilated room
l is connected only to the right kind of outlet. with the right electric supply
and grounding.
l IS used only for lobs expected of home ranges.
l is out of the weather
l IS properly maintained.
l is not used by childrc)n or others who may not understand how it should
be used
3
Using
the surface
unit
controls
The Surface Unit Control Knobs must be pushed In before turning
them. This helps avoid turning them on accidentally when wiping off the
Control Panel. And it helps keep small children from turning them on. You
must
PUSH IN and turn to
setting.
push in on them...then
turn to the setting
you want.
A design by each knob tells which unit is turned on by that knob.
(For example. [ . ] shows that the right front unit.. the one closest to you
on your right.. will heat when you push in and turn that knob.)
The knob may be set anywhere between “HI” and “OFF.” As you
use your surface units. you will get used to the settings that match your
pots. pans and favorite foods the best.
As a guide. the setting should cook at about the following heats:
HI - To start most foods cooking. To bring water to a boil.
MED-HI -To hold a rapld boil; to fry pancakes or chicken.
MED ~ To make gravy. puddings and icings; to cook large quantities of vegetables.
MED-LO ~ To keep food cooking after starting it at a higher setting.
LO -~ To keep food warm until ready to serve. You will notice
that you can set the heat higher or lower within the LO
band [ Lo] to help keep food at the temperature you
want.
The Signal Light will glow whenever a Surface
sure this light is off when you have finished cooking.
Using
Unit is on. Be
the oven controls
Baking:
First-Follow
the directions on page X for “Positioning
Oven
Racks.”
To bake, turn the Oven
Selector
Knob to BAKE.
Second--Turn the Oven Selector Knob to “BAKE.”
Third-Turn
the Oven Temperature Control Knob to the baking
temperature you want. The Oven Signal Light will glow while the oven is
heating. When this light goes off, the oven has heated to the temperature
you set.
Fourth-Place
food in oven. The heating elements turn off and
on during baking to keep the oven at the temperature you set. The Oven
Signal Light will glow when the heating elements are on.
Fifth--When
the baking is done, turn both the Oven Temperature
and Oven Selector Knobs to “OFF.”
NOTE: Do not lock the oven door during baking. If you do, you
may not be able to unlock it until the oven has cooled
Broiling:
To broil, turn the Oven
Selector Knob to
BROIL.
First-Follow
the directions on page 5 for placing meat at the right
distance from the Broil Element.
Second-Turn
the Oven Selector to “BROIL.”
Third-Turn
the Oven Temperature Control Knob to “BROIL” or
turn it to a lower temperature (see “Variable Broil Feature.“ below).
Fourth-Put
the broiler pan on the oven rack.
Fifth-Keep
the oven door open about four inches (10 cm).
There is a stop in the hinges to hold it there. The Oven Signal Light will
glow while the broil element is on.
Sixth-When
you are through. turn both the Oven Temperature
Control and the Oven Selector Knobs to “OFF.”
The following
chart suggests broiling times and oven-rack
positions for different kinds of meats when the Oven Selector Knob is set
to BROIL.
Inches (cm) from
Food
ALWAYS broil with the
door open about 4
inches (10 cm).
Beef Steaks
Rare
Medium
Well done
Beef Steaks
Rare
Medium
Well done
Hamburgers
Lamb Chops
Medium
Ham slice. precooked
or tendered
Canadian Bacon
Pork Rib or Loln Chop
Well done
Chlcken
Fish
Liver
Description
top of food
to Broil
Element
Approximate
Minutes
2nd side
1st side
l”12 5cm)
I” (2 5 cm)
1” (2 5 cm)
3” (8 cm)
3” (8 cm)
3” (3 cm)
7-9
9-11
1 l-l:3
3-5
4-7
5-7
l’~‘(4cml
1’2” (4 cm)
l’i”l4cm)
‘2” (1 cm1
4”-5”(1@13cm)
4”-5”(1&13cm)
4”-5”(10-13
cm)
3” (8 cm)
13-15
17-19
19-21
6-S
6-X
S-10
14-16
4-S
1” (2 5 cm)
I i “- 1 ”
3” (8 cmi
6-S
4-5
II-2 5cml
‘2” (1 cm1
$4 -1”
12-2 5 cm1
2-3 lb
11-1 5 kg)
cut In half
whole
fillets
’ 2” i4”
1l-2 cm)
3” (8 cml
3” (8 cm)
6-H
6
4-5
4
Frankfurters
screw; NOTICE position
of notches.
Lower: move black part
toward “LO.”
One notch equals about
10°F (5°C).
Higher:
move black
part toward “HI.”
One notch equals about
10°F (5°C).
Variable
3” 5’ (10-13
cm)
7” -9” (1X-23 cm)
3” (8 cm)
3” (8 cmi
3” (8 cm)
4”-5”(1&13cm)
15
10
25-K
11-16
7-x
IO-12
9-14
s-7
3
6-7
3
4-5
Broil Feature:
You might want to broil some foods slower than others. Brolllng
can be slowed down by setting a lower temperature on the Oven Temperature Control Knob instead of “BROIL.” Using a lower temperature will
cause the broil element to turn on and off during the broiling so that the
food broils more slowly.
When the Oven Temperature Control Knob is on “BROIL.” the
Broil Element heats all the time Set the temperature lower and it heats
some of the time. The lower the temperature setting. the shorter are the
periods of heating.
NOTE: The Oven Selector must be in the “BROIL” posltion In
order for the Broil Element to heat.
Resetting
the Oven Temperature
Control
Knob:
Does your new oven seem hotter or colder than your old oven?
The temperatures in older ovens often shift very gradually. getting hotter
or colder without the user really noticing the change. Your new oven is
properly adjusted to provide accurate temperatures. but when compared
to your old range, the new design may give you different baking results If
you think that the temperature setting on your range needs to be hotter or
colder, you can adjust the Temperature Control Knob by yourself.
To adjust the setting, first pull the Oven Temperature Control Knob
straight off. On the back. just across from the locking screw, are a row of
notches on the black part of the knob and one tooth on the chrome part.
To set your oven about lO”F(5”C) cooler, remove the locking
screw and move the row of notches one notch closer to “LO.” To set your
oven about lO”F(5’C) warmer. move the row of notches one notch
closer to “HI.” Each notch equals about lO”F(5”C).
Replace the locking screw.
5
Setting
Clock
and Timer
Knob
the clock
to the correct
time
of day
1 Push in the Minute Timer Knob and turn it clockwise to set the hands
to the correct time of day.
2 The Minute Timer hand will turn as you set the clock. When the clock
is set. let the knob pop out. Then. while it is out. turn the Minute Timer
hand clockwise to “OFF.” If you push in on the knob when setting the
Minute Timer. you will change the setting of the clock.
Using
the Minute
Timer
The small numbers inside the clock face are the minute markings.
Turn the knob in the center of the clock...don’t
push it in. ..to the
number of minutes you want to time. When the time you set is up. a
buzzer will sound. Turn the hand to “OFF” to stop the buzzer.
The Minute Timer does not start or stop cooking. It only buzzes
when the time you set is up. It can be used to time almost any cooking
operation. It can even remind you of other thmgs (like when to add the
softener to the washer)
For the most accurate timing. turn the knob past the time you
ulant. Then turn it bac.k to the setting.
Minute
Timer
Using
the automatic
MEALTIMER’
clock
The automatic feature of the MEALTIMER< Clock lets you be away
from home when the oven starts. or when it stops. It will turn on and off
automatically. or lust turn off automatically.
Let’s say you tlave a roast that will take four hours to cook. Dinner
is supposed to be at (1.00. but you have an appointment at 1.30 and you
know you won’t get llome until at least 4.00. When do you have time to
put in the roast’!
With the Autornatlc MEALTIMER’ Clock, it’s easy. Just before you
leave lor your appointment. put the roast in the oven. set the start time for
2:OO and the stop time for 6:OO (four hours). Set the Oven Selector to
“TIMED” and set the Oven Temperature Control Knob for the temperature you want. Then leave. The oven will start at 200. bake for four hours
at the selected temperature. and shut off at 6:O0.
.Tmk
To start and stop your oven automatically:
1. Be sure the clock is set to the
right time of day. (The start
and stop time hands will also
show the correct time.)
2. Place the food in the oven.
3. Push
in and turn
the
Time Knob clockwise
time you want
start.
the
Start
to the
oven to
5. Turn the Oven Temperature
Control Knob to the temperature you want to use to cook
the food.
When cooking is finished,
4. Push
in and turn
the
Stop
Time Knob clockwise to the
time
stop.
6. Set
you
the
want
Oven
the
oven
Selector
to
to
“TIMED.”
turn both the Oven Selector and the
Oven Temperature Control Knobs to “OFF.”
If you want to stop the oven before it stops automatically,
turn
the Temperature anti Selector Knobs to “OFF.” Remove food from the
oven. You don‘t have to do anything wtth the Stop Time Knob.
When you want the oven to start now, but stop automatically:
1 Be sure the clock ,-lnd the start and stop time hands show the right time
of day
2 Put the fr,od III thr, oven
3. Push in and turn tihe Stop Time Knob to the time you want the oven to
stop cookq
4 Turn the Oven Sc,lector to “TIMED” and the Oven Temperature Control to the temper<lture setting you want.
5 When cooking IS ,rnished. turn the Oven Selector and Temperature
Control Knobs to ‘.OFF
Oven rack positions
Your oven has two racks. Always put the racks where you want
them to be before you turn on the oven.
To remove a rack. take hold of it on the front edge and pull it out
until it stops. Then lift up the front edge and pull again. It will slide past the
stops. out of the guides and out of the oven.
To put it back, fit the back corners into the guides at each side of
the oven and slide it in. keeping the front tilted up until the rack passes
the stops in the rack guides.
To remove rack, pull
forward until rack
stops, lift and pull.
For:
Place Rack:
Baking
On the second or third rack guide from the top..
so food is in the center of the oven.
So food is about the distance from the broil
element suggested in the broiling ttmetable
under “Using the Oven Controls.”
On the bottom rack guides.
Broiling
Roasting LARGE
cuts of meat
Roasting
SMALLER
cuts of meat
~___
So food is in the center of the oven.
When baking, always leave at least 1% to 2 inches (4-5 cm) of
air space between the sides of a pan and other pans and the oven wall
for air circulation.
Gasket
1
0
B
@E
0
To replace the oven
light, remove glass
cover and gasket.
For best results. get additional information on placing pans. cookte
sheets and other utensils from the “Cooking Guide.”
Using
the oven light
The Oven Ltght will come on when the Oven Door IS opened.
To replace
the light bulb:
The oven light bulb has a glass cover which is held on by a wtre
holder. This cover must be in place when the oven is being used.
1. Turn off the electric power at the main power supply.
2. Pull out on the wire holder and move it to one side. This will let you
remove the glass cover and gasket.
3. Replace the bulb with a 40-watt appliance bulb (designed to stand
up to oven heat) available at most grocery, variety and hardware
stores
4. Replace the gasket and glass cover. Snap the wire holder in place.
The oven vent
There is an oven vent under the right rear surface element. When
the oven is on. heated air will escape through it. A vent is needed for air
circulation in the oven during baking. You can cook on this surface unit
while the oven is on. A warm pan of food will stay warm on this unit while
the oven IS on. It may be warm enough to melt butter. too.
Do not try to save heat or energy by blocking the vent. Poor
baking can result. Plastic utensils may melt if they are over the vent
while the oven is on.
The optional
rotisserie
If you would like a rotisserie with your oven. you can order a kit
from your dealer. Easy installation instructions come with the kit.
Usins
the self-cleaning
oven cycle
The Self-Cleaning Oven uses high heat that actually burns away
oven soil. For best results and safety, read this section carefully. Make sure
you understand how everything works before you set your oven to
“CLEAN.”
Things
l
l
l
l
l
l
l
l
to do before you start:
Some areas may not be cleaned during the Self-Cleaning cycle:
-The frame around the oven opening
-The door. especially the part around the outside of the oven seal.
Soil on these areas will be more difficult to remove after the SelfCleaning cycle. Use hot water and detergent.. or a soapy steel-wool
pad. Rinse well.
Do not move or bend the fiberglass
clean it by hand.
oven door seal. Do not try to
The high heat during the cleaning cycle will discolor the racks and
take the shine off them if they are left in the oven during the SelfCleaning cycle. If you want your oven racks to stay shiny and bright,
take them out before starting the cleaning cycle. If you do clean the
racks during the cleaning cycle. read the “Special Tips” at the end of
this section.
Don’t leave any pots or pans in the oven during cleaning. They won’t
be able to stand the high heat.
Wipe up spillovers. boilovers and grease that hasn’t baked onto the
bottom of the oven. This will help reduce smoking during the cleaning
cycle.
Chrome
reflector
bowls must not be cleaned
in the oven.
Turn on the vent hood fan or other kitchen vents during the cleaning
cycle. This will help remove smoke. odor and heat that are normal
during the cycle
If you have a rotisserie, be sure the motor socket cover is closed.
9
Setting
the controls
1. Set the Oven
to “CLEAN.”
10
to the Self-Cleaning
Selector
Knob
cycle:
2. Set the Oven Temperature
Control Knob to “CLEAN.”
3. The clock and dials for start
and stop time should all have the
right time of day.
4. Push in on the Stop Time
Knob and set it ahead as many
hours as you want for the cleaning cycle. For a lightly
soiled
oven, two hours ahead may be
enough.
For heavy soil, three
hours ahead may be about right.
If some soil does not get removed
during the cleaning
cycle, see
“Special
Tips”
later
in this
section.
5. Lock the oven door by moving
the Lock Lever all the way to the
right. When it is all the way over,
the Clean Light will come on. If
the Clean Light doesn’t come on,
the lever isn’t all the way over
and the cleaning
cycle won’t
start.
When the clean light comes on,
the oven starts the cleaning cycle.
About 20 minutes later, the Lock
Light will come on. It will stay on
during the cleaning
cycle. The
door cannot be unlocked
while
the Lock Light is on.
6. The oven will shut off when
the preset stop time is reached,
but the oven door will stay locked
until the oven has cooled. When
the Lock Light turns off, turn the
Oven Selector
Knob and Oven
Temperature
Control
Knob to
“OFF.” This turns off the Clean
Light. Now, move the Lock Lever
back to the left. Do notforce
the
Lock Lever. If it doesn’t want to
move easily, wait until it does.
With the Lock Lever all the way
to the left, the oven door can be
opened.
7. When the oven has cooled
off
a11 the way. wipe out any residue
or ashes from the bottom.
How the Self-Cleaning
cycle work s:
When oven contr& are set to “CLEAN.” the oven gets much hotter
than it does for cooking. This high heat causes soil on the inside oven
walls to burn off, or break up and mostly disappear. While this is
happening. a special part in the oven vent helps remove smoke. DO
not cover the right-rear surface unit during the cleaning cycle.
The chart below shows about what happens during a 2-hour SelfCleaning cycle. Any time less than that shortens only the cleaning
cycle. not the heating and cooling times.
Don’t touch the range during the cleaning cycle.. it will be hot.
When the cleantng cycle is over. you will find some fine ashes in the
oven The amount of ash depends upon the amount of soil there was
in tile oven. When the oven is cool, clean up all that is left with a
damp cloth, cleanser. or a soap-filled steel-wool pad.
During the cleaning cycle. you may hear the sounds of metal heating
and cooling. These are normal sounds. and a lot like those you can
hear when the oL,en heats for regular cooking.
SELF-CLEAN
OVEN-LIGHT
SOIL
CYCLE
1000
1000.
800
800.
600
600”
400
400
200
200;
1 hr.
1 Yz hr.
2 hr.
2Yz hr.
11
Special
l
l
l
l
l
l
l
tips:
If the cleaning cycle doesn’t get the oven as clean as it should be,
the time set for cleaning was probably not long enough. Set the
cleaning time longer next time. You can set it for more than 3
hours. if you want.
Plan to clean the oven before it gets too heavily soiled. Otherwise. you may notice more smoke than you would expect coming from the oven vent. And. the cleaning cycle has to be longer
to clean a very soiled oven
There will be normal “heat odors“ during the cleaning cycle. To
help get rid of them. keep the kitchen well ventilated.
To stop the cleaning cycle after it has started:
-Turn the Stop Time Knob to the right time of day.
--Turn the Oven Selector Knob to “OFF.”
--Turn the Oven Temperature Control Knob to “OFF.”
--.-Unlock and open the oven door when the Lock Light turns
off
NOTE: Do not force the Lock Lever. Wait until it moves easily.
Do not use foil or other oven liners in your Self-Cleaning Oven.
Don-t use commercial oven cleaners in your Self-Cleaning Oven.
If racks are left in the oven during a cleaning cycle. they will lose
their shine. discolor and be harder to slide in and out. To make
them slide easiclr. polish the edges of the racks and rack guides
with a soapfilled steel wool pad. rinse well. and wipe on a thin
coating of s&d oil
Cleaning
and caring
for your range
Your range is designed to be easy to clean. You will usually wipe off
spills and spatters when they happen. but you will sometimes want to
clean under and behlnd the control knobs and surface units. This section
will tell you how to remove those. and what to use when cleaning.
Removing
1,
2.
3.
4.
5.
and replacing
surface
unit control
knobs:
Be sure the control knobs are set to “OFF.”
Pull straight out on the black knobs.
If the control has a chrome trim ring. pull it straight out.
Wash the knobs (and trim rings) in warm. sudsy water.
Replace the trim rings first. If the control spring was removed,
it back exactly
as shown on the left...smaII
put
end first.
6. Hold the black knob so it points to “OFF” Push it straight back on.
Removing
Pull knob and trim ring
straight out. Remember
how the spring goes.
12
and replacing
oven control
knobs:
1. Be sure the knobs are set to “OFF.”
2. Pull each knob straight off.
1% Wash the knobs In warm, sudsy water.
4. The knobs are not interchangeable. Make sure you put the adjustable Oven Temperature
Control Knob on the right place. and the
nonadjustable
Oven Selector Knob on the other.
I ,\
Removing
Terminal
surface
wash surface
mal use.
To remove surface
unit, lift and pull
straight out.
units and reflector
bowls:
1. First. be sure the Surface Unit Controls are all “OFF” and that the
surface units are cool.
2. See where the surface units plug into the range? Lift each surface
unit about an inch (2.5 cm) at the edge away from the plug-in
(receptacle). Pull the unit straight away from the plug-in. Do not
units: they will burn themselves
clean during
nor-
3 Lift out the reflector bowls.
Hold surface unit level
when replacing.
Replacins
reflector
bowls and surface
units:
Be s’;re the surface unit controls are on “OFF”
Put the reflector bowls back into their places. Make sure you can see
the plug-ins (receptacles) for the surface units through the square
hole in the side of each bowl.
Hold the surfact> unit level with the prongs (terminals) pointing at
the plug-in
With the prongs <tarted In the plug-in. start pushing in on the surface
unit. At the same time. lift a little on the side of the surface unit that’s
by the plug-ill
5. Make sure the sul-face-unit prongs are pushed into the plug-in as far
as they will go. The surface unit will fit into the reflector bowl and be
level when everything has been done right.
Cleaning
Prop up the top with
support rod.
Removing
Pull to stop. Lift; pull
again.
under the cooktop:
To clean the area under the cooktop. lift the front of the cooktop at
the center. Raise the swing-up rod to hold it. (Be sure the tip of the rod is
in the notch in the cooktop.) Use warm soapy water and asponge or cloth.
Scouring powders or any other abrasive cleaner may harm porcelainenamel finishes and can scratch chrome.
Be careful not to raise the cooktop so high that it touches the
control console. And don’t drop it Dropping the cooktop can chip or crack
a hard porcelain finish. or damage side panels and surface units.
the storage
drawer:
The drawer below your oven is meant to store pots and pans.
Never keep anything in there that will burn or melt.
You may want to remove the drawer for cleaning under the range.
Pull it straight out until It stops. Lift the front and pull some more to get it
over the stop. Now slide it out until it stops again. Lift the drawer away
from the range until it slops out of the guides.
To put it back. fit the side rails at the back of the drawer into both
guides on the range Fush it closed while lifting the front to get past the
stops.
13
PART
WHAT TO USE
HOW TO CLEAN
Outside of
appliance
Soft cloth, warm soapy water
l
Nylon or plastic scouring pad
for stubborn spots
Surface units
l
No cleaning required
Warm. sudsy water and bnstle
brush
Chrome
reflector bowls
Automattc dishwasher or
warm, soapy water or plastic
scrubbing pad
Do not allow food containing acids (such as
vrnegar. tomato. lemon juice or milk) to remain on
surface. Acids will remove the glossy finish.
l
Do not use abrasive or harsh cleansers
l
Spatters or spills will burn off.
l
Control knobs
and chrome
nms
Wipe off regularly when range is cool.
Wipe off excessive spills with damp cloth when
surface unit is cold. Do not place in Self-Cleaning
Oven.
l
Do not immerse in water
l
Wash. rinse and dry well.
l
Do not soak.
l
Clean frequently.
l
Wash with other cooking utensils.
l
I)o not use harsh abrasives
l
Wash with other cooking utensils.
l
Do not place in Self-Cleaning Oven.
Aluminum
broiler pan and
grid
Warm. soapy water or soapy
steel wool pads
Control panel
Warm. soapy water
l
Wash, rinse and dry with soft cloth.
Oven racks
Self-Cleaning Oven cycle
l
Leave in oven during Self-Cleaning cycle
Warm. soapy water or soapy
steel wool pads
Oven door
glass
Self-Cleaning
Oven
l
Wash. rinse and dry. Use soapy steel wool pads for
stubborn areas.
Make certain oven is cool. Wash. rinse and dry well
with soft cloth.
Warm. soapy water or plastic
scrubbing pad
l
Commercial glass cleaner
l
For areas outside SelfCleaning area use warm.
soapy water or soapy steel
wool pads
. Clean before using Self-Cleaning cycle to prevent
burnon of soil.
l
l
Follow directions provided with cleaner.
Follow directtons grven on page 9. “Using the
Self-Cleaning Oven Cycle.”
Do not use commercial oven cleaners.
Do not use foil to line the bottom
14
of your Self-Cleaning
Oven.
If you need service
three steps:
or help, we suggest
you follow
these
1. Before you call for service^:
If your range does not seem to be operating properly. check the
following before calling for service.
If nothing
l
l
operates:
Is the range plugged into an operating outlet or wired into a live circuit
with the proper voltage! (See Installation
Instructions.)
Have you checkt>d the main fuse or circuit-breaker box?
If the oven will not operate:
l
l
Is the Oven Selector Knob turned to a setting (BAKE or BROIL. but
not TIMED)”
Is the Oven Temperature Control Knob turned to a temperature
setting’?
If surface
l
l
l
units will not operate:
Have you checked the main fuse or circuit-breaker box?
Are surface units plugged in all the way?
Do the control knobs turn?
If surface-unit
l
l
Control
If the Self-Cleaning
l
l
l
l
Knob or Knobs will not turn:
Is the spring put in correctly. as shown on page 12 in the “Cleaning
and Canny for your Range” Section?
Did you push in before trying to turn?
Cycle will not operate:
Are the Oven Selector Knob and Oven Temperature Control Knob
set to “CLEAN” ’
Does the Start T:jne Knob show the correct time of day?
Is thk>Stop Tim<’ Knob set ahead to the time you want the cleaning
cycle to stop”
Is the Lock Lc,vt,, Jl the way to the right? (The Clean Light will come
011)
If cooking
results
aren’t what you expect:
Is the range level’
l Are you using paris recommended in the Cooking
Guide?
l If baking. have you allowed 1’ 2 to 2 Inches (4-5 cm) on all sides of
the pans for air circulation!
l Does the oven temperature seem too low or too high? See page 5.
“Resetting Your Oven Temperature Control Knob.”
l Have you preheated the oven as the recipe calls for?
l Are the pans the 5ize called for in the recipe?
l Are you following a tested recipe from a reliable source?
l Do the cooking utensils have smooth. flat bottoms?
l Do the cooking utensils fit the surface unit being used?
See the Cooking Guide for more information on cooking problems and how to solve them
2. If you need service. :
If your WHIRL,POOL’ appliance ever needs service anywhere in
the United States. help is lust a phone call away to your nearest
Whirlpool franchised TECH-CARE’ service representative.
Whirlpool
maintains a nationwide
network of franchised
TECH-CARE service companies to fulfill your warranty and provide afterwarranty seTvIce and maintenance to keep your WHIRLPOOL appliance
in peak condition.
l
15
You’ll find your nearest TECH-CARE service company listed in
your local telephone book Yellow Pages under WashersiDryers-Repairing or Servicing. Should you not find a listing, dial free, the Whirlpool
COOL-LINE”
service
When calling from:
Michigan
..
Alaska & Hawaii
assistance
...
.
telephone
.,
.
.
number
.. .
..
(800) 253-1301.
(800) 632-2243
(800) 253-1211
If you move..
To make sure that your appliance is correctly installed and to insure
its continued satisfactory operation, please telephone your nearest
TECH-CARE” service company for installation or to get the name of a
qualified installer. (Installation cost will. of course, be paid by you.)
Helpful
hints..
You can help your TECH-CARE service representative give you
faster service if you include the model and serial number of your appliance
ushen requesting service Also. retain your sales slip and warranty to verify
your warranty status
Remember..
Your TECH-CARE service representative is specially trained in the
expert repairing and servicing of your WHIRLPOOL appliances. He can
help you maintain the quality originally built into your WHlRLPOOL
appliance. So why riot take the time. now. to look up his telephone
number and jot it down 111the space provided on the cover.
3. If you have a problem’:
Call Whirlpool Corporation in Benton Harbor at the COOL-LINE
service assistance telephone number (see Step 2) or write:
Mr Strph~~n t: Upto: 1.Vice President
Whirlpool Corporatic>
Administrative Centc,;
2000 U.S. 33 North
Benton Harbor. Mlchlyar> 49022
If you must call or write. please provide: your name. address.
telephone number. type of appliance. brand. model. serial number. date
of purchase. the dealer‘s name. and a complete description of the problem. This informatior! IS needed in order to better respond to your request
for assistance
mirlpool
cc k”“.
Part No
310602
.YTi I
tle111o11 Harbor,
Mlchlgan
Auromatac
Washers.
Clothes
Dryers,
Freezers
Refrigerator
Freezers,
Ice
Makers,
Dishwashers,
Bud1 I” Ovens and Surface
Umts,
Ranges.
Microwave
Ovens,
Compactors,
Room
AK Condltmners.
Dehumldlflers.
Central
Heailng and Au Condltmmng
Systems
Pnnted
,,I U S A