1
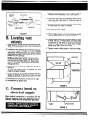
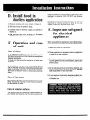
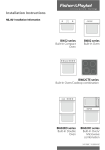
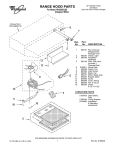
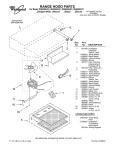
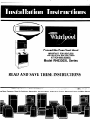
Convertible Oven Vent Hood
IMPORTANT:
FOR VENTLESS
INSTALLATION
USE DUCTLESS
KIT RCH-6600 (830853)
Model RH6330XL Series
READ AND SAVE THESE INSTRUCTIONS
~-mT,!a~‘%+~~ ii , ?‘*y
i .; -2i’:‘
L- i i
_
..“:‘:v.p
..,‘ &*‘Jly:-p&&*.ii&.
..“Z’i
-
-.?,
F-s
-,~,c;*.-
il
“-?&g&Q”;
r.;;
3L. :T$.-$+
_
ave Ovens, Compactors, Room Air Conditioners, Dehumidifiers, Automatic Washers, Clothes Dryers, Freezers, Refrigerator-Freezers, Ice Makers,Oishwasl
1
‘-
‘.
,I
.h-
P..?
This hood is designed to be compatable with Whirlpool
Eyelevel Ranges RHM, RM, RE, REE, RFE and
RGE, the power source for the hood is supplied directly from the range. See Section C.
A. Selecting the proper
venting system
Before starting . . .
This oven hood can be vented either vertically through
the roof, horizontally out the wall, or ductless. Select
the most practical
method for your particular
installation.
To install the range hood read the following instructions
completely and carefully. There are important steps
outlined that will simplify the installation job when
followed carefully. In addition, they will help you decide
what materials you need for your installation.
Figure 1 shows the standard through the roof venting.
Figure 2 illustrates horizontal venting. Make wiring wall
cutouts and venting cutouts according to dimensions
given in Figure 3.
For ductless
installation
see Section D.
)F CAP
You’ll need these tools:
a
l
l
Drill, electric or ratchet
drive, with 1%a” wood bit
(to drill an access hole in
the cabinet or kitchen wall
for the electrical power
line.)
One common head screwdriver (to secure hood
mounting screws to the
cabinet and hood sheet
metal parts).
-3% x 10 DUCT
*DAMPER
HOOD-
OVEN-
FIGURE 1
l
l
l
Pliers (for opening knockouts)
Pencil, ruler and level for
marking cabinet locations.
Saber saw or keyhole saw
for cutting the wall or
cabinet openings.
Caulking, metal snips, duct
tape, ducts (with elbow and
transition, if necessary) and
wall cap or roof cap, as
required.
DAMPER
WALL CAP
HOOD--r
OVEN-
FIGURE 2
‘.,q:.-
ELECTRICAL
CUTOUT
VENT
1. With a screwdriver and a pair of pliers, remove
knockout from underside of unit. See Figure 4.
CUTOUTS
A
r
DUCTLESS
VENT COVER
2. Disconnect attachment plug between switch box &
rear wiring box. See Figure 5. Press two ears on
male plug to disconnect.
3. Pull power supply cord through hole-in the bottom
of oven hood until slack is removed.
4. Set hood on top of range.
FIGURE 3
5. Lift front edge enough to connect hood power supply
cord to receptacle in top of range. Figure 4.
B. Locating vent
cutouts
6. Loosen screws holding two mounting plates on back
of hood, see Fig. 3. Rotate plates until extra holes
in plates line up with holes in range back. Remove
screws in range back and secure hood through
plates using these same two screws.
1. Open flip front of hood and remove aluminum filter.
Note: Remove packing screw on top of hood before
trying to remove filter.
7. Tighten screws holding plates to hood and range.
2. Location for vent opening can be found by measuring locations given in Figure 3 or by removing
appropriate venting knockout and simply holding
hood shell into position and marking the appropriate
location for vent opening.
NOTE: Locations can be made easier by removing the fan power pack. Simply unplug the power
cord near the front (See Section C, Step 2) and
loosen 4 wing nuts. Assembly can be removed
through the front.
3. Connect hood to electrical supply as outlined in
Section C.
Be sure that damper which is supplied with this
model is properly installed.
4. Attach damper to hood to give required venting. If
damper is attached to the back of hood, be sure
damper hinge is toward the top. See Figure 1 and 2.
5. Complete duct connections so they are air tight.
6. Re-assemble
VENT HOOD
BOTTOM
SUPPLY CORD
RECEPTACLE
fan power pack.
FIGURE 4
C. Connect hood to
electrical supply
1
Make electrical connections in accordance with the
National Electrical Code and applicable local ordinances. Hood must be permanently
grounded.
FRl%DoF
LPRESS
FIGURE 5
3
HERE
range to preserve its lasting beauty. Clean with a mild
detergent to preserve finish. DO NOT use abrasive
cleaners.
D. Install hood in
ductless application
For effective removal of smoke & odors, turn on fan at
beginning of cooking operation & allow to run until
smoke & odors are removed from room.
1. Remove ductless vent cover shown in Figure 3.
2. Set hood on top of eyelevel
range.
3. Connect hood to electrical
Section C.
supply
as outlined
in
4. Add charcoal filter from ductless kit, RCH6600
(830853) and replace aluminum filter.
E. Operation and care
of unit
Care of filters
A. ALUMINUM FILTER: For greatest efficiency, the
permanent type aluminum filter should be removed and
cleaned periodically.
F. Important safeguard
for electrical
appliances
When using electrical appliances, basic safety precautions should always be followed including the following:
1. Read and follow all instructions.
2. Close supervision is necessary when any appliance
is used by or near children.
To clean, the filter should be soaked in hot water and
detergent.
3. To avoid providing fuel for a grease pan fire, clean
lint and grease from all hood surfaces - interior and
exterior. Be sure to remove and clean air filter every
three months.
6. CHARCOAL FILTER: (FOR DUCTLESS UNITS
ONLY) This filter should be inspected periodically and
when it becomes saturated, it should be replaced.
There are no effective means of reactivating charcoal
filters.
4. Do not saturate electrical connections, switches, and
motor in water during cleaning, remember, WATER
AND ELECTRICITY DO NOT MIX!
Care of fan motor
5. If any electrical malfunction becomes evident during use, disconnect power to hood at your home fuse
or breaker box.
Fan motor has life-time sealed bearings that never need
oiling. Occasional cleaning of motor may be required.
Do not emerse in water.
Care of exterior surfaces
Your kitchen hood is a beautifully finished addition to
your kitchen and requires only the care you give your
G.If
you need service or assistance, we suggest
these four steps:
1. Before calling for assistance...
Performance problems often result from little things you
can find and fix yourself without tools.
It nothing operates;
l
Have you checked the main fuse or circuit breaker
box.
2. If you need assistance...
Call Whirlpool
COOL-LINE@
service assistance
telephone number. Dial free, (900) 253-1301 and talk with
one of our trained Consultants. The Consultant can instruct you in how to obtain satisfactory operation from
your appliance or, if service is necessary, recommend
a qualified service company in your area.
you follow
3. If you need service. . .
Whirlpool has a nation-wide
network
of franchised
Service
TECH-CARE@
Companies.
TECH-CARE
service technicians
are
trained to fulfill the product
warranty and provide afterwarranty service anywhere in the United States. To
locate TECH-CARE service in your area, call our
COOL-LINE service assistance teleohone number (see
Step 2) or look in your telephone directory Yellow Pages
under:
APPLIANCES-HOUSEHOLD
MAJOR-SERVICE
L REPAIR
WHIRLPOOL APPLIANCES
FRANCHISED TECHCARE SERVICE
SERVICE COMPANIES
XYZ SERVICE CO
123Maple
OR
9949993
ELECTRICAL APPLIANCESMAJOR-REPAIRING
L PARTS
WHIRLPOOL APPLIANCES
FRANCHISED TECH-CARE SERVICE
SERVICE COMPANIES
XY2 SERVICE CO.
9999999
123 MAPLE
OR
WASHING MACHINES, DRYERS
h IRONERS-SERVICING
WHIRLPOOL APPLIANCES
FRANCHISED TECH-CARE SERVICE
SERVICING COMPANIES
XYZ SERVICE CO.
123 MAPLE
.ss3-9999
4.If you have a problem...
Call our COOL-LINE service assistance telephone
number (see Step 2) and talk with one of our Consultants,
or if you prefer, write to:
Mr. Robert Stanley, Division Vice President
Whirlpool Corporation
2000 M-63
Benton Harbor, Ml 49022
If you must call or write, please provide model number,
serial number, date of purchase, and a complete descrip
tion of the problem. This information is needed in order
to better respond to your request for assistance.
Making your world a little easier.
In the event your WHIRLPOOL appliance
../* (_
,
_‘,
i ‘.
Learn the benefits of using TECH-CARE service for malntaining the quality originally built into your
.Whirlpool appliances.
jI
:
.’& :I:
‘I i’i”..
Part No. A626-118/830876
Rev. C
Printed in U.S.A.
ifiers Automatic Washers, Clothes Dryers, Freezers, Refrigerator-Freezers, Ice Makers, Dishwashers, Built-In Ovens and Surface Units, Ranges, Microw