1
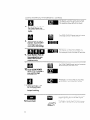
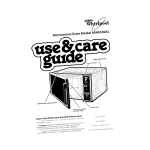
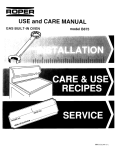
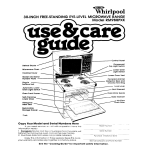
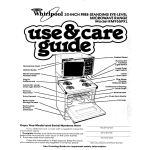
Microwave Oven
Models MW8550XL and MW8600XL
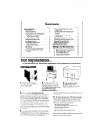
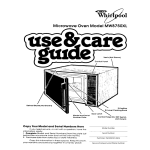
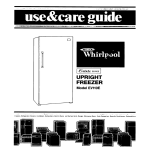
Vents (Not Shown)
Control
Panel
El-Level Cooklng
Rack
(Model MW8600XL only)
Model and Serial
Number Plate
Copy
Your Model
and Serial Numbers
Control
Panel ON/OFF Switch
(not shown)
Here
have
this
Model
Number
1 Complete
Model and Serial Numbers (from the plate
behind the microwave
oven door on the oven frame).
2. Purchase date from sales slip (or date installed).
just
Serial
Number
If you need service,
Information
ready:
or call with a question,
Copy this information
in these spaces. Keep this book,
your warranty and sales slip together in a handy place.
Purchase/lnslallatlon
SerVlCe Company
Date
and Phone Number
.
Contents
Page
Responslbllltles
Installation
Proper, Safe Use
Precautions
to Avoid Possible
Exposure to Excessive
Microwave
Energy
‘Using the Mlcrowave
Oven
Using the Minute Timer
The Safety Switch
Cooklng in One Cycle
High Cook Power
Lower Cook Powers
Defrosting
Foster or Slower Defrosting
Cooking
in More Than One
Cycle ,........I..,.......I,..I.
3
4
5
5
6
6
6
8
8
9
Y&r respodbilities..
Fill out and
return
the “Mlcrowave
Page
Cooking Automatically
after
Defrosting
Cooking with The Temperature
Probe
Changing
or Cancelling
Instructions
Other Operating
Instructions
Cleaning
the Microwave
Oven
Bi-Level Cooking Rat k
Replacing
the Llght Bulb
Important
InformatIon,
How Microwave
Ovens Work
Bulldlng In Your Mlcrowave
Oven
If You Need Service or Assistance.
I. Before Calling For Assistance.
2. If You Need Assistance
3. If You Need Service
4. If You Hove a Problem
2
2
3
11
14
16
16
16
17
17
18
20
20
27
21
21
22
22
.
Reglstratlon
Cardl’attached
to the oven
door.
I
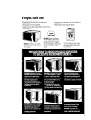
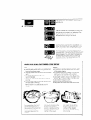
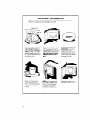
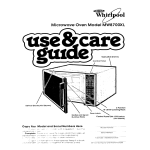
1.
Empty the microwave
oven and clean inside It with
a soft damp cloth.
/’
2. Put the oven on a cart,
counter, table or shelf that is
strong enough to hold the
oven. (The control side ot the
unlt Is the heavy slde.
Handllng can be trtcky.)
4. For your safety, thls oven must be
arounded.
DO NOT REMOVE THE THIRD PRONG
FROM THE PLUG. You must hove CI quaIlfled
electrician
pui in the right outlet If yours does
not have the J-prong plug-in, or if the outlet
IS not grounded
accordtng
to National Electncal Codes and local codes or ordinances.
The outlet must supply 120 volts, 60 Hz., A.C.
When the oven is on, it will use about 1375
watts. It should not shore a circuit wlth another
applrance.
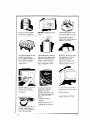
5.
Put about one cup [250 ml] of cold water
In a gloss container
in the oven. Close the
door Make sure it locks Follow the drrections
on page 4 to set the oven to COOK for 1’ I
3. Do not block vents
on back of the oven.
Blockrng vents con cause
poor cooking results
minutes. When the time IS up, the water should
be heated.
6. Fill out and return the “Mlcrowave Reglstratlon Card”attached
to the oven door. If
the cord is missrng, please send the model
pnd serial number of your microwave
oven,
with your name and address to.
Whirlpool Corporation
Microwave
Registration
Deportment
Admintstratrve
Center
2000 US 33 North
Benton Harbor, Michigan
49022
This information
will help us reach you if
there IS ever a need to pass along information
about your mrcrowove
oven
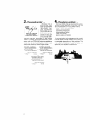
Proper, safe use
Your microwave
must be...
l
Installed according
to the installation
instructions.
l Protected
from the weather.
l
Used only for jobs expected
of home microwave ovens.
NEVER start the oven when
it’s empty. The oven can be
damaged.
l
l
Used only by people who can
properly
Kept clean and in good repair.
DO NOT cook or reheat
whole eggs in the microwave oven. Steam buildup can cause an egg to
burst. Damage
to the oven
or injury to the user may
result.
Operate
DO NOT use the oven until
you have read and understand ALL the information
on safe use.
it
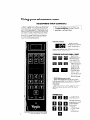
Using your microwave oven
MICROWRVE OVEN CONTROLS
When You first plug in the oven, the Display
WIII show “88:88”irthe
Control Panel ON/OFF
swatch IS ON (see page 5). If the Display ever
again shows all 8’s, it means your electricity
was off for a while or that the Control Panel
ON! OFF Switch was turned OFF and then
back ON. To clear the 8’s from the Display,
touch CANCEL [the colon remarns on) or
touch In cooking instructrons
One note. The Command
and Number
Pads are not buttons. You don’t have to
push them...just touch them.
DIGITAL DISPLAY
When you are
using the mrcrowave
oven, this acts as a
display
It counts
down time settings and It shows you what
number pads You touched
COMMAND
PADS AND SIGNAL LIGHTS
Touch Command Pads to tell
the microwave
oven what to do
and in what order.
A few examples:
-COOK CYCLE 1
(or 2) tells the
oven You are
going to cook
-COOK
POWER
tells the oven
you are going to
cook at less
than full power.
- START tells the oven to start.
Each Command
Pad has its own Signal
Light (except START and CANCEL). The Signal
Light comes on when you touch the Command Pad.
While the oven is running, a Signal Light (or
lights) will be on to show what the oven is
doing.
NUMBER PADS
the oven what vou
L
Control
Panel ON! OFF Switch
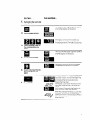
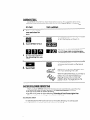
USING THE MINUTE
TIMER
The Minute Timer does not start or stop cooking; it works like a kitchen timer. Set in
minutes or seconds and you will hear a beep when the set time is up. The oven door
must be closed before setting the Minute Timer.
THIS HAPPENS...
DO THIS...
The MINUTE TIMER Signal Light will come on
and the Display will show a “0.” Within 5
seconds start touching number pads for
the desired time.
1.
Touch
MINUTE TIMER.
The Display will show what numbers you
touched in the order you touched them.
This example
shows? minute, 45 seconds.
2.
Touch Number Pads for
minutes and seconds.
The MINUTE TIMER Signal Light will stay on to
show that the Minute Timer is running.
3.
Touch START.
The Display counts down the seconds to
show how much time is left on the Minute
Timer.
count
down
When the set time is up, you will hear a
beep and the Display will show a “0”. To
remove the “O”, touch CANCEL.
P
1.
2.
3.
The Minute
Opening
Timer can be used when the oven is cooking.
the microwave
oven door does not stop the Minute
If you open oven door and reset the Minute
Minute Timer and to restart the oven.
To change
or cancel
the Mlnute
1. Touch MINUTE TIMER.
2. Touch number 0 to cancel,
or
2. Touch desired new number
Then:
3. Touch START.
Timer touch
Timer.
START twice
to start the
Tlmer:
pads to change.
THE CONTROL PANEL
ON/OFF SWITCH
Just Inside the microwave
oven door, on the
control panel frame, is a Control Panel ON/
OFF Switch The switch is designed
to keep
“busy little fingen” from using the oven.
When the switch is OFF, the oven cannot be
used and the Drsplay WIII be dark. The switch
must be ON to cook in the mrcrowave
oven
and to use the Minute Trmer. The colon (:] stays
on when the switch IS ON.
I
5
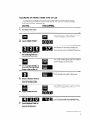
COOKING IN ONE CYCLE
Follow these steps to cook at one power
level
HIGH COOK POWER
DO THIS...
1.
THIS HAPPENS...
Put food in the oven and
close the door.
The COOK CYCLE 1 Signal Lrght WIII come
on and the Display WIII show 4 O’s
2.
Touch COOK CYCLE 1.
The Display will show the numbers you
touched in the order you touched them.
This example
shows 4 mrnutes. 30 seconds.
Touch Number Pads for
the cooking time you
want.
The oven will automatically
cook
at high Cook Power.
The COOK CYCLE 1 Signal Lrght WIII stav on
to show that the oven IS cookrng in the first
cycle.
The Display counts down the time to show
how much cookrng time is left In the first
cycle.
When the cooking time ends you will hear
4 beeps. (You can stop the beeping
by
opening the oven door or touching
CANCEL.) When the beeprng stops, the Display
will show only the ”
“.
LOWER COOK POWERS
For best results, some recipes call for lower Cook Powers Lowerrng the Cook Power
slows the cooking
The lower the Cook Power, the slower the cookrng
Each Number
Pad on Your microwave
oven stands for a different percentage
of Cook Power. Many
recipes In Your MICRO MENUS Cookbook
tell you, by number, which Cook Power to
use Recrpes In other books and magazines
may tell you by name (HI. MED. LO, etc ) or
by percentage
(10%. 50%. 80%. etc )
The followrng chart gives you the percentage
of Cook Power each Number Pad
stands for. and the Cook Power name usually used
Tmk
automatic
100% of full power
HIGH
9
90% of full power
0
80% of full power
7
70% of full power
MED-HI
6
60% of full power
5
50% of full power
MED
4
40% of full power
3
30% of full power
MED-LO
2
20% of full power
1
10% of full power
LOW
DO THIS...
1.
THIS HAPPENS...
Put food in the oven and
close the door.
The COOK CYCLE 1 Signal Light will come
on and the Display will show 4 0’s.
2.
Touch COOK CYCLE 1.
The Display will show the numbers you
touched in the order you touched them.
This example
shows 7 minutes, 30 seconds.
3.
Touch Number Pads for
the cooking time you
want.
The COOK POWER Signal Light will come
and the Display will show 2 O’s
4.
Touch COOK POWER.
5.
Touch a Number Pad for
the Cook Power you
want.
6.
Touch START.
I
Count
down
on
The COOK CYCLE 1 and COOK POWER Signal Lights will stay on to show that the oven
is cookrng in the first cycle at a Cook
Power other than high.
The Display counts down the time to show
how much cooking time is left in the frrst
cycle.
For 2 of every 10 seconds, the Drsplay will
show the Cook Power you selected.
When the cookrng time ends. you WIII hear
4 beeps. (You can stop the beeping
by
opening the door or by touchtng CANCEL)
When the beeping
stops, the Display WIII
show only the” : ‘I
7
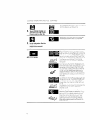
DEFROSTING
Use DEFROST CYCLE to thaw frozen food before cookrng
For suggested
check the guide on the inside of the oven door or In your MICRO MENUS
DO THIS...
1.
defrost trmes
Cookbook
Tmk
THIS HAPPENS...
Put frozen food in the
oven and close the
door.
The DEFROST CYCLE Signal Light will come
on and the Display will show 4 O’s
2.
Touch DEFROST CYCLE.
The Display WIII show the numbers you
touched in the order you touched them.
This example
shows 2 mrnutes, 30 seconds.
3.
Touch Number Pads for
the defrosting
time you
want.
The DEFROST CYCLE Signal Light will stay
on to show that the oven IS in the Defrost
Cycle.
4.
Touch START.
count
down
The Display counts down the time to show
how much defrosting time is left.
When the defrost time ends. you will hear 4
beeps. (You can stop the beeping
by
opening the oven door or touching
CANCEL.) When the beeping
stops, the
Display will show only the ” : “.
FASTER OR SLOWER DEFROSTING
When you touch DEFROST CYCLE, the microwave
oven automatrcally
uses 30% of full
Cook Power. For slower or faster defrosting, see lower Cook Powers on page 6
l
Use 20% of full power for slower defrosting.
l
Use 40% of full power for faster defrosting. Defrosting
at Cook Powers higher than
30% can cause some cooking on the outside of the food.
STANDING TIME
For best results allow the food to stand for a while after defrosting
the temperature
of the food and provide more even defrosting
Thts WIII equalize
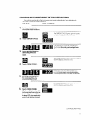
COOKING IN MORE THAN ONE CYCLE
For best results, some recrpes call for one Cook Power for a certain length of trme,
and another Cook Power for another length of time Your oven can be set to change
from one to the other, automattcally.
DO THIS...
1.
THIS HAPPENS...
Put food in the oven
and close the door.
The COOK CYCLE 1 Signal Light will come
on and the Display WIII show 4 O’s
2.
Touch COOK CYCLE 1.
The Drsplay will show the numbers you
touched in the order you touched them.
This example
shows 3 minutes, 25 seconds.
3.
Touch Number Pads for
the cooking time you
want in the first cycle.
The COOK POWER Signal Light will come
and the Display WIII show 2 0’s.
4.
Touch COOK POWER. (If
you want the high Cook
Power, skip to step 6.)
5.
Touch a Number Pad for
the Cook Power you
want in the first cycle.
on
The COOK CYCLE 2 Signal Light WIII come
on and the Display will show 4 0’s.
7.
Touch Number Pads for
the cooking time you
want in the second
cycle.
CONTINUED
NEXT PAGE
0
COOKING
IN MORE THAN ONE CYCLE
CONTINUED
The COOK POWER Srgnal Lrght WI/I come
and the Drsplay WIII show 2 O’s
or-
Touch COOK POWER. (If
you want the high Cook
Power, skip to step IO.)
Touch a Number Pad for
the Cook Power you
want in the second
cycle.
10. Touch START.
count
down
count
down
When you touch START,the COOK CYCLE 1
Lrght WIII stay on whrle the oven IS cooking
In the first cycle The COOK POWER Light WI!
be on if vou are lustno a Cook Power other
than hrg’h All other Sygnal Lights WIII go off
counts down the cooking
The Display
trme to show how much time IS left in the
ftrst cycle
For 2 of every 10 seconds. the Display WI/I
show the Cook Power you selected
I( you
are using a Cook Power other than high
You will hear a beep at the end of the first
cycle You can either open the door to
check the food, or you can let the oven
start the second cycle If you do open the
door. just close It and push START to restart
the oven
The COOK CYCLE 2 Light will be on during
be off
The Display coi;nts down the cooking
to show how much time IS left In the
second cycle
time
For 2 of every 10 seconds. the Drsplay WI/I
show the Cook Power you selected, rf you
are using a Cook Power other than high
When the last cycle ends you wtll hear
4 beeps (‘r’ou can stop the beeprng
by
opening the door or touching CANCEL )
When the beeping
stops. the Display WIII
show only the ”
”
10
COOKING AUTOMATICALLY
The controls can be set so the mlcrowave
the Cook Cycles you have touched In.
DO THIS...
1.
AFTER DEFROSTING
oven goes automatically
from defrosting
to
THIS HAPPENS...
Put frozen food in the
oven and close the door.
The DEFROST CYCLE Signal Light WIII come
on and the Display ~111show 4 O’s
2.
Touch DEFROST CYCLE.
3.
Touch Number Pads for
defrosting
time you
want.
The COOK CYCLE 1 Slgnal Light WIII come
and the Display will show 4 O’s
on
The COOK POWER Slgnal Light wtll come
and the Display ~111show 2 O’s
on
4.
5.
Touch Number Pads for
the cooking time you
want in the first cycle.
6.
cook at high power. Skip
to step 12 if you want only
one cycle at high power.)
CONTINUED
NEXT PAGE
11
COOKING
AUTOMATICALLY
AFTER DEFROSTING
CONTINUED
The Display WIII show what you touched
This example
shows 60% of full power
7.
Touch a Number Pad for
the Cook Power you
want in the first cooking
cycle.
The COOK CYCLE 2 Signal Lrght WIII come
on and the Drsplay will show 4 O’s
8.
Touch COOK CYCLE 2.
(Option: Touch START if
cooking in only one
cycle after defrosting.)
9.
Touch Number Pads for
the cooking time you
want in the second
cooking cycle.
The COOK POWER Signal Light WIII come
and the Dtsplay will show 2 O’s
on
10. Touch COOK POWER.
(Opflon: Touch START if
you want the hlgh
Cook Power.)
11 .Touch
a Number Pad
for the Cook Power
you want in the
second cooking
cycle.
When you touch START,the DEFROST CYCLE
Signal Light ~111staY on All other Signal
Lights Will go oft
count
down
12
The Display counts down the time TO show
how much trme IS iefl In the defrost cycle
count
d
own
P
count
down
When the defrost time ends, the microwave
oven automatically
lets the food stand for
the same amount of time used for
defrosting.
The Display counts down the
standing time. During the countdown, the
oven will be dark ond the fon w//l be off
The defrost Signal Light will be on.
When the standing trme is over, you will
hear a beep and the first cooking cycle
will start
The Display counts down the time to show
how much time IS left in the first cooking
cycle.
For 2 of every 10 seconds, the Display will
show the Cook Power you selected
If you
are usrng a Cook Power other than high.
P
When the first cookrng
hear a beep.
cycle
ends you will
The second cooking cycle will start. [If
only one cookrng cycle IS used, you will
hear 4 beeps and the oven WIII stop ]
The COOK CYCLE 2 Signal Light will be on
during the second cooking cycle. The
COOK POWER Light will also be on if you
are using a Cook Power other than high
count
down
The Display counts down the time to show
how much cooking trme IS left in the
second cycle.
For 2 of every 10 seconds, the Display WIII
show the Cook Power you selected
If you
are using a Cook Power other than high.
When the last cooking cycle ends you will
hear 4 beeps. [You can stop the beeping
by opening
the oven door or touching
CANCEL.] When the beeping
stops, the
Display will show only the ” : ”
Standlng tlme provides
more even
defrostlng
and cooklng because
It allows
food temperature
to even out.
To sklp the automatic
standlng tlme:
l
Instruct the microwave
oven to defrost tn
DEFROST CYCLE and to cook In COOK
CYCLE 2
TO check
or stlr foods between
or
durlng cycles:
1 Open the door. The oven will shut off.
2. Check, stir or rotate the food.
3 Close the door.
4 Touch START. The oven WIII go on from
where it stopped.
13
COOKING WITH THE TEMP ERATURE PROBE
Probe takes guesswork out of cookrng roasts and
The MEAL SENSOR Temperature
larger casseroles. The probe IS desrgned
to turn off the oven when rt senses the
temperature
you want. For suggested
temperatures
for different foods, see your MICRO
MENUS Cookbook
Final food temperature
settrngs are printed on Number Pads.
DO THIS...
1.
Insert at least 1 , of the
temperature
probe Into
the food
DO THIS...
2. Place food in the oven
and plug the probe into
the socket on the oven
wall
3. Make sure ihe’probe
does not touch any part
of the oven interior. Close
the door.
THIS HAPPENS...
The COOK TEMP Signal Light WIII come
and the Display will snow 2 O’s
4.
5.
on
OOK TEMP.
Touch : Number Pad for
the desired final
temperature.
The Display will show the number you
touched
This example
uses 6 or a final
cooked temperature
of about 150 F (66 C)
The 0 means the fooa IS still cold
The COOK POWER Srgnal Light WIII come
and the Drsplay will show 2 O’s
6.
on
Touch COOK POWER.
(Option: Touch START if
you want to use
full power.)
The Drsplay WIII show what you touched
Thus example
shows 60% of full power
7.
14
Touch the Number Pad
for the Cook Power
you want.
‘Tmk
The COOK TEMP and COOK POWER LlgntS
will stay on
8.
Touch START.
The left number on the display shows what
temperature
(number] you selected
The
right number shows you how the
temperature
IS nsrng In the food
For 2 of every 10 seconds. the Display will
show the Cook Power you selected
If you
are ustng a Cook Power other than high
When the probe senses the temperature
you selected. the oven shuts off and you WI/I
hear 4 beeps (You can stop the beeping
by opening the oven door or touching
CANCEL ] When the beeping
stops. the
Display will show only the
HINTS FOR USING THE -TEMPERATURE PROBE
DON’T...
DO...
l
l
l
l
l
use hot pads when removing
probe from
food or food from oven
unplug probe from socket to turn off oven
lrght
stir foods during cooking when
recommended
stir soups. casseroles
and drinks before
servrng
cover roasts with toll and let stand a few
minutes after cookrng.
Remove foil if you decide to cook it
longer
For casseroles
the trp of
the probe should be In
the center of the food Stir
roods when recommended
Replace the
probe
let probe or probe cable touch any part
of the oven interior.
l
let probe touch foil (If used). Foil can be
kept away from probe with wooden
toothpicks
Remove foil If arcing occurs
l
use paper, plastic wrap or or plastic containers They WIII be in the oven too long
l
use probe in regular oven
l
force probe into frozen food.
a use probe for foods that need to simmer.
l
For Irqulds. balance
the
probe on a wooden
spoon or spatula so the
trp of the probe IS in the
center of the lrquid
For roasts. the tip of the
probe should be in the
center of the largest
muscle but not touching
fat or bone
CHANGING OR CANCELLING INSTRUCTIONS
To change or cancel any lnstructlons you have touched, simply touch CANCEL, All
instructrons WIII be cancelled
The Display WIII show ” : ” and you can start over,
If you want to change or cancel rnstructrons before you have touched START, simply
touch In the new instructions
They WIII cancel the old ones
OTHER OPERATING HINTS
These are a number of things you can do with your mrcrowave
oven Some ~111be
reminders
Others WIII be mentioned
for the first time
1 To double check settings while the oven IS runnrng, touch the command
pad for the
setting you want to check The Instruction programmed
for that pad will show on
the Display for 5 seconds
Then the Drsplay returns to show what the oven IS doing
2 To stop the oven while it is running:
. Open the door The oven will stop You can restart It by closing the door and
touching START
. Touch CANCEL All Instructions wili be erased You must touch in new lnstructlons
3 If you touch two rnstructlons Into the same cycle, the second instructions WIII erase
the first
4 When using a Cook Power other than hrgn the Display WI// show the Cook Power for
2 seconds of every 10 during cooking
5 When COOK CYCLE 1 follows DEFROST CYCLE, a standing time equal to the defrostrng time will occur between the two COOK CYCLE 1 will automatlcally
begin after
this standing time
CLEANING THE MICROWCVE CWEN
Wrpe often with warm sudsv
water and a soft cloth or
sponge
For stubborn SOII, boil a cup
of water in the oven for 2 or 3
minutes Steam will soften
the so11
Be sure to clean the areas
where the door and oven
frame touch when closed
Rinse well.
Abrasive cleaners, steel wool pads, grrtty wash cloths and the like can damage
the
control panel and electronics.
Use a soft cloth or a sponge with a mrld detergent
01
commercial
glass cleaner
CLEANING
THE PROBE:
1 Remove probe from microwave
oven using hot pads
2. Wipe probe with a hot sudsy cloth. Use a plastic scouring pad to remove stubborn foods
3 Probe may be placed
In the silverware
basket of the dishwasher
4 Be careful not to kink the cable
NOTE: Make sure you have the right probe for Your oven It will have ‘HI-Z” on the handle
16
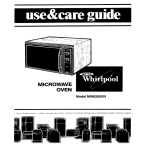
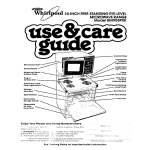
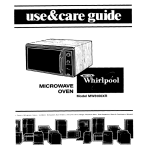
BI-LEVEL
COOKING
RACK (Model
MW86OOXL
only)
Use the Br-Level Cooking Rack when cookrng In more than one contarner
The rack
can be turned upslde-down
to help fit taller containers
on the bottom of the oven See
the MICRO MENUS’ Cookbook
provided
wrth your oven.
First Posltlon: Use the rack only when heating
more than one container
of food.
Do not let a container
touch the top of the
oven.
CLEANING
SPECIAL CAUTIONS
l
l
l
l
l
l
l
Do not use with browning
dish.
Use only when cooking foods in more than
one container.
Do not use in conventional
ovens or under
brorler.
Do not let food or container touch the top of
the oven
Do not store rack in the oven.
Put food in containers,
then place
containers
on rack.
Do not cook foods directly on rack wrthout
putting them in containers
first.
REPLACING
1.
Unplug
l
l
THE RACK
Wash by hand with a mild detergent
or in
your dishwasher.
Do not use abrasive
scrubbers or cleansers
THE LIGHT BULB
the power
2. Remove holding
access panel.
Second Posltlon: Turn rack upside-down
when using a taller container
on the bottom
of the oven.
cord.
screw on
3. Remove the light bulb
from its socket.
.
4. Replace
bulb with a 40.
watt appliance
bulb
II Bulb
5. Replace the access
panel and holding screw.
6. Plug In the power
.lmk
cord.
Screw
17
_I.MPORT?LNT INFORMATION
Before you start using your rnlcrowave
oven, read
/nformot/on
w/l help yo;&oid
domoge
lo your oven
Metallic
Metolllc
Glaze
carefully
rhis
Trim
/
Cookrng In metal containers
can damage
the oven. So
can contarners with hldden
metal (twist-ties. forl-lining,
staples, metallic glaze or
tram] resf drnnerwore or cookware before usmg
Paper can char or burn,
and some plastics can
melt If used when heating
foods for more than 4
mrnutes
18
this section
To tesf u dish for scVe use, put rt
into the oven with a cup of
water beslde it. Cook on high
Cook Power for one minute
If the dlrh gets hot and the
water stays cool, do not
use It.
NEVER start a microwave
oven when it’s empty. The
oven can be damaged
If
you experrment.
put a
container
of water rn the
oven
NEVER COOK OR REHEAT A
WHOLE EGG. Slice hard
boiled eggs before
heating. Steam burld-up In
whole eggs may cause
them to burst and possibly
damage
the oven
Don’t let anything
touch
the top of the oven cavltv
Rough or harsh cleaners
DO NOT store things In the
can scratch or dull the
oven
oven frnlsh. DO NOT USE THEM.
2 ‘*r I// /
\’
‘j, P ,<c
Overcooking
some foods
can cause them to scorch
or flame ..especially
foods
like potatoes, popcorn,
snacks, etc. See the MICRO
MENUS’ Cookbook
0
Make popcorn
only in
poppers designed
for use
In microwave
ovens.
Follow popper drrections.
Results are the popper
manufacturer’s
responsibrlrty
Liquids heated In certain
containers
may overheat.
The liquid may then splash
out with a loud noise. This
does not harm the oven,
but you should not use
such containers
to heat
liquids agarn.
DO NOT OVERCOOK
POTATOES. At the end of the
recommended
cooking
time they should be
slightly firm Wrap rn foil
and set aside for 5 minutes
They WIII finish cooking
while standing.
USE HOT PADS. Microwave
energy does not heat
containers,
but the hot
food does.
Follow MICRO MENUS’
Cookbook
directions
carefully
If using a
different cookbook,
you
may need to experiment
with times and Cook
Powers.
It IS normal for the Inside of
the oven door to look wavy
after the oven has been runnlng for a while
l
l
If your electric power lrne
voltage IS less than the
normal 120 volts, cooking
times may be longer.
.Tmk
Double-check
settings.
all
It IS normal for the signal
lights to flicker whrle the
microwave
oven IS on
Use the oven only for
defrosting, cooking or
reheating
19
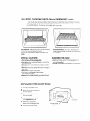
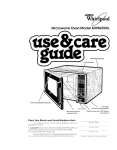
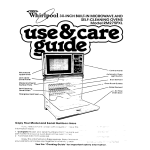
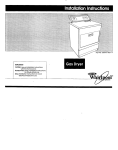
HOW MICROWWE
OVENS WORK
Mtcrowave
ovens are safe. Microwave
energy IS not hot It causes
make its own heat, and it’s this heat that cooks the food
Mode
Mixer
\
food to
Ceramic
Magnetron
/
Bottom
Oven .Cavity
Metal
Mrcrowaves
are lake TV
waves or lrght waves You
can’t see them, but you can
see what they do
A magnetron
in the microwave oven produces
microwaves.
The microwaves
move into the oven where
they are scattered
or stirred
by a mode mixer (like a fan).
Microwaves
bounce off
metal oven walls and are
absorbed
by food.
The ceramic
bottom of your
microwave
oven lets microwaves through Then they
bounce off a metal floor,
back through the ceramrc
bottom and are absorbed
by
the food.
Mrcrowaves
pass through
glass, paper and plastic
wtthouf heatrng them so food
absorbs the energy Mrcrowaves bounce off metal pans
so food does not absorb the
energy
Microwaves
may not reach
the center of a roast. The heat
around the outside is what
cooks the roast all the way
through. This is one of the
reasons for letting some
foods (roasts, baked potatoes) stand for a while after
cooking, or for stirring some
foods during the cookrng time
The microwaves
drsturb
water molecules
in the food
As the molecules
bounce
around bumptng
Into each
other, heat IS made lrke rubbing your hands together
Thus IS the heat that cooks
Bottom
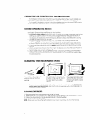
Building in your microwave oven
your microwave
Oven Is not limited to carts, Counters or tables
are made easy with kits available
from your dealer,
1.
Burld the mrcrowave
oven Into a cabinet or
wall by Itself or over
built-rn single ovens rn
the Whrrlpool RDE, REE.
RGE, RB and SB model
series or lmperral 7200
srngle gas ovens
2.
Attach the microwave
oven to a wall by itself or
with cabinets over rt
.
Ask your dealer for detarts on
l
RCK803 (832849) - 30.Inch Burlt-In Krt
l
RCKBOS (8328561 -25’,-rnch
Burlt-In Krt
l RCK807
(832850) - 27.Inch Butlt-In KII
l
RCK710 (832763) -Wall Mount K/t
20
l
l
l
3.
Custom rnstallatrons
Put the microwave
oven
on the MICRO SHELF’
Hood over a cooktop. The
hood is available
ducted
or as a rectrculating
hood, and Includes cooktop lrghts
RCKBll (832675) -Wall Mount Vent Grille
and Frller Kit
RCK713 (832769) -Wall Mount Cookbook
Storage Cabinet
RH3330XL - MICRO SHELF Hood
‘Tmk
If you need sertice or assistance,
we suggest you follow these four steps:
1. Before
calhg
for assis tame.. .
Performance
problems often result from
little things you can find and fix yourself without tools of any kind.
If nothing operates:
IS the oven correctly
plugged
into a
live clrcult wrth the proper voltage?
(See page 2.)
. Have you checked
the maln fuse or circuit
breaker box7
If the microwave
oven will not run:
l
Is the timer set7
l
Is the Control Panel Swatch ON7 (See
page 5 I
l
Is the door firmly closed and latched?
l
Did you touch START?
l Dtd you follow
the directions
exactly?
l
If the microwave
oven has been stored in a
cold area:
* Allow It lo stand for 20 to 30 minutes at room
temperature
before operating
the controls.
If microwave
cooking times seem too long:
Is the electric supply to your home low or
lower than normal? Your electric company
can tell You If the line voltage is low.
l
Is the Cook Power at the recommended
settrng?
l Are you allowlng
for more time when cookIng more food at one time?
If the display shows a time counting down
but the oven is not cooking...
l
Is the Minute Timer Signal Light on7
l
Is the oven door closed completely?
l
Is the oven In a standlng time between
DEFROST CYCLE and COOK CYCLE I? [See
page12 I
If the fan seems to be running slower than
usual...
l
Has the oven been stored In a cold area3
The fan WIII run slower unttl the oven
warms up to normal room temperature
If there has been a power lnterruptlon
or if
the Control Panel ON/OFF Switch has been
turned OFF and then ON agaln, the Display
will show 88:88. Touch CANCEL or touch in
cooking
instructions.
If the microwave
oven turns off too soon or
not soon enough when using the probe:
l
Is at least 9 of the probe In the food?
l
Is the probe tip In the center of the food?
l
Is the probe touching
bone or fat7
l
Gave you allowed
roasts to stand for a few
minutes after cooking?
l
Is the probe plugged
tightly Into Its socket7
l
Is the Cook Power set where It should be7
l
Is the Cook Temperature
set at the end temperature you want7
l Do you have
the correct probe for your
oven? See page 16.
l
2
l
If you need assistance
...
Call the Whirlpool
COOL-LINE p service
assistance telephone
number. Dial free from:
Contlnental
U.S. . . . . . . . . (800) 253- 130 1
Mlchlgan
. . . . . . . . . . . . . . . . (800) 632-2243
Alaska & Hawaii . . . . . . . . (800) 253- 1121
and talk with one of our trained
Consultants.
The Consultant
can instruct you In how to obtain satisfactory
operation
from your appllante or, if service is necessary,
recommend
a
qualrfied
service company
In your area
21
3
l
4
If you need service ’ . . .
Whirlpool
has a
nationwide
network of franchised
TECH-CARE service
technicians
are
trained to fulfill the
~RAHCHISED
SERVICE
j
product
warranty
and provide
afterwarranty
service,
anywhere
in the United
States. To locate
TECH-CARE service
in your
area, call our COOL-LINE service assistance
telephone
number (see Step 2) or look in your
telephone
directory
Yellow Pages under:
ELECTRICALAPPLIANCESMAJOR-REPAIRING
APPLIANCES-HOUSEHOLDMAJOR-SERVICE
h REPAIR
~~HIRLPOOLAPPLIANCES
iQAhCHISEDTECH
CARESERVICE
.SEHI'I('E
1‘:
SEAVICECO
!1 MaoNe
('011/!4
OR
.L;EH I'/(‘,!
VIE.';
KY: SERVICE co
173 Mao/e
999 9999
OR
WASHING MACHINES,
(I IRONERS-SERVICING
DRYERS
WHlRLPOOLAPPLlANCtS
FRANCHISEOTECH CARE SERVICE
22
h PARTS
WHIRLPOOLAPPLIANCES
FRANCHISEDTECH-CARESERVICE
('0
Mm
S/E.S
999.9999
l
Ifyou have a problem’“. . .
Call our COOL-LINE service assistance
telephone number [see Step 2) and talk with one
of our Consultants, or if you prefer, write to:
Mr. Guy Turner, Vice President
Whirlpool Corporation
Administrative
Center
2000 US-33 North
Benton Harbor, MI 49022
If you must call or write, please provide: model
number, serial number, date of purchase,
and
a complete
description
of the problem.
This
information
is needed
in order to better respond to your request for assistance.