1
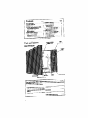
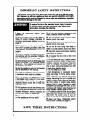
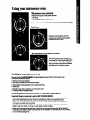
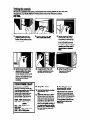
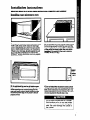
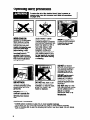
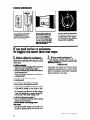
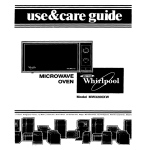
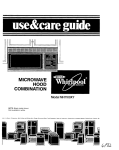
MICROWAVE
OVEN
Model MW1200XW
freezers. Refrlgeralor-freezers.
Ice Makers. Dishwashers. Bwll-In Ovens and Surface Un~ls. Ranges. MIcrowave Ovens. Trash Compactors. Room Au Condltloners. Dehumtdl
St
,
!
i
,I
Fill out and return the “Mlcrowave
Reglstratlon Card” Included with your oven. If the cord is
missing, please send the model number and serial number of your microwave oven with your name
and address to . . .
Whirlpool Corporation
Microwave Registration Deportment
Administrative Center
2000 M-63
Benton Harbor, Michigan 49022
This information will help us reach you if there is ever a need to pass along information about your
microwave oven.
Before you install your microwave oven
Read and carefully tallow the “Installation
tound on page 7 ot thls Use & Care Guide.
Instructions”
Pwsonal Injury Hazard
Failure to tallow the lnstallatton Instructtons could lead to product
Before you use your microwave oven
Read thls “Use & Core Guide” carefully for fmportant use and safety information.
Store in a convenient place for future use.
It Is your responslblllty
to be sure your microwave oven:
Has been installed where it is protected from the elements. The microwave
oven should be at a temperature above WF (10%) tor proper opemtlon.
l Has been installed
on a surface strong enough to support its weight.
l Has been properly
connected to elecfrlcoi supply and grounded.
(See “lnstallatlon Insfrucflonsl’)
l
Is operated wlth the removable gloss tray In place
l Is not used by children
or anyone unable to operafe tt properly.
l Is properly
maintoined.
l Is used only for Jobs expected
of 0 home mlcrowave oven.
l
PRECAUTIONS TO AVOID
POSSIBLE EXPOSURE TO EXCESSIVE
MICROWAVE ENERGY...
DO NOT affemptto operafe this oven wifh fhe door
open since opendoor
opemtion can result In
harmful exposure to micro
wove energy. It Is Important
not to defeat or tamper
wifh the safefy inferlocks.
DO NOT place any obJect between the oven front
face and the door or allow
sol1 or cleaner resldue to
;;cz;oylate
on sealing
DO NOT opemte the oven
If lt is damaged. It Is padlculorly Important that the
oven door close properly
and that there is no
damage to the
(1) Door (bent),
(2) Hlnges and latches
(broken or k~sened),
(3) 2~~11s
and seailng
The microwave oven
should be checked for
microwave lea koge by
qualified sewlce personnel
after a repalr Is made.
The oven should not be
adjusted or repalred by
anyone except properly
quoliffed service
personnel.
DONOTOperateth0
DO NOT opemtethe
microwave oven if the door
window is broken.
mlcrowave oven wlth fhe
outer cabinet removed.
3
IMPORTANT
SAFETY INSTRUCTIONS
Mlcrowave ovens have been thoroughly tested for sate and efflclent operatlon. However, as wlth any appliance, there are special lnstallatlon and safety
pfecautlons which must be followed to ensure safe and satisfactory operatlon
and prevent damage to the unlt.
To reduce the risk of fire, electrical shock, Injury to persons
or damage when uslng the mlcrowave oven, follow basic
precautions, lncludlng the followlng:
1. Read ail instructions before using
appliance
2. Read and follow the specific “PRECAUTIONS TO AVOID POSSIBLEEXPOSURETO
EX&CE;VE MICROWAVE ENERGY’ found on
3. Thls appilance
must be grounded. Connect oniy to properiy grounded outlet. See
“GROUNDING INSTRUCTIONS” found on
page 8.
4. install or located this appliance only in
accordance with the provided “INSTALLATION INSTURCTIONS”found on page 7.
5. Some products such as whole eggs and
sealed containers - for exampie “Osed
glass jars - may explode and should not
be heated in this oven.
6. Use this appliance oniy for its intended
use as described in this manual.
7. As with any appliance, close supervision
is necessary when used by children.
8. Do not operate th!s appliance if it has
a damaged cord or plug, if it Is not working prOperh/, or if it has been damaged or
dropped. Electric shock, fire or other hazards may result.
9. This appliance should be serviced only
by qualified service personnel. Call an authorized Whirlpool” service company for
examination, repair or adjustment.
10. Do not cover or block any opening
on the appliance, fire may result.
11.Do not use outdoors, damage to the
oven or electric shock may result.
12. Do not immerse cord or plug in water,
electric shock may result.
13. keep cord away from heated surfaces,
electric shock may result.
14. Do not let cord hang over edge of
table or counter, electric shock may result.
15. See door suface and interior cleaning
instructions On page 9.
the risk of fire or fire in the
oven cavity:
a. Do not overcook food. Carefully attend
appliance if paper, plastic or other combustibie materials are placed inside the
oven to facilitate cooking. Paper can
char or burn, and some plastics can melt
if used when heating foods
k Do not deep fry in oven.
c Test dinnerware or cookward before
using. See page 12. Some dishes (melamine, Centura? etc) absorb microwave
energy, becoming too hot to handle and
slowing cooking times Remove wire twistties from paper or plastic bags before
placing bag in oven. Cooking in metal
containers can damage the oven. So can
containers with hidden metal (twist-ties, foil
lining, staples, metaiilc glaze or trim.)
d. If materials inside the oven should ignite
keep oven door closed, turn oven off, and
disconnect the power cord, or shut off
power at the fuse or circuit breaker panel.
16. To reduce
17. Read and follow “OPERATING SAFETY
PRECAUTIONS”starting on page 10.
SAVE THESE INSTRUCTIONS
4
Using youi microwave oven
Microwave oven controls
There are two parts in the control section:
-The Timer
-The Variable Cook Power Control
These will be covered on the followlng
pages. Read them carefully
The Timer
The Variable Cook Power Control
The Cook Power Control allows You
to choose the Cook Power seltlng that
best meets your cooklng needs. See
the Cook Power Chart for the dltterent
percentages of cooklng powers.
Cooking in your microwave oven
Be sure to read the MICRO MENUS@Cooking Gulde packed wlth the mlcrowave
lt contains lntormatlon about:
l What is mlcrowave
energy?
l How food Is cooked
by mlcrowave energy.
l What affects cooklng
speed and cooklng evenness.
0 Safety tips.
l Utenslls to use when cooklng
In a mlcrowave oven.
l Cooklng
times for different foods.
oven.
The MICRO tvlENUS@Coaklng Guide will help you get the BESTCOOKING RESULTS.
Important things to remember to get the BESTCWKIMG RESULTS.
ALWAYScook food for the mlnlmum recommended cooklng time. If necessary, add ttme In
one or two minute periods. then check for doneness to avold overcooklng the food.
l stir, turn or rearrange
the food belng cooked about halfway through the cooklng tlme for
mast even doneness wlth all recipes.
l
If a glass cover is not available, use waxpaper, paper towels or microwave approved
plastic wmp Turn back a corner to vent steam during cooking.
l When uslng mlcrowave
recipes tram cookbooks or sources other than the MICRO MENUS@
Cooklng Gulde slightly longer cooklng ttmes will be needed. For example, add 1to 2 minutes
to a 5 mlnute cooklng tlme.
l
Setting the controls
Etesure you understand the basics of mlcrowave oven cooklng before you start. Start wlth
recipes from your MICRO MENUVCooklng Gulde. Follow the dlrections caretully
1. Opentheovendoorby
pressing the DOOR OPEN
2.PutfoodIntheoven.DO
NOT CLOSE THE DOOR.
BlJtWi~thebottomOfthe
conlmi pane’.
3. Set the cooklng time by
tumlng the Tlmer Knob
clockwlse. To reduce the
cooklng time, turn the Timer
Knob counterclockwise.
To @etffmer for less than 1
minute, km tfmer past 1
minute then to deslred
flme.
4.
SeftheCaokPawertothe
deslred setting from HiGH
toLOW.Forbestresu&
same recipes oaii for lower
Caok Pcwers. (See chart
below) The lowerthe Cook
Power, the slower the
oooklng.
6. Close the door. The oven
wlil start cooklng and you
will hear a fan running.
6. Whenthesettlmelsup,
the oven will shut off
automatically
COOK POWERCHART
Recipes In your MICRO
~osfoplheoven
MENUvCooklng
Gulde use
Cook Power setltngs from HIGH tc 1. TumthenmerKnobcounterciookwlse ta “OFF.”
LOW.Recipes from other
books and magatlnes may
use different Cook Power
2. &theovemdaar.Opmpercentages The followlng
ingtheovendoorstopsthe
chart may be helpful:
oven sci you can sttr,turn, re+
HIOn-lOO%offuNpower
arrange or add Ingredients
tothefood.Closetheoven
MED-HIOW- 70% of full
door to complete cooklng. If
power
yOUremoVethefOOd,S&the
MED- 50% of full power
ttmer to “OFF”bebre closing
MED-LOW/
the oven door so oven will
D5FRO5T- 30% of full power
notoperate.
LOW-15% of full power
6
Defrosflng In your
mlcrowave oven
Use the MED-LOW/DEFROST
setttng tothaw frozen food
before cooklng. Thls sefflng
cooks at 30% of full power for
the deslred defrostlng tlme.
For suggested defrosttlmes,
see the chart behind the
oven door.
Installation
instructions
SEFOREYOUBEGIN,READlHE KXLOWING INSTRUCTIONSCOMPLETELY
AND CAREWUY.
Installing your microwave oven
Ir
II II
\
1. Empty the mlcrowave oven and clean lnslde
lt with a soft, damp cloth. Check for damage
such as mlsallgned door. Damage around the
door or dents lnslde the oven or on the exterior.
If there Is any damage, do net operate the unlt
until It has been checked by an authorlzed
WhirlpooP service technician and any repairs
have been made
2. Put the oven on a cart, counter, table or shelf
that Is strong enough to hold the oven and the
toad and utensils you put In It. (lhe oontrol side
3. Do not block fhe vent or alr Intake openlngs on the rear of the oven. Blocklng vent or alr
4. Do not install the mlorowave oven so thaf
the right side Is flush wlfh a wall, shelf or cabInet. Leave clearance of at least 5 In. (12.7cm)
Intake openlngs can cause damage to the
oven and poor cooklng results. Make sure the
mlcrowave oven legs are In place to ensure
proper alr flow
of the unlt Is the heavy side. Use care when
handling.) The welght of the oven Is approxlmately 34 Ibs. (15.3 kg.).
on the rlght slde for proper operatton. No clearance Is required for the left slde or top.
Do not install the oven next to a conventional surface unit or in any area where
excessive heat and steam are generated. This could damage the outside of
the cabinet.
I
7
5. Electrical requirements
Observe all govemlng codes and ordlnancer
A 120 Volt, 60 Hz, AC only, 15 or 20 amp fued electrical’supply
is required. (Time-delay fuse
us recommended.) It is recommended that a separate circuit sewing only this appliance be
provided.
6.
GROUNDING
INSTRUCTIONS
7. For your personal safety, this appliance must
be grounded. In the event of an electrical short
circuit, grounding reduces the risk of electric
shock by providing an escape wire forthe electric current. This appliance is equipped with a
polarized &prong grounding plug. It must be
plugged into a correctly polarized mating 3prong grounding type wall receptacle, properly installed and grounded in accordance
with the National Electrical Code and local
codes and ordinances. If a mating wall receptacle is not available or if you are not sure if the
3-PRONG 0
GROUNDING l’ WE
WALL RECEPTACLE
II-2
I
3-PRONG
GROUNDING PLUG
GROUNDING
PRONG
8. Plug me oven into me proper electrical outlet and put about one cup
(250 ml) of cold water in a glass container in the
oven. Close the door. Make sure it latches. Follow the directions on page 6 to set the oven to
COOK for 2 mlnutes. When me ttme is up me
water should be heated.
wall receptacle
is properly grounded and
polarized,
have it checked by a qualified
electrician.
It is the personal responsibility and obligation of
the customer to have a properly grounded and
correctly polarized 3-prong wall receptacle
installed by a qualified electrician.
Consult a quallfled electrlcian if me grounding
instructions are not completely understood, or if
doubt exists as to whether the appliance
is
property grounded.
It Is NOT recommended to use an extension
cord with Your mlcrowave oven, but if You find
lt necessary to do so tempomrlly (until a properly grounded and polarized 3-prong receptacle Is Installed), use only a heavy duly UL llsted
3 wire groundlng tYpe extenslon cord containing
three 16 gauge (mlnlmum) copper wires. It must
not be longer than 10 feet (cords longer than 10 feet
may affect the cooking performance of your microwave oven). The plug on the extension cord
must fit into a J-prong grounding type wall receptacle (as shown on this page) and the receptacle
end of the extension cord must accept the 3-prong
grounding plug of the microwave oven.
9. This mlcrowave oven Is deslgned for use In
the household only and must not be used for
commercial purposes.
DO NOT remove me door, control panel, or
cabinet at any ttme. The untt Is equipped with
high voltage and should not be serviced unless
by an authorized Whirlpool” service technician.
SAW THESE INSTRUCTIONS
Custom mounting
your microwave
Your microwave oven is not limited to carts,
counters or tables. Custom installations are
made easy with kits available from your dealer.
1. Attach the microwave oven to the wall.
4158002
Wall Mounting Kit
2. Attach the microwave oven directly to the
underside of a cabinet.
4158000
Under-the-Cabinet Mounting Kit
4158025
Under-the-Cabinet Spacer Kit
Do not Install the oven next to or over a conventlonal surtace unlt or In any area where
excessive heat and steam are generated.
l’hls could damage the mlcrowave oven.
oven
I
Caring for your microwave oven
Cleaning the microwave oven
Wipe often with warm sudsy
water and a soft cloth or
sponge.
The glass tray may be
removed for cleaning. Wash
by hand in mild detergent or
in the automatic dishwasher.
ALWAYSOPERATEOVEN WITH
GLASS TRAYIN PLACE.
for stubborn soil, boil a cup
of water in me oven for 2 or 3
minutes. Steam will soften
me soil.
Abrasive cleansers, steel wool pads, gritty wash clothes, ek,
can damage the control panel, and the lnterlor and exterior
oven surtacer Use a sofl cloth or a sponge with a mlld detergent or spray glass cleaner.
Be sure to clean the areas
where the door and oven
frame touch when closed.
When cleaning surfaces of
door and oven that come together on closing the door,
use only mild, nonabrasive
soaps or detergents applied
with a sponge or soft d0m.
Rinse well.
Operating safety precautions
To reduce the risk d fir@ eleclrical shock, InJury to persons, or
damage when using lhe mlcrowave oven, follow the precautlonr
on pages 1042.
NEVERCOOKOR
REHEATAWNOUEGG.
Uqulds heated In cetialn
containers (especially
cytlndrtcal-shaped
containers)
may become overheated. The
llquld may splash out with a
loud nolse durtng or after
heating or when addlng
lngredlents (coffee, etc)
resulting In harm to the oven
and possible personal InJury.
For best results sttr any llquld
several times before heatlng
or reheating.
Steam bulld-up In whole
eggs may cause them to
burst and bum you, and
possibly damage the oven
Slice hard boiled eggs
before healtng. In rare
instances, poached eggs
havebeenknownto
explode. Cover poached
eggs and allow a standing
time of one minute before
cultlng Intothem.
NEVER lean on me door
or allow a child to swlng on
itwhenthedoorlsopen.
InJury could result.
DO NOT can foods In
me oven. Closed glass lars
may explode resulting In
damage to the oven or
possible personal InJury.
I
’
/
,
USE HOT PADS.
Mlcrowave energy does
not heat contalners, but the
hot food does. You could
get burned.
DO NOT let the oven
contlnuetoopemte after
removlng
time.
Addltlonal
l
l
l
10
food. Cancel
I
DO NOT heat, store or use
flammable or Inflammable
materials In or near the oven.
Fumes can create a fire
hazard or exploslon.
DoNoTusetheovento
sterlllze objects (baby
boffles, etc.). it Is dlfflcult
to malntaln the hlgh temperature required for safe
sterlllzatton.
Do NOTdeepfryInthe
oven. Mlcrowavabie utensils
are not sultabie and It Is
difficult to malntaln
approprlate deep frying
tempemtures
Precautions
Carefuliy place cookware on glass tray to avoid possible breakage
Handle glass tray wtth care when removing from oven to avoid possible breakage
When a browning dlsh is used, the brownlng dlsh bottom must be at least 3/16 Inch above
glass turntable
DoNOTWetheOVen
for storage. Do not leave
paper products, book or
cooklng utensils In the oven
when not In use. Fire may
result If someone accldentally starts the oven.
Don’t let anythlng touch the
top of the oven.
If a tire should start In the
oven cavity:
l keep door closed
l lumovenofi
l dlsoonrnot
lhe powor
supplyatthecord,tuseor
clrcult breaker.
DO NOT pop popcorn,
except In a mlcrowavs
wwvd
popcorn popper
or commercial package
deslgned especially for
mlcrowave ovens.
NEVERtrytopopcornln
a paper bag. Overcooklng
may result In smoke and
tire.
Starting a mlcrowave oven
when It& empty Is not recommended. If you experlment, put a container of
water In the oven.
NEVER remove the stirrer
cover. The plastic cover
protects the mlcrowave
stirrer blade tram soll or
bendlng.
DO musenewspaper
or other prlnted paper In
the oven. Fire could result.
DoNoTovERcooK
POTATOES.Flm could
result. At the end of the recommended cooklng time
they should be sllghtty flrm.
Wrap In foil and set aslde
for 5 mlnutes. They will tlnlsh
cooklng while standlng.
DoNoTmountthlsoven
over a cooktop or range.
Damage to the oven may
result
DO NOT try to melt
parattln wax In the oven.
You may be burned.
Do WT dry flowers, hult,
herbs, wood. paper, gourds
or clothes In the oven. Fire
may result.
connnued on next page
11
General Information
If your electric power line
voltage Is less than the
normal 120 volts, cooklng
times may be longer.
To test a dlsh for safe use,
put It Into the oven wlth a
cup of water berlde lt.
Cook on hlgh Cook Power
for one mlnute. If the dish
gets hot and waler stays
cool, do not use lt.
If time Is left on the timer when
you remove food from the oven,
turn the timer to “OFF” before
closing the door. Thls prevents
the oven from operating.
If you need service or assistance,
we suggest you follow these four steps:
1. Before Calling for assistance...
2. If you need assistance%.
Performance problems often result from llttle
things you can find and fix yourself without tools
of any klnd.
It nothlng operates:
l lsthe oven correctly
plugged Into a live clrcult
wlth the proper voltage? [See page 8.)
l Have you checked
your home’s maln fuses or
clrcult breaker box?
l Have you checked
the electric company for
a power failure?
If the mlcrowave oven will not fun:
l Isthetlmerset?
l Is the door firmly closed
and latched?
l Dld you follow the dlrectlons
exactly?
It mlorowave oooklng times seem too long:
l
Is the electric supply to your home or wall
outlet low or lower than normal? Your electric company can tell you lf the line voltage
is low. Your electrician or service technician
can. tell you if the outlet voltage is low.
l Is the Cook Power set correctly?
l Are you allowing
more time when cooklng
morethanonefoodltem?
If the tan seems to be funning slower
than usual:
l
Has the oven been stored In a cold area? The
fan will run slower unttl the oven warms up to
normal rcom temperature.
Call Whlrlpool
COOL-LINE@ service asslstanoe telephone number. Dlal tree from
anywhere In the U.S.:
l-800-253-1301
and talk with one of our trained Consultants. The
Consultants can instruct you in how to obtain
satisfactory opemtion from your appliance or, if
service is necessary, recommend a qualified
service company in your area.
continued
12
on next page
3. If
you need service%.
Whirlpool has a
-&ydtuz
rlzed Whirlpod”
service companies. Whirlpool
service technicians are trained to fulfill the
product warranty and provide after-warranty
service, anywhere in the Unlted States To
locate the author&d Whlrlpaol service company in your area, call our COOL-LINE@
sewice assistance telephone number (see Step
2) or look In your telephone directory Yellow
Pages under:
APPLIANCES-HOUSEHOLDMAJOR-SERVICE
6 REPAIR
ELECTMCAL
APPLIANCESMUOR-REPIIRING
A WITS
4.
If you have a problem%.
Call our COOL-LINE sewlce assistance telephonenumbef(seeStep2)andtatkwlttlone
of our consultants, or it You prefer, write to:
Mr. DonaM Skinner
Dlrector of consumer Raanons
WhIrlpool corporation
2oooM-63
Benton Harbor, MI 49022
Please Include a daYtlme phone number in
your correspondenca
l
lfyoumu.stcallorwrite,pbasepmmide
model number, serial number, date d purcs”,p
complete description ot the
ldomdbnlsneededinorderto
better r&pond to Your request for assistance
OR
WA!%ING MACHINES.
DRYERS
a WONERS-SERVICING
WHIRLPOOLAPPLIANCES
AUTHORIZED
WHIRLPOOLSERVICE
SERVICE
XYZ SERVICECO
123 MAPLE
COMPANIES
999.9993
13
Notes
14
l!
WHIRLPOOL”
MICROWA~
OVEN
WARRANTY
l.W@TH
OF
WARRANTY
MWOOi
WHIRLPOOL Will PAY FOR
RRl ONE-YEAR WARRAHlV
From Date of Purchase
FSP replacement parts and repair labor to correct defects in
materials or workmanship Service must be provided bY an authortzed Whirlpod” service company.
LlMlTED FOUR-YEAR WARRAm
Second Through Fifth Year
From Date of Purchase
FSP@replacement magnetron
In materials or workmanshlp.
tube on mlcrowave
ovens If defecttve
WHWl.POOl WILL NOY PAY FOR
A. Service calls to:
1. Correct the installation of the microwave oven.
2. Instruct you how to use the microwave oven.
3. Replace house fuses or correct house wiring.
4. Replace owner accessible light bulbs.
R Repairs when microwave oven is used in other than normal, single-family household use.
C. Pick up and dellvery. This product is designed to be repaired in the home.
D. Damage to microwave oven caused by accident, misuse, fire, flood, acts of God or use of
products not approved bY Whirlpool.
E. Any labor costs during the limited warrantv.
WHIRLPOOLCORPORATION SHALL NOT BELIABLEFOR INCIDENTAL OR CONSEQUENTIAL DAMAGES. Some states
do not allow the exclusion or llmltatton of lncldental or consequenttal damages so thls llmltatlon or exclusion
may not apply to You. Thls warranty gives You speclflc legal rights, and You may also have other rights which
vary from state to state.
Outslde the Unlted States, a dlfferent warranty may apply. For details. please contact Your franchised Whlrlpool
dlstrlbutor or mllltary exchange.
Part No. 4874610A/4158513
Q 1989 Whirlpool Corporation
z Makers. Dishwashers. Bwlt-In Ovens and Surlace lln~tr. Ranges. Mlcroware Ovens. Trash Compactors. Room Au Condllloners. Oehumldlfws.
Automallc Washers, Clolhes